
Shopify gives you every product in one CSV file. WooCommerce cannot read it as it is: Shopify writes one row per variant and one row per extra image, so a coffee sold in two sizes takes two rows, and a mug with two photos takes two rows too. Imported row by row, that becomes half-empty products with no variations. Below: Shopify products into WooCommerce from the CSV file, with variations, sale prices, stock, images and categories, then the customers with their addresses.
We tested it with Shopify-format exports of 4 products (8 rows) and 5 customers using Import Export by RockStarLab 2.1.24 with the PRO add-on 2.1.4, WooCommerce 11.2 and WordPress 7.1. Importing WooCommerce products and customers is a PRO feature.
Short Answer
- In Shopify, go to Products → Export, choose All products and a CSV format. Shopify emails you the file.
- Back up the WordPress site.
- In WordPress, open Import Export → Import, choose WooCommerce Products and upload the Shopify file as it is. The plugin recognizes it and combines the rows into products.
- Click Auto Map. Every column is matched.
- Set Check for Existing Items by Field to SKU, keep Automatically Import Media Files on, and start the import.
- Customers: export them in Shopify under Customers → Export and import the file the same way as WooCommerce Customers.
What Is in a Shopify Product Export
Our test file, products_export_1.csv, has Shopify’s current column names (URL handle, SKU, Price, Compare-at price, Inventory quantity and so on) and 8 rows for 4 products:
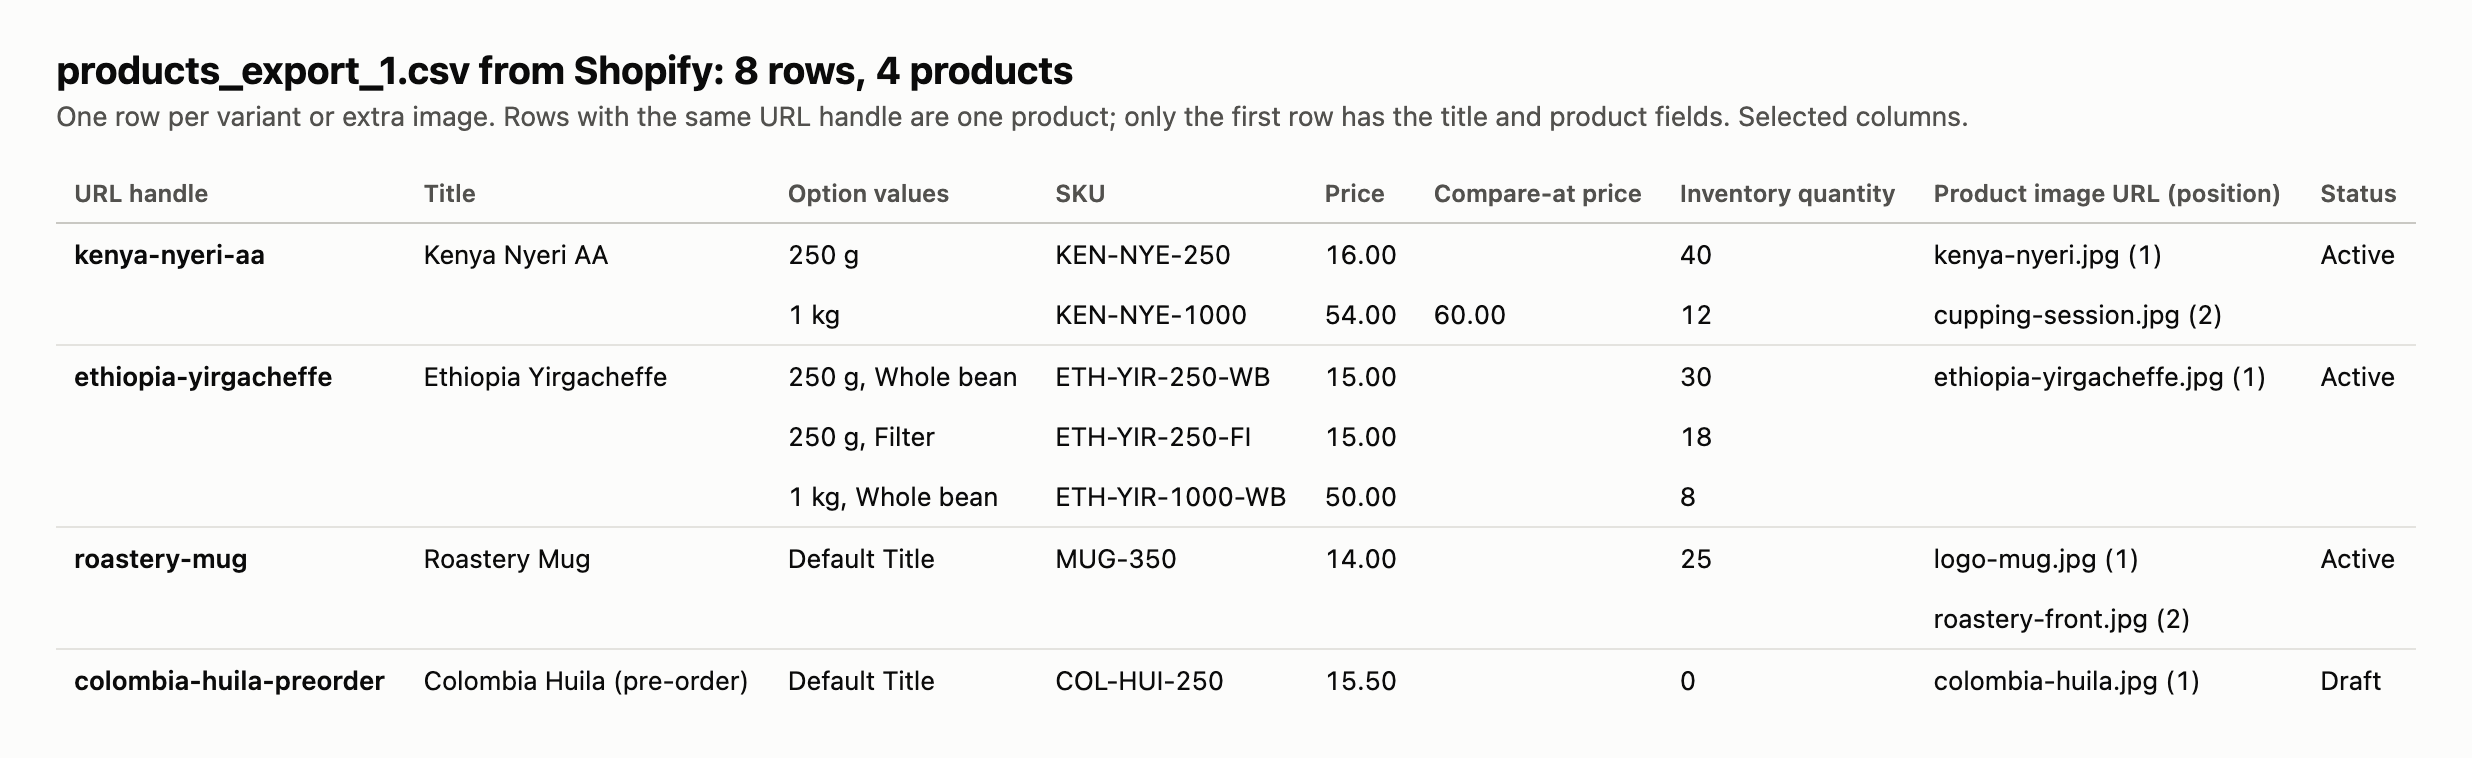
- Kenya Nyeri AA: one option (Size) with two variants. The 1 kg bag is on sale: price 54, compare-at price 60. It also has a second image.
- Ethiopia Yirgacheffe: two options, Size and Grind, three variants.
- Roastery Mug: no options. Shopify still writes a variant called
Default Title. The second row only carries the second photo. - Colombia Huila (pre-order): status Draft, 0 in stock.
The rows of one product are linked only by the URL handle column (Handle in older exports). The title, description, tags and SEO fields are filled in on the first row only.
Why a Plain CSV Import Gets It Wrong
A generic CSV importer treats each row as a product. With this file you would get products without a title for every second variant, a separate product for the extra mug photo, simple products instead of variable ones, and the compare-at price lost. The status column also needs translating: Shopify writes Active, Draft or Archived, WordPress expects publish or draft.
The PRO import reads the file the way Shopify meant it. When you upload a Shopify product export, it combines the rows of each product before the preview, so you map and import 4 products, not 8 rows.
Step 1: Export Products from Shopify
In the Shopify admin, open Products and click Export. Choose All products, pick either CSV file type, and click Export products. An export of all products is sent to the store owner’s email; save the attached file, usually called products_export_1.csv.
Do not open and re-save the file in a spreadsheet before importing. Excel can change SKUs that look like numbers and break the encoding of accented characters. If you have to edit it, save it again as CSV UTF-8.
The CSV contains image links, not image files. The images stay on Shopify’s CDN and the import downloads them from there, so keep the Shopify store and its products in place until the import is finished.
Step 2: Back Up WordPress
The import creates products, variations, categories, tags and media files. Make a backup first: UpdraftPlus Backup Now, your host’s backup, or ask an AI agent to run rsl-ie/updraftplus-backup-start. See How to Create a WordPress Website Backup and Restore It.
Step 3: Upload the Shopify File
Go to Import Export → Import, choose WooCommerce Products, and upload the file. Keep the comma delimiter. After the upload the plugin reports what it found:

The 8 rows became 4 products with 5 variations. The next step, Preview Data, already shows one line per product.
Step 4: Auto Map
On Field Mapping, click Auto Map. The combined file uses the importer’s own field names, so all 25 columns map without any changes:
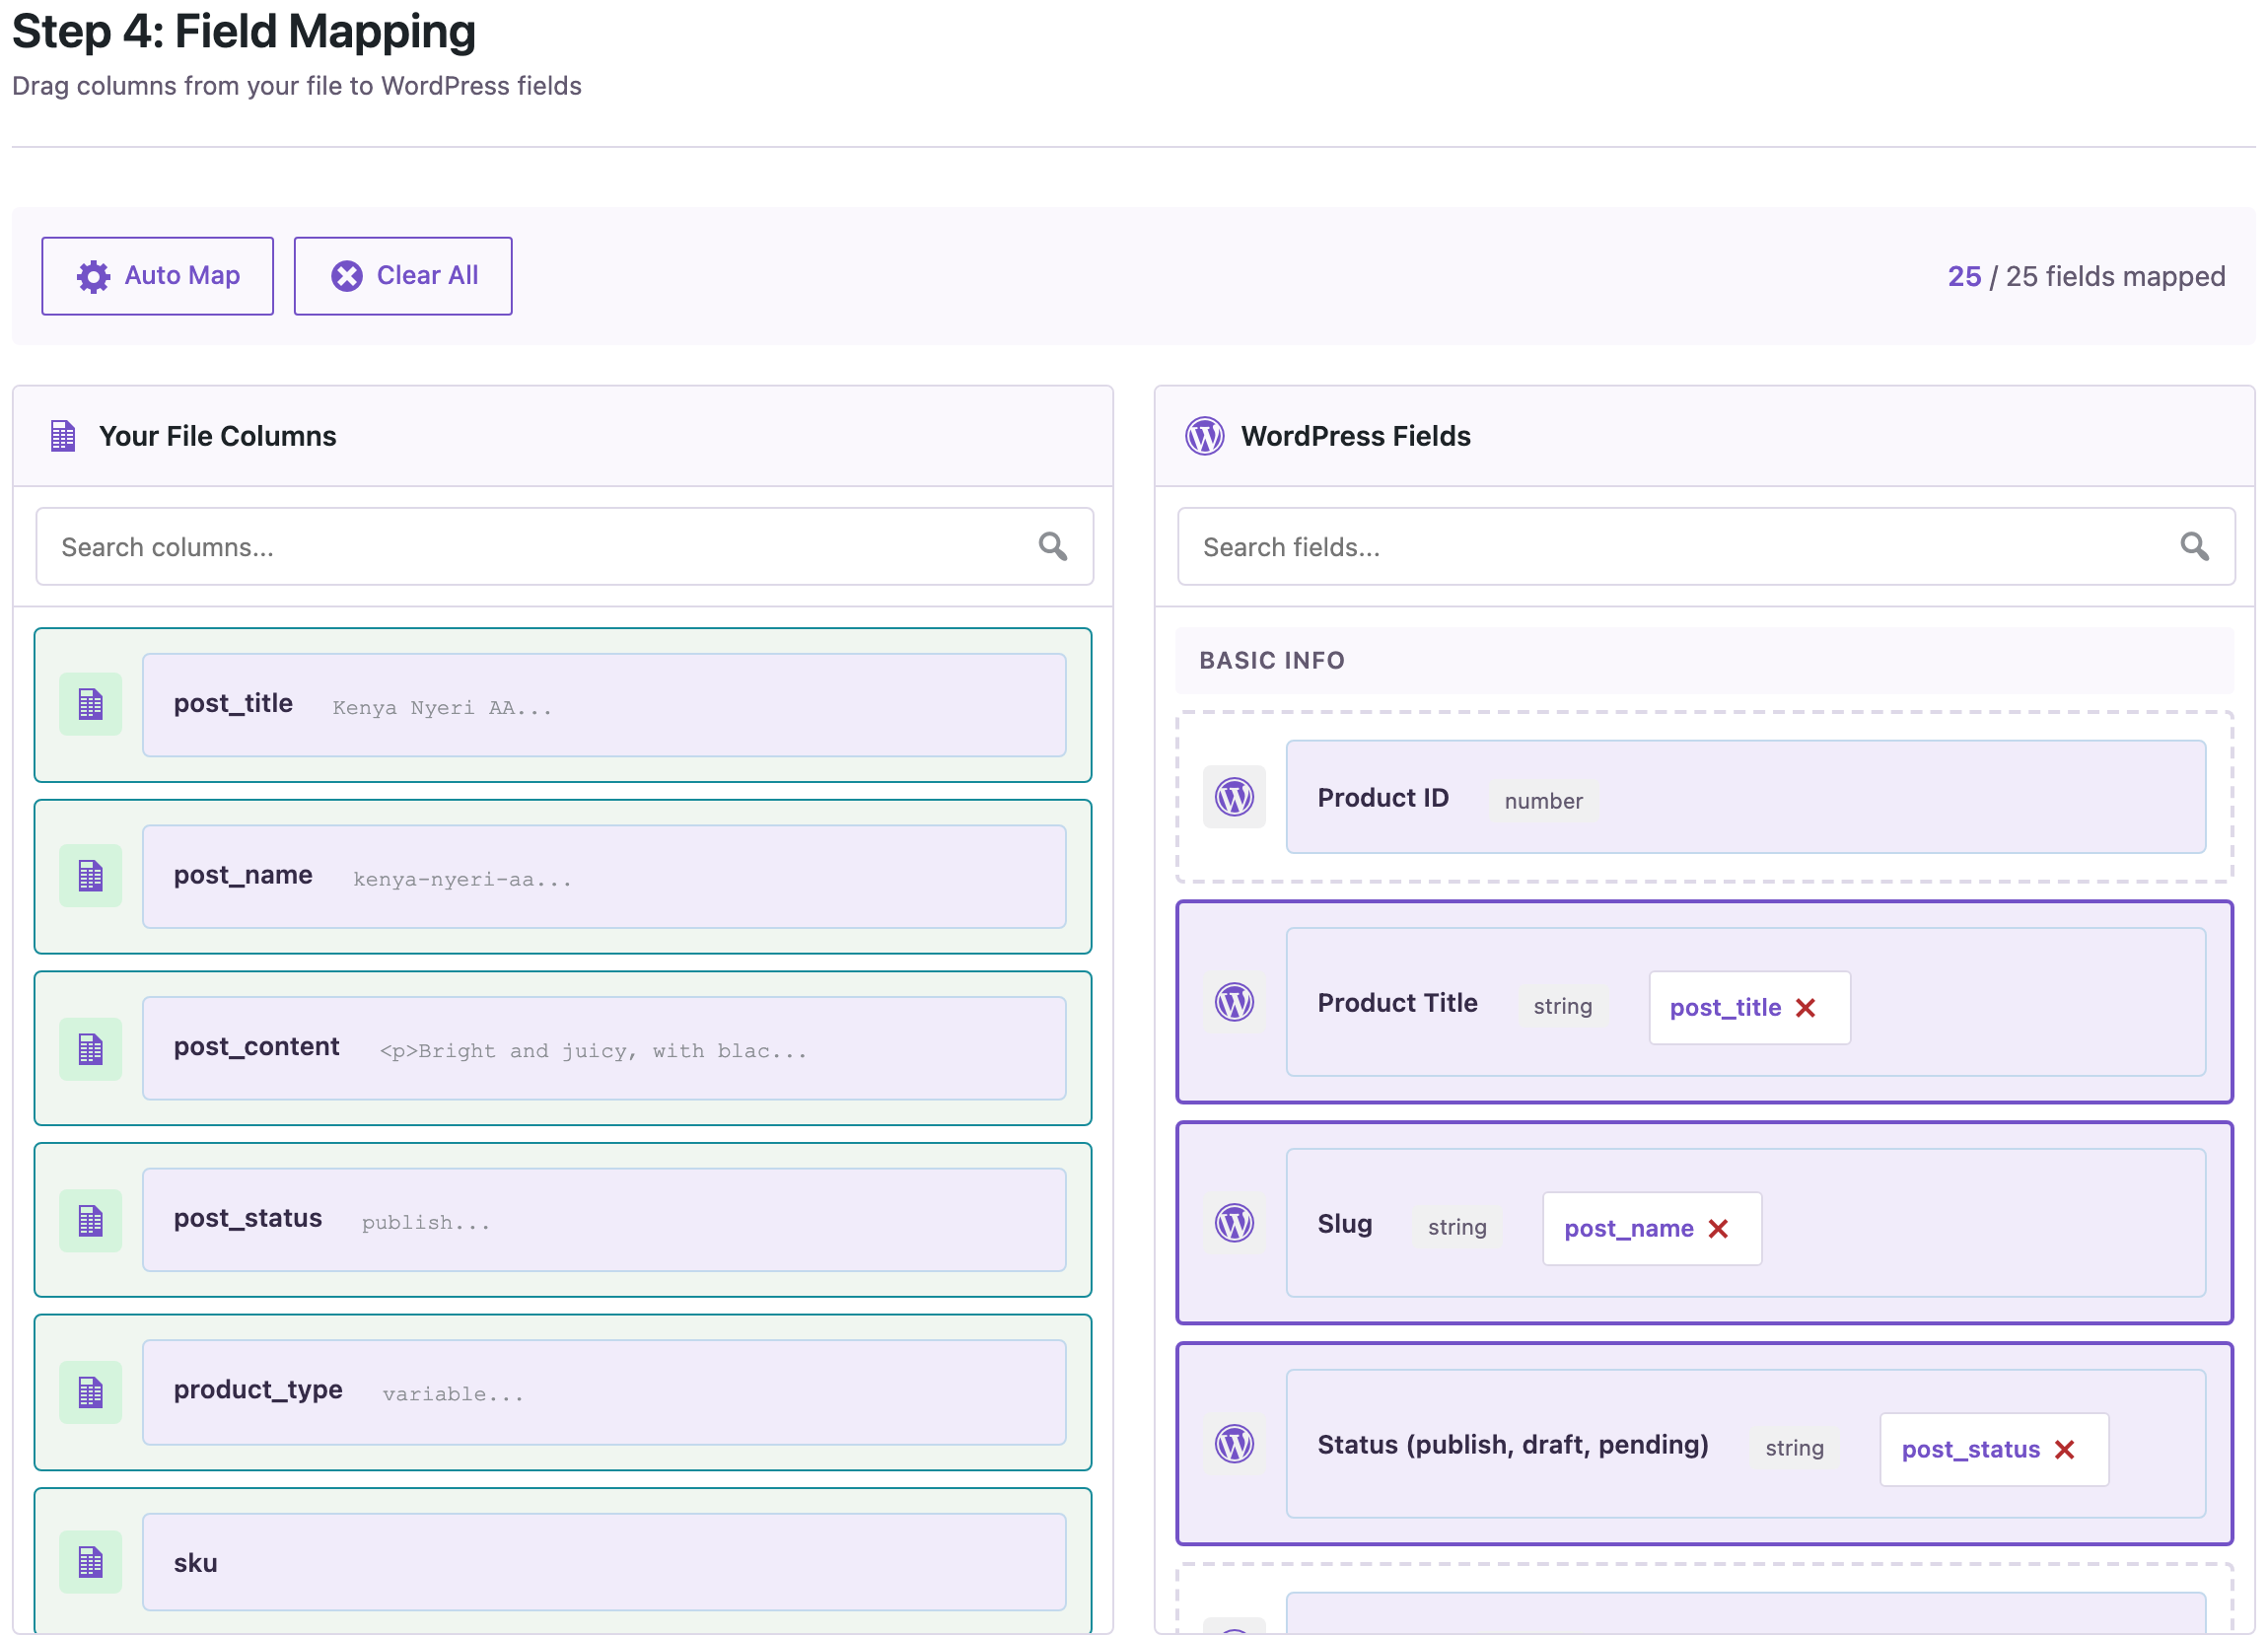
Here is where each Shopify column ends up:
| Shopify column | WooCommerce |
|---|---|
| Title, Description | Product name and description (HTML kept) |
| URL handle | Product slug, so the URL stays /product/kenya-nyeri-aa/ |
| Status (Published on online store in old files without Status) | Active → Published; Draft and Archived → Draft |
| Option1–3 name and value | Product attributes used for variations; one variation per variant |
| SKU, Price | SKU and regular price of the variation (or of a simple product) |
| Compare-at price | If it is higher than Price: regular price = compare-at, sale price = Price |
| Inventory tracker, Inventory quantity | Manage stock and stock quantity; no tracker → stock not managed, in stock |
| Continue selling when out of stock | continue → backorders allowed; deny → not allowed |
| Weight value (grams) | Weight, converted to the store’s weight unit |
| Packed product length, width, height | Dimensions, converted to the store’s dimension unit |
| Charge tax, Requires shipping, Gift card | Tax status (taxable or none) and Virtual |
| Product image URL, Image position | Image 1 → product image; the rest → product gallery, in order |
| Variant image URL | Variation image |
| Type | Product category (if Type is empty: the last level of Product category) |
| Tags | Product tags |
| Vendor | Brand |
| SEO title, SEO description | Yoast SEO title and meta description, when Yoast SEO is active |
Not imported with products: cost per item, barcodes, unit prices, Google Shopping columns, metafields, collections, inventory per location, orders and reviews. Customers have their own export; see Import Shopify Customers below.
Step 5: Choose Options and Import
On Import Options:
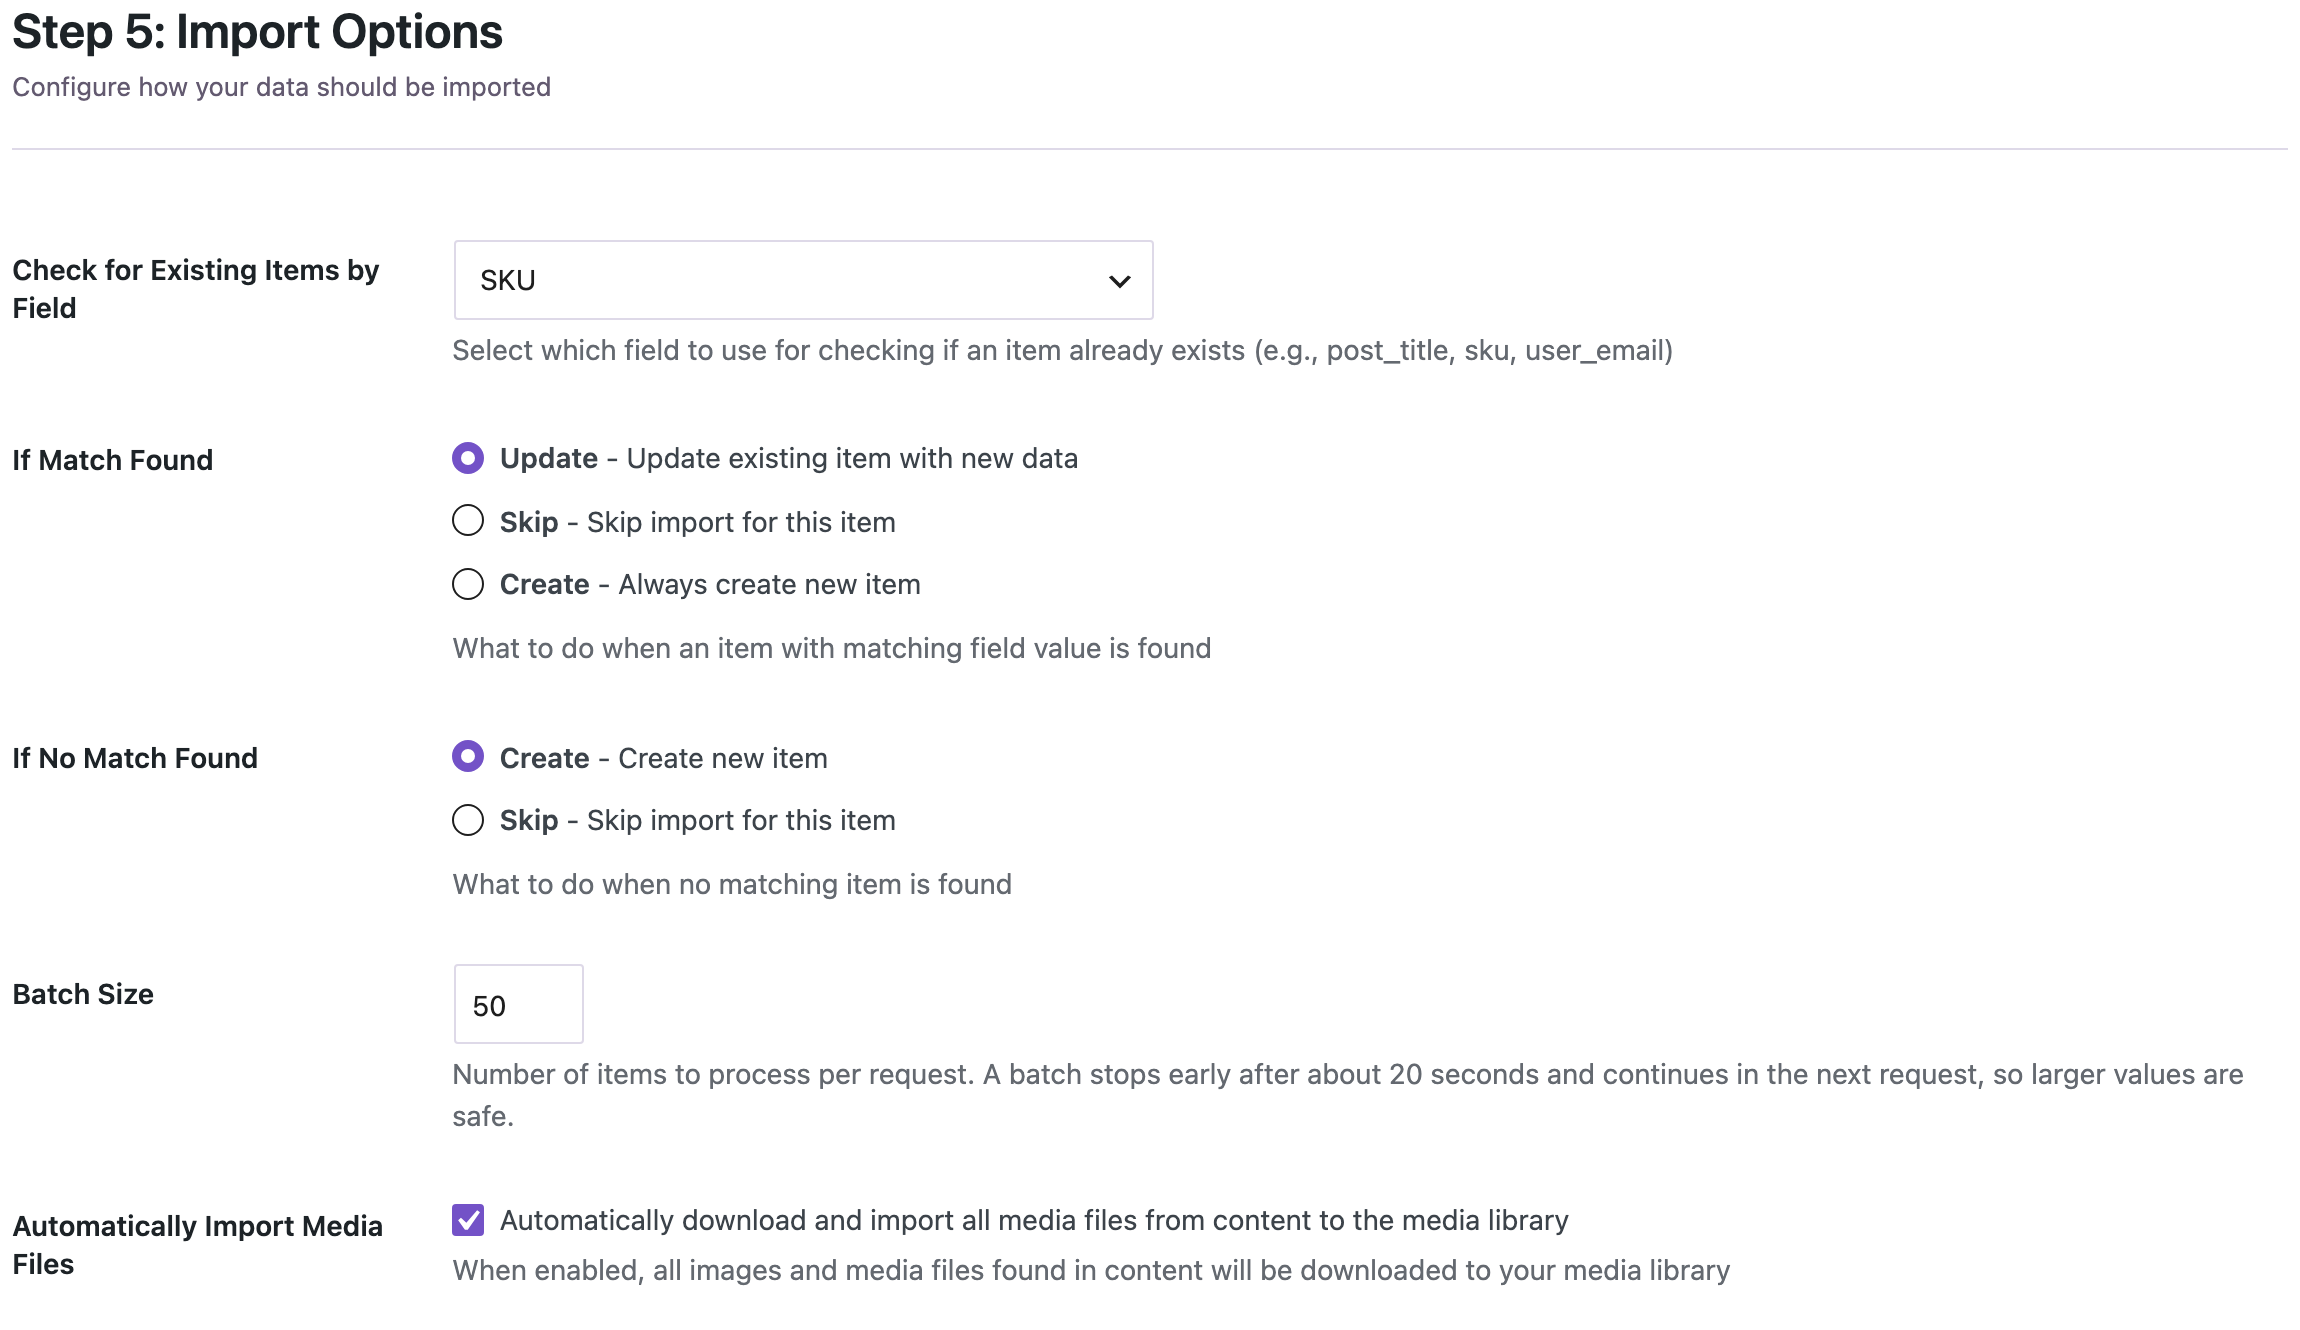
- Check for Existing Items by Field: SKU. A variable product has no SKU of its own, so the plugin finds it through the SKUs of its variations. Running the same file again then updates the products instead of creating copies. Slug works too.
- If Match Found: Update. If No Match Found: Create.
- Automatically Import Media Files: on. This downloads the images from Shopify into the Media Library.
Click Start Import. Our 4 products were created in 3 seconds, images included:

Step 6: Check the Products
In Products, the two coffees with options are variable products with a price range, the mug is a simple product with stock 25, and the pre-order coffee is a draft, out of stock. Categories, tags and the brand came from Type, Tags and Vendor:

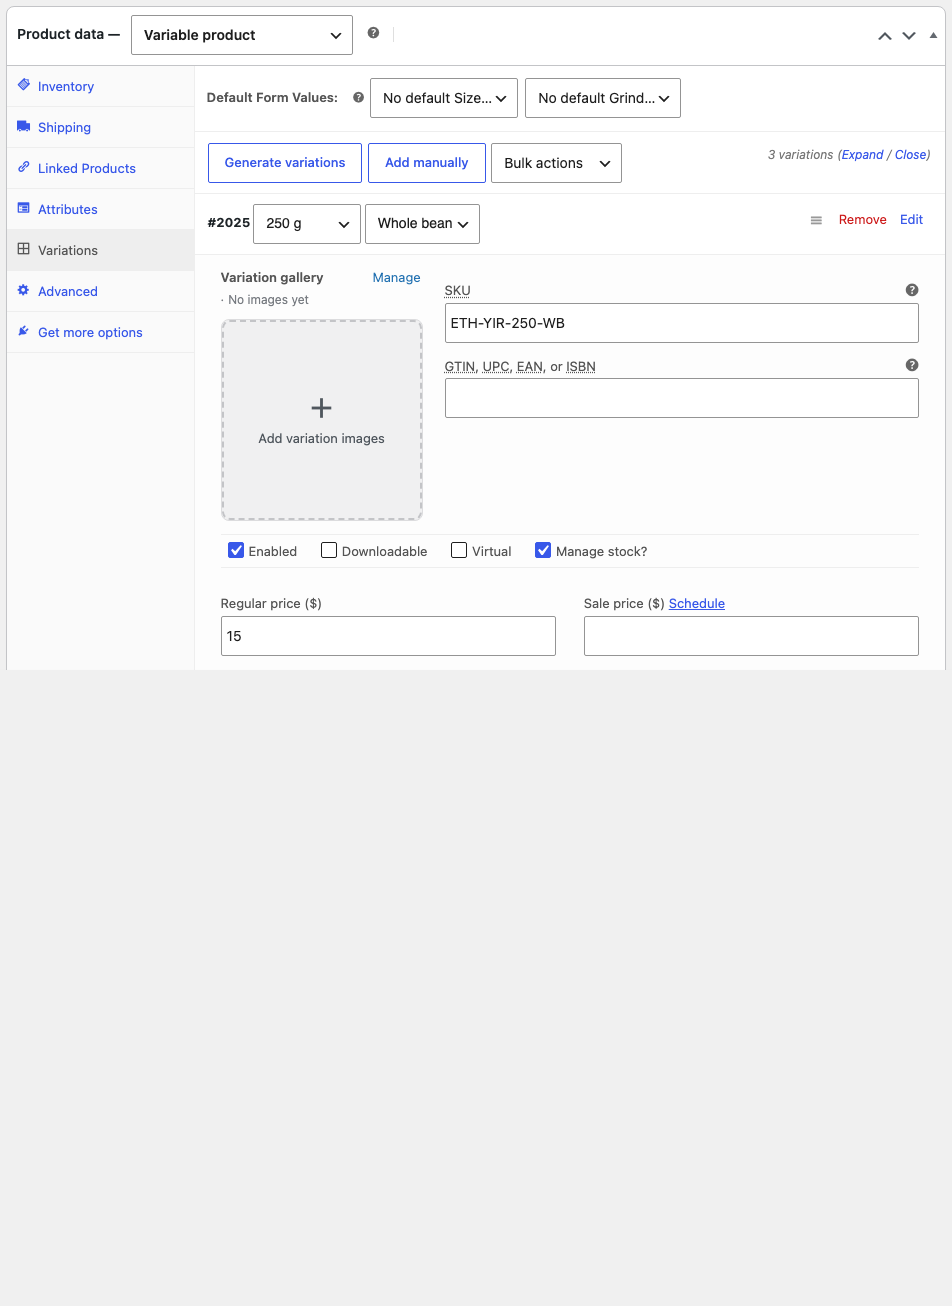
Open a variable product and go to Product data → Variations. Ethiopia Yirgacheffe has the three variants from Shopify, each with its SKU, price, stock and weight. Shopify’s 250 g became 0.551 lbs because this store uses pounds:
On the product page, Kenya Nyeri AA lists the sizes from Shopify. The 1 kg bag shows 54.00 with 60.00 crossed out, and 12 in stock, as it was on Shopify. The second image from the export is in the gallery:

Before you switch the domain, compare a few products with Shopify, including one with options, one on sale and one draft.
Import Shopify Customers
Customers are a separate file. In Shopify, open Customers, click Export, choose All customers and a CSV type, and click Export customers. Up to 50 customers download at once; a larger export is emailed. The file has one row per customer with the default address, phone, marketing consent, tags, note and totals.
In WordPress, choose WooCommerce Customers on the first import step and upload the file as it is. Our test file had 5 customers; one of them was a walk-in customer from the point of sale with a phone number but no email:

Click Auto Map on the mapping step; all 26 columns match. Customers are matched by email, so keep If Match Found: Update. Start the import:
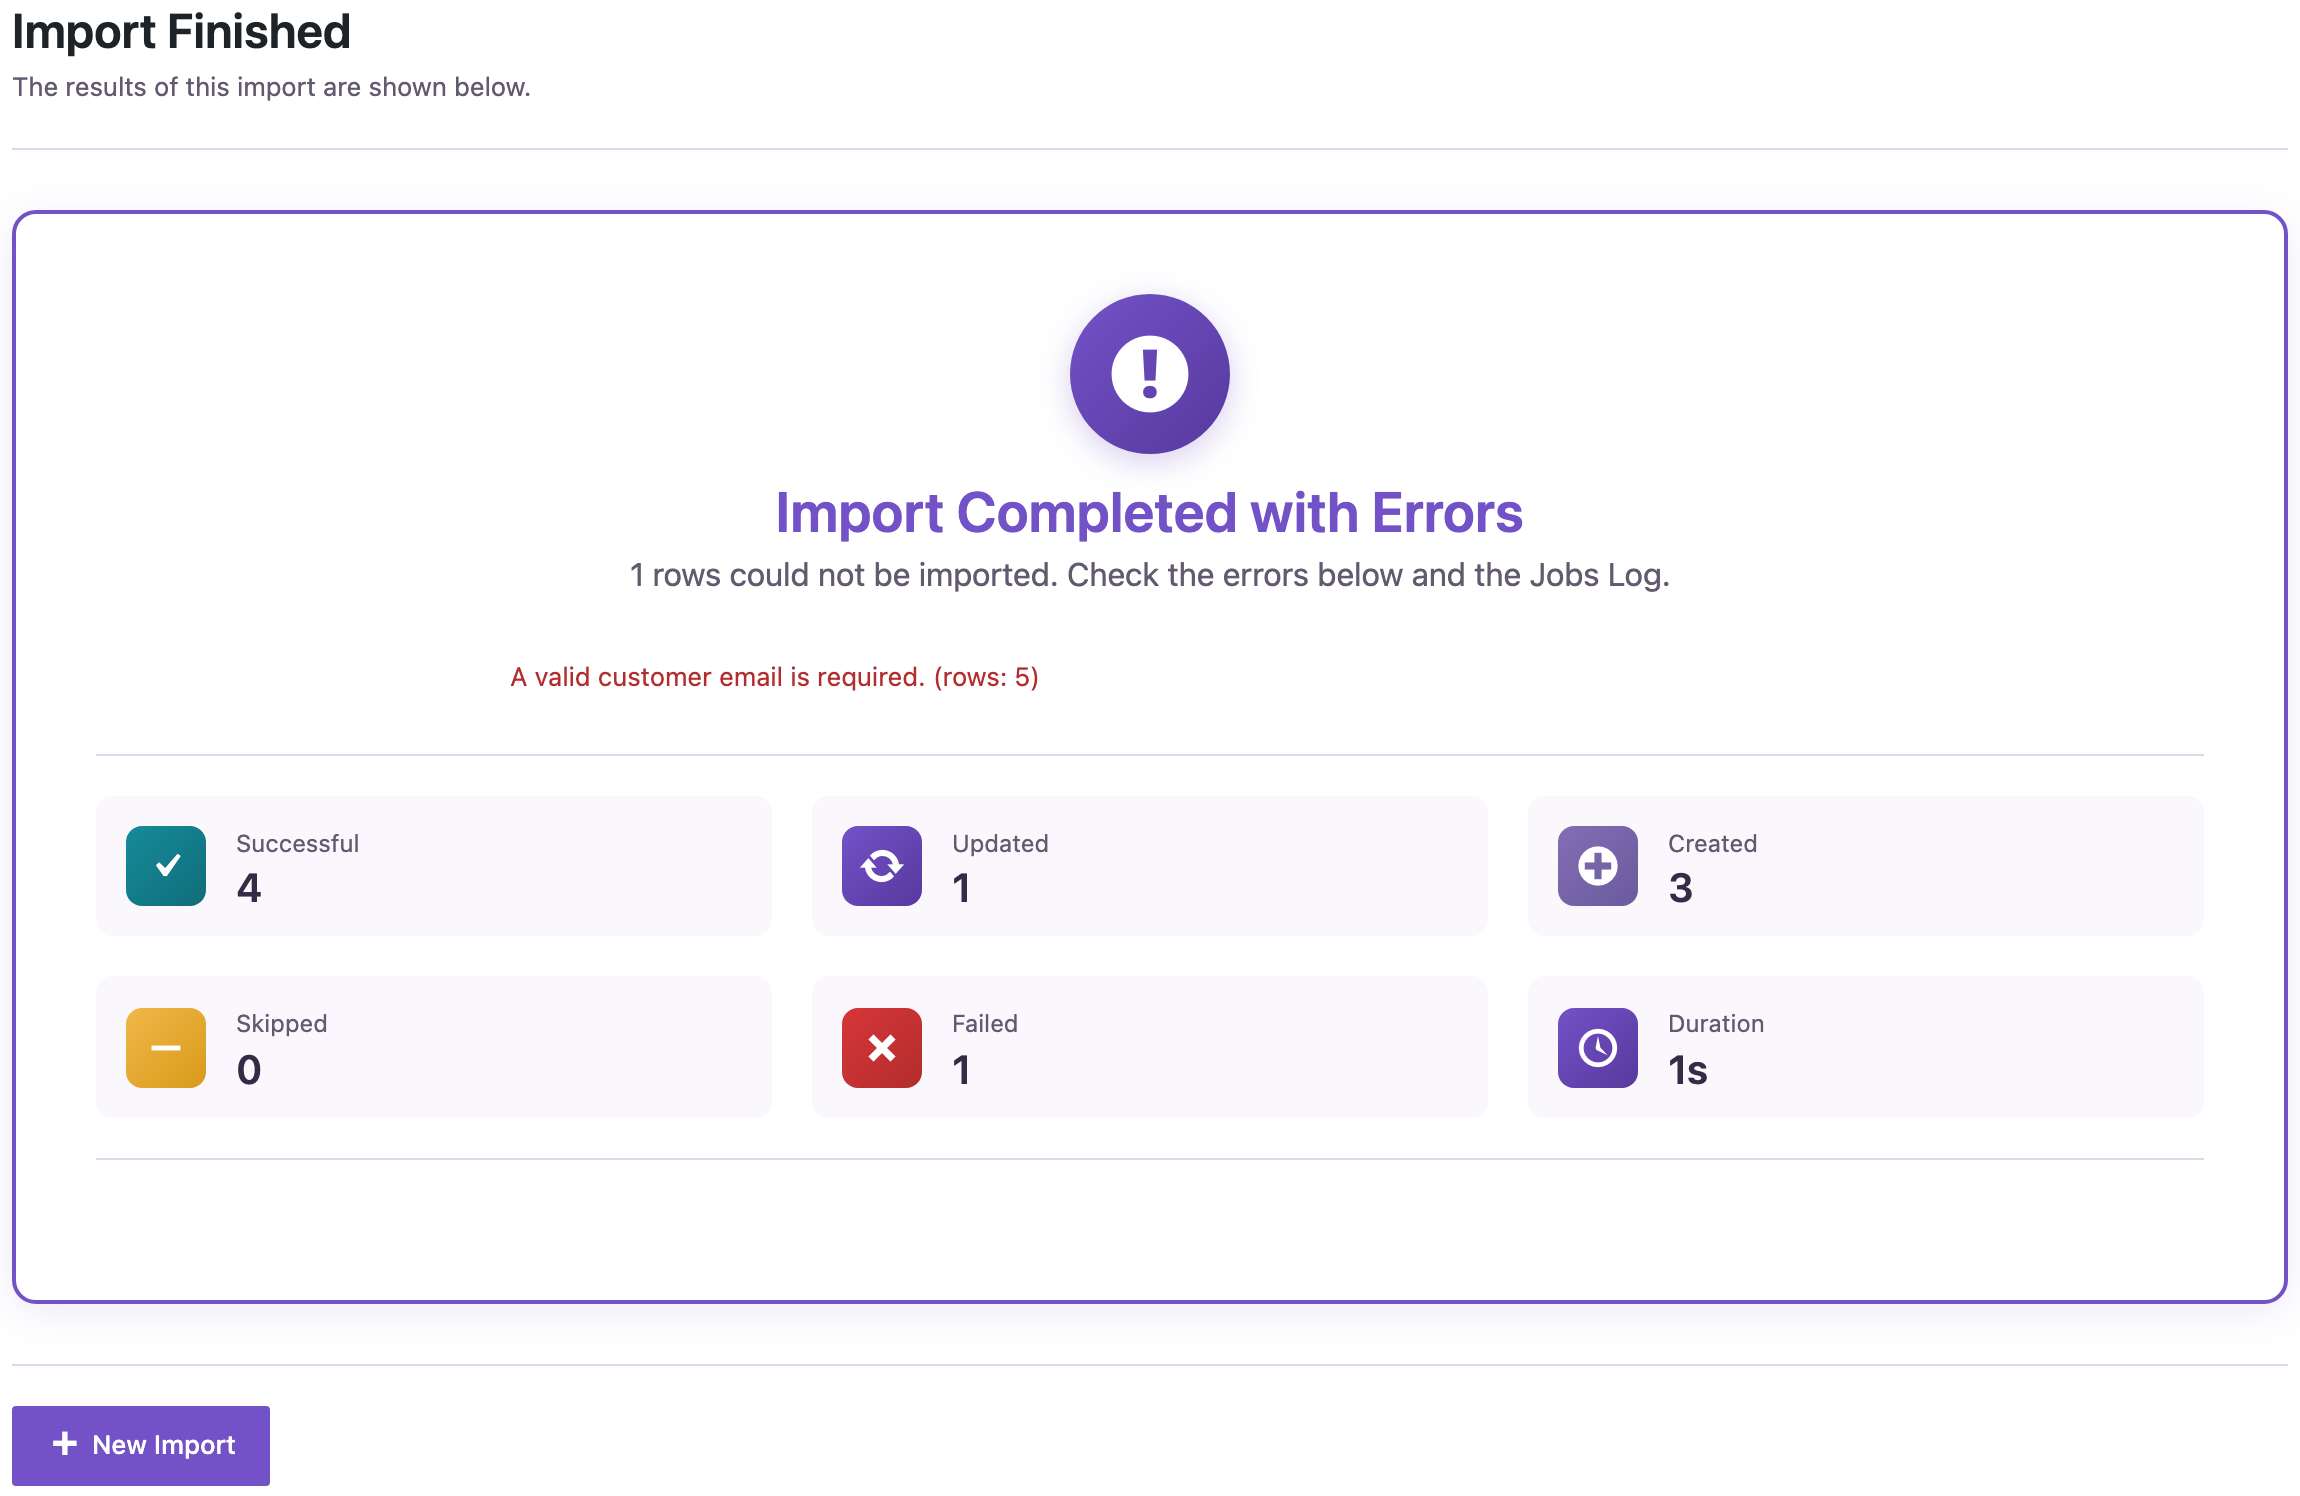
- 3 created: new WooCommerce customers with the role Customer.
- 1 updated: Anna already had an account in WordPress with the same email. Her address was updated, and no second account was created. A user with another role, such as an administrator or editor, keeps that role.
- 1 failed: the customer without an email. WordPress accounts need an email address, so add one in the file or create that customer by hand.

The Shopify default address becomes both the billing and the shipping address, with company and phone:

Data that WooCommerce has no field for is kept with the customer as user meta: shopify_customer_id, shopify_tags, shopify_note, shopify_accepts_email_marketing, shopify_accepts_sms_marketing, shopify_tax_exempt, shopify_total_spent and shopify_total_orders. You can export or filter by them later, for example to find customers who agreed to email marketing before you import them into your newsletter tool.
Passwords cannot be moved: Shopify does not export them. Customers set a new password with Lost your password? on the My Account page. The import does not send any emails, so tell your customers about the move yourself.
Orders are not part of this import. Keep the Shopify order export as your archive.
Importing Again After Changes
A migration rarely happens in one go. If prices or stock change on Shopify while you build the WooCommerce store, export again and import the new file with the same options. We imported the same file a second time: all 4 products were updated, none were created, and the images were reused instead of downloaded again.
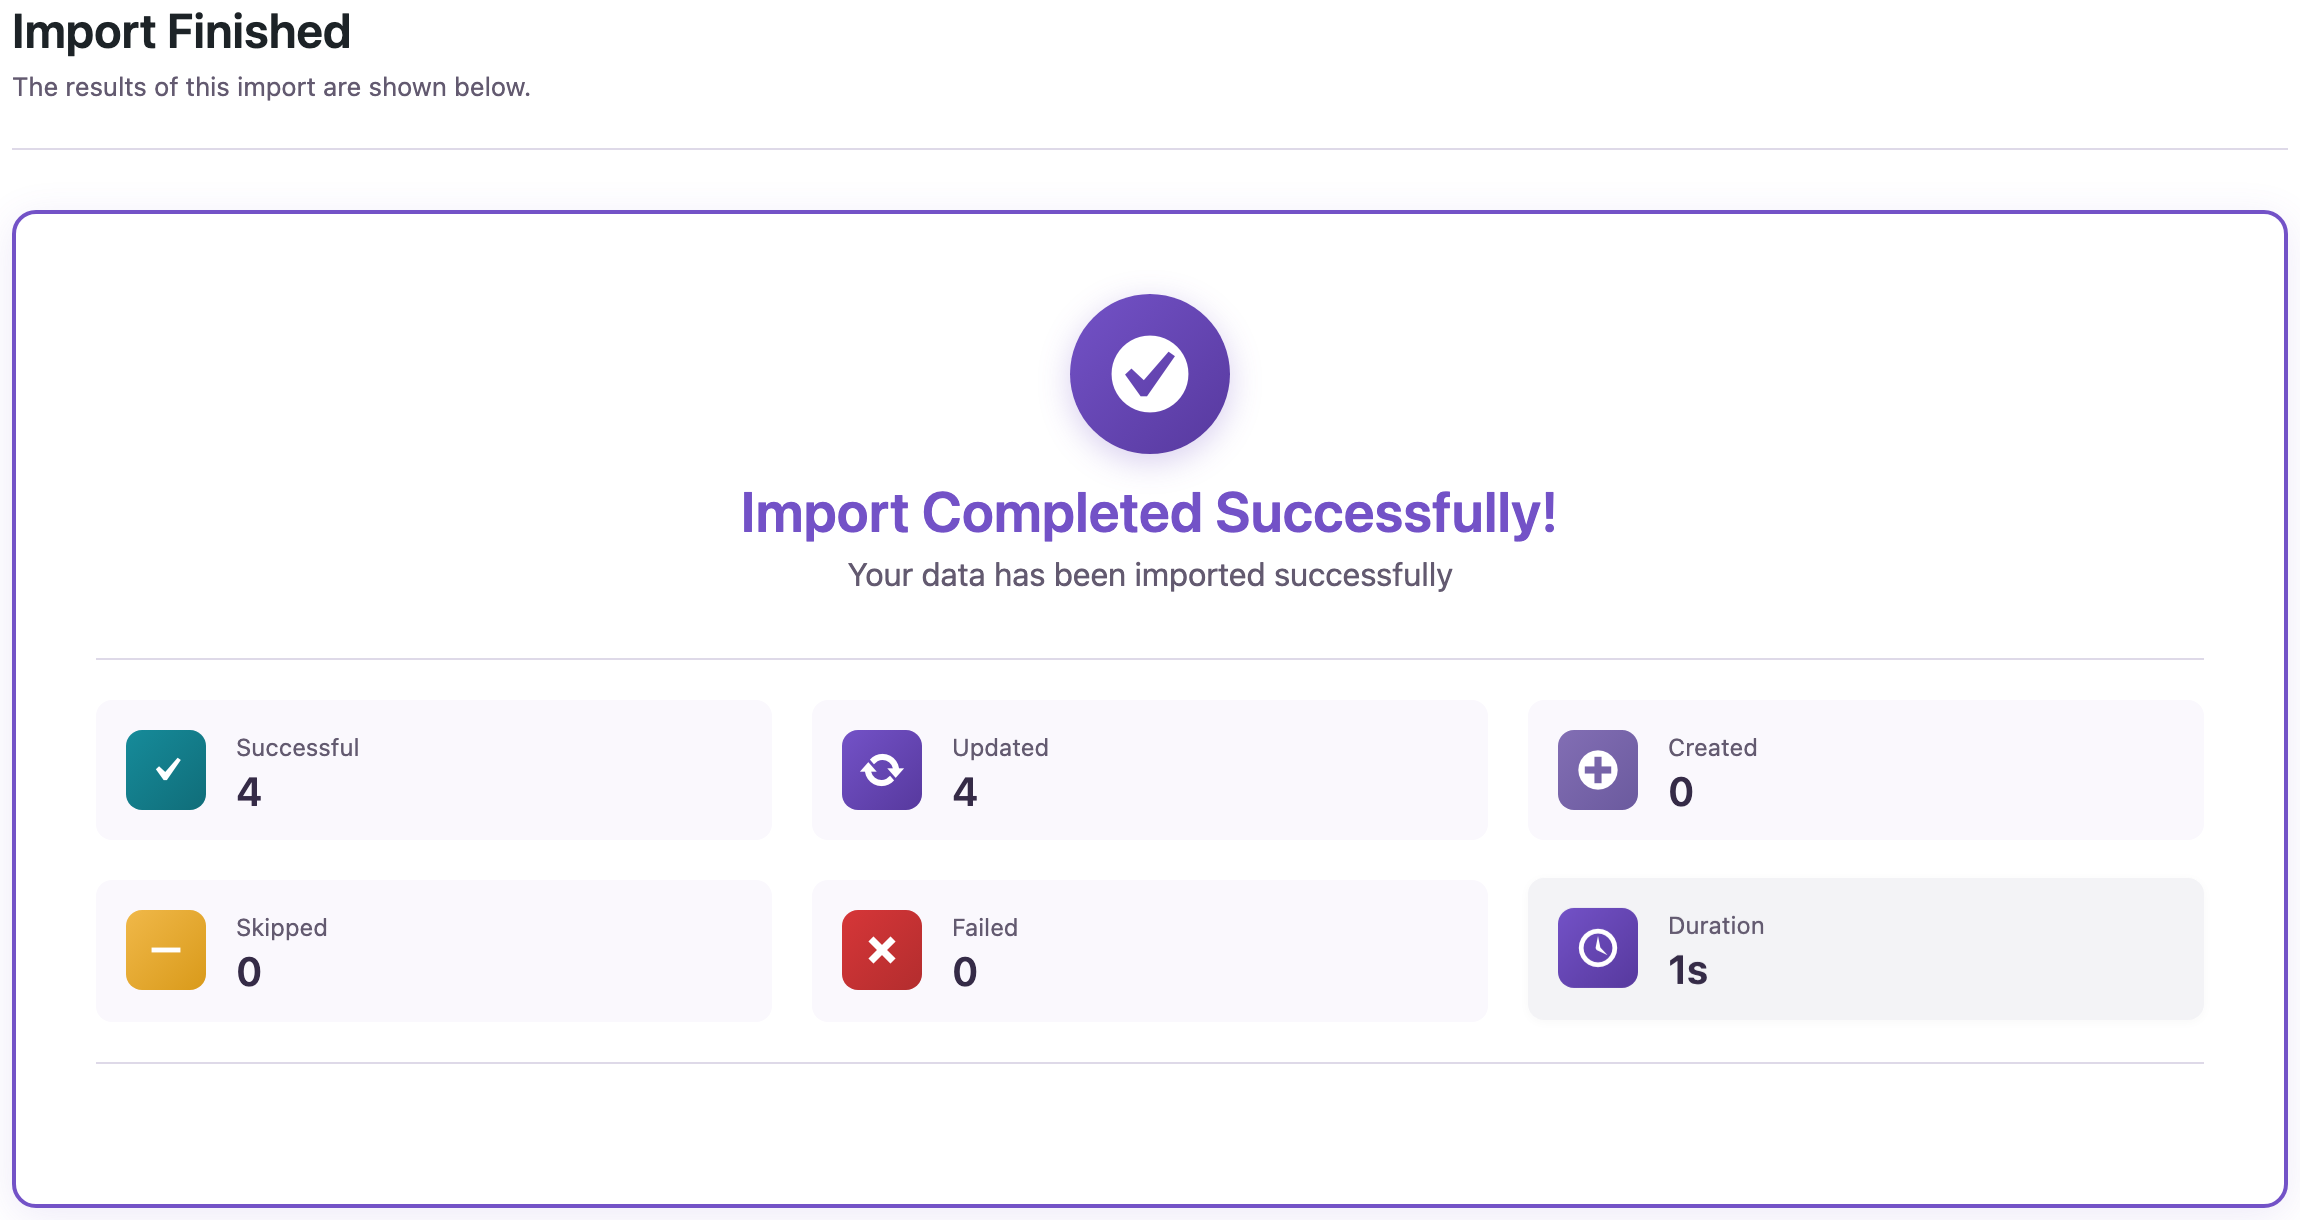
Variations follow the Shopify file. A variant that was deleted on Shopify is removed from the WooCommerce product on the next import, and a new variant is added.
Only importing new prices and stock for products that are already in WooCommerce? See How to Update WooCommerce Prices and Stock by SKU from CSV.
Common Mistakes
- Splitting the export into several files. Keep all rows of a product in the same file and next to each other, as Shopify writes them. If the rows of one product are separated, the upload stops with a message that asks you to sort the file by handle.
- Re-saving the file in Excel. SKUs like
000123lose their zeros, and accented letters can break. Upload Shopify’s file without changes. - Closing the Shopify store before the import. The images are downloaded from Shopify’s CDN during the import.
- Matching by title. Two products with the same name would be merged into one. Use SKU or Slug.
- Forgetting redirects. Shopify product URLs are
/products/handle, WooCommerce uses/product/handle. The handle is kept as the slug, so one redirect rule covers all products.
FAQ
Does it work with older Shopify exports?
Yes. Files with the older column names (Handle, Body (HTML), Variant SKU, Variant Price, Image Src) are recognized the same way.
Are the attributes global?
No, each product gets its own attributes (Size, Grind), as in Shopify, where options belong to the product. If you want global attributes for filtering, see How to Import WooCommerce Global Attributes and Terms from CSV.
What happens to the Shopify product category?
Shopify’s Product category comes from its standard taxonomy and is used for US tax rates. The plugin uses your own Type as the WooCommerce category and falls back to the last level of the Shopify category when Type is empty.
Can I import products from a WooCommerce CSV the same way?
Yes, that is the ordinary product import: How to Import WooCommerce Products from CSV or Excel, and for variations How to Import WooCommerce Variable Products from CSV.
Can I import Shopify orders?
Not from the Shopify order export. Products and customers are enough to start selling; keep the Shopify order export for your records and for returns of older orders.
Do I need PRO?
Yes, importing WooCommerce products and customers requires the PRO add-on. Posts and pages import with the free version.
Related Guides
- How to Import WooCommerce Product Images from URLs
- How to Export and Import WooCommerce Product Categories
- How to Import WooCommerce Customers from CSV
- How to Import WooCommerce Products from CSV or Excel
- How to Import WooCommerce Variable Products from CSV
- How to Update WooCommerce Prices and Stock by SKU from CSV
- How to Migrate WooCommerce Store Data to Another Site
- How to Export and Import WordPress Media Files Without Duplicates
Get the free plugin on WordPress.org.

Comments 0
Have a question or a tip to share? Leave it below.