
A WooCommerce category is more than a name. It has a slug that appears in the shop URLs, a parent that places it in the menu tree, a description, a thumbnail shown on the shop page, and display settings. When you move categories to another store, or create a new set from a spreadsheet, all of that has to arrive together, and the thumbnails must point to images in the target store’s media library. Categories can be exported and imported with their images and hierarchy.
We tested it with Import Export by RockStarLab 2.1.27 and the PRO add-on 2.1.7, WooCommerce 11.2 and WordPress 7.1. Category exports and imports are part of PRO.
Short Answer
- On the source store, go to Import Export → Export → Taxonomy Terms and pick Product categories (product_cat).
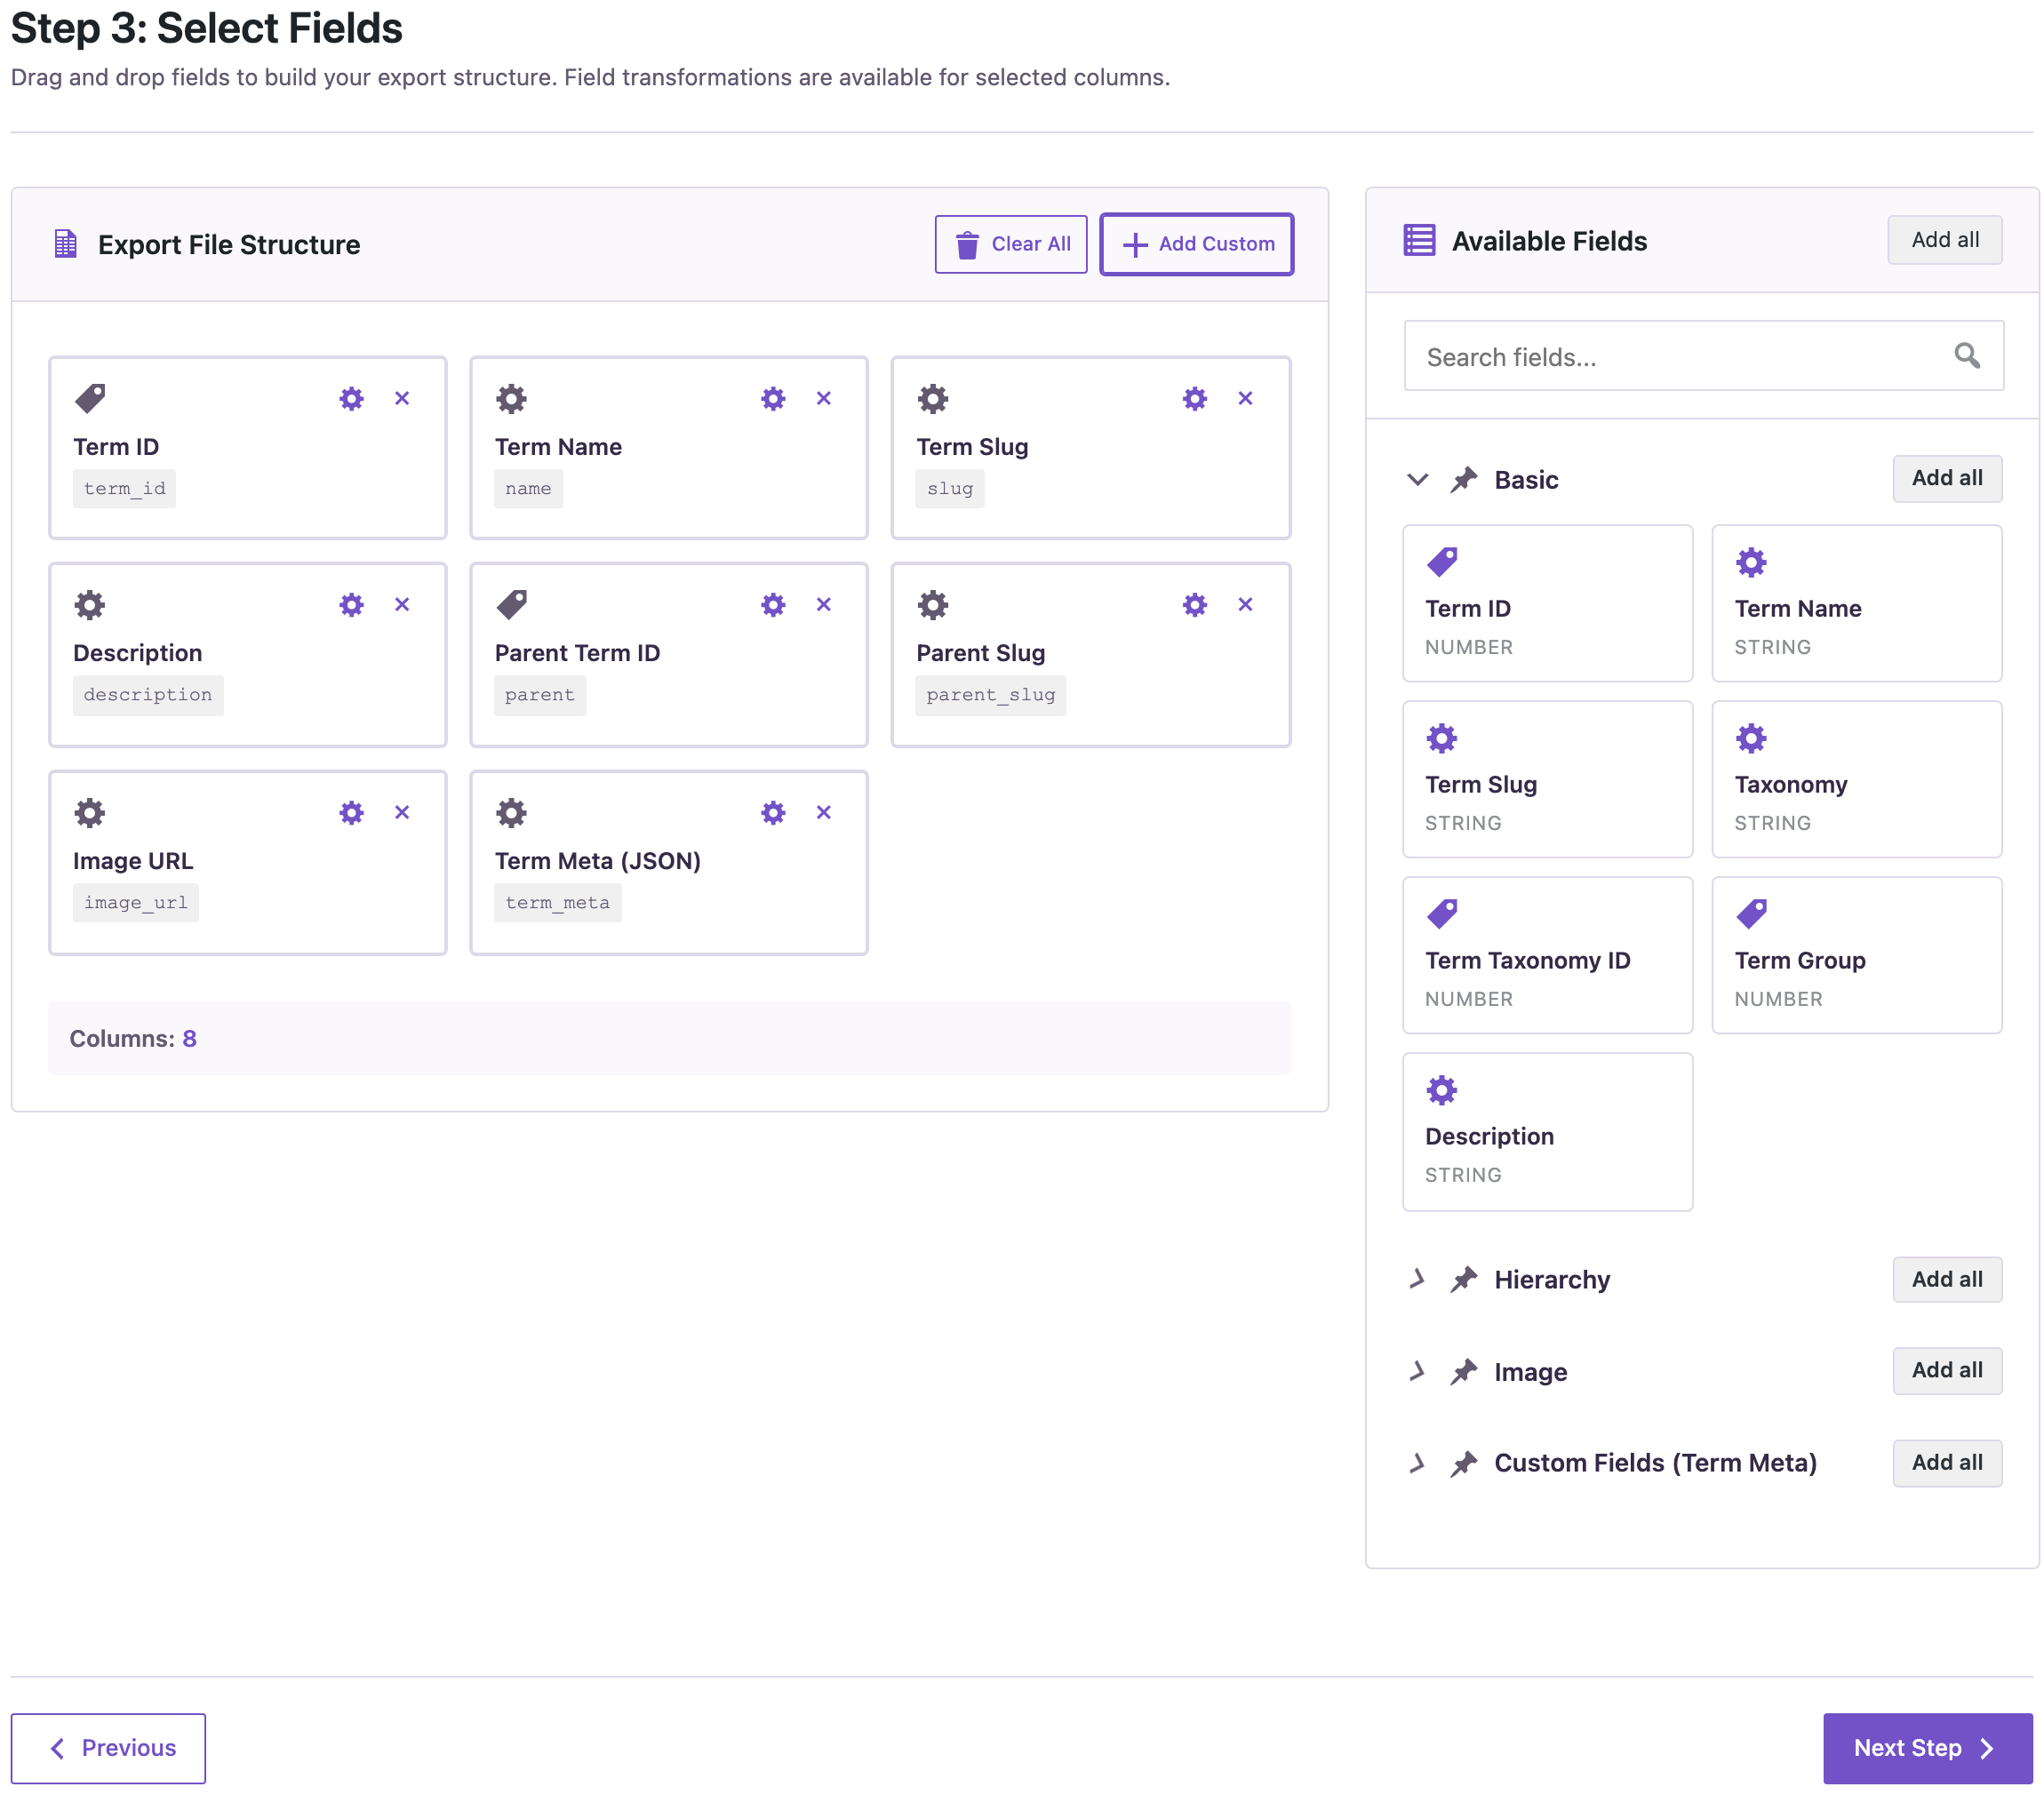
- Export Term ID, Name, Slug, Description, Parent Term ID, Parent Slug, Image URL and Term Meta (JSON) to CSV.
- Back up the target store.
- There, go to Import Export → Import → Taxonomy Terms, upload the file, click Auto Map, match by Slug and import.
- Open Products → Categories and check the tree and the thumbnails.
To create categories from a spreadsheet instead, use columns Name, Parent Category, Description, Image (a URL) and Taxonomy. The steps are in Create Categories from a Spreadsheet.
What Moves with a Category
- Name, slug and description. The slug is the part of the category URL, so keeping it keeps your links working.
- Parent. Exported as the parent’s ID and slug. On the target store the parent is found by slug, because IDs differ between sites.
- Image. Exported as the image URL. The import uses the same file if the target store already has it, or downloads it into the media library.
- Display type and sort order. These WooCommerce settings are in Term Meta (JSON) and are copied as they are.
Product assignments are not part of a category file. A product’s categories are saved with the product, so they move when you import or sync the products; see How to Sync WooCommerce Products Between Two WordPress Sites. Import categories first, products second.
Step 1: Export the Categories
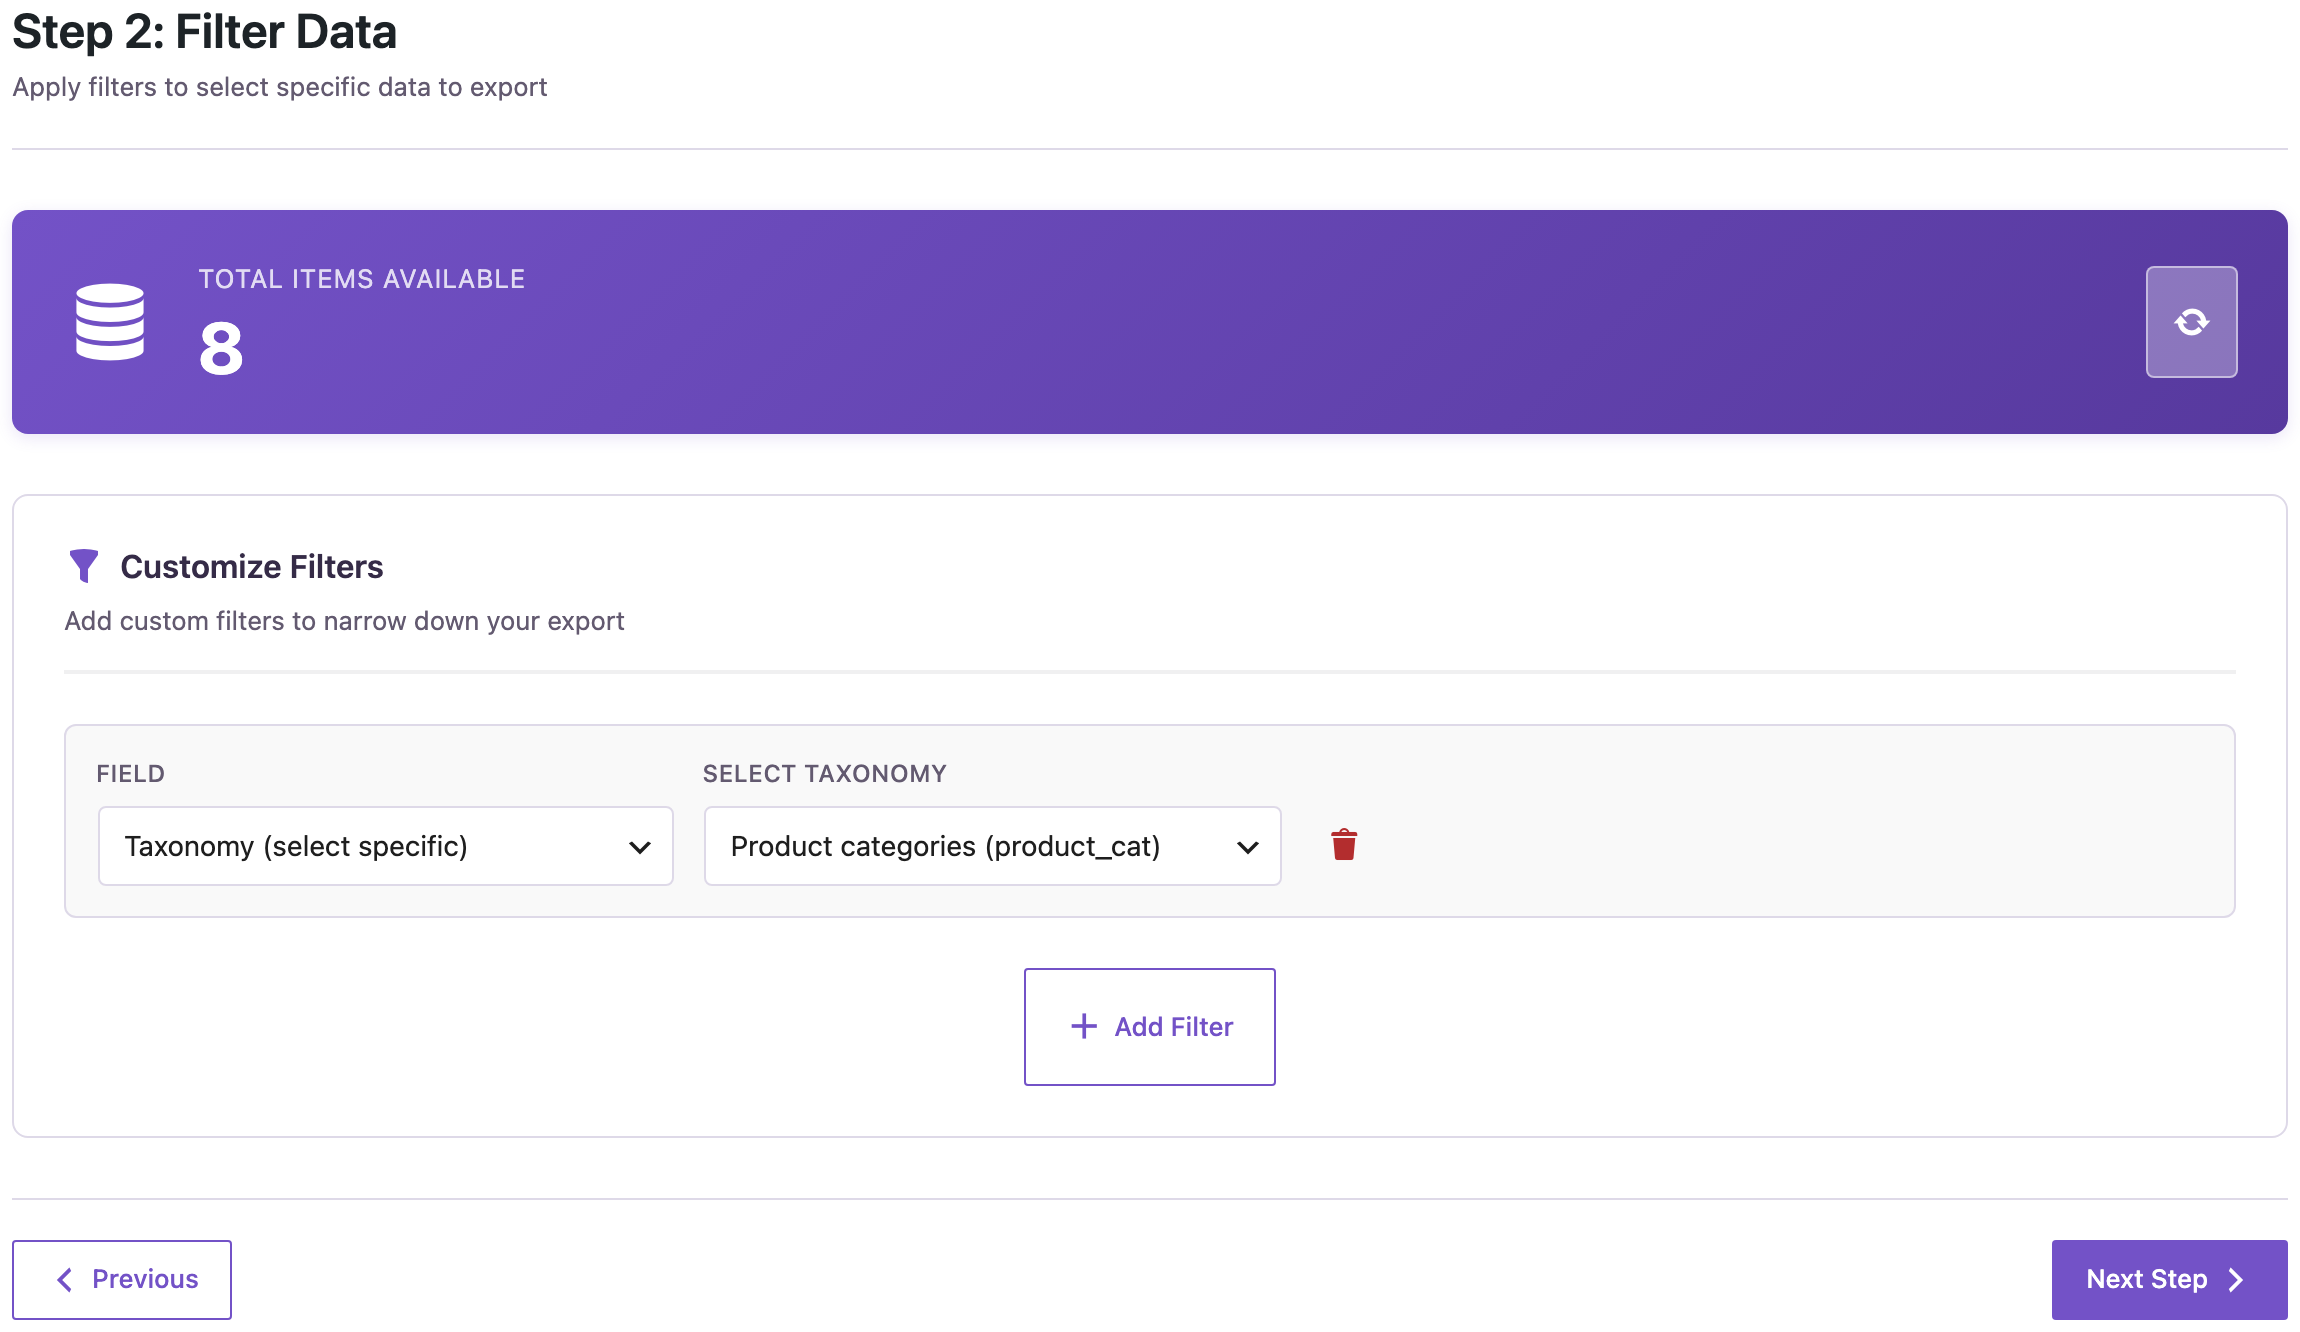
We had a new category tree on a staging store: Clothing with T-Shirts, Hoodies and Accessories, Hats under Accessories, plus Decor and Drinkware, each with a thumbnail. Open Import Export → Export, choose Taxonomy Terms, and on Filter Data set Taxonomy (select specific) to Product categories (product_cat). Our store had 8 categories, including the default Uncategorized:
On Select Fields, add Term ID, Term Name, Term Slug, Description, Parent Term ID, Parent Slug, Image URL and Term Meta (JSON):
Export to CSV. The file has one row per category. The parent is there twice, as an ID and as a slug, and the image is a full URL:
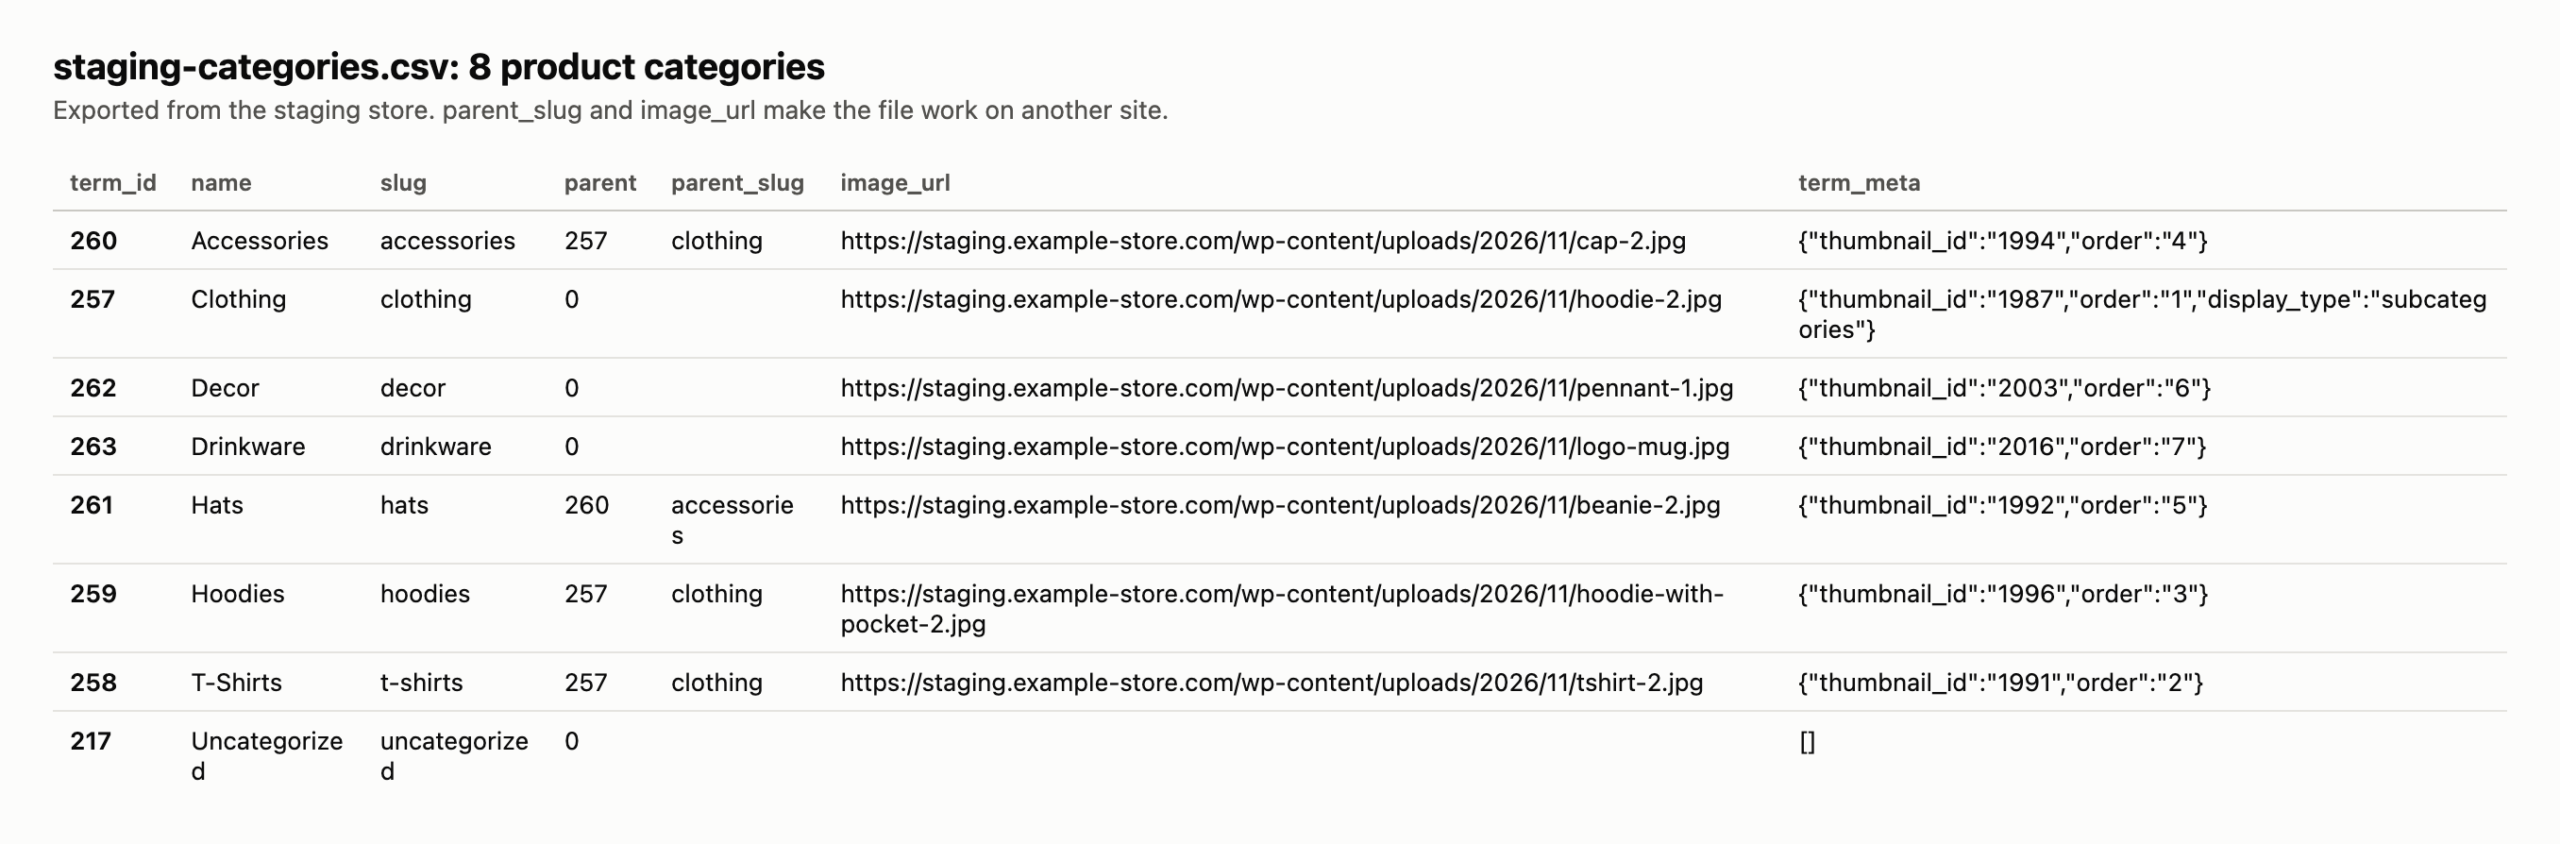
The rows are sorted by name, so a child can come before its parent (Accessories before Clothing). That is fine: the import sets the parents after all rows are in.
Step 2: Back Up the Target Store
The import creates and changes categories. Make a backup first: UpdraftPlus Backup Now, your host’s backup, or ask an AI agent to run rsl-ie/updraftplus-backup-start. See How to Create a WordPress Website Backup and Restore It.
Step 3: Import and Match by Slug
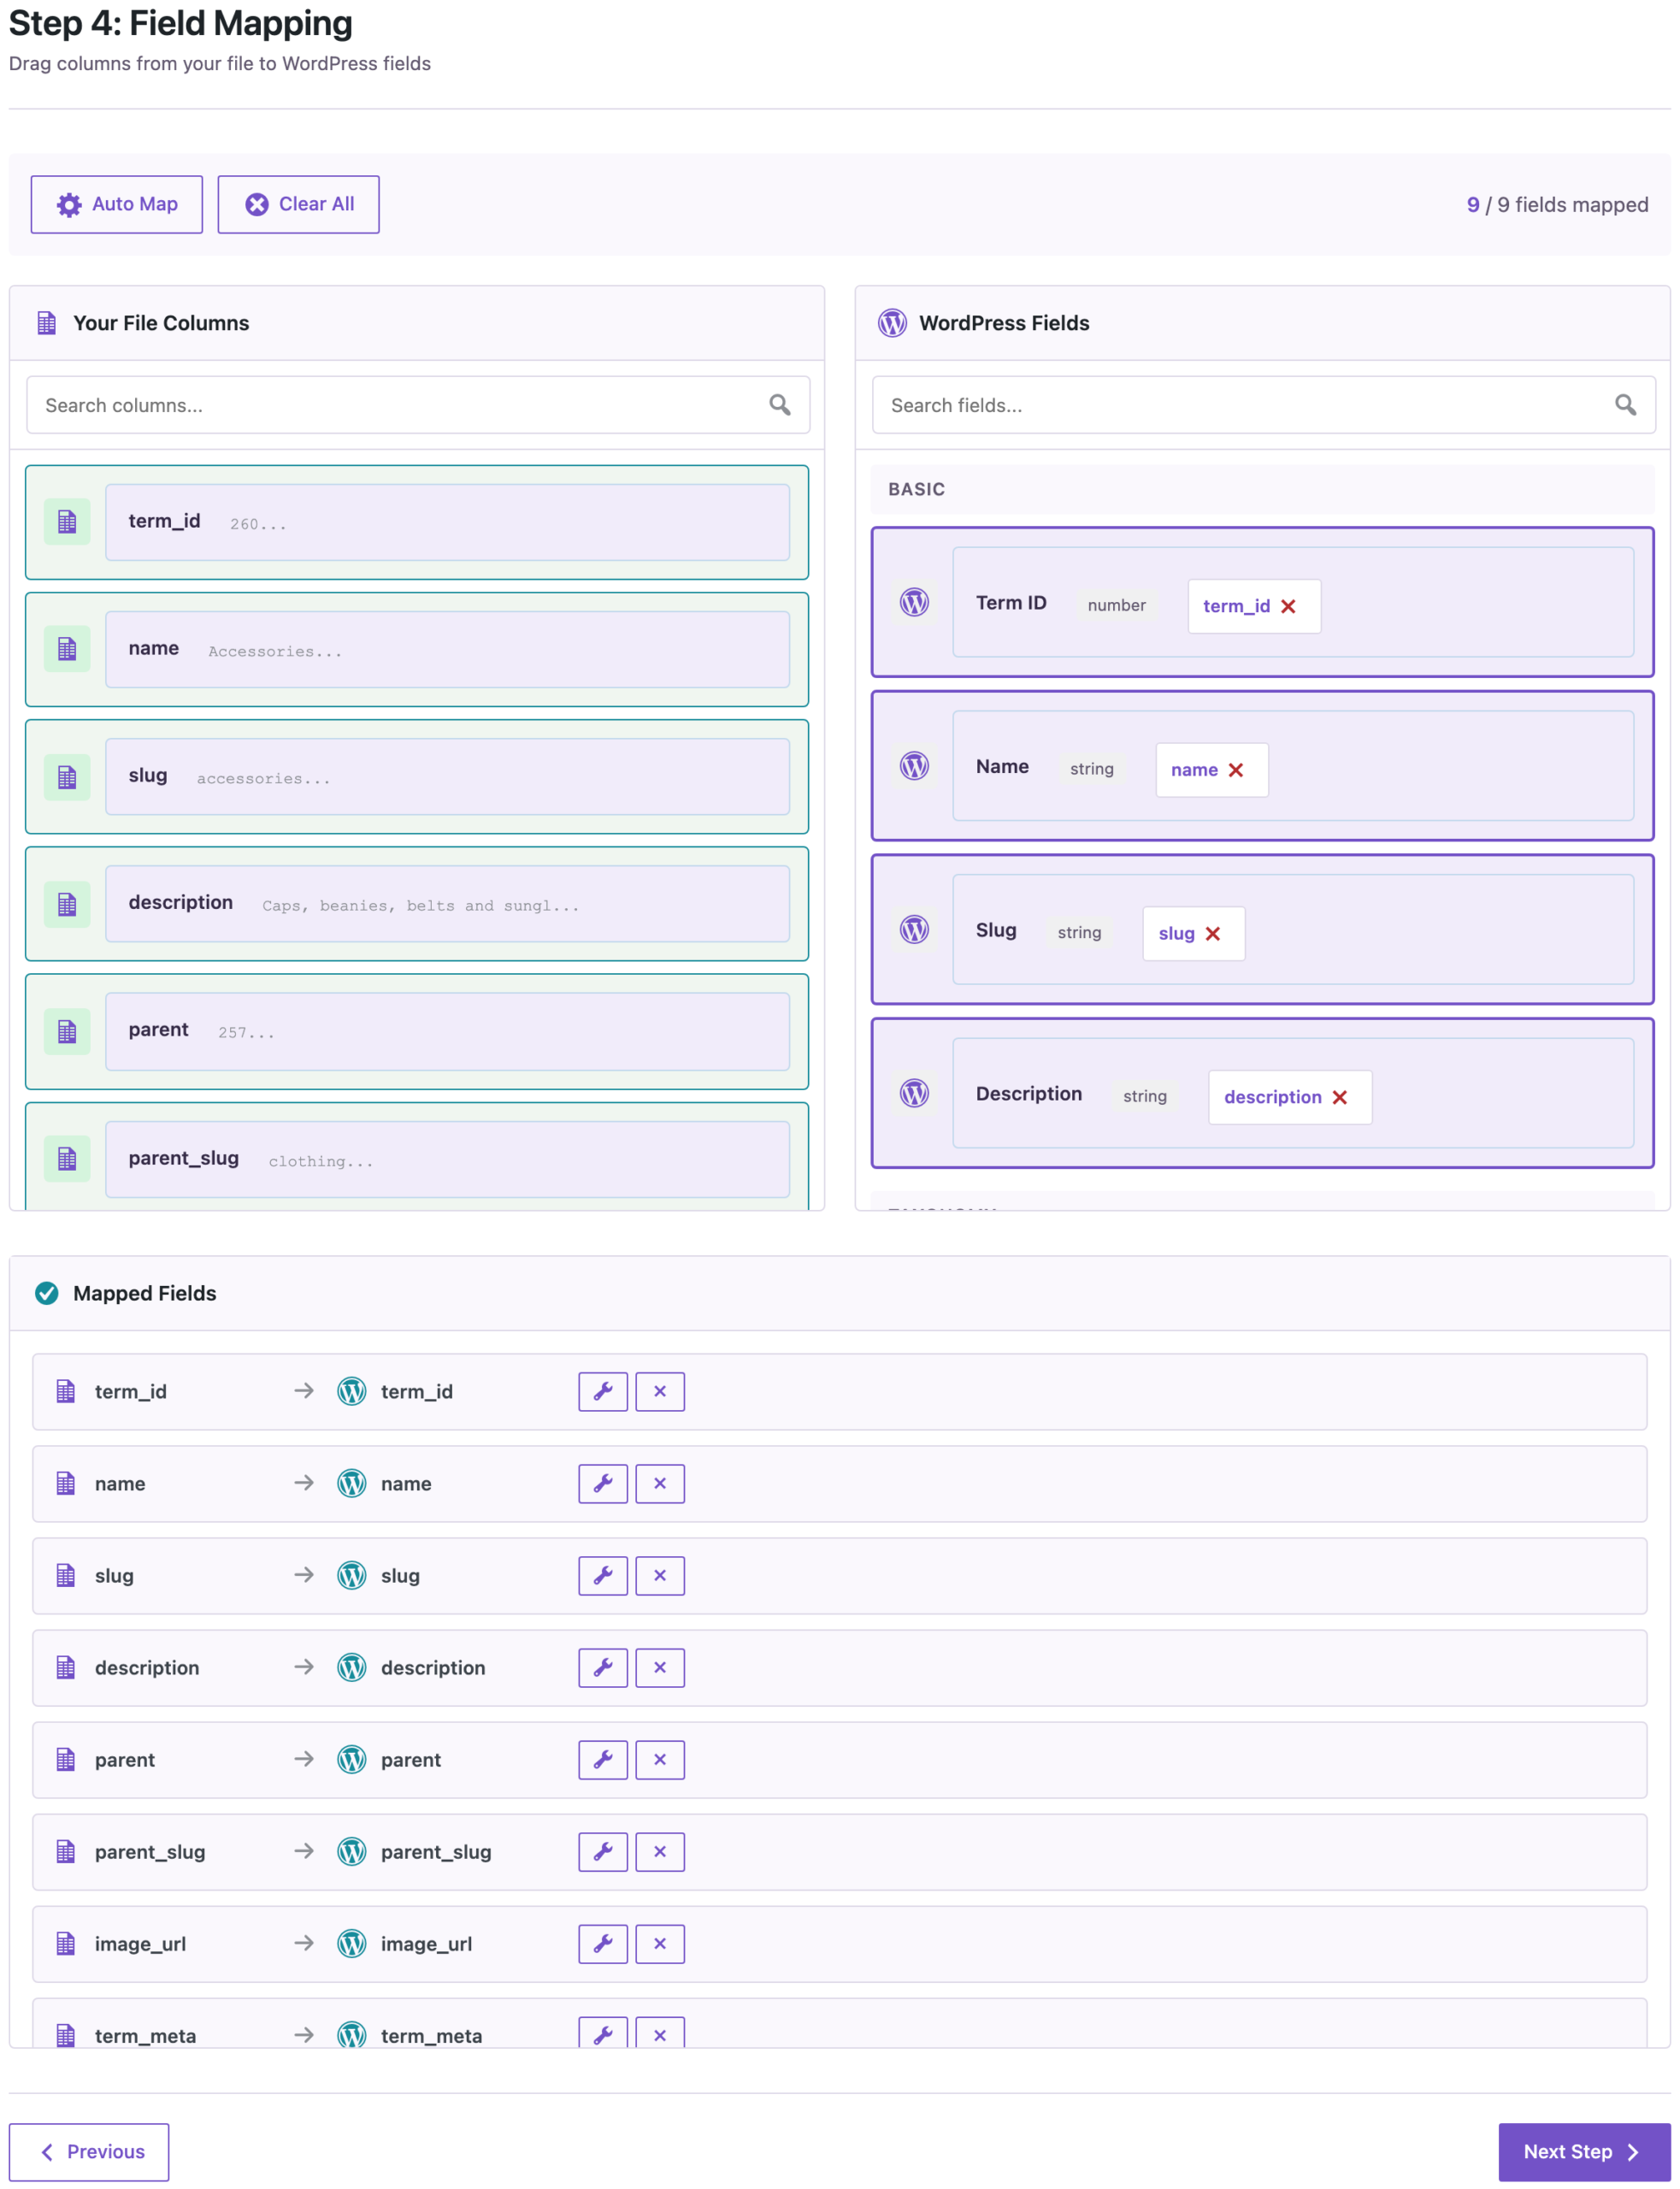
On the target store, open Import Export → Import, choose Taxonomy Terms and upload the CSV. On Field Mapping, click Auto Map. A file exported by the plugin maps column by column, including parent_slug and image_url:
On Import Options, set Check for Existing Items by Field to Slug, keep If Match Found: Update and If No Match Found: Create:
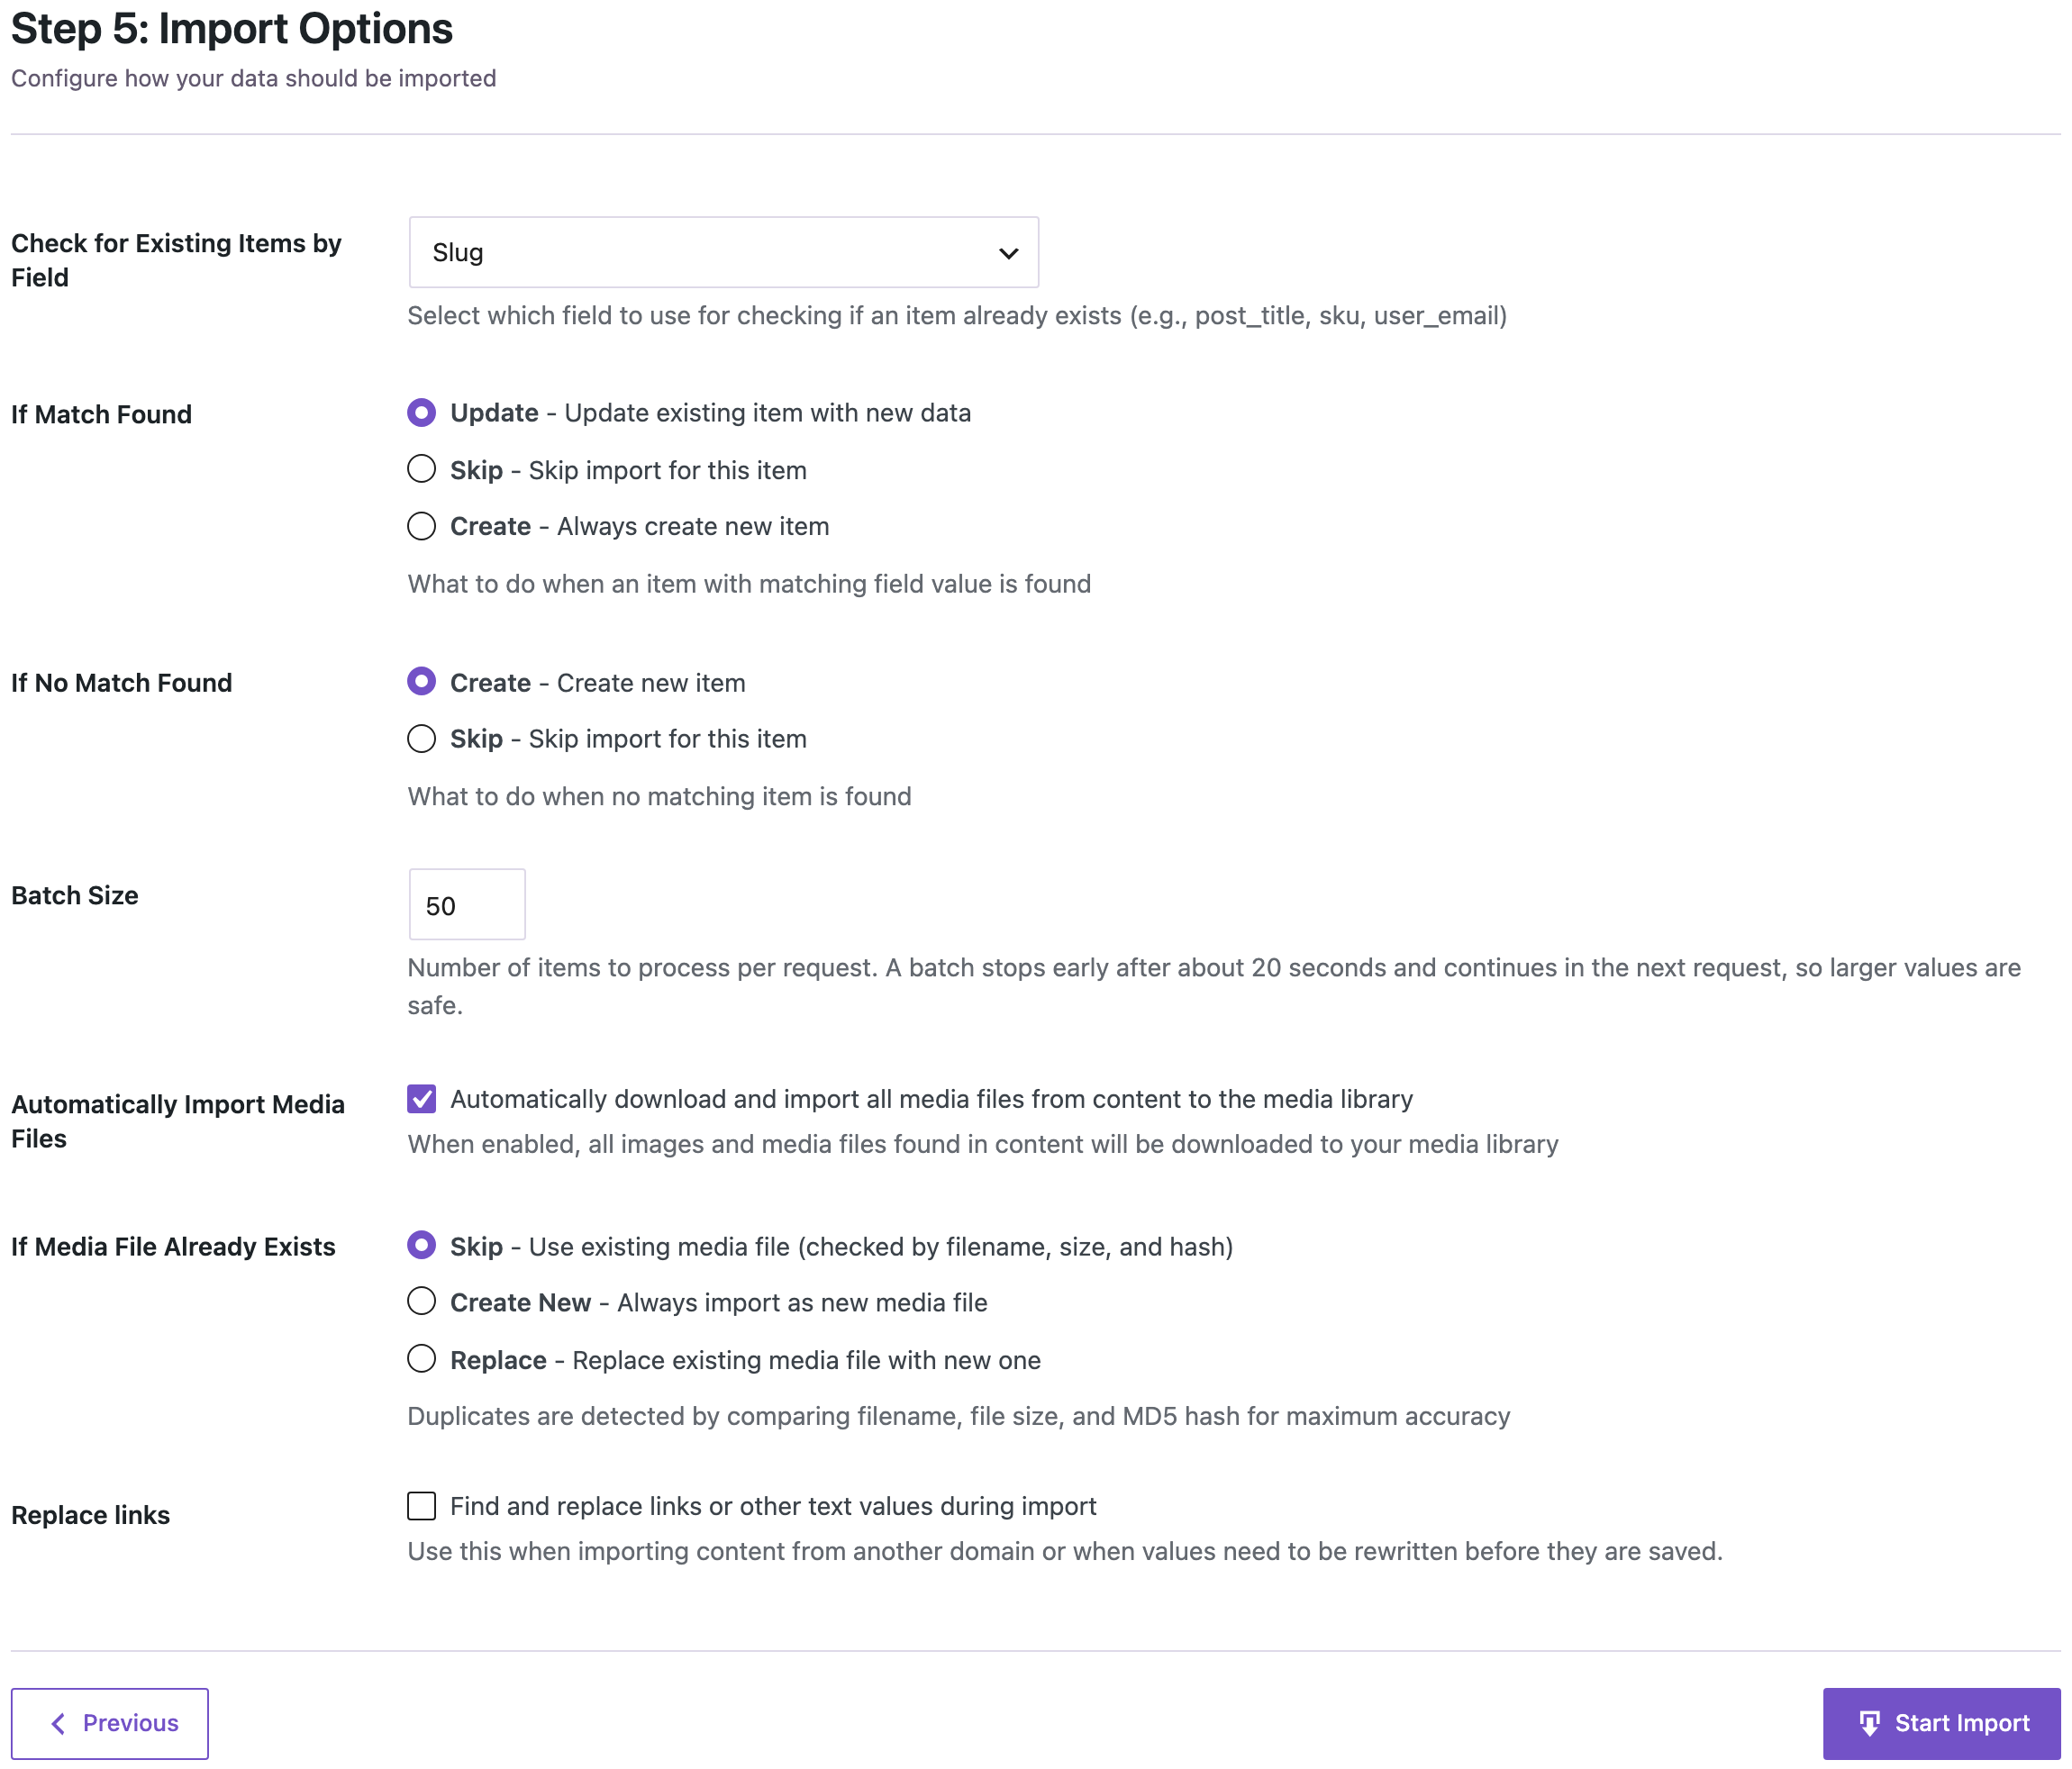
The slug is the same on both stores and identifies a category safely. Term IDs are numbered separately on every site, so the same ID usually belongs to another category. With slugs you can also run the same import again later without creating duplicates.
Start the import. Seven categories were created and Uncategorized, which every store has, was updated:

We compared both stores category by category: names, slugs, descriptions, parents on three levels, thumbnails, display type and sort order were the same. The live store already had the staging images in its media library, so the import used those files and added no copies.
Create Categories from a Spreadsheet
For a new category tree you don’t need IDs or slugs. Write one row per category:
- Name: the category name.
- Parent Category: the parent’s name or slug. Leave it empty for a top-level category.
- Description: optional.
- Image: a URL of the thumbnail. It can be on any public site.
- Taxonomy:
product_catin every row, so the import knows these are product categories.
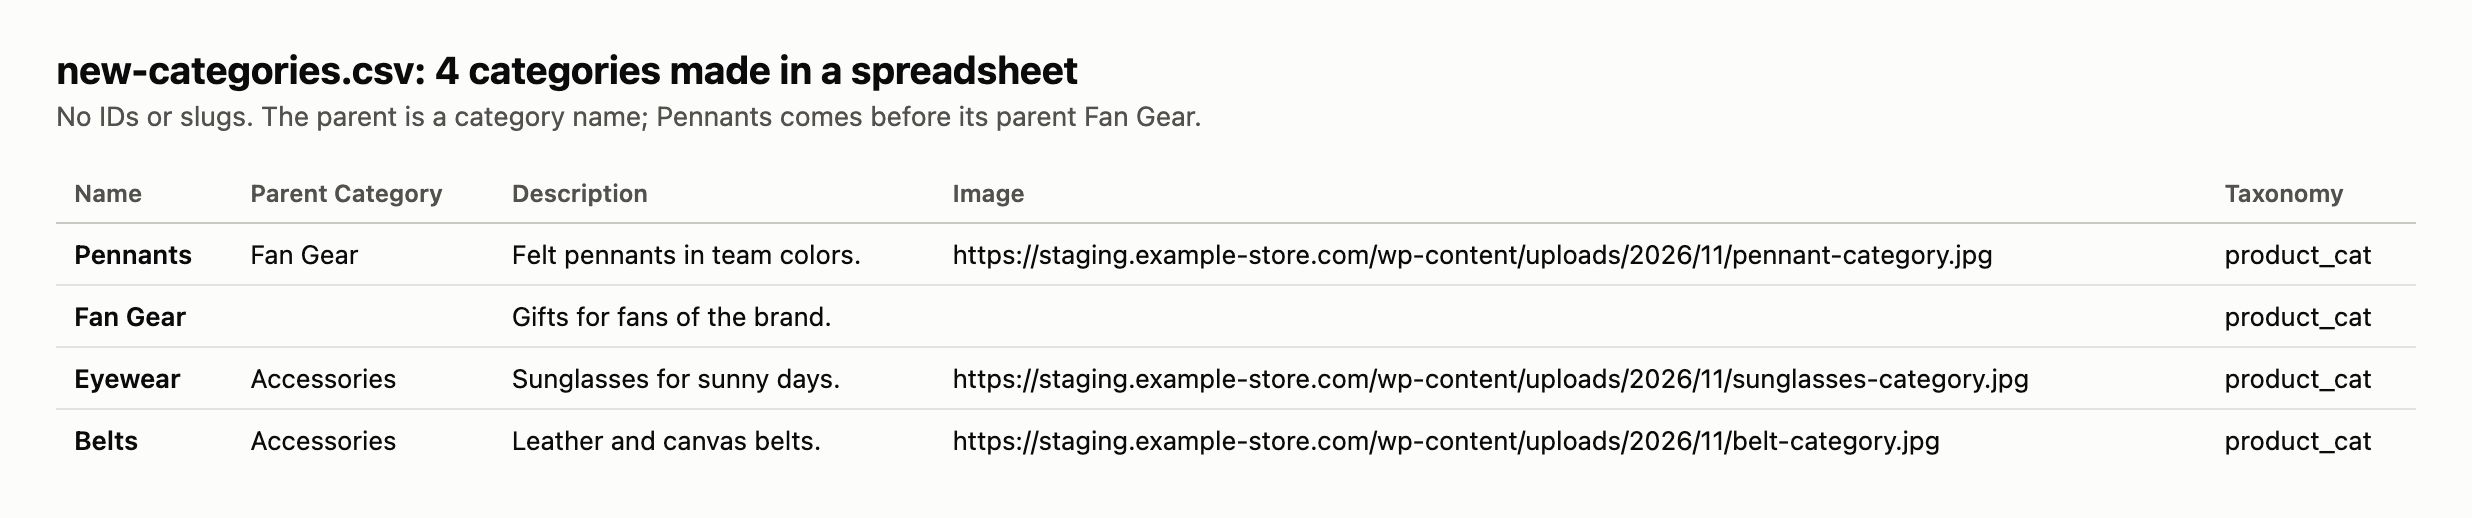
Save the sheet as CSV and import it as above. Auto Map sends Parent Category to Parent Slug or Name and Image to Image URL:
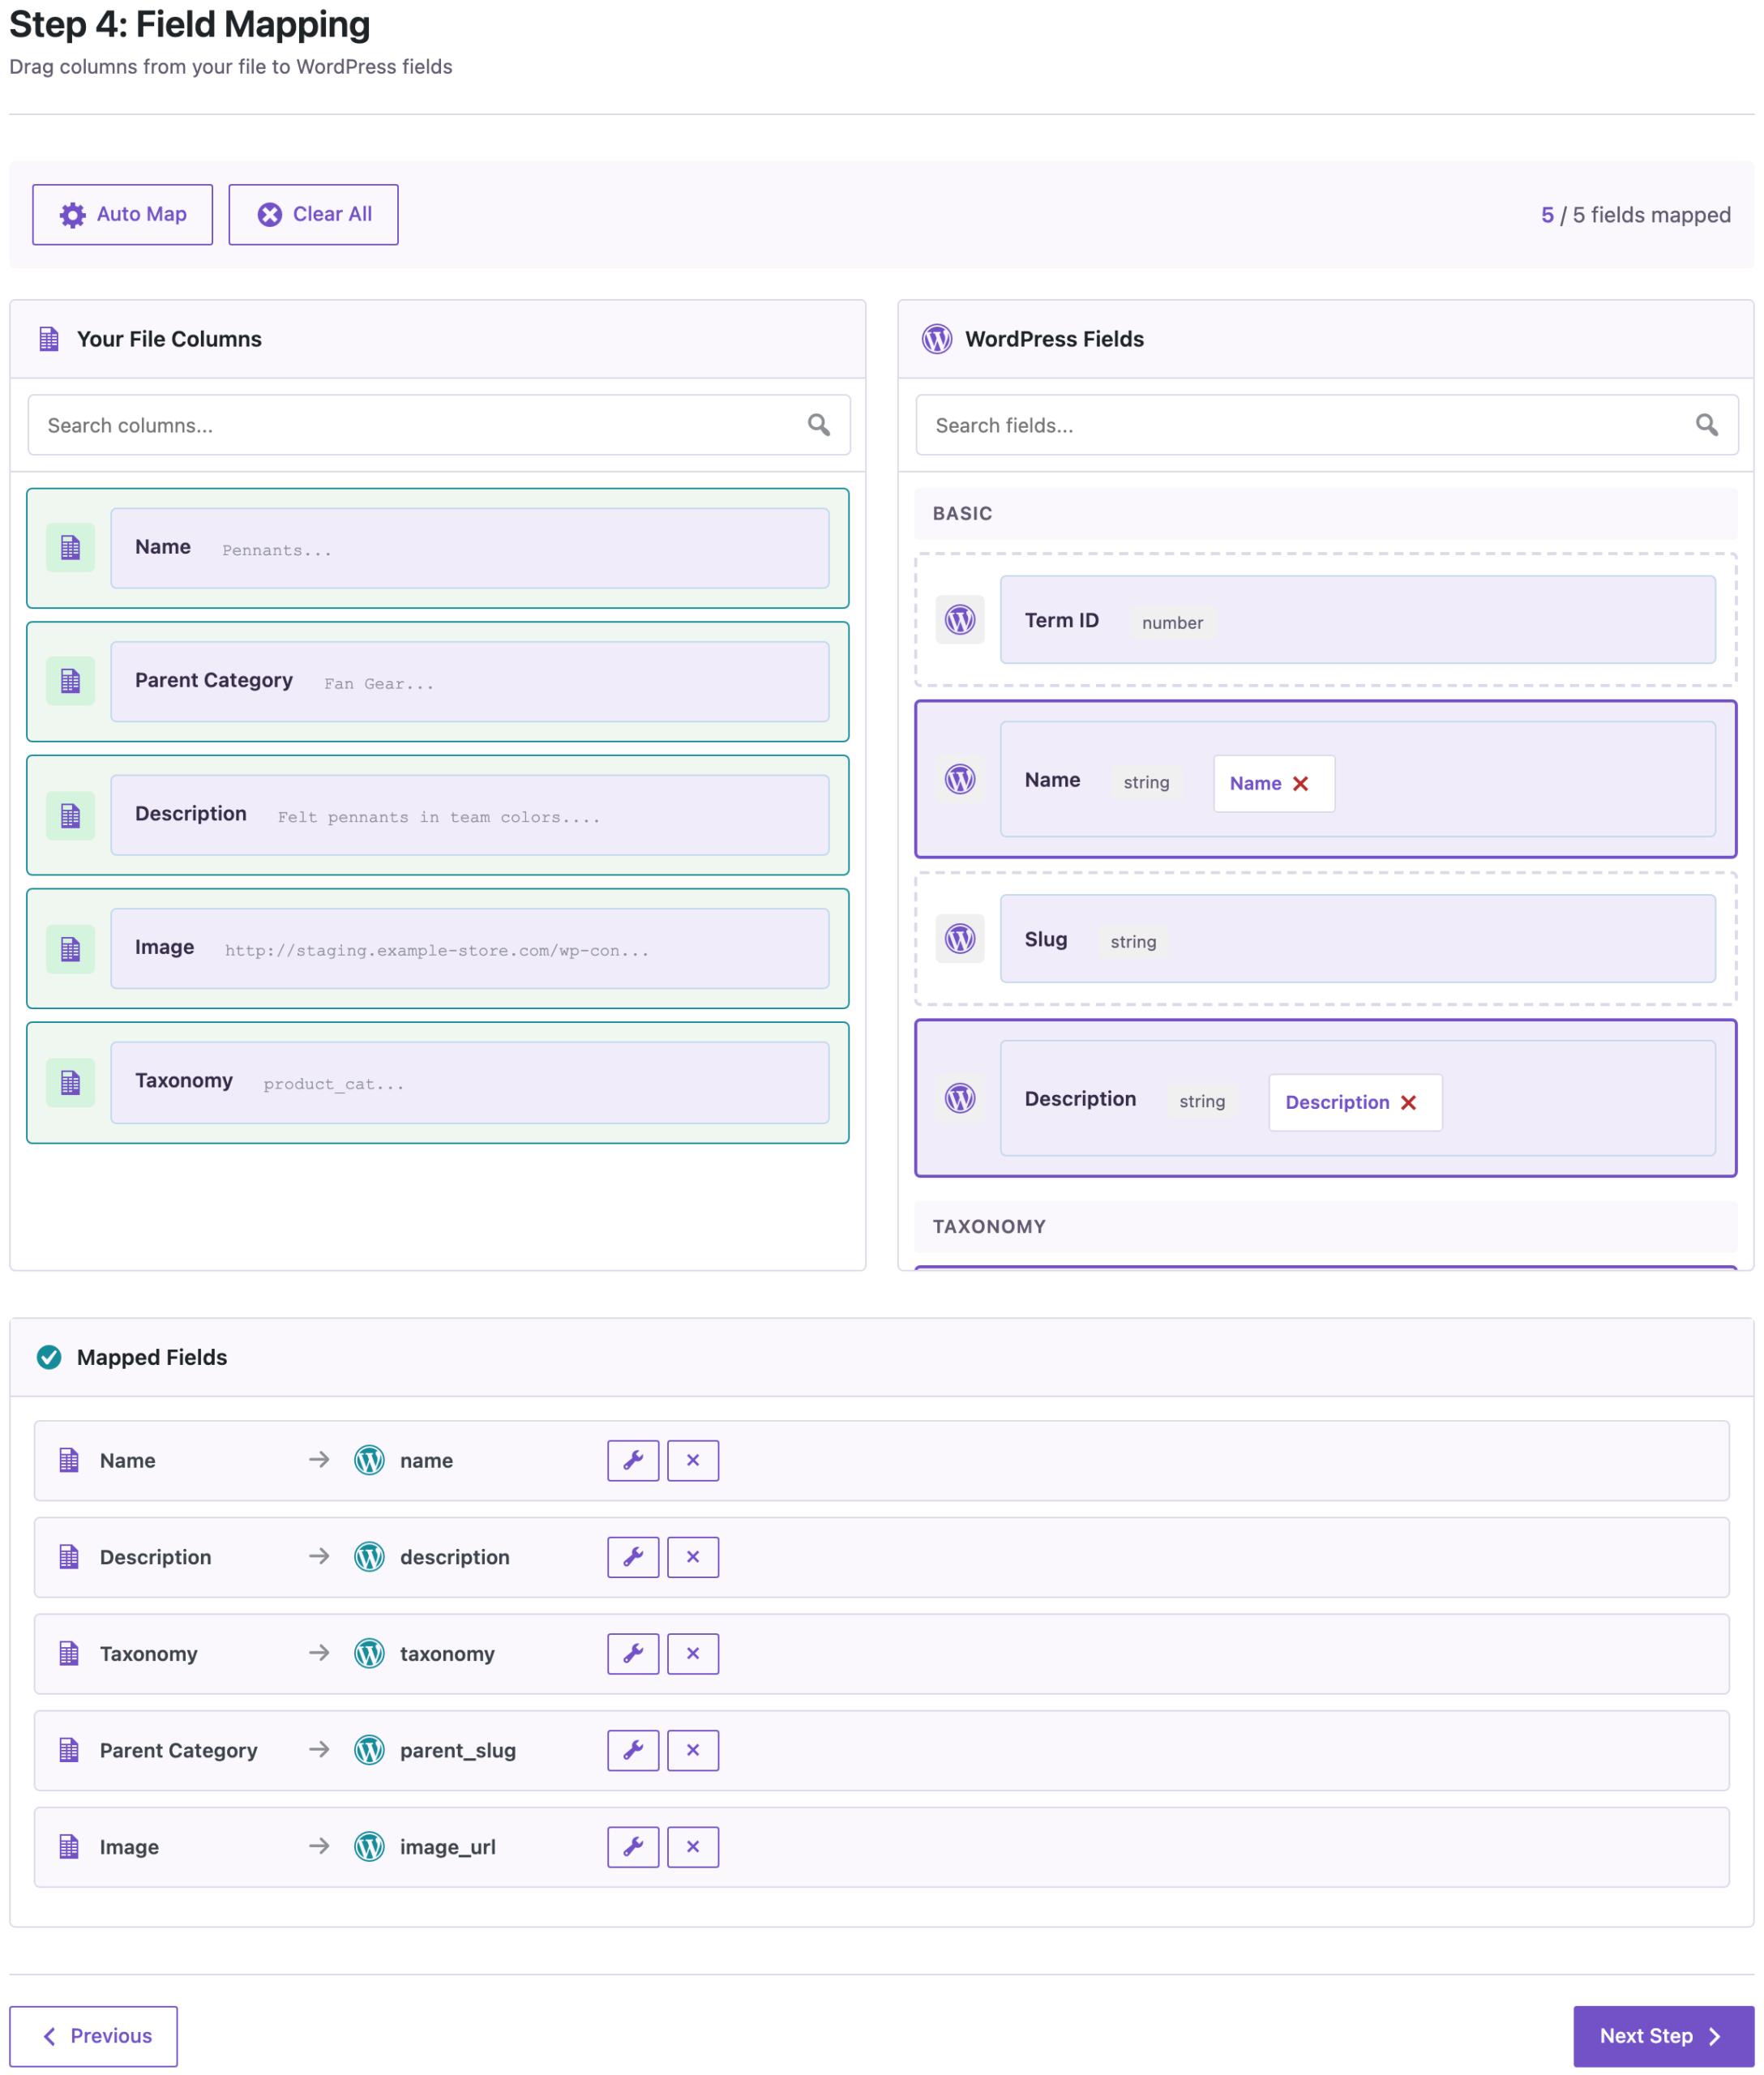
Without slugs in the file, match by Name on Import Options. Our four rows were created, the three images were downloaded into the media library, and Pennants got its parent Fan Gear even though Fan Gear comes later in the file. Eyewear and Belts went under the existing Accessories category.
Step 4: Check the Categories
Open Products → Categories. The dashes before the names show the levels, and every category has its thumbnail:

The Count column is 0 because no products are in these categories yet on this store; it fills in when you import or sync the products. Open a category to see its parent, description, display type and thumbnail:
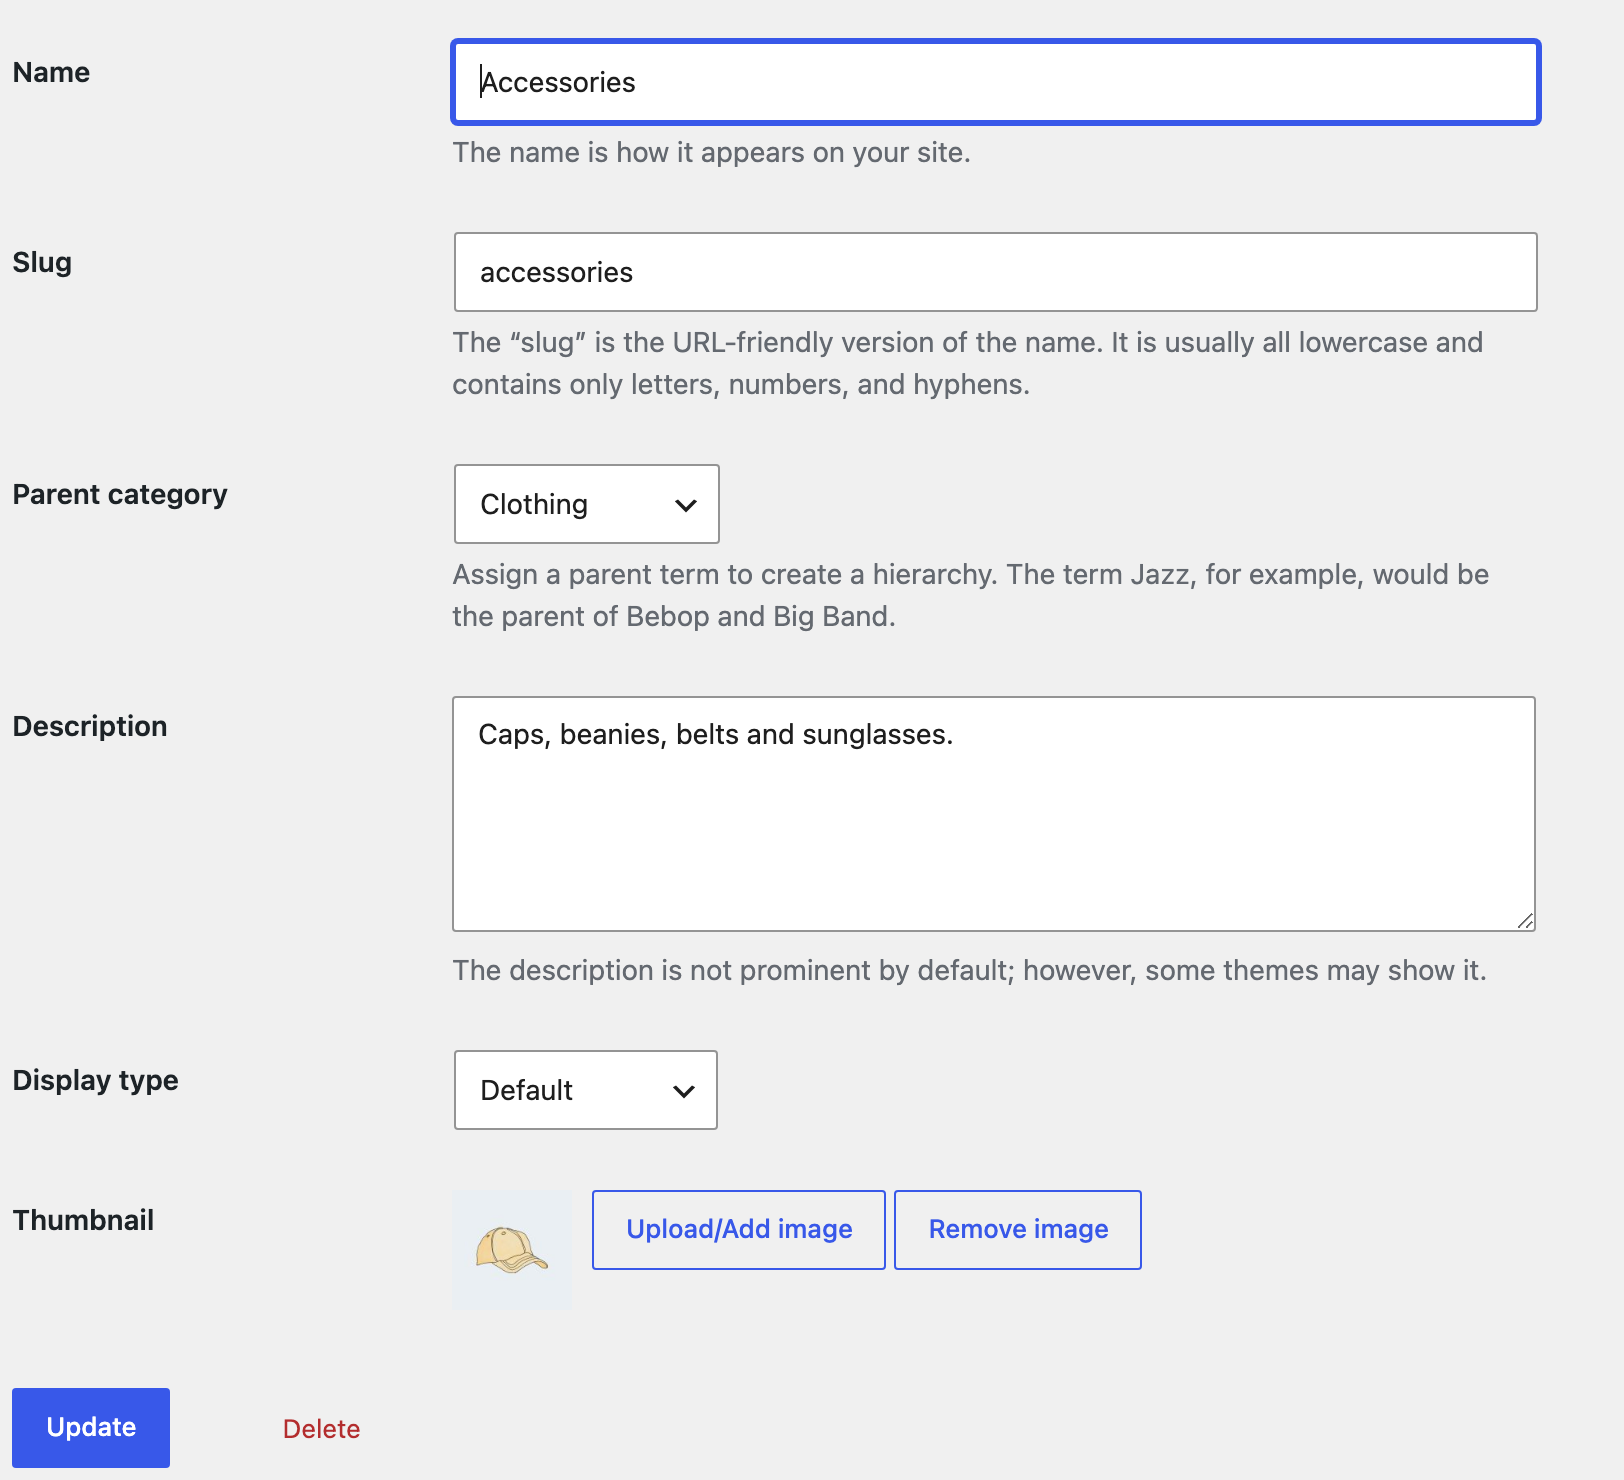
How Category Images Are Handled
- Same site, or a copy that shares the media. If the file from the URL is already in the target store’s uploads (as on a staging copy), that attachment is used.
- Another site. The image is downloaded once and added to the media library. The next import with the same URL uses the downloaded image again instead of making a second copy.
- Empty Image cell. The category keeps the image it already has.
- Image that cannot be downloaded (a broken link, a private site). The category is still imported without the image, and the Jobs Log lists the URL.
Term Meta (JSON) also contains thumbnail_id, the image’s ID on the source site. The import does not copy that number, because on another site it points to a different image or to nothing. The image always comes from the Image URL column.
Common Mistakes
- Matching by Term ID between two stores. IDs differ from site to site. Use Slug for exported files and Name for spreadsheets.
- Exporting without Image URL. The categories arrive without thumbnails. Add the column and import again; matched by slug, the categories are updated.
- A parent name with a typo. If no category has that name or slug, the row becomes a top-level category. Check the tree after the import and fix the name in the file.
- Two categories with the same name under different parents, such as two “Accessories”. Give them different slugs and use the slug in Parent Category, so the import knows which one you mean.
- Forgetting the Taxonomy column in a spreadsheet. Each row needs
product_cat, otherwise the import does not know where the terms belong.
FAQ
Does this work for product tags and brands?
Yes. Choose Product tags (product_tag) or Product brands (product_brand) in the taxonomy filter; brands can have images too. Tags have no parents.
Can I change category names or descriptions in bulk this way?
Yes. Export, edit the cells, and import with Check for Existing Items by Field: Slug and If Match Found: Update. Keep the slug column unchanged, since it is what the rows are matched by.
Will the import delete categories that are not in the file?
No. It only creates and updates the categories in the file.
Are the product counts copied?
No. WooCommerce counts the products in each category itself, so the counts are right as soon as products are assigned on the target store.
Do I need PRO?
Yes, exporting and importing taxonomy terms is part of the PRO add-on.
Related Guides
- How to Export and Import WordPress Categories, Tags, and Custom Taxonomies
- How to Import WooCommerce Products from CSV or Excel
- How to Sync WooCommerce Products Between Two WordPress Sites
- How to Import Global WooCommerce Attributes and Terms from CSV
- How to Migrate WooCommerce Store Data to Another Site
Get the free plugin on WordPress.org.

Comments 0
Have a question or a tip to share? Leave it below.