
A reliable WordPress media migration must transfer both the files and their attachment data. Titles, captions, alt text, descriptions, authors, file paths, MIME types, dimensions, and other metadata may all be required to recreate the Media Library correctly.
WP Import Export by RockStarLab lets you export WordPress media data to CSV and import it into another WordPress website. Field mapping connects CSV columns to WordPress attachment fields, while duplicate detection and the Media Hash Index help identify files that already exist.
Media import and export may require the WP Import Export PRO Addon, depending on the installed edition and active configuration.
Why copying the uploads folder is not enough
WordPress does not manage media files only through the wp-content/uploads directory. Every Media Library item also has an attachment record in the WordPress database.
An attachment record can contain:
- Attachment title
- Slug
- Caption
- Description
- Alternative text
- File URL and relative path
- MIME type
- Author
- Upload date
- Parent post
- Image dimensions
- Generated image sizes
- Custom fields and other attachment metadata
Exporting and importing media through a structured CSV workflow helps preserve this information instead of moving only the physical files.
For additional background, see the official WordPress Media Library documentation.
When to use this workflow
Media export and import can be useful when you need to:
- Move attachments from staging to production.
- Migrate a Media Library to another WordPress website.
- Transfer only selected images, videos, or documents.
- Preserve titles, captions, descriptions, and alt text.
- Move media uploaded by a particular author.
- Update existing attachment metadata.
- Avoid creating duplicate Media Library records.
How to export WordPress media files
Go to Import Export -> Export in the WordPress dashboard.
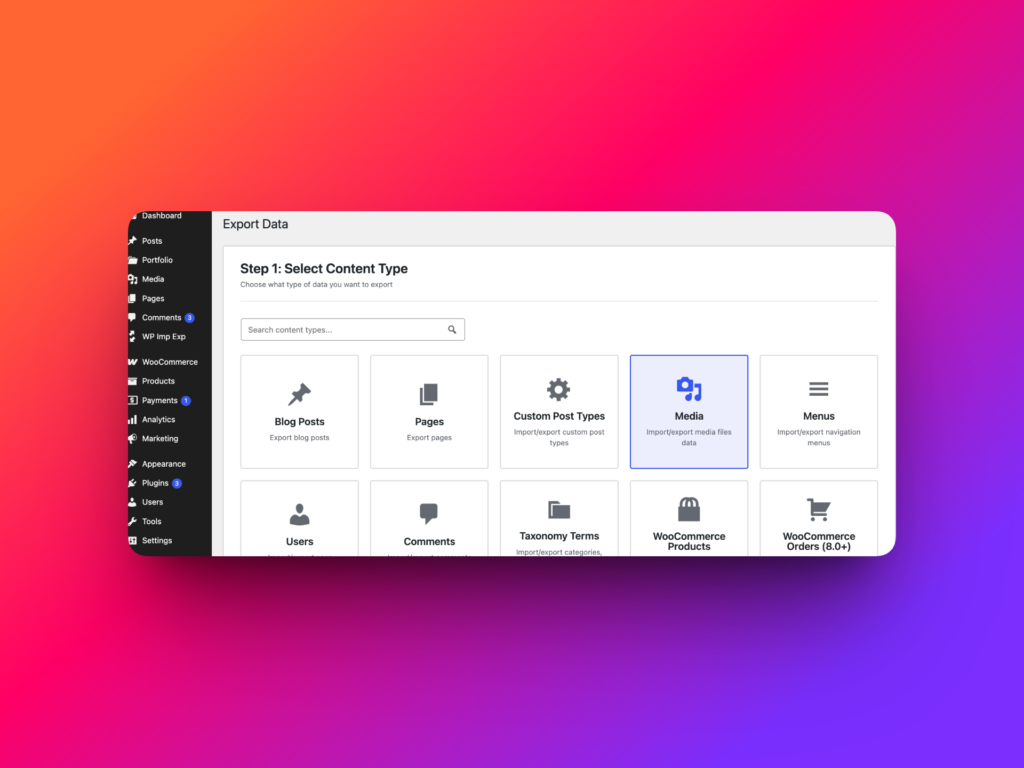
Step 1: Select Media as the content type
Select Media as the Content Type. This tells the plugin that you want to export WordPress attachment records and their available media fields.
If Media is not available in the content type list, confirm that the required edition or PRO Addon is installed and activated.
Step 2: Filter the media records
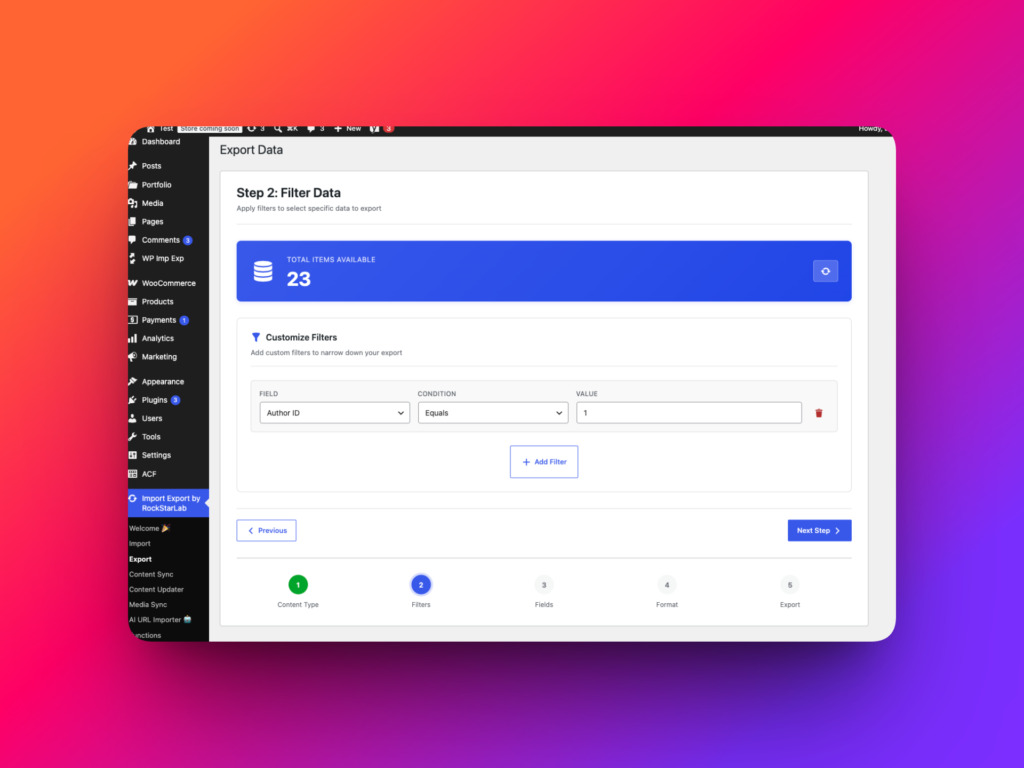
Filters are optional. If you want to export the entire Media Library, continue without adding any filters. Otherwise, define conditions that limit which attachments will be included.
For example, you can filter media by:
- Author: export files uploaded by a particular WordPress user.
- Image width: export images wider or narrower than a specified value.
- Image height: select images based on their vertical dimensions.
- Upload date: export files uploaded during a particular period.
- MIME type: export only JPEG images, PNG images, PDFs, videos, or another supported file type.
- Attachment title: find media whose title contains a particular word.
- File name or path: select files from a particular directory or naming pattern where the field is available.
- Parent post: export attachments associated with particular posts or pages.
- Attachment status: select media records with a particular WordPress status.
- File size: export files above or below a specified size where this value is available for filtering.
You can combine multiple conditions to create a more precise selection. For example, you might export JPEG images uploaded by a particular author during the previous month or select images larger than a specific width.
Review the filters carefully before continuing. An incorrect condition may exclude required media records from the export.
Step 3: Select the fields to export
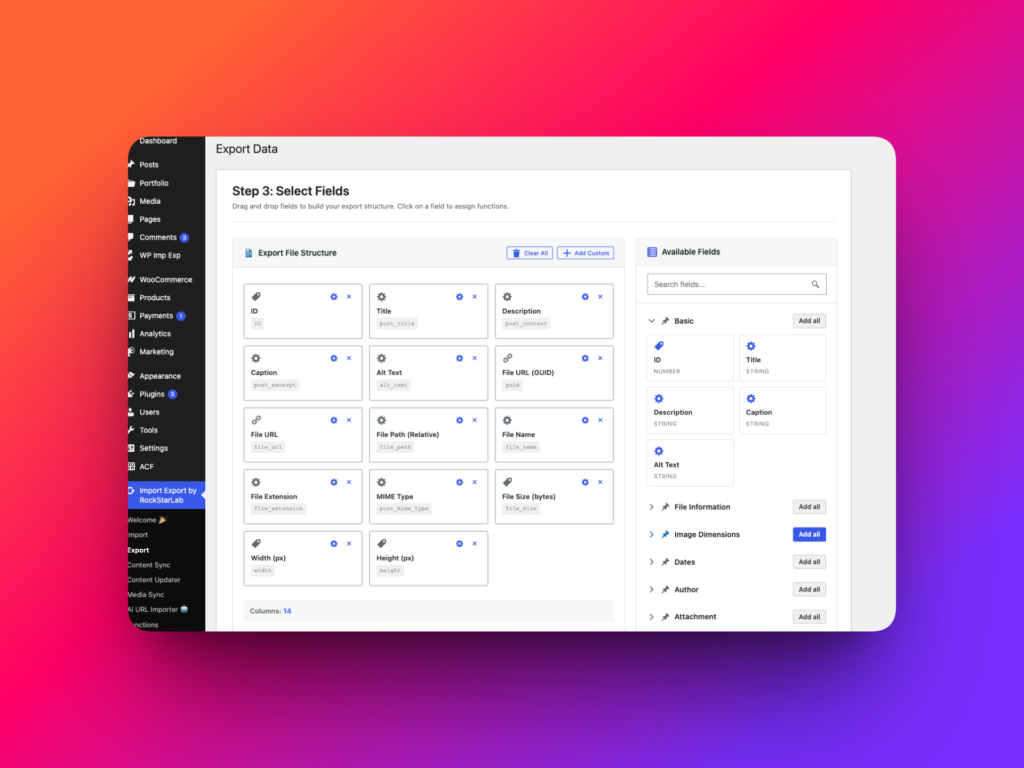
Choose which media fields should be included in the CSV file. Drag the required fields from the available-fields panel into the export layout.
If you need every available field, click Add all. The plugin will add all fields from the selected group to the export configuration.
A typical media export may include:
- Attachment ID for reference
- Title
- Slug
- Caption
- Description
- Alternative text
- File name
- File URL
- Relative file path
- MIME type
- Author
- Upload date
- Parent post information
- Image width and height
- Attachment metadata
- Relevant custom fields
Include the media URL or another usable file location in the export. The destination website needs a source value from which the media file can be imported.
The original attachment ID can be useful for reference and duplicate matching. However, WordPress may assign a different ID when the attachment is imported into another website.
Optional: Apply transformation functions (PRO Add-on)
A transformation function changes a field value before it is written to the export file. This is useful when media data must be adjusted for the destination website.
For example, a transformation function can:
- Replace a staging domain with the production domain.
- Convert relative file paths into absolute URLs.
- Remove obsolete directories from media paths.
- Normalize attachment titles.
- Remove HTML from captions.
- Create fallback alt text when a value is empty.
Assign the required function to the corresponding export field. Test transformations involving URLs or file paths before exporting the entire Media Library, because an invalid path can prevent a later import from locating the file.
Step 4: Configure the export options
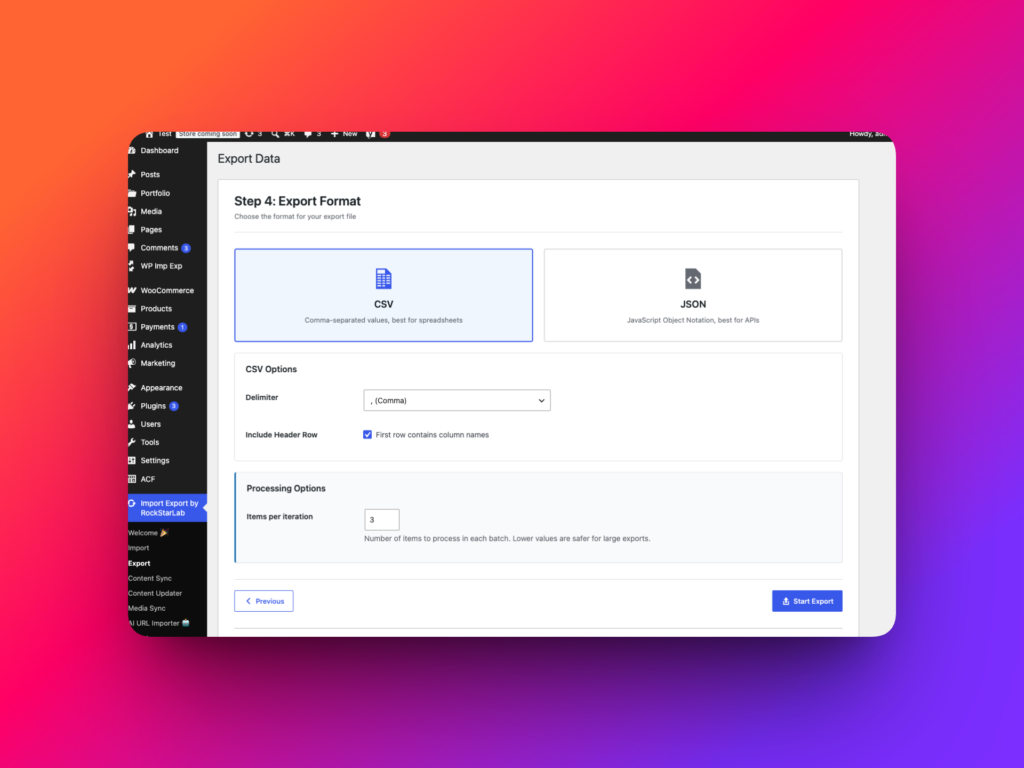
On the export options page, select CSV as the file format. CSV is the appropriate format when the exported data will later be imported with WP Import Export.
Configure Items per Iteration. This value controls how many media records the plugin processes during one background iteration.
A lower value uses fewer server resources but may make the export take longer. A higher value can speed up the operation on a powerful server, but it also increases memory usage and the amount of work performed during each iteration.
On an ordinary shared hosting account, begin with a conservative value. Dedicated servers and hosting environments with higher memory and execution limits can usually process more items per iteration.
Start and download the export
Click Start Export. The plugin will process the selected media records in the background and display the operation progress.
After the export finishes, click Download to save the generated CSV file. Completed export jobs can also be reviewed under Import Export -> Jobs Log.
Build the Media Hash Index Before Importing Media
Before importing media into a website with an existing Media Library, it is recommended to build the Media Hash Index. The index lets WP Import Export compare the actual contents of files instead of relying only on file names, URLs, titles, or attachment IDs.
Two files can have different names or URLs while containing exactly the same data. WP Import Export calculates an MD5 hash for every indexed Media Library file. Identical files produce the same hash, allowing Import, Media Sync, and Content Sync to detect duplicates more reliably.
Build the Media Hash Index on the destination website before importing media. This gives the plugin a complete set of hashes for files that already exist in the Media Library.
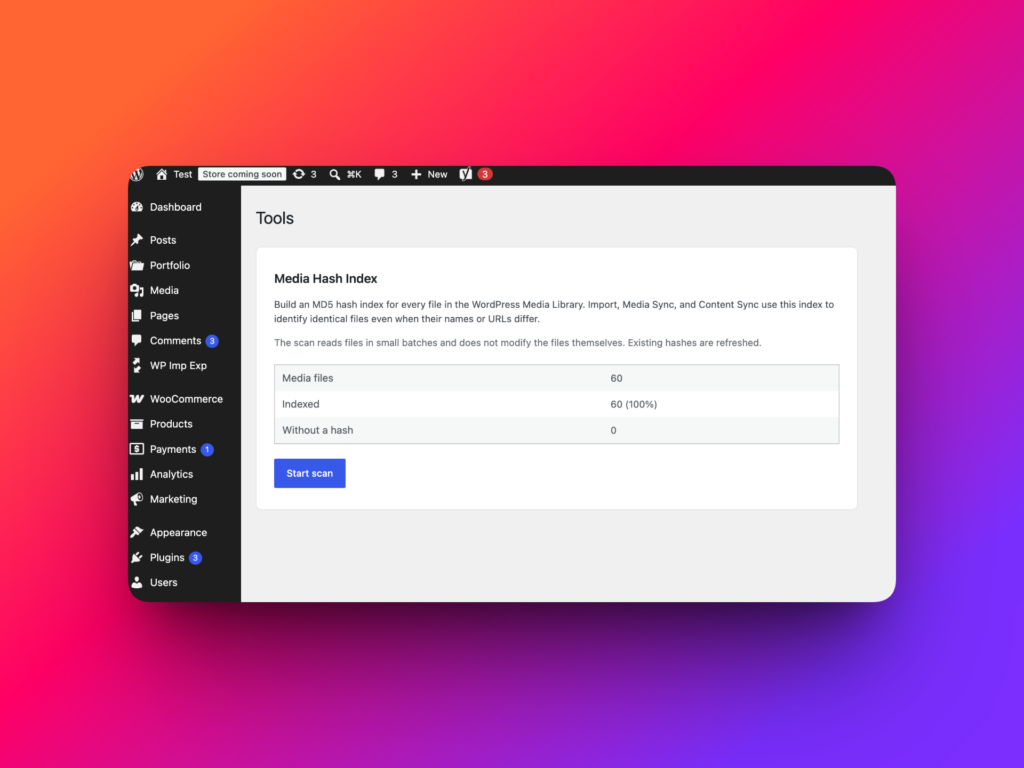
Step 1: Open the Media Hash Index tool
In the WordPress dashboard, go to Import Export -> Tools. Find the Media Hash Index section.
The tool displays three statistics:
- Media files: the total number of attachment files found in the WordPress Media Library.
- Indexed: the number and percentage of files that already have a stored hash.
- Without a hash: the number of files that still need to be indexed.
Step 2: Start the media hash scan
Click Start scan. WP Import Export will read the existing Media Library files, calculate an MD5 hash for each readable file, and store the result with the corresponding attachment.
The scan processes files in small batches to reduce server load. A progress bar shows how many attachments have been processed and how much of the Media Library remains.
The scan does not rename, move, replace, compress, or otherwise modify the media files. Existing hashes are refreshed, while attachments without hashes are added to the index.
Step 3: Wait for the scan to finish
Keep the Tools page open while the scan is running. When processing finishes, the page displays the number of indexed files and reports any files that could not be read.
Ideally, the Without a hash value should be 0 before you start the media import. If some files could not be indexed, check that they still exist on the server and that WordPress has permission to read them.
Why hash comparison is more accurate
| Comparison method | Possible problem | Hash index advantage |
|---|---|---|
| File name | The same file may have been renamed. | The hash remains the same when the file contents are identical. |
| Media URL | The domain or uploads path may differ between websites. | The hash does not depend on the website URL. |
| Attachment title | Different files can use the same title. | The hash is calculated from the physical file contents. |
| Attachment ID | WordPress IDs usually differ between websites. | The same file can be recognized regardless of its attachment ID. |
Building the index does not mean that every imported row will automatically be skipped. The final action still depends on the selected import and duplicate-handling options. The index gives the plugin a reliable way to recognize files that are already present.
How to import WordPress media files without duplicates
Go to Import Export -> Import on the destination WordPress website.
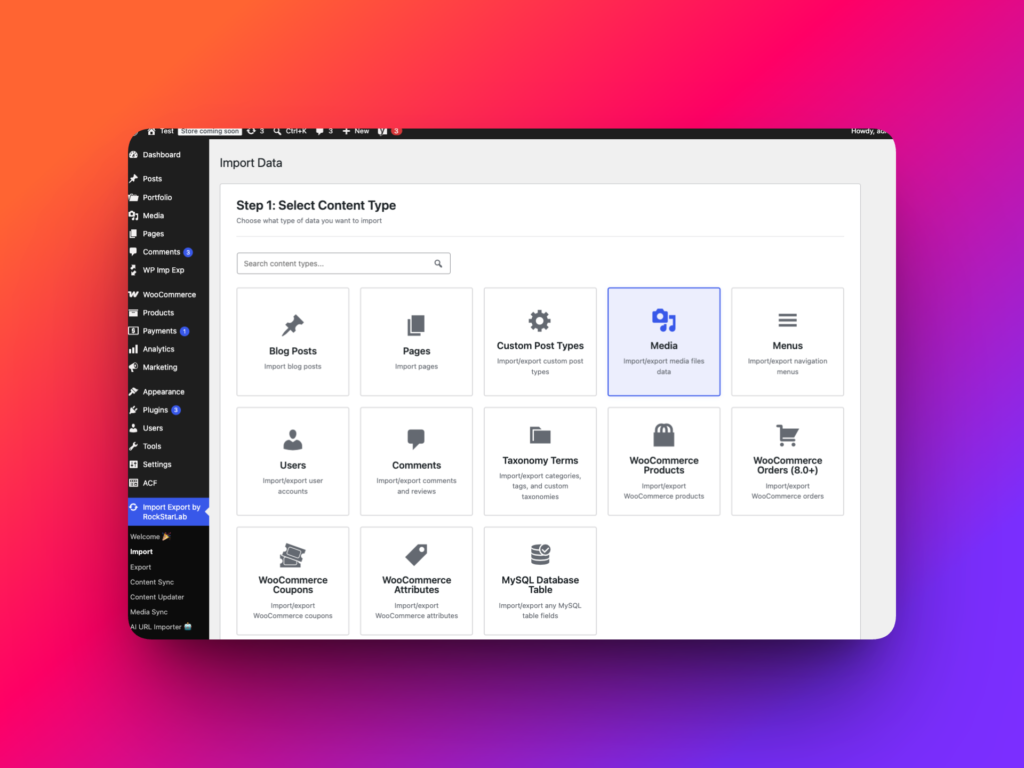
Step 1: Select Media as the content type
Select Media as the Content Type. The importer will use the uploaded data to create or update WordPress attachment records.
Step 2: Upload the media CSV file
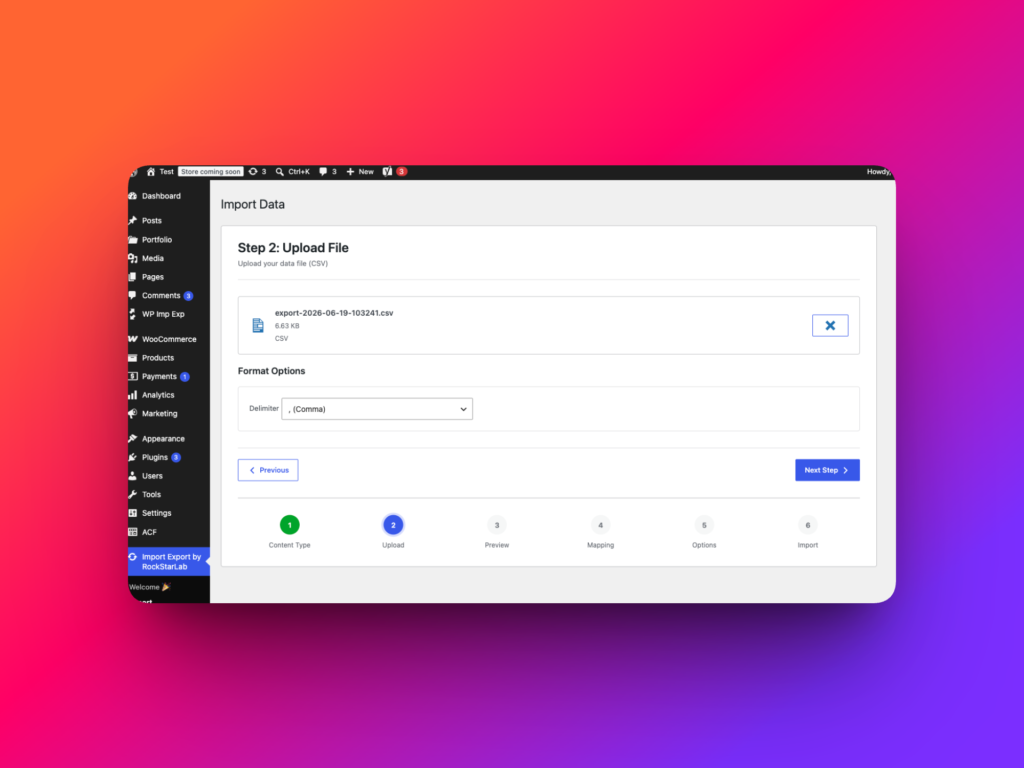
Select the CSV file containing the media data. This can be a file generated by WP Import Export or a CSV created by another system.
Choose the delimiter used to separate columns in the file. A comma is common, but CSV files may also use a semicolon, tab, pipe, or another delimiter.
The selected delimiter must match the structure of the uploaded file. Otherwise, the importer may combine several values into one column or divide individual values incorrectly.
Step 3: Review the data preview
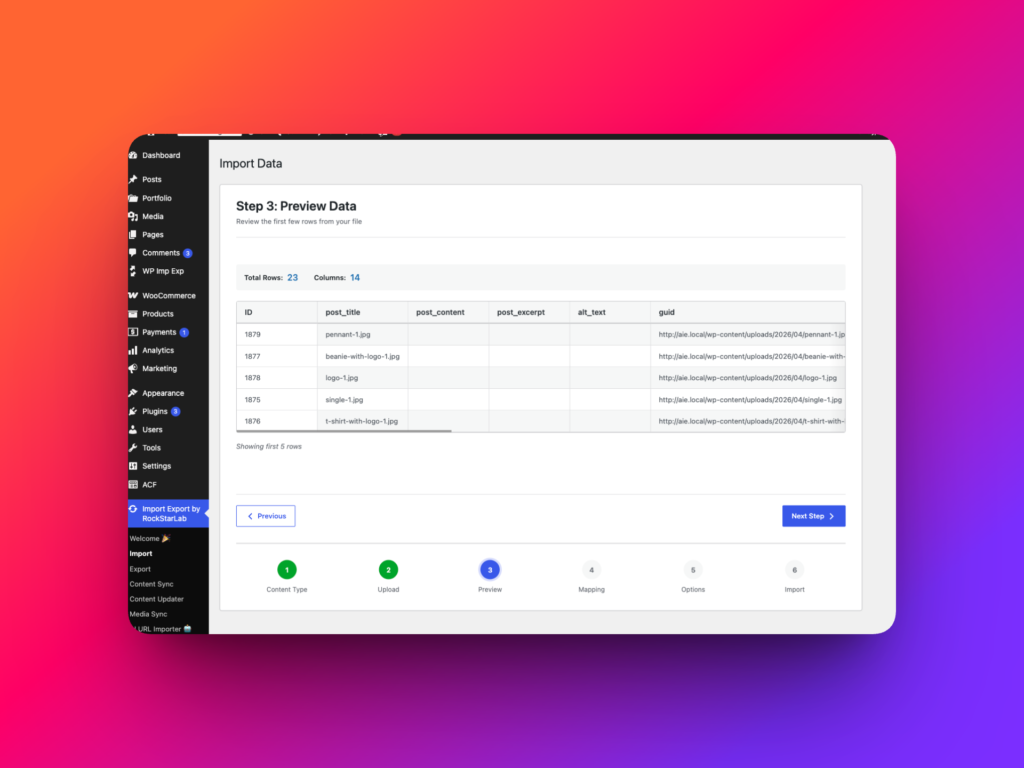
The preview shows how WP Import Export recognized the uploaded CSV. Check that every row and column was parsed correctly before continuing.
Pay particular attention to:
- File URLs
- File names and paths
- Attachment titles
- Captions
- Alternative text
- Authors
- MIME types
- Image dimensions
If the values appear in the wrong columns, several columns are combined, or a row is divided unexpectedly, the file may use a different delimiter. Return to the previous step, change the delimiter, and check the preview again.
Do not continue until the preview accurately represents the source file. Incorrectly parsed CSV data cannot be mapped reliably.
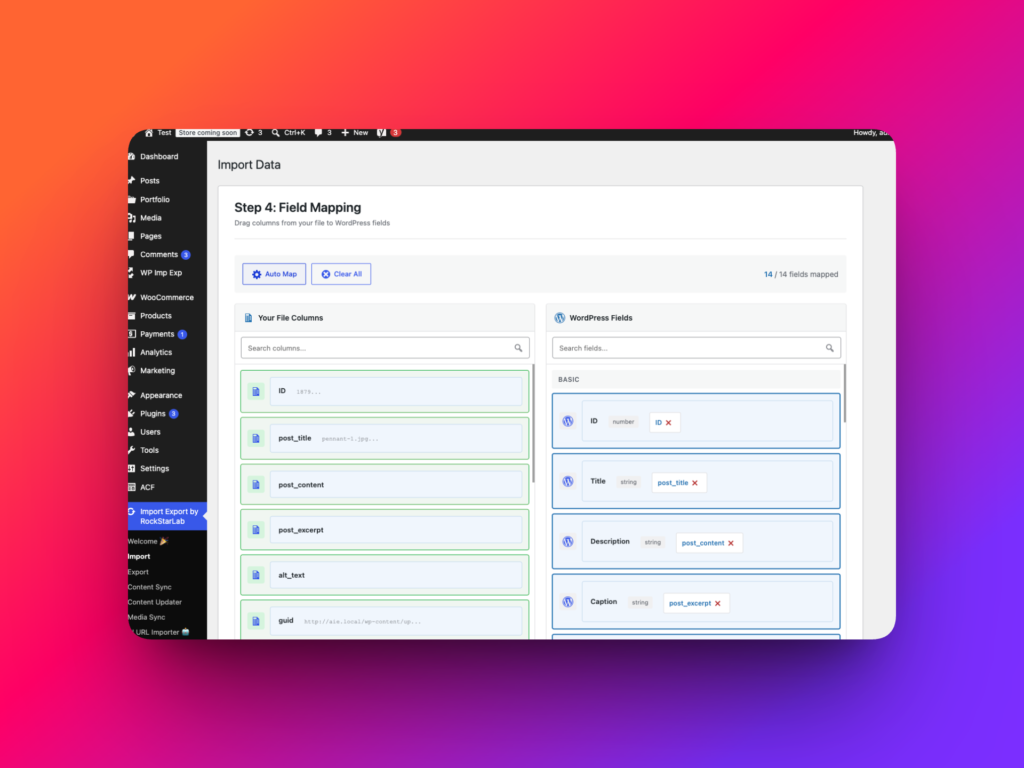
Step 4: Map CSV columns to WordPress media fields
Field mapping defines where each value from the CSV should be saved in WordPress. The importer reads columns from the source file, but it needs to know which WordPress attachment field corresponds to each column.
For example:
| CSV column | WordPress field | Imported value |
|---|---|---|
title |
Attachment Title | The title shown in the Media Library. |
file_url |
Media URL | The location of the media file. |
alt_text |
Alternative Text | The accessible description of an image. |
caption |
Caption | The attachment caption displayed by WordPress themes where applicable. |
description |
Description | The longer description stored with the attachment. |
author |
Author | The WordPress user associated with the attachment. |
If the CSV was exported with WP Import Export by RockStarLab, click Auto Map. The plugin will recognize compatible CSV column names and automatically connect them to the corresponding WordPress fields.
Always review the automatically generated mapping before starting the import. A field may need manual adjustment if the destination website uses a different configuration.
If the CSV was created by another plugin or external system, drag each recognized source field from the left column into the corresponding WordPress field on the right.
Field mapping prevents media data from being saved in the wrong place. Without correct mapping, an attachment title could be imported as a caption, alt text could be omitted, or the importer might not know where to find the media file.
Transform mapped values when necessary
Transformation functions can modify CSV values during import. Assign a function to a mapped field when the source data needs to be cleaned or adapted before WordPress saves it.
Media import transformations can be used to:
- Replace an old domain in media URLs.
- Add a domain to relative file paths.
- Remove query parameters from URLs.
- Normalize attachment titles.
- Remove HTML tags from captions.
- Generate fallback alt text from the file name or title.
Transformation functions receive the current field value and row context, then return the final value that will be imported.
Step 5: Configure the import options
Import options control how the plugin identifies existing attachments, handles matches, creates missing items, and divides the operation into background batches.
Check for Existing Items by Field
Select the field the importer should use to determine whether a media record already exists. This is the main duplicate-detection setting.
Choose a field whose value is stable and as unique as possible. Depending on the available mapping and source data, suitable values may include:
- File URL
- Relative file path
- File name
- Attachment slug
- Original attachment ID stored as a reference
- Another unique custom field
Matching only by attachment title can produce inaccurate results because multiple files may have the same title. File URLs and paths are generally more specific, although they may need a transformation function when the domain changes between websites.
If Match Found
This option determines what happens when the selected field matches an existing WordPress media record.
- Update: update the existing attachment with data from the CSV.
- Skip: leave the existing attachment unchanged and skip the matching row.
- Create: create a new attachment even when a matching item exists.
Choose Update when you need to refresh titles, captions, alt text, descriptions, or other attachment fields. Choose Skip when existing media should remain untouched.
Avoid Create when the objective is to import media without duplicates. This option intentionally creates another record after a match is found.
If No Match Found
This setting controls rows for which the importer cannot find an existing attachment.
- Create: create a new WordPress media item from the CSV row.
- Skip: ignore the row and do not create a new attachment.
Select Create for a normal media migration. Select Skip only when the import should update existing attachments without adding new ones.
Batch Size
Batch Size defines how many media records the plugin processes during a single request or background iteration.
For ordinary shared hosting, leave the Batch Size at 1. Media processing can involve downloading files, validating MIME types, generating image metadata, creating thumbnail sizes, writing database records, and saving files to the uploads directory. These tasks require more memory and processing time than importing text fields alone.
Processing one item per iteration reduces the risk of:
- PHP memory limit errors
- Request timeouts
- Server overload
- Interrupted file downloads
- Incomplete image metadata generation
On a dedicated server or a hosting environment with generous memory and execution limits, you can gradually increase the Batch Size. A larger batch may complete the import faster because the plugin processes more records during each iteration.
Increase the value in small steps and monitor the import progress. If the job begins to fail, pause, or time out, reduce the Batch Size.
Start the media import
Review the field mapping and import options, then click Start Import. Wait for the background process to finish before checking the destination Media Library.
After completion, open Media -> Library and inspect several imported items. Confirm that the files are available and that their titles, captions, descriptions, alt text, authors, and other mapped values were imported correctly.
Import results and errors can also be reviewed under Import Export -> Jobs Log.
Recommended options for importing media without duplicates
| Option | Recommended starting value | Purpose |
|---|---|---|
| Media Hash Index | Build before import | Allows existing files to be compared by their MD5 hashes even when names or URLs differ. |
| Check for Existing Items by Field | File URL, path, or another unique field | Identifies attachments that may already exist. |
| If Match Found | Update or Skip | Prevents a second attachment from being created. |
| If No Match Found | Create | Adds media that is missing from the destination website. |
| Batch Size on shared hosting | 1 | Reduces memory usage and timeout risk. |
| Batch Size on a dedicated server | Increase gradually | Can improve speed when sufficient resources are available. |
Common media import mistakes
Importing before building the Media Hash Index
An older Media Library may contain many attachments without stored hashes. Go to Import Export -> Tools and run Media Hash Index before importing files into an existing library. This improves duplicate detection when the same file has a different name, URL, attachment title, or WordPress ID.
Using a non-unique matching field
Attachment titles and file names are not always unique. Use a full file path, URL, or another stable identifier when possible.
Choosing Create when a match is found
The Create option adds a new attachment even when an existing record matches. Select Update or Skip to avoid duplicate records.
Using the wrong CSV delimiter
An incorrect delimiter causes values to appear in the wrong columns. Return to the upload step and select the correct delimiter before mapping fields.
Importing with incomplete field mapping
Verify that the file location and required attachment fields are mapped. Missing mappings can result in incomplete Media Library records.
Using a large Batch Size on shared hosting
Media files consume more resources than text-only records. Start with a Batch Size of 1 and increase it only after a successful test.
Using source URLs that are no longer available
The destination website must be able to access the source media. Keep the original website or file location available until the migration has finished and been verified.
Post-import verification checklist
- Confirm that the Media Hash Index was completed on the destination website before import.
- Compare the number of exported and imported records.
- Open several imported images, videos, and documents.
- Verify attachment titles.
- Check captions and descriptions.
- Confirm that image alt text was preserved.
- Check attachment authors and dates where imported.
- Search the Media Library for unexpected duplicates.
- Verify media used by posts and pages.
- Review failed or skipped rows in Jobs Log.
- Clear relevant WordPress, CDN, and image caches.
Recommended links
FAQ
Should I build the Media Hash Index before importing media?
Yes. Building the Media Hash Index before import is recommended when the destination website already contains media. It lets WP Import Export identify identical files by their MD5 hashes even when file names, URLs, titles, or attachment IDs differ.
How do I build the WordPress Media Hash Index?
Go to Import Export -> Tools, find Media Hash Index, and click Start scan. Wait until the scan finishes and, when possible, confirm that the Without a hash counter is 0.
Does the Media Hash Index modify existing files?
No. The scan reads each file and stores its MD5 hash with the attachment. It does not rename, move, replace, compress, or edit the physical media files.
Can I export and import WordPress media files?
Yes. WP Import Export can export WordPress media data to CSV and import media records from CSV where Media support is available in the active edition and configuration.
How do I import WordPress media without duplicates?
Select a stable field under Check for Existing Items by Field. Choose Update or Skip when a matching attachment is found instead of creating another record.
Can the plugin map exported media fields automatically?
Yes. If the CSV was generated by WP Import Export, click Auto Map to match recognized CSV columns with the corresponding WordPress media fields. Review the mapping before starting the import.
What is field mapping?
Field mapping connects each CSV column to a WordPress field. It tells the importer where to save file URLs, titles, captions, descriptions, alt text, authors, and other media values.
Which field should I use to detect duplicate media?
Use a stable and unique value such as a file URL, relative path, or custom source identifier. Attachment titles are less reliable because different files can have the same title.
What should happen when matching media is found?
Select Update to refresh the existing attachment or Skip to leave it unchanged. Selecting Create can produce a duplicate attachment.
What Batch Size should I use for media imports?
Use a Batch Size of 1 on ordinary shared hosting. Dedicated servers with sufficient memory and execution time can use a higher value to process imports faster.
Can I preserve image alt text during import?
Yes. Include alt text in the CSV and map that column to the WordPress alternative-text field during Step 4.