
Moving content between two WordPress websites does not always need an export file. When sites are connected through Content Sync, posts and custom post types can be pushed or pulled directly between them.
WP Import Export Content Sync connects WordPress sites with a secure API key. After the connection is configured, you can sync posts, pages, custom post types, media, featured images, custom fields, and ACF fields where supported by the active setup.
Short Answer
To sync content between two WordPress websites without export files, open Import Export -> Content Sync, copy the API key from the first site, add that site as a connected site on the second site, and repeat the connection in the opposite direction if you need two-way sync.
After the connection is configured, the Sync Content button appears in post and custom post type list screens. You can use it to pull remote posts into the current site, push selected local posts to another site, or pull content from a connected site.
When to Use Content Sync
Use Content Sync when you need to move content between WordPress sites without creating export files. It is especially helpful when the same content needs to exist on staging, production, regional sites, partner sites, or client environments.
Common use cases include:
- Copying approved posts from staging to production.
- Pulling live content back into a staging website.
- Moving custom post type entries between connected websites.
- Syncing posts with featured images and referenced media.
- Updating content across related WordPress installations.
- Moving content with custom fields and ACF fields where supported.
- Reducing manual copy-paste work during launches and migrations.
Content Sync is different from a file-based export/import workflow. It is designed for direct site-to-site movement after the sites are connected.
What WP Import Export Supports
| Task | Supported? | Notes |
|---|---|---|
| Connect two WordPress websites | Yes | Use Content Sync and a secure API key to create a connection. |
| Connect more than two websites | Yes | Add each remote site with a site name, site URL, and API key. |
| Push selected posts to another site | Yes | Select posts in the admin list and use Sync Content. |
| Pull remote posts into the current site | Yes | Use Browse remote posts to choose content from a connected site. |
| Sync a single post from the editor | Yes | Use Sync this post in the post editor sidebar. |
| Sync custom post types | Yes, where available | Supported post types can show the Sync Content workflow in the admin list. |
| Sync media and featured images | Yes, where supported | Referenced media and featured images can be included in the sync workflow. |
| Sync custom fields and ACF fields | Yes, where supported | Useful for structured content models that rely on custom metadata. |
Before You Start
Decide whether the connection should be one-way or two-way. A one-way connection is enough when you only need to copy content from staging to production, or from production to staging. Two-way sync requires configuring the connection on both sites.
You should also confirm that both websites have WP Import Export installed and that the content types you want to sync are available on both sites. For custom post types and ACF fields, the destination site should have the same content structure before syncing.
One-Way Sync vs Two-Way Sync
Use one-way sync when one site is the source and the other site is the destination. For example, a staging site can push approved content to production without production needing to push content back.
Use two-way sync when both sites need to send and receive content. In that case, create the connection on Site A with Site B details, and also create the connection on Site B with Site A details.
Check Content Types and Fields
Before syncing custom post types, make sure the same custom post type exists on the destination site. If the content depends on ACF fields or custom fields, confirm that the field groups and templates are available on both websites.
This matters because the sync can move content data, but the destination site still needs the right content model to display it correctly.
How to Connect Two WordPress Sites for Content Sync
The connection starts on the Content Sync screen. You will use the API key from one site to create a remote site connection on another site.
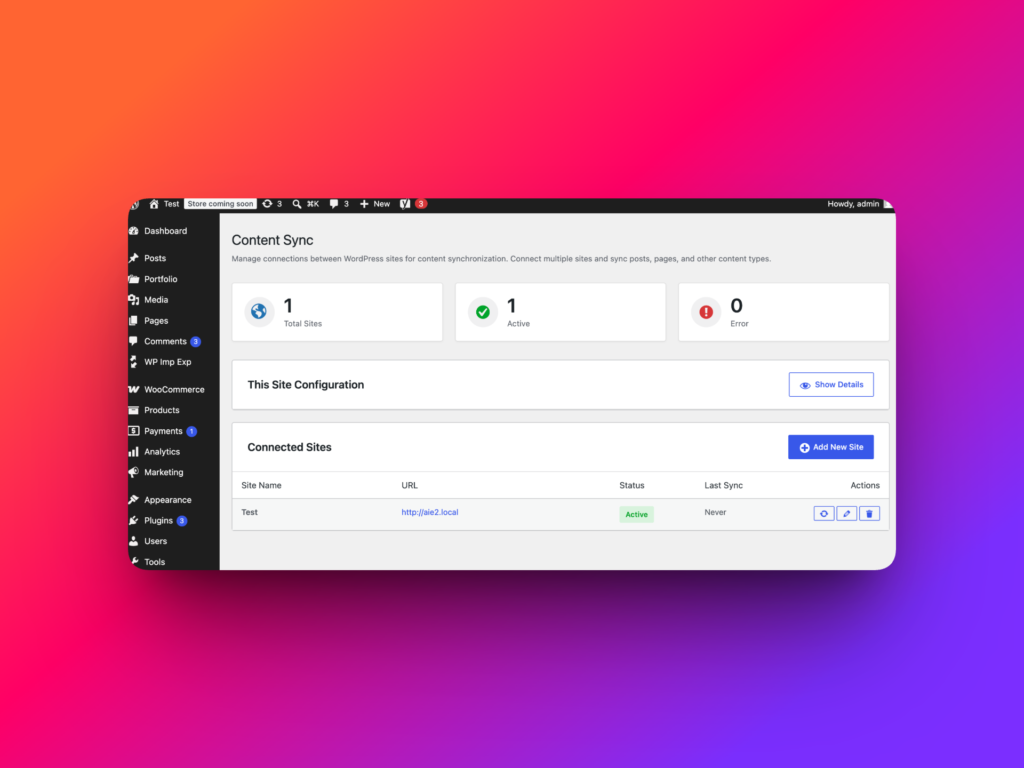
Step 1: Open Content Sync
In the WordPress admin area, open Import Export -> Content Sync. This screen contains the local site configuration and the connected sites list.
Step 2: View This Site Configuration
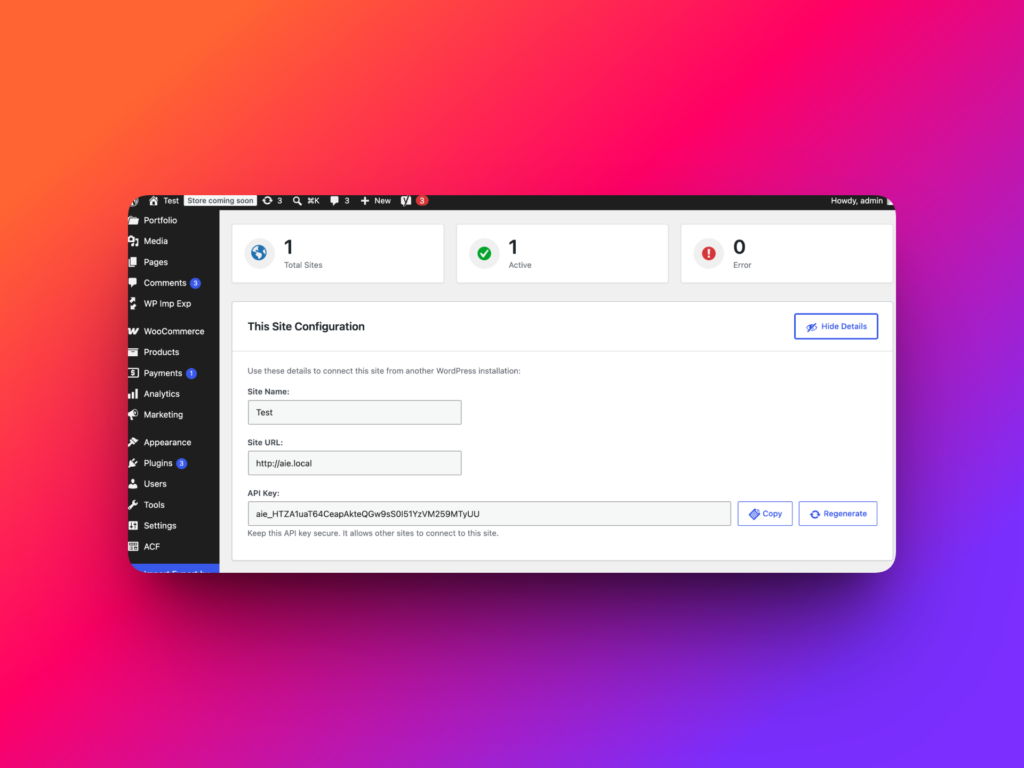
Find the This Site Configuration panel. Click Show details to reveal the unique API key for the current website.
This API key is used by another WordPress site when it needs to connect to this site. Keep it private because it controls access for the sync connection.
Step 3: Add the First Site on the Second Site
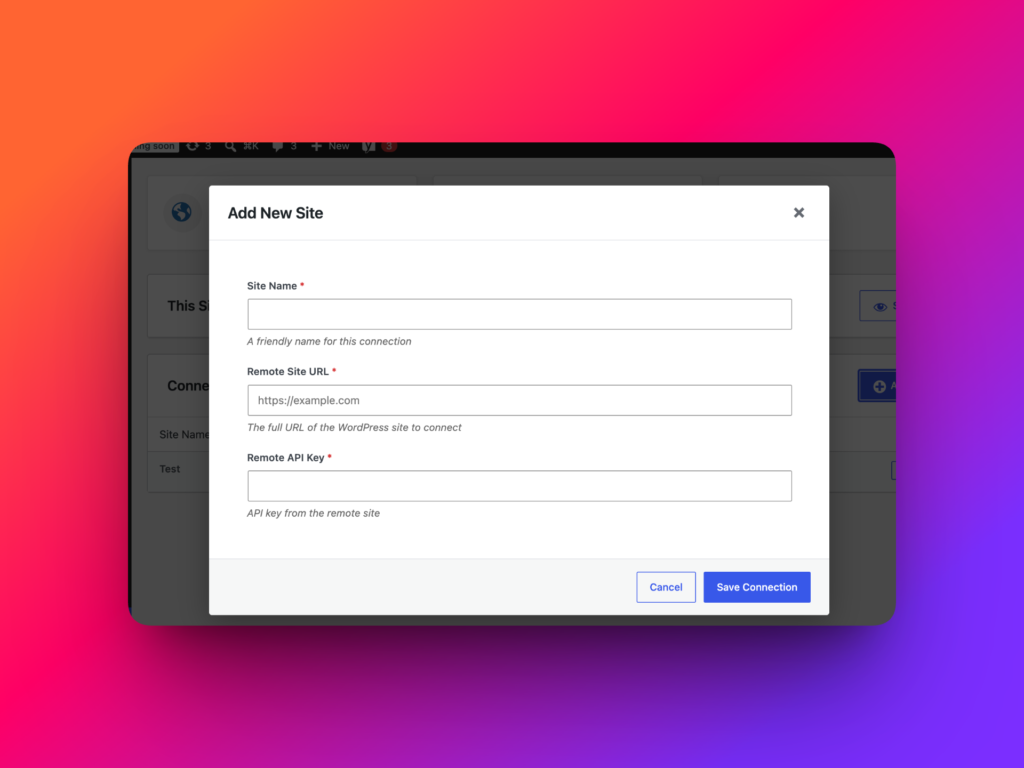
On the second WordPress website, open Import Export -> Content Sync and click Add new site.
Enter the site name, site URL, and API key from the first site. The site name is a label that helps you recognize the connection later. The site URL tells WP Import Export where the remote site is located, and the API key authorizes the connection.
Step 4: Repeat the Connection for Two-Way Sync
If the second site also needs to push or pull content back to the first site, repeat the same setup in the opposite direction.
Open This Site Configuration on the second site, copy its API key, return to the first site, click Add new site, and enter the second site’s name, URL, and API key.
If you only need one-way sync, you can skip this reverse connection. For example, you can copy content from staging to production without allowing production to send content back to staging.
How to Pull Remote Posts into the Current Site
After a site connection is active, WP Import Export adds the Sync Content workflow to supported post and custom post type list screens.
Step 1: Open a Post List Screen
Open a post list such as wp-admin/edit.php. For custom post types, open the relevant admin list screen for that post type.
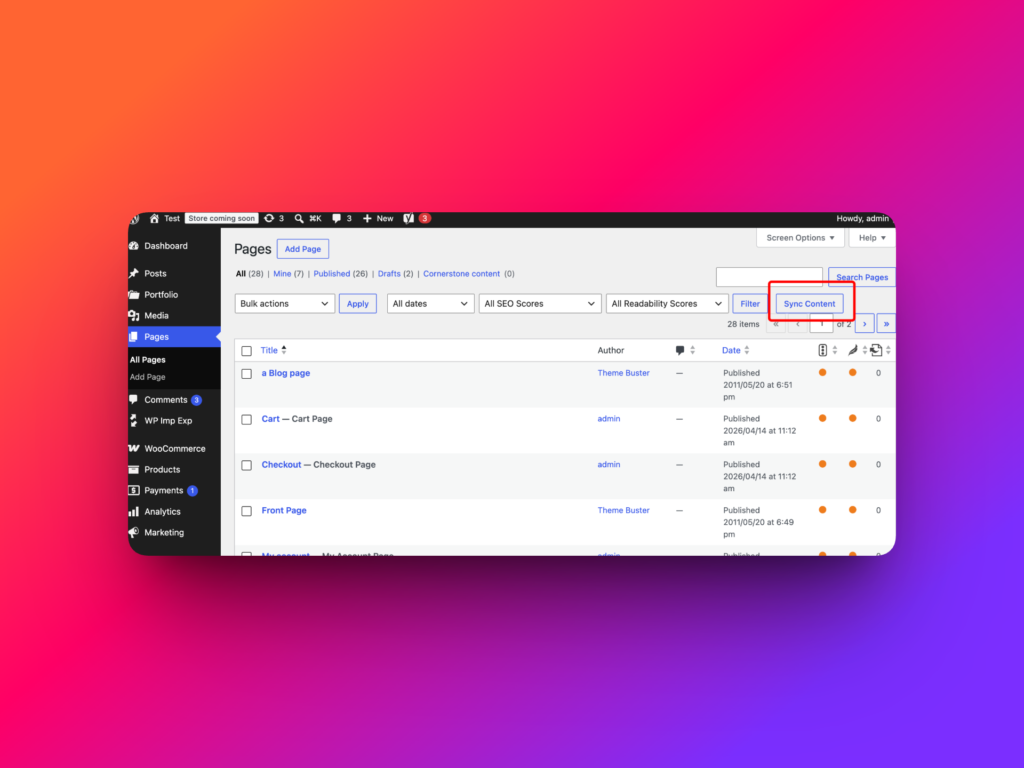
You should see a Sync Content button where the sync workflow is available. The WordPress post list is the same general admin area described in the official WordPress Posts Screen documentation.
Step 2: Click Sync Content
Click Sync Content. A dialog window opens and lets you choose one of the connected sites.
Choose the remote site you want to pull content from.
Step 3: Browse Remote Posts
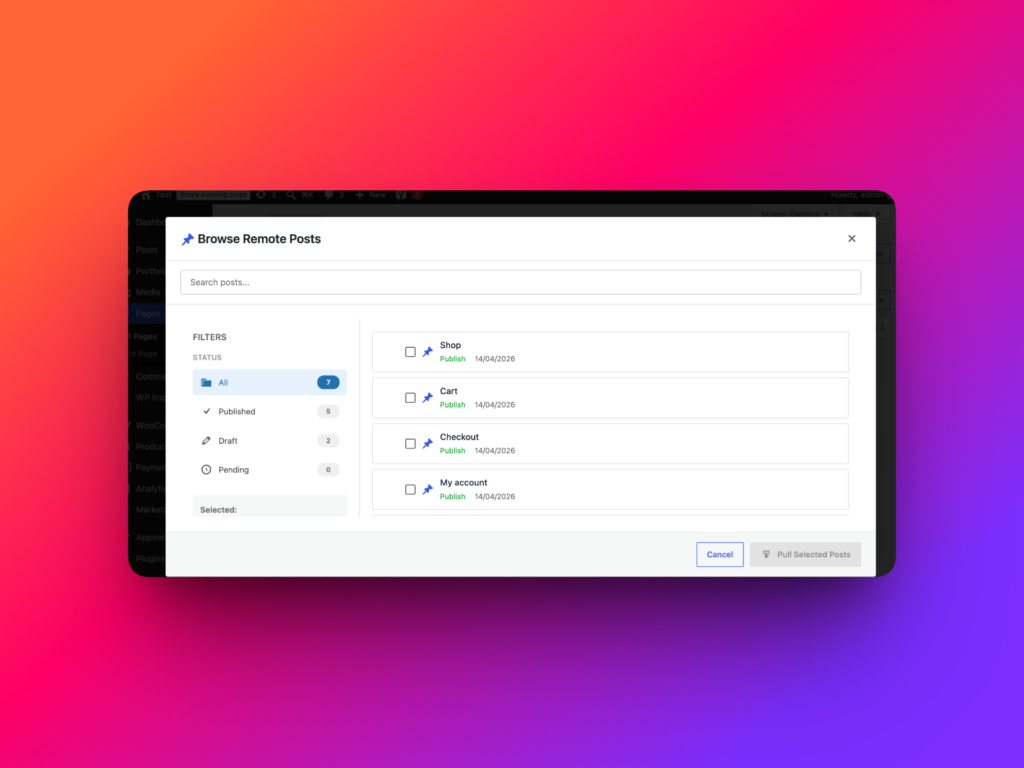
After you choose the connected site, another window appears with Browse remote posts.
Use this screen to view available remote posts. Select one or more posts that should be pulled into the current site.
Step 4: Pull Selected Posts
After selecting the remote posts, pull them into the current WordPress site. WP Import Export will copy the selected content from the connected site.
Review the imported content after the pull. Check titles, body content, featured images, media, custom fields, ACF fields, taxonomy terms, and frontend output.
How to Push or Pull Selected Local Posts
You can also select local posts first and then decide whether to push them to a connected site or pull matching content from that site.
Step 1: Select Posts in the List
Open the supported post list screen and select one or more posts with the checkboxes.
Only select content that you actually want to sync. This is especially important when moving updates from staging to production.
Step 2: Click Sync Content
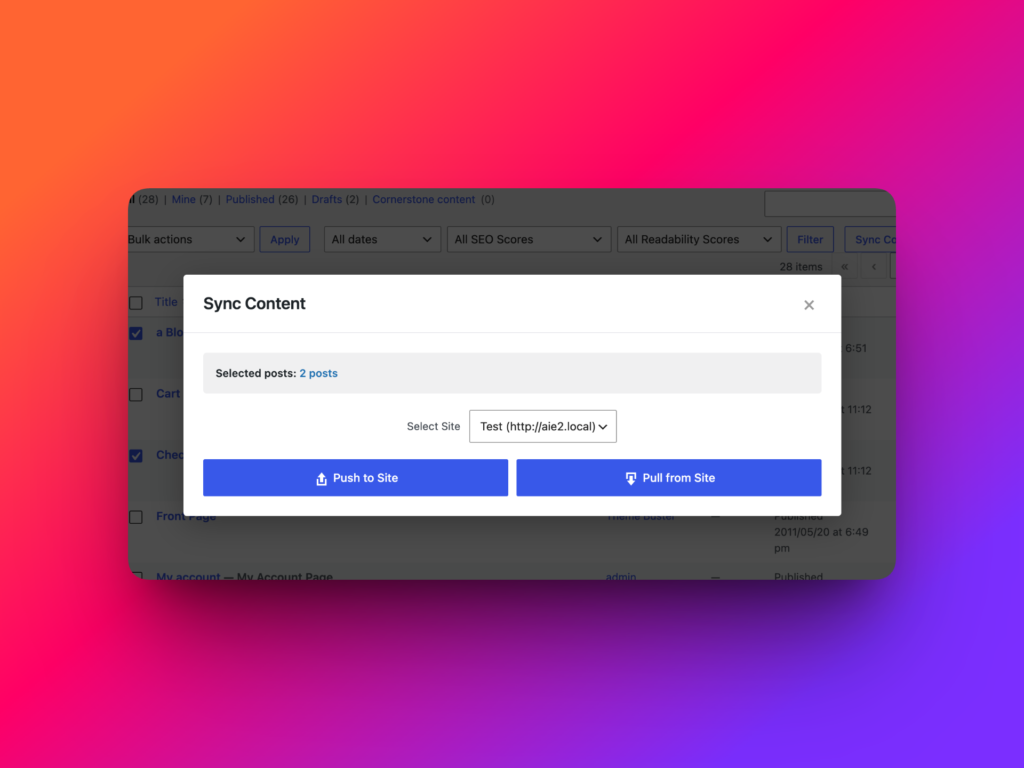
After selecting posts, click Sync Content. The dialog will show two workflow options: Push to site and Pull to site.
Step 3: Choose Push to Site
Choose Push to site when the selected local posts should be sent to another connected WordPress site.
This is useful when content has been prepared on staging and needs to be copied to production.
Step 4: Choose Pull to Site
Choose Pull to site when the current site should receive the matching remote version of the selected content.
This is useful when you need to refresh staging with content from production or compare local content against the connected site.
How to Sync a Single Post from the Editor
WP Import Export also supports single-post sync from the post editor. This is useful when you are editing one post and want to push or pull only that item.
Step 1: Open the Post Editor
Open a post edit screen such as wp-admin/post.php?post=1&action=edit.
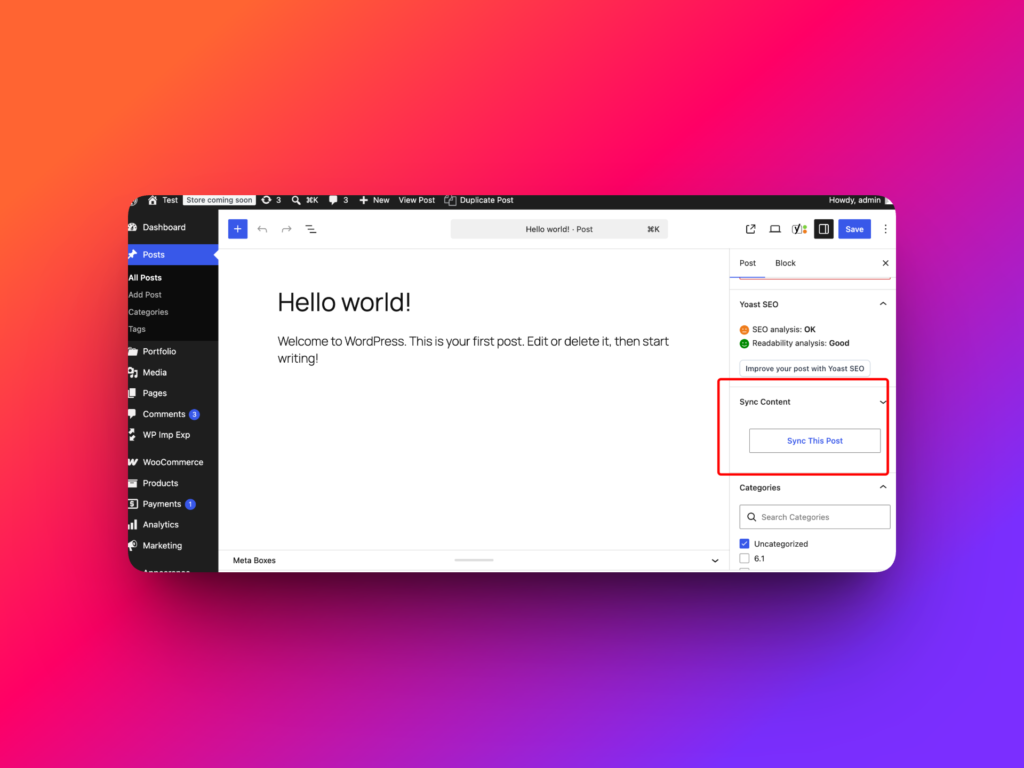
In the right sidebar, look for the Sync this post button.
Step 2: Click Sync This Post
Click Sync this post. A dialog opens and lets you choose whether to pull or push the current post.
This workflow is useful when you are reviewing one content item and do not need a bulk sync from the posts list.
Step 3: Push or Pull the Current Post
Choose the connected site and direction that matches the workflow. Use push when the current post should be sent to another site. Use pull when the current post should be updated from the connected site.
After the sync, review the post content, media, featured image, fields, and frontend display.
What Gets Synced
Content Sync can move the main post data and related content details where supported by the active setup. This helps the copied content behave more like native WordPress content on the destination site.
Depending on the site configuration, synced data can include:
- Post title and main content.
- Pages and supported custom post types.
- Featured image.
- Referenced media.
- Custom fields.
- ACF fields where supported.
- Content relationships and metadata where supported by the active setup.
Always test custom content models before relying on a production sync. Complex ACF structures, custom templates, or plugin-specific metadata may need validation on the destination site.
Example: Push Content from Staging to Production
Suppose your team drafts content on a staging site and publishes final content on production. You can connect the production site to staging with Content Sync.
A practical workflow would be:
- Open
Import Export -> Content Syncon staging. - Click Show details and copy the staging API key.
- Open
Import Export -> Content Syncon production. - Click Add new site.
- Enter the staging site name, staging URL, and staging API key.
- Return to the staging posts list.
- Select the posts that are ready for production.
- Click Sync Content.
- Choose Push to site and select production.
- Review the synced posts on production.
This avoids a manual export file and lets the team move selected content through a direct site-to-site workflow.
Example: Pull Production Content into Staging
If staging is out of date, you can use Content Sync to pull selected production posts into staging.
A practical workflow would be:
- Connect production as a remote site on staging.
- Open the staging posts list.
- Click Sync Content.
- Select the production site.
- Open Browse remote posts.
- Select one or more production posts.
- Pull them into staging.
- Review content, featured images, media, custom fields, and ACF fields.
This is useful when editors need realistic production content while testing changes on staging.
Common Mistakes
The most common mistake is configuring only one direction when the team expects two-way sync. If both sites need to send content to each other, configure the connection on both sites.
Another mistake is syncing custom post types before confirming that the destination site has the same post type and field structure. The destination site should be prepared before moving structured content.
Do not share API keys publicly. The API key is part of the secure connection between sites and should only be used inside trusted WordPress admin configurations.
Also avoid pushing unreviewed staging content directly to production. Use checkboxes carefully, confirm the selected posts, and review the destination content after sync.
Best Practices for Syncing WordPress Sites
- Use one-way sync when only one site should send content.
- Use two-way sync only when both sites need to push and pull content.
- Keep API keys private.
- Test the connection with a small post before syncing many items.
- Confirm that custom post types exist on both sites.
- Confirm that ACF field groups and templates exist on the destination site.
- Review featured images and referenced media after sync.
- Use the post editor sync button for single-post updates.
- Use the posts list Sync Content button for bulk push and pull workflows.
Recommended Links
FAQ
Can I sync WordPress sites without export files?
Yes. WP Import Export Content Sync connects WordPress sites with a secure API key, so you can push or pull content without downloading and uploading export files.
Where do I configure Content Sync?
Open Import Export -> Content Sync in the WordPress admin area. The direct admin URL may look like wp-admin/admin.php?page=rsl-ie-content-sync.
How do I connect another WordPress site?
Click Add new site, then enter the remote site name, site URL, and API key from that site’s This Site Configuration panel.
Do I need to configure both sites?
Only if you need two-way sync. For one-way sync, configure the destination or source connection needed for your workflow.
Can I sync custom post types?
Yes, supported custom post types can be synced where available in the active setup. The destination site should have the same custom post type registered.
Can Content Sync move media and featured images?
Yes, WP Import Export can sync referenced media and featured images where supported by the active setup.
Can Content Sync move ACF fields and custom fields?
Yes, custom fields and ACF fields can be synced where supported. Complex field structures should be tested before production syncs.
Can I sync a single post from the editor?
Yes. Open the post editor and use the Sync this post button in the right sidebar to push or pull the current post.