
Bulk edits can create duplicates when they are handled as imports instead of updates. Content Updater avoids that problem by modifying existing WordPress records directly.
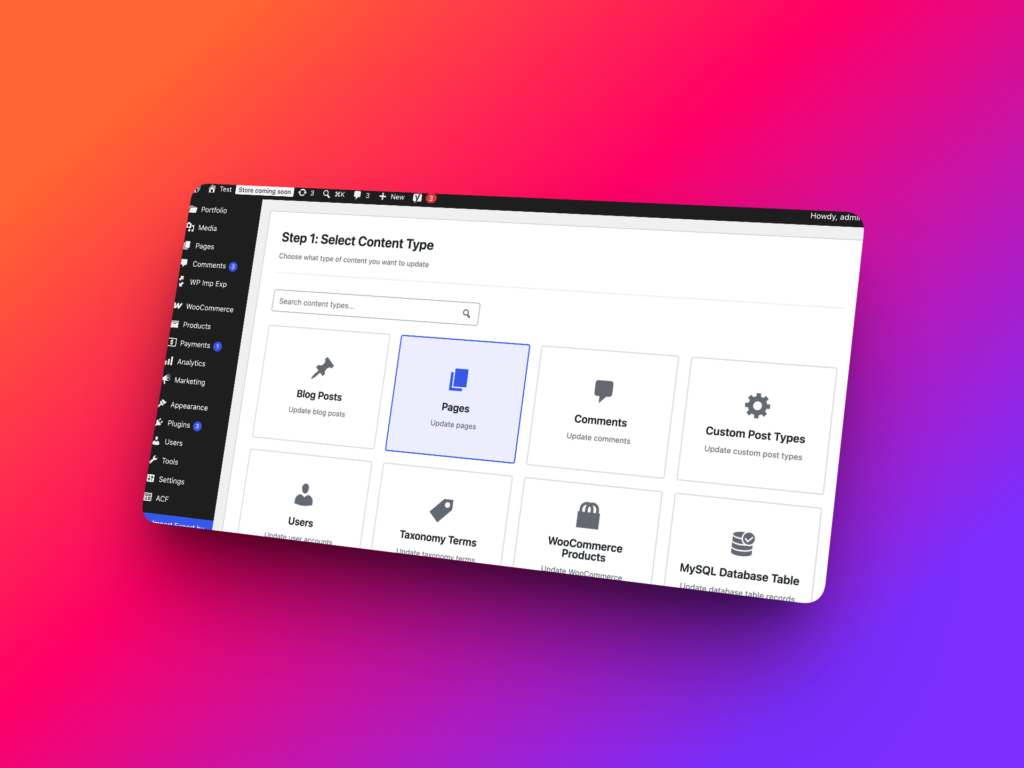
With WP Import Export Content Updater, you choose a content type, filter the records to update, select the fields, assign transformation functions, and process the changes in batches. This is useful for updating existing posts without creating new duplicate posts. This feature available in PRO Add-on.
Short Answer
To bulk update WordPress posts without duplicates, open Import Export -> Content Updater, choose Posts, filter the posts if needed, select the fields to update, assign transformation functions to those fields, choose the number of items per iteration, and start the update.
Content Updater changes existing WordPress records directly. Always back up the database or test on staging before running bulk updates on production.
When to Use Content Updater
Use Content Updater when you need to change existing posts in bulk. It is designed for update workflows where creating new posts would be the wrong outcome.
Common use cases include:
- Changing post titles across many existing posts.
- Updating draft posts before publishing.
- Cleaning old content or metadata.
- Replacing text patterns inside selected fields.
- Applying consistent formatting to titles, excerpts, or custom fields.
- Updating ACF fields where supported by the active setup.
- Running controlled batch updates instead of manual editing.
For example, you can filter posts where post_status = draft, choose Post title, assign a function that converts titles to uppercase, and update only those matching draft posts.
What WP Import Export Supports
| Task | Supported? | Notes |
|---|---|---|
| Bulk update existing posts | Yes | Use Import Export -> Content Updater and choose Posts. |
| Filter records before updating | Yes | Step 2 can limit updates to matching records, such as draft posts. |
| Select fields to update | Yes | Step 3 lets you choose fields such as Post title. |
| Assign transformation functions | Yes | Step 4 applies functions to the selected fields (available in PRO Add-on). |
| Control batch size | Yes | Step 5 uses Items per Iteration to control processing size. |
| Update without creating duplicates | Yes | Content Updater modifies existing records instead of creating new posts. |
Before You Start
Bulk update WordPress posts carefully because Content Updater directly modifies database records. A small mistake in filters, selected fields, or assigned functions can update more posts than intended.
Before running the update, back up the database or use a staging site. Test the workflow on a small filtered set first, then apply the same update to a larger group after confirming the result.
Why This Avoids Duplicate Posts
Duplicate posts often happen when existing content is imported again without a reliable matching rule. Content Updater avoids that problem because it works on records that already exist in WordPress.
Instead of creating new posts, it selects existing posts and updates only the fields you choose. This makes it a better workflow for formatting cleanup, content corrections, and metadata changes.
Plan the Update Rule
Before opening Content Updater, decide exactly which posts should change and which field should be updated. For example, you might want to update only draft posts and only change the Post title field.
You should also decide what function should be applied. A title function might convert text to uppercase, trim extra spaces, replace old words, or standardize a naming pattern.
Step-by-Step Workflow
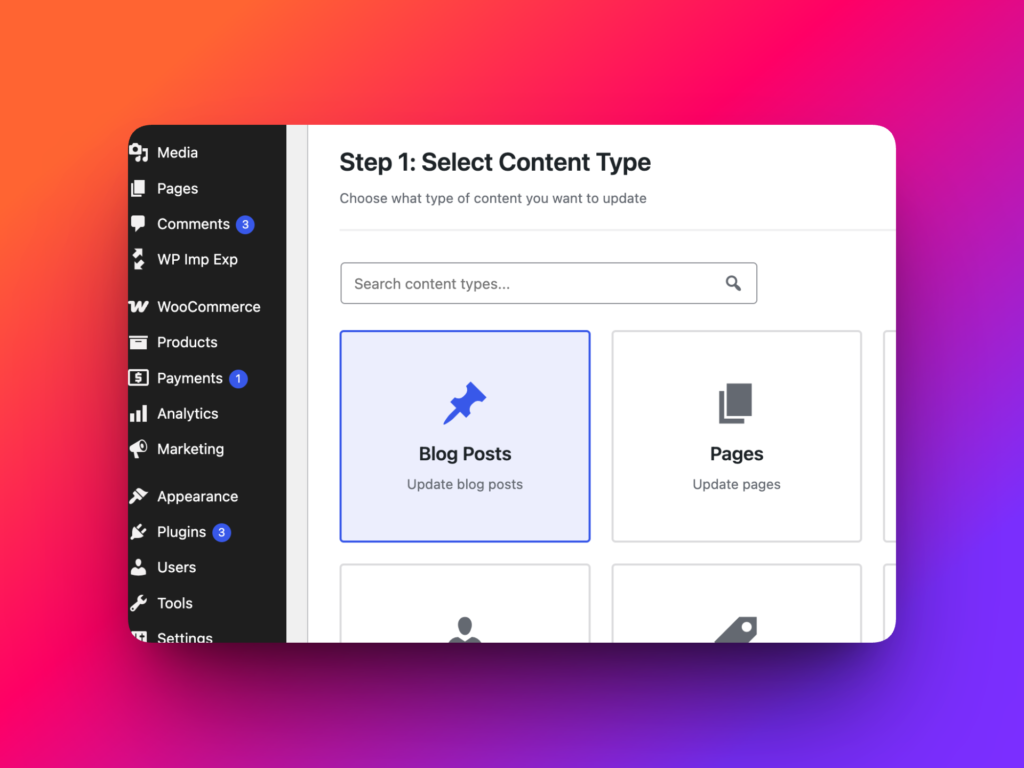
Step 1: Open Content Updater and Choose Posts
In the WordPress admin area, go to Import Export -> Content Updater.
Choose the content type you want to update. For this example, select Posts.
Step 2: Filter Data Optional
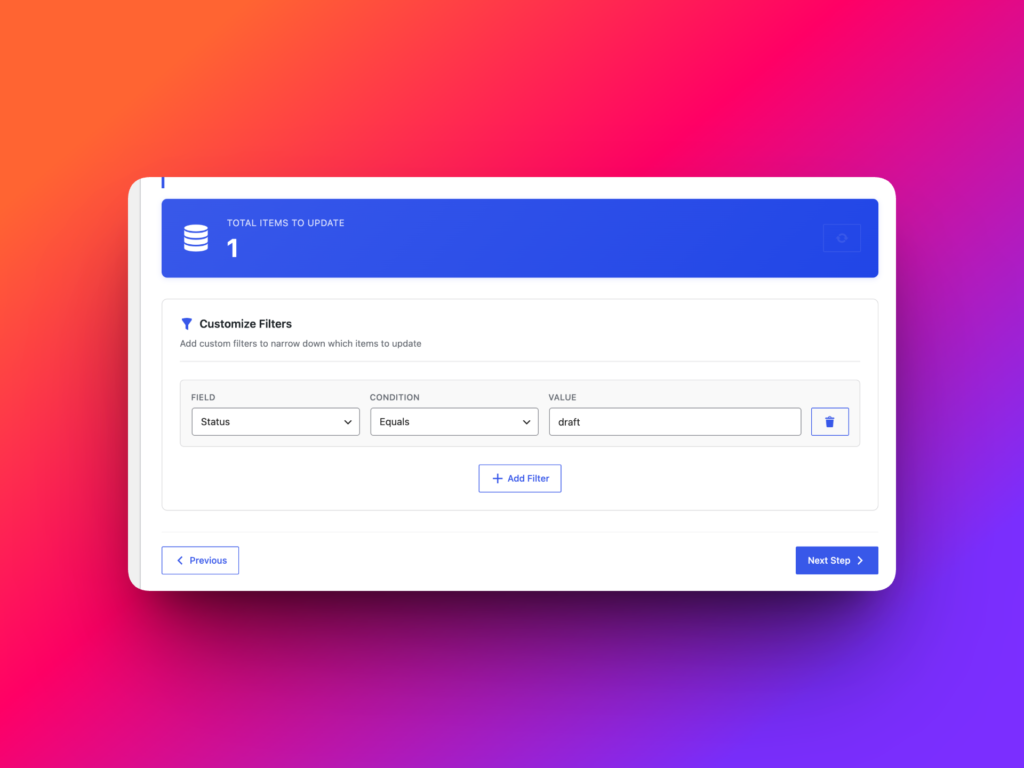
In Step 2: Filter Data (Optional), choose which posts should be updated. Filters are optional, but they are strongly recommended for controlled updates.
For example, you can filter posts where status = draft. In that case, only draft posts will be updated, while published posts and other statuses will stay unchanged.
Step 3: Select Fields to Update
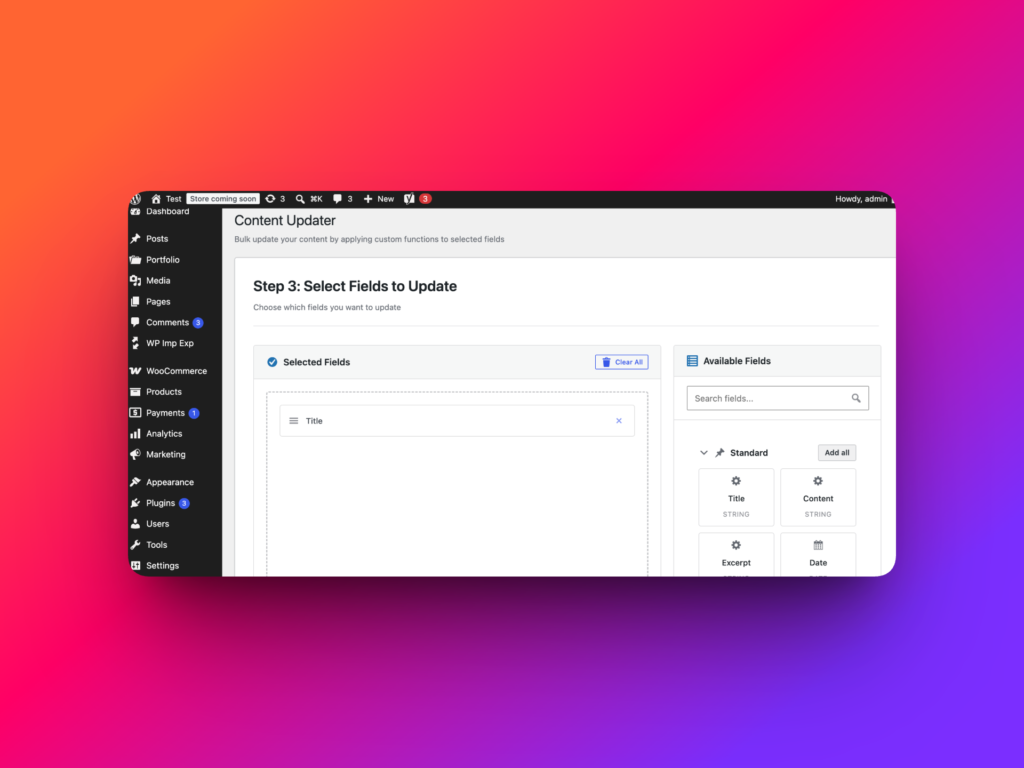
In Step 3: Select Fields to Update, choose the fields that should be changed.
For example, select Post title if the update should only change post titles. Avoid selecting fields that do not need to be modified.
Step 4: Assign Functions to Fields (PRO Add-on)
In Step 4: Assign Functions to Fields, assign a transformation function to each selected field.
For example, assign a function that converts the Post title value to uppercase. When the update runs, the function will read each selected post title, transform it, and save the updated title back to the existing post.
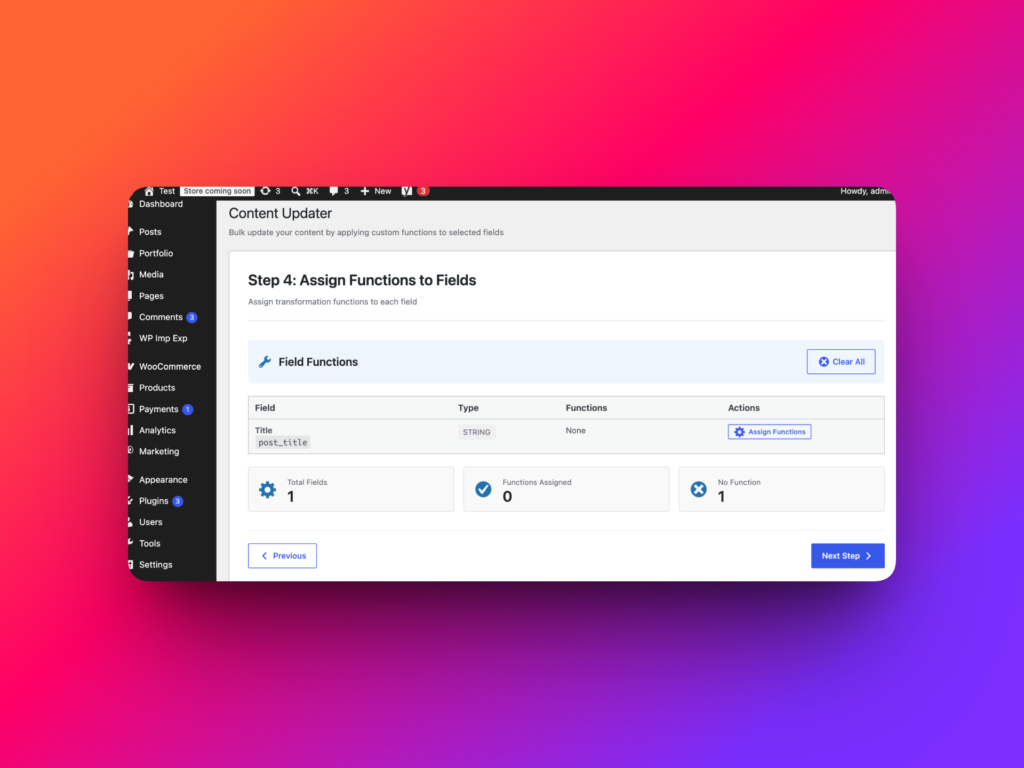
Example Function: Convert Post Titles to Uppercase
A simple uppercase function could look like this:
function uppercase_post_title( $value, $row ) {
    return strtoupper( (string) $value );
}
Use a function like this only after testing it with sample values. If your titles include multilingual text, special characters, or title casing rules, test the result carefully before applying it in bulk.
Step 5: Choose Items per Iteration and Start Update
In Step 5, choose Items per Iteration. This controls how many posts are processed in each batch.
For example, set Items per Iteration to 10 to update 10 posts per batch. Smaller batches can be safer on limited hosting environments and easier to monitor during testing.
Click Start update. WP Import Export will update the selected fields in the selected posts according to the functions assigned in Step 4.
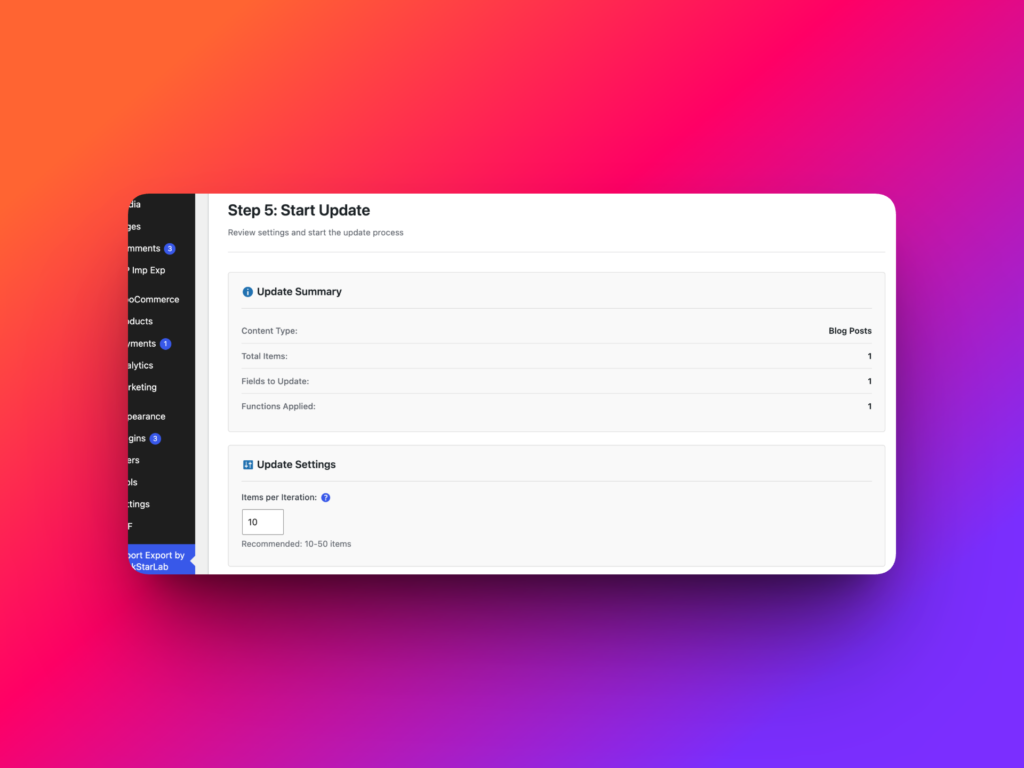
Example: Uppercase Draft Post Titles
Suppose you want to bulk update WordPress posts that are still drafts and convert their titles to uppercase.
A safe workflow would be:
- Open
Import Export -> Content Updater. - Choose Posts as the content type.
- In Step 2, filter posts where
status = draft. - In Step 3, select Post title.
- In Step 4, assign an uppercase transformation function to Post title.
- In Step 5, set Items per Iteration to
10. - Click Start update.
- Review several updated draft posts in the WordPress admin.
The result is an update to existing draft posts only. No new duplicate posts are created because Content Updater modifies the selected records directly.
Using Content Updater with Custom Fields and ACF
Content Updater can also be useful when existing posts use custom fields or ACF fields where supported by the active setup. For example, you might normalize a subtitle field, replace old values in a text field, or set fallback values for missing metadata.
WP Import Export supports mapping and updating Advanced Custom Fields where supported by the active setup, including ACF PRO fields such as Flexible Content where available. Complex ACF field structures should always be tested on staging before production updates.
When updating structured fields, keep the transformation function focused and test with realistic values. A field-specific function is safer than a broad function that changes many formats at once.
Common Mistakes
The most common mistake is running Content Updater without a backup. Because the workflow directly changes existing posts, you need a rollback plan before updating production content.
Another mistake is skipping filters. If you only want to update draft posts, add a draft status filter before selecting fields and starting the job.
Do not select more fields than necessary. If the goal is to update titles, select only Post title.
Also avoid assigning an untested function to a large update. Test the function first, use a small filtered set, and review the results before processing more posts.
Best Practices for Bulk Updating WordPress Posts
- Back up the database before running Content Updater.
- Use staging for large or sensitive updates.
- Filter records in Step 2 when only some posts should change.
- Select only the fields that need to be updated.
- Assign one clear transformation function per selected field.
- Test transformation functions with sample values first.
- Use a small Items per Iteration value for the first run.
- Review updated posts before applying the same workflow broadly.
Recommended Links
FAQ
Can I bulk update WordPress posts without creating duplicates?
Yes. Use WP Import Export Content Updater to modify existing posts directly instead of importing content as new posts.
Where do I find Content Updater?
Open the WordPress admin area and go to Import Export -> Content Updater.
Can I update only draft posts?
Yes. In Step 2, add a filter such as status = draft so only matching draft posts are updated.
Can I choose which fields are updated?
Yes. Step 3 lets you select the exact fields to update, such as Post title.
How are fields changed during the update?
In Step 4, assign transformation functions to selected fields. The function changes the existing field value and saves the updated result.
What does Items per Iteration mean?
Items per Iteration controls how many posts are processed in each batch. Smaller values can be safer for testing or limited hosting environments.
Should I back up the site before using Content Updater?
Yes. Content Updater directly modifies existing records, so you should back up the database or test on staging before production updates.