
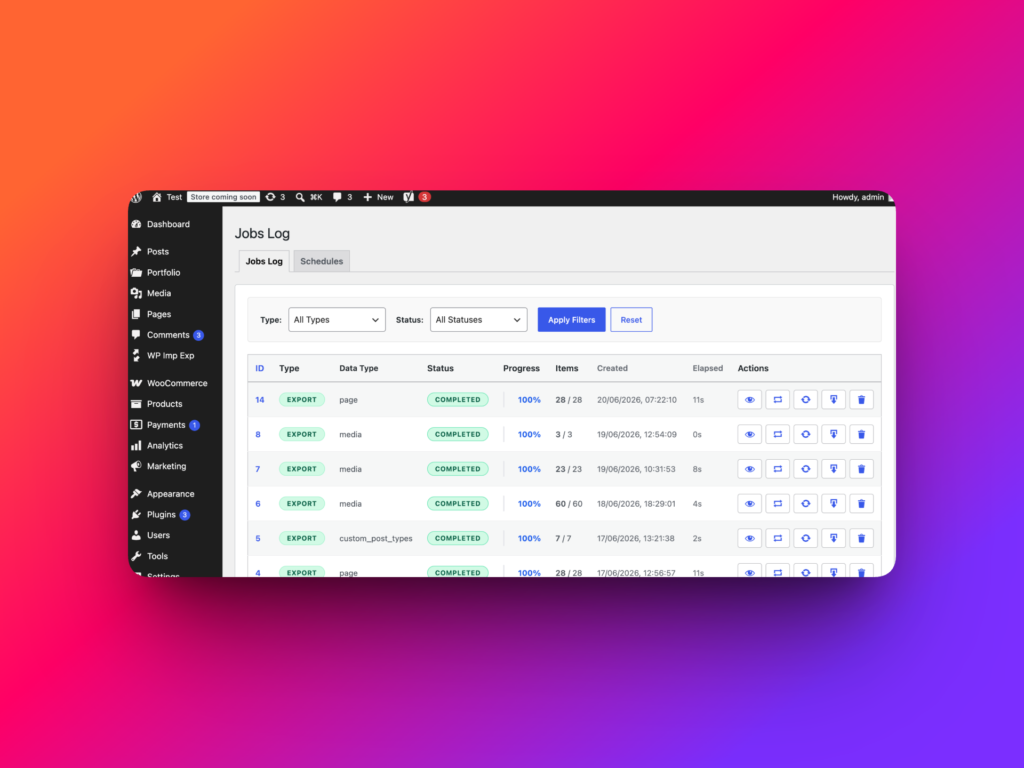
WordPress Jobs Log in WP Import Export by RockStarLab stores the history and current state of import, export, Media Sync, Content Sync, and Content Updater operations. It helps you monitor progress, inspect errors, download completed exports, and reuse previously configured jobs.
With the new Schedules feature, selected Jobs Log operations can also run automatically. You can schedule a supported job once at a future time or repeat it hourly, twice daily, daily, or weekly.
What Is Jobs Log?
Every time WP Import Export starts a supported operation, it creates a job. The job contains the operation configuration, processing status, progress, results, timestamps, and other information required to understand what happened.
Jobs Log provides one place to view and manage these operations. Instead of waiting on the original Import, Export, Media Sync, Content Sync, or Content Updater page, you can return to Jobs Log and check the process later.
Open it from:
Import Export -> Jobs Log
Why Jobs Log Is Useful
Import and export operations may process thousands of records or large media files. Jobs Log makes these background operations easier to monitor and manage.
You can use Jobs Log to:
- Check whether a job is pending, processing, completed, paused, cancelled, or failed.
- Monitor the number of processed and successful items.
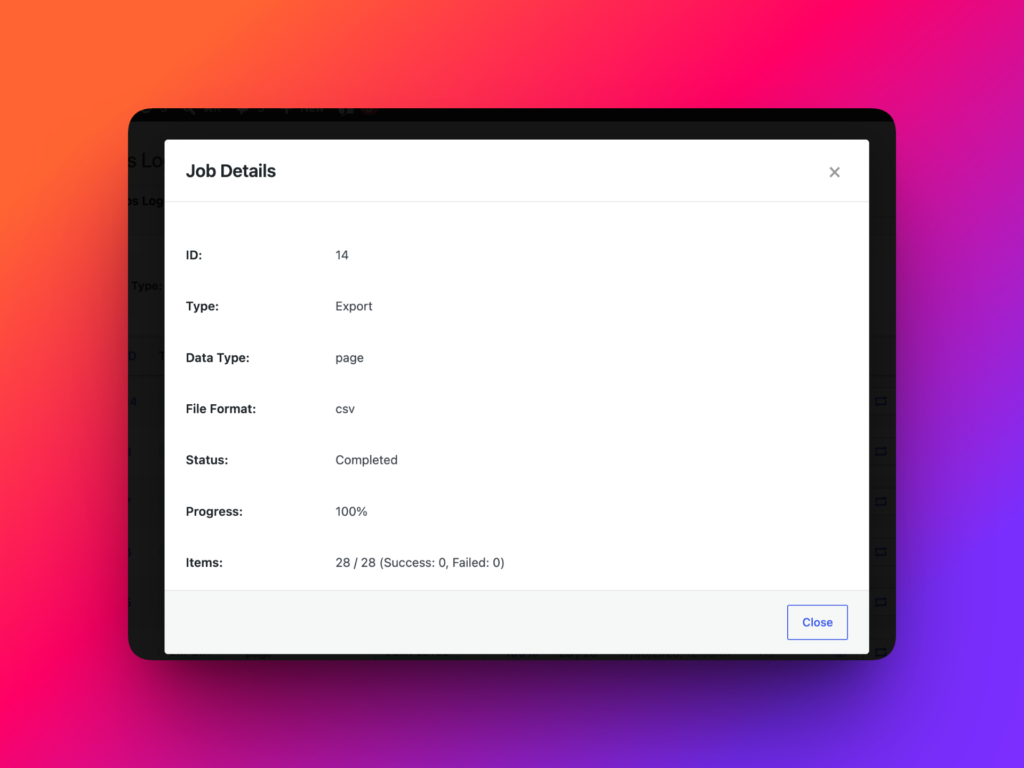
- Review job configuration and execution details.
- Inspect errors from completed or failed operations.
- Resume a paused operation.
- Restart or retry a job without rebuilding the complete workflow.
- Download files generated by completed export jobs.
- Cancel an operation that is still running.
- Delete old job records.
- Use a saved job as the source for a new schedule.
Jobs Log is more than a history screen. Saved jobs can be reused as templates for manual reruns and automatic schedules.
Which Operations Appear in Jobs Log?
| Operation | Saved in Jobs Log? | Example |
|---|---|---|
| Import | Yes | Import posts, media, products, users, or other supported data from CSV. |
| Export | Yes | Export WordPress data to CSV or JSON. |
| Media Sync | Yes | Register files found in a server folder in the Media Library. |
| Content Sync | Yes | Move supported content between connected WordPress websites. |
| Content Updater | Yes | Apply transformation functions to existing WordPress records (PRO Add-on). |
Information Available in Jobs Log
The exact columns and details can depend on the job type, but Jobs Log can include:
- Job ID: a unique identifier for the operation.
- Type: import, export, sync, update, or another supported operation.
- Data type: posts, pages, media, products, users, database tables, or another supported content type.
- File format: the selected CSV or JSON format where applicable.
- Status: the current state of the job.
- Progress: how much of the operation has been processed.
- Item counts: total, processed, successful, skipped, or failed items where available.
- Timestamps: when the job was created, started, updated, and completed.
- Duration: how long the operation took.
- File information: file name, location, or size where applicable.
- Parameters: filters, field mapping, transformation functions, duplicate options, and other saved settings.
- Details: additional results and error information.
Understanding Job Statuses
| Status | Meaning | Recommended action |
|---|---|---|
| Pending | The job is waiting in the processing queue. | Wait for background processing to start. |
| Processing | The job is currently processing records. | Monitor its progress. |
| Completed | All required processing finished successfully. | Review the results or download the export file. |
| Completed with errors | The job finished, but some items could not be processed. | Open the details and review failed items. |
| Paused | Processing has stopped temporarily. | Resume the job when appropriate. |
| Failed | The job stopped because of an error. | Review the error and retry after fixing its cause. |
| Cancelled | The job was manually or programmatically stopped. | Restart it only if the operation is still required. |
How to View Job Details
Open Import Export -> Jobs Log and locate the required job. Use its details action to inspect the saved configuration and processing results.
Job details are useful when you need to check:
- Which content type was processed.
- Which file was imported.
- Which filters were used during export.
- How CSV columns were mapped.
- Which transformation functions were assigned.
- How duplicate items were handled.
- How many records succeeded or failed.
- Why an operation stopped.
Jobs Log Actions
Resume a Paused Job
Use Resume when a paused job should continue from its saved processing state. This is useful for large operations that were intentionally paused or interrupted.
Restart a Job
Restart creates a new job based on the original configuration. Use it when the entire operation should run again from the beginning.
For example, you can restart an export after WordPress data has changed or rerun a configured import after replacing its source CSV.
Retry a Failed Job
Retry creates a new attempt using the saved job parameters. Review and resolve the original error before retrying; otherwise, the new job may fail for the same reason.
Download an Export File
Completed export jobs provide a download action when the generated file is available. This makes Jobs Log the central place for retrieving CSV and JSON exports after background processing finishes.
Cancel a Running Job
Cancel an operation when it was started with incorrect settings or is no longer required. Review the website after cancellation because records processed before the cancellation may already have been created or changed.
Delete an Old Job
Delete old jobs when their history and files are no longer needed. Do not delete a Source Job while an active schedule depends on it. Remove the schedule first.
New Feature: Schedules for Saved Jobs
The new Schedules feature extends Jobs Log with automatic execution. A supported job can now run once at a selected future time or recur at a regular interval.
Schedules support these Source Job types:
- Import
- Export
- Media Sync
- Content Updater
Complete and verify the operation before using it as a Source Job. Pending and currently processing jobs cannot be selected for a new schedule.
How Scheduled Jobs Work
A schedule reuses the configuration stored in a Source Job. When an occurrence becomes due, WP Import Export creates a separate job and adds it to the normal background processing queue.
The original Jobs Log entry is not modified. Every scheduled occurrence receives its own Job ID, status, progress, timestamps, and results.
This approach provides a clear history:
- The Source Job preserves the original configuration.
- Each occurrence appears as a separate Jobs Log entry.
- Completed export occurrences create separate downloadable files.
- The schedule records its next and most recent execution.
Each scheduled occurrence creates a new job with the same configuration; the Source Job is never overwritten.
Available Schedule Types
| Run type | Repeat option | Typical use |
|---|---|---|
| One time | Not used | Run a prepared job once at a future date and time. |
| Recurring | Hourly | Process frequently changing data or server files. |
| Recurring | Twice daily | Refresh data every twelve hours. |
| Recurring | Daily | Create daily exports or run regular imports. |
| Recurring | Weekly | Generate weekly reports or perform periodic maintenance. |
How to Create a Job Schedule
Step 1: Complete and Verify the Source Job
Configure the Import, Export, Media Sync, or Content Updater operation as usual. Run it once and review the result under Import Export -> Jobs Log.
Confirm that:
- The correct content type was selected.
- Filters select the intended records.
- Field mappings are correct.
- Transformation functions return the expected values.
- Duplicate handling matches the workflow.
- The source file or folder remains available.
- The operation completes successfully.
Step 2: Open Schedules
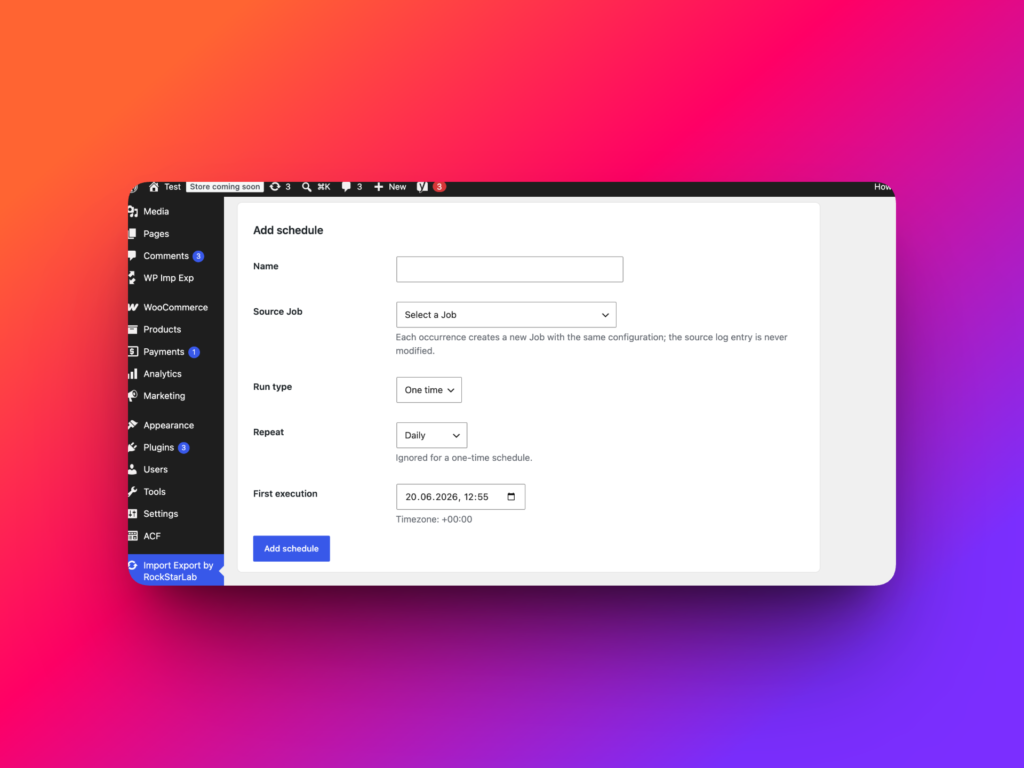
Go to Import Export -> Schedules. This screen contains the Add schedule form and the list of existing schedules.
Step 3: Enter a Schedule Name
Enter a descriptive name that makes the automation easy to identify.
Examples include:
Daily WooCommerce product exportWeekly published posts reportNightly supplier CSV importHourly SFTP media syncOne-time campaign content import
If the field is empty, WP Import Export creates a default name based on the Source Job ID.
Step 4: Select the Source Job
Open the Source Job list and choose the saved job whose configuration should be reused.
The list identifies available jobs by their Job ID, operation type, data type, and status. Select the job you tested and approved in Jobs Log.
Step 5: Choose the Run Type
Select one of the following options:
- One time: run the job once at a selected future date and time.
- Recurring: repeat the job according to the selected interval.
Step 6: Choose the Repeat Interval
For a recurring schedule, choose:
- Hourly
- Twice daily
- Daily
- Weekly
The Repeat setting is ignored when Run type is set to One time.
Step 7: Set the First Execution
Choose the future date and time for the first occurrence. The Schedules form shows the WordPress timezone used to interpret this value.
Check the timezone carefully when the website, server, and administrator operate in different regions.
Step 8: Add the Schedule
Click Add schedule. The new schedule appears in the Existing schedules table.
The table displays:
- Name
- Source Job
- Schedule
- Next run
- Last run
- Status
- Actions
How to Manage Existing Schedules
Every schedule includes these actions:
- View: inspect the complete schedule configuration.
- Edit: change the name, Source Job, Run type, recurrence, or execution time.
- Delete: remove the schedule and cancel its future cron event.
Deleting a schedule does not delete the Source Job or Jobs Log entries created by previous occurrences.
After a schedule runs, the Last run column links to the most recently created Job ID. Open that job in Jobs Log to review its results.
Useful Schedule Examples
Daily Product Export
Configure a WooCommerce product export with the required fields, filters, transformations, and CSV options. Run it successfully, then create a daily schedule from the completed export job.
Each occurrence exports current product data and creates a separate downloadable file in Jobs Log.
Weekly Editorial Report
Schedule a weekly export of published posts, authors, dates, categories, custom fields, and Yoast SEO metadata. Editors can download the latest report from Jobs Log without rebuilding the export.
Recurring Supplier Import
A supplier can replace a CSV file in a stable server location every day. A scheduled import then processes that file using the saved mapping and duplicate-handling rules.
The replacement CSV must keep the same delimiter, columns, encoding, and structure expected by the Source Job.
Automatic Media Sync
If another system regularly uploads images through FTP or SFTP, schedule Media Sync to scan the configured server folder and register new files in the WordPress Media Library.
Make sure the source folder remains available and review File Operation and duplicate settings before creating the schedule.
Future Content Launch
Prepare a CSV import in advance and select a one-time execution date. This can help launch posts, pages, products, or other supported content at a planned time.
Recurring Content Update
Schedule Content Updater when the same tested transformation must be applied regularly to records matching specific filters.
Content Updater modifies database records directly. Create a backup and make sure every transformation function is safe to run repeatedly.
Preventing Overlapping Scheduled Jobs
WP Import Export prevents overlapping runs of the same schedule. If the previous generated job is still pending or processing when the next occurrence becomes due, another simultaneous job is not created for that schedule.
This protection prevents large imports, exports, media scans, or updates from running over each other and consuming unnecessary server resources.
Schedules and WordPress Cron
Schedules use WP-Cron, the scheduling system built into WordPress. WP-Cron normally checks for due tasks when the website receives a page request.
On a low-traffic website, an occurrence may start later than the displayed execution time. For automation that must begin close to an exact time, configure the hosting server to call WordPress cron regularly.
See the official WordPress Plugin Handbook documentation about WP-Cron for more information.
Important Scheduling Considerations
Keep Import Files Available
Scheduled imports reuse the file connected to the Source Job. Do not delete or move that file while the schedule is active.
Preserve the CSV Structure
If an external system replaces the CSV, keep its delimiter, headers, encoding, and field structure consistent with the saved field mapping.
Use Repeatable Transformation Functions
A recurring transformation must be safe to apply more than once. A function that adds a prefix without checking for an existing prefix could create values such as:
SALE-SALE-SALE-Product titleReview Media Sync File Operations
Scheduled Media Sync reuses the original folder and settings. If the previous operation moved or deleted source files, later occurrences may not find them.
Choose a Suitable Frequency
A large job should not run hourly when the underlying data changes only once per week. Select a frequency that balances freshness with server resource usage.
Best Practices for Jobs Log and Schedules
- Review Jobs Log regularly for failed or completed-with-errors operations.
- Complete and verify a Source Job before scheduling it.
- Use clear and descriptive schedule names.
- Confirm the WordPress timezone.
- Keep scheduled CSV files and server folders available.
- Preserve the structure of externally replaced CSV files.
- Use repeatable transformation functions.
- Back up the database before scheduling Content Updater.
- Check Jobs Log after the first scheduled occurrence.
- Use a server cron trigger when precise timing matters.
- Delete schedules that are no longer required.
- Retain important export files before deleting old jobs.
Recommended Links
FAQ
What is Jobs Log in WP Import Export?
Jobs Log stores the status, progress, configuration, results, and history of import, export, sync, and update operations performed by WP Import Export.
Which operations appear in Jobs Log?
Jobs Log records Import, Export, Media Sync, Content Sync, Content Updater, and other supported background operations.
Can I rerun a saved job?
Yes. Jobs Log provides restart or retry actions where available, allowing a new job to be created from saved parameters.
Where can I download a completed export?
Open Jobs Log and use the download action for the completed export job while its generated file remains available.
What are Schedules in WP Import Export?
Schedules automatically create and run new jobs using a saved Jobs Log configuration. A schedule can run once or recur hourly, twice daily, daily, or weekly.
Which jobs can be scheduled?
Schedules support Import, Export, Media Sync, and Content Updater jobs. Complete and verify the Source Job before creating a schedule.
Does a schedule modify the Source Job?
No. Each occurrence creates a separate job with the same configuration. The original Source Job remains unchanged in Jobs Log.
Where can I find scheduled job results?
Every occurrence creates a separate Jobs Log entry. The schedule also links to its most recently generated Job ID.
Can scheduled occurrences overlap?
No. If the previous job is still pending or processing, WP Import Export prevents another simultaneous occurrence of that schedule.
Why did a scheduled job start late?
Schedules use WP-Cron, which normally checks for due tasks during page requests. Low-traffic websites may need a server cron trigger for more reliable timing.
Can I edit or delete a schedule?
Yes. Existing schedules include View, Edit, and Delete actions. Deleting a schedule does not delete its Source Job or previous job history.