
Uploading files through FTP or SFTP only places them on the server; it does not automatically register them in the WordPress Media Library. That is why images, videos, PDFs, or downloads can exist in a folder but still be missing from Media -> Library.
WP Import Export Media Sync solves this by scanning a server folder and registering supported files as WordPress media items. Before running Media Sync, it is recommended to build the Media Hash Index so the plugin can reliably recognize files that already exist in the Media Library.
Short Answer
To register FTP or SFTP uploaded files in the WordPress Media Library, first build the Media Hash Index under Import Export -> Tools. Then open Import Export -> Media Sync, choose the server folder, scan it, review the discovered files, configure sync options, and start the sync.
Media Sync is designed for files that are already present on the server. It does not upload files from your computer; it scans server folders and adds supported files to the WordPress Media Library.
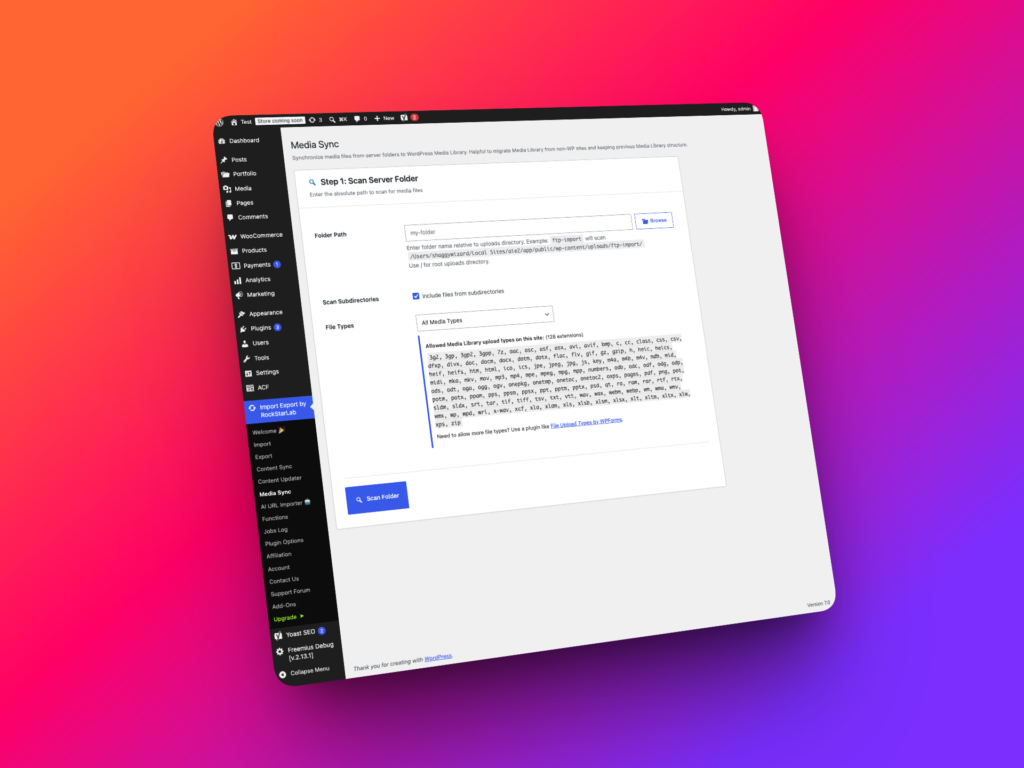
Why FTP Uploaded Files Do Not Appear in the Media Library
Uploading a file through FTP or SFTP only places the file on the server. It does not create a WordPress attachment record, generate Media Library metadata, or connect the file to WordPress admin screens.
That is why a file can exist in a server directory but still be invisible under Media -> Library. WordPress needs the file to be registered before it can be selected in the block editor, used as a featured image, attached to posts, or managed through media tools.
This is a common issue during migrations, bulk image uploads, agency handoffs, large file transfers, and server-side media cleanup projects.
When to Use Media Sync
Use Media Sync when files already exist on the server but are not visible in the WordPress Media Library.
- You uploaded images through FTP or SFTP.
- You migrated files from another WordPress site.
- You copied media folders directly on the server.
- You restored files from a backup but the Media Library does not show them.
- You added product images, PDFs, videos, or downloads outside the WordPress admin.
- You want to register server files without manually uploading each file again.
What WP Import Export Media Sync Supports
| Task | Supported? | Notes |
|---|---|---|
| Scan a server folder | Yes | Use Import Export -> Media Sync and choose the folder path. |
| Include files from subdirectories | Yes | Enable the subdirectory option before scanning. |
| Filter by file type | Yes | Choose all registered file types or limit the scan to groups such as images or videos. |
| Review files before sync | Yes | Select all discovered files or exclude specific files before syncing. |
| Media Hash Index | Yes | Build an MD5 hash index for existing Media Library files before synchronization. |
| Duplicate detection | Yes | Compare files by hash, filename, or file size, depending on the selected option. |
| Batch processing | Yes | Use Batch Size to control how many files are processed at a time. |
| Create virtual folders in Real Media Library | Yes, when available | Media Sync can create virtual folders in the Real Media Library plugin when that integration is available. |
Step-by-Step Workflow
Step 1: Build the Media Hash Index
Before scanning FTP or SFTP folders, it is recommended to create a hash index for the files that are already registered in the WordPress Media Library.
Go to Import Export -> Tools and find the Media Hash Index section.
The tool displays three statistics:
- Media files: the total number of attachment files found in the Media Library.
- Indexed: the number and percentage of files that already have a stored hash.
- Without a hash: the number of files that still need to be indexed.
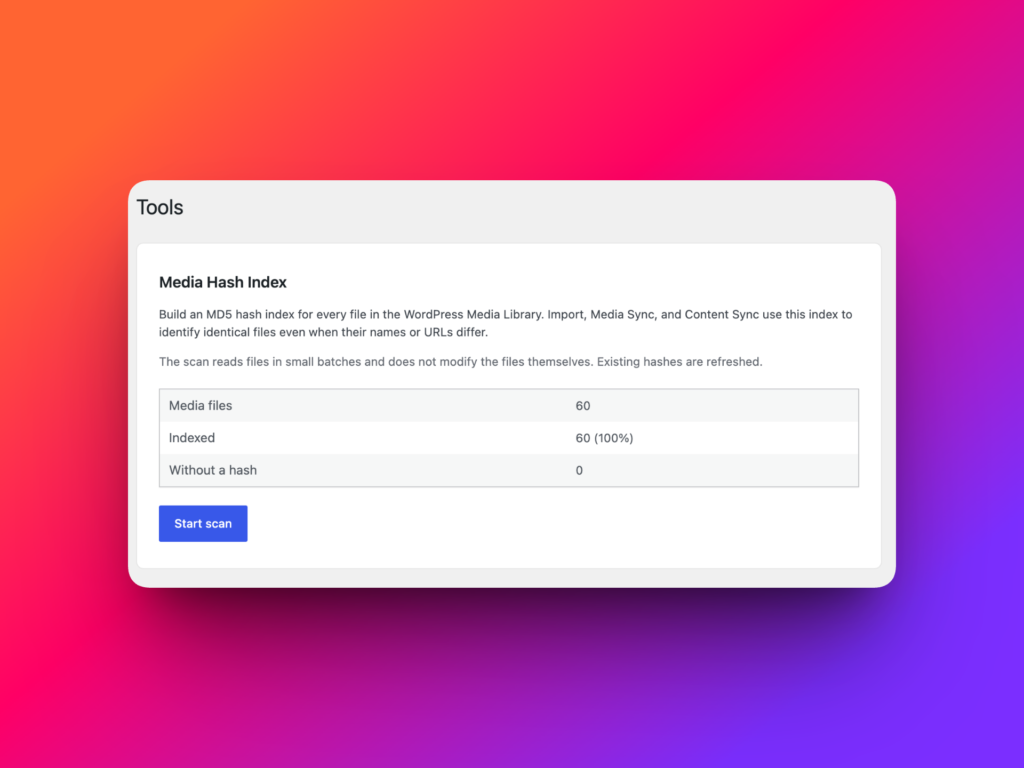
Click Start scan. WP Import Export will read the existing Media Library files, calculate an MD5 hash for each readable file, and store the result with the corresponding attachment.
The scan runs in small batches to reduce server load. A progress indicator shows how many files have been processed.
The Media Hash Index does not rename, move, replace, compress, or otherwise modify the physical files. Existing hashes are refreshed during the scan.
Wait for the scan to finish before starting Media Sync. Ideally, the Without a hash value should be 0. If some attachments cannot be indexed, confirm that their files still exist on the server and that WordPress has permission to read them.
Building the Media Hash Index allows Media Sync to recognize identical files even when their filenames, URLs, attachment titles, or directory paths differ.
Why Hash-Based Duplicate Detection Is More Reliable
| Comparison method | Possible problem | Hash index advantage |
|---|---|---|
| Filename | The same file may have been renamed. | Identical file contents produce the same hash. |
| File path | The same file may exist in a different server folder. | The hash does not depend on the directory path. |
| Media URL | The domain or uploads URL may have changed. | The hash does not depend on the website URL. |
| Attachment title | Different files can use the same title. | The hash is calculated from the physical file contents. |
| File size | Different files can occasionally have the same size. | A file hash provides a more precise comparison. |
Step 2: Open Media Sync
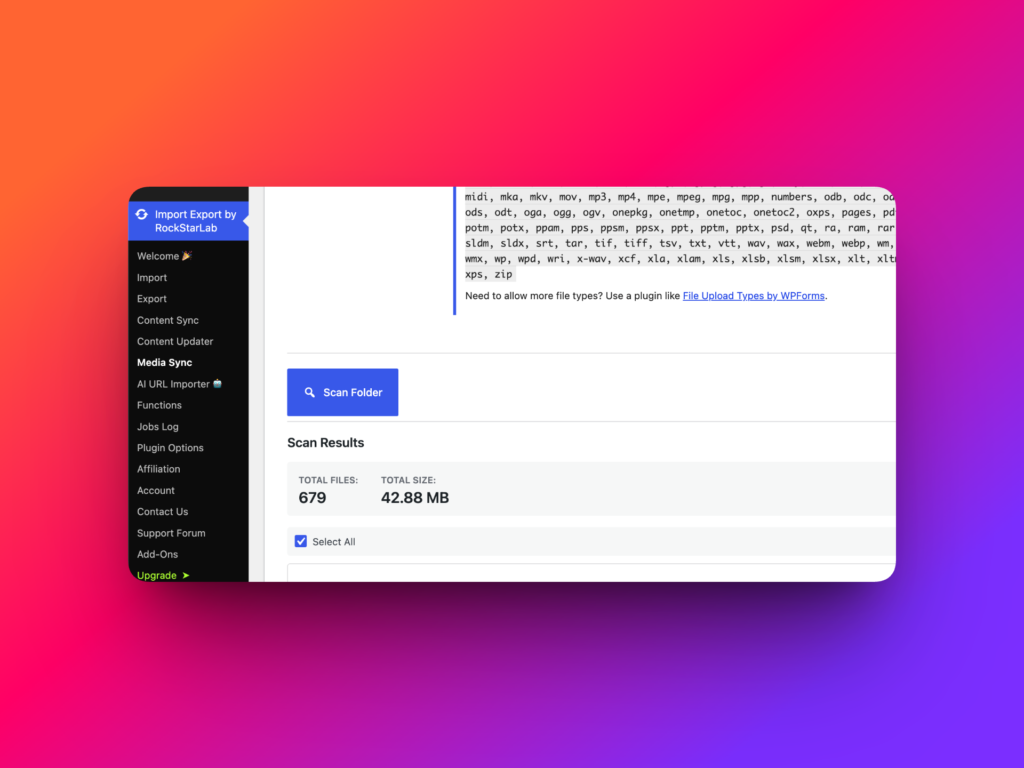
In the WordPress admin area, go to Import Export -> Media Sync.
This screen is used to scan server folders and register supported files in the WordPress Media Library.
Step 3: Choose the Server Folder
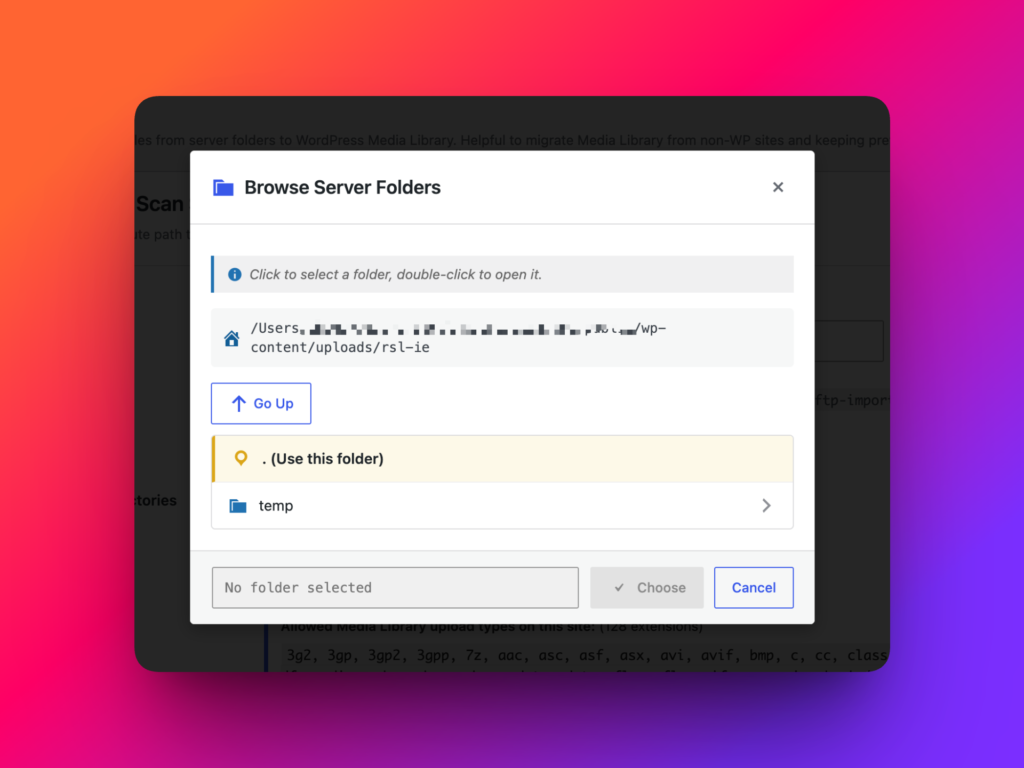
In Step 1: Scan Server Folder, choose the folder that contains the files uploaded through FTP or SFTP.
Click the Browse button to open the folder selection dialog. In the dialog window, navigate to the folder you want to scan and select it.
Choose the folder carefully. If you select a large parent directory, the scan may discover more files than you intended to register.
Step 4: Decide Whether to Include Subdirectories
Use Include files from subdirectories when the target folder contains nested folders that should also be scanned.
Enable this option if files are organized in subfolders such as year folders, product folders, client folders, or image category folders. Leave it disabled if you only want to scan files directly inside the selected folder.
For large directories, start with a smaller folder or test scan. Recursive scanning can find many files when the selected folder contains a deep directory structure.
Step 5: Choose File Types
The File Types option controls which files Media Sync should discover.
You can scan all registered file types or limit the scan to a specific group such as images, videos, or other supported file categories. This is useful when a folder contains mixed files and you only want to register certain media types.
For example, choose images when syncing product photos, galleries, post images, or design assets. Choose videos when registering uploaded video files that should appear in the Media Library.
Step 6: Scan the Folder
After selecting the folder, subdirectory behavior, and file types, click Scan folders.
Media Sync will scan the selected server folder and display a list of discovered files. This scan helps you review what will be registered before synchronization starts.
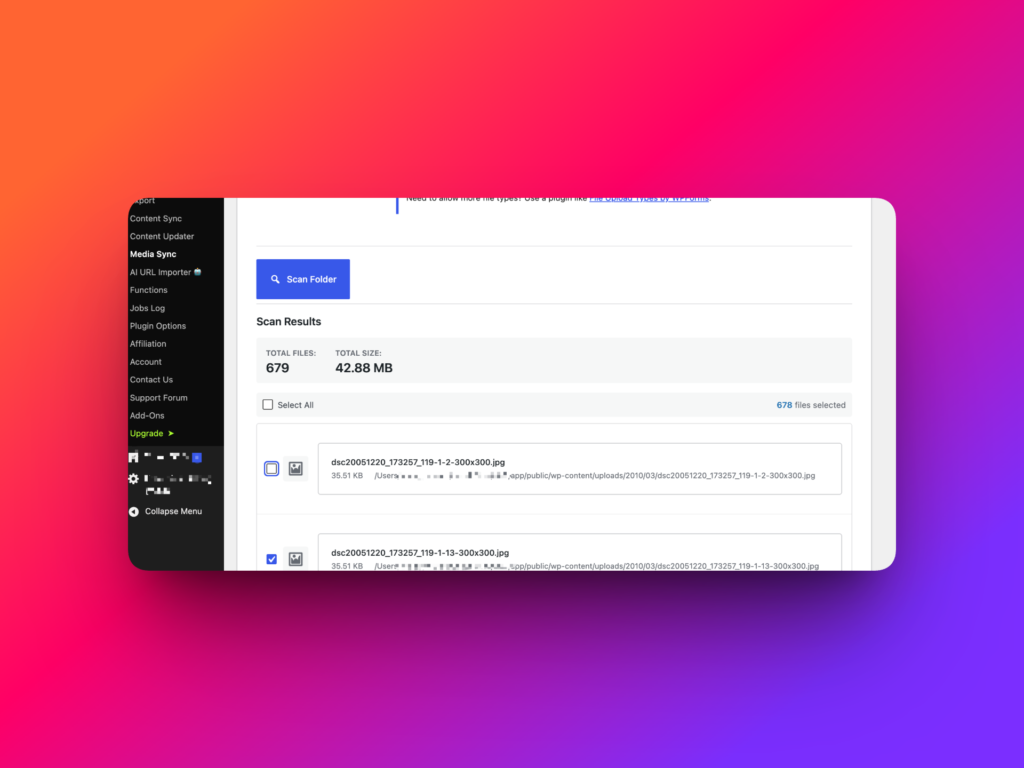
Step 7: Review the File List
After the scan finishes, review the list of discovered files. You can select all files or exclude specific files that should not be registered.
This review is important when a folder contains old files, temporary assets, backup copies, duplicate exports, or files that should remain outside the Media Library.
Before continuing, confirm that the selected files match the media you actually want to sync.
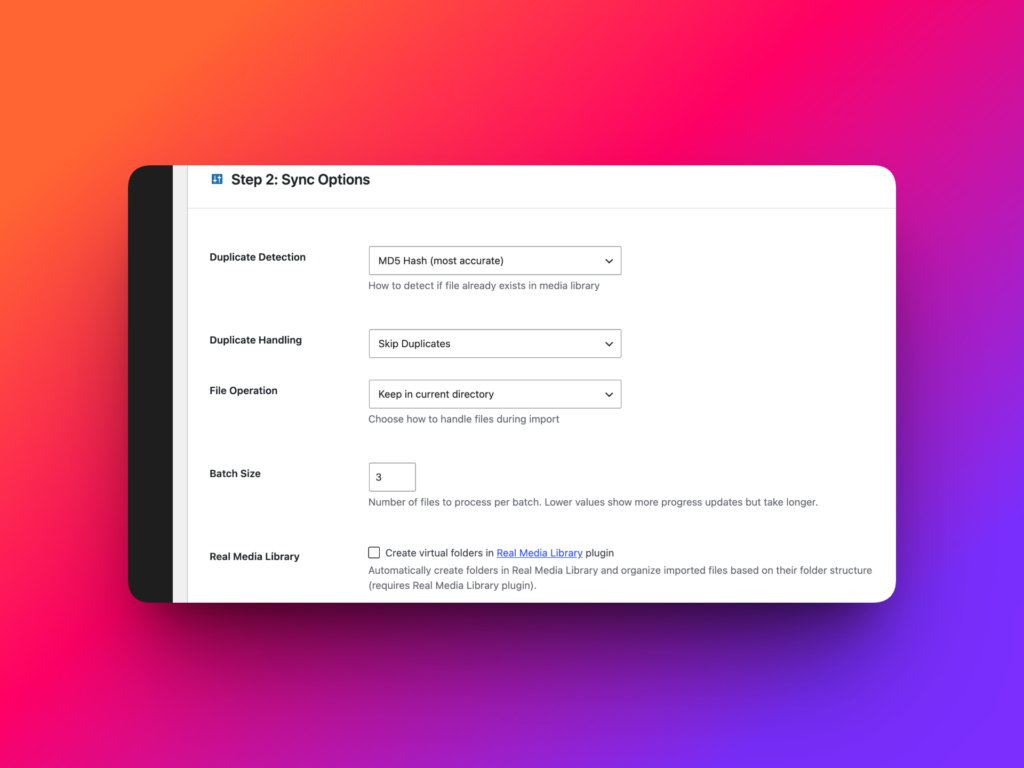
Step 8: Configure Sync Options
After reviewing the files, continue to Step 2: Sync Options.
This step controls how Media Sync handles duplicates, file operations, processing size, and optional folder integration.
Duplicate Detection
Duplicate Detection determines how Media Sync identifies files that may already exist in the Media Library.
Depending on the selected option, duplicate detection can compare:
- File hash
- Filename
- File size
Hash comparison is recommended when you need to detect identical files whose names, URLs, or locations may have changed. Before selecting hash-based duplicate detection, build the Media Hash Index under Import Export -> Tools.
The index contains hashes for existing Media Library files. Media Sync can compare the incoming server file with that index and identify an identical file even when its filename or path is different.
Duplicate Handling
Duplicate Handling controls what happens when Media Sync finds a file that appears to be a duplicate.
Choose the option that matches your workflow. When the goal is to avoid unnecessary Media Library clutter, use a setting that skips or reuses the detected file instead of creating another attachment.
File Operation
File Operation controls how files are handled during synchronization.
Review this setting carefully before starting the sync. It can affect whether files remain in their current locations or are handled according to the selected sync behavior.
Batch Size
Batch Size controls how many files Media Sync processes at a time.
Smaller batches are safer on limited hosting environments. Larger batches may finish sooner but require more server memory and processing time.
If you are syncing many files, start with a conservative Batch Size and monitor the job. Increase it gradually only after confirming that the server processes the synchronization reliably.
Create Virtual Folders in Real Media Library
If the Real Media Library plugin is available, Media Sync can create virtual folders there.
This option is useful when server files are already organized in folders and you want a similar structure inside the Media Library interface. Real Media Library virtual folders make synchronized files easier to browse and manage.
Step 9: Start the Sync
When the file list and sync options are correct, click Start Sync.
Media Sync will begin registering the selected supported files in the WordPress Media Library. Large jobs are processed in background batches.
After the sync finishes, open Media -> Library and confirm that the synchronized files are visible.
Example Workflow for FTP Uploaded Product Images
Imagine a store owner uploads 2,000 product images through SFTP into a folder such as /wp-content/uploads/product-import/. The files exist on the server but do not appear in Media -> Library.
A recommended workflow would be:
- Open
Import Export -> Tools. - Find Media Hash Index and click Start scan.
- Wait until the existing Media Library files have been indexed.
- Open
Import Export -> Media Sync. - Click Browse and choose the product image folder.
- Enable Include files from subdirectories if images are grouped into nested folders.
- Set File Types to images.
- Click Scan folders.
- Review the discovered files and exclude anything that should not be registered.
- Select hash-based duplicate detection where appropriate.
- Configure Duplicate Handling and File Operation.
- Choose a Batch Size suitable for the hosting environment.
- Enable Real Media Library virtual folders if required.
- Click Start Sync.
After the sync, the product images should be available in the WordPress Media Library for product imports, content editing, and media management workflows.
Common Mistakes to Avoid
Skipping the Media Hash Index
An existing Media Library may contain many attachments without stored hashes. Build the index under Import Export -> Tools before using hash-based duplicate detection in Media Sync.
Confusing FTP Upload with Media Library Registration
FTP only transfers files to the server. Media Sync registers those files as WordPress attachments.
Scanning an Overly Broad Directory
Do not scan a broad parent directory unless you intend to review a large result set. Start with the most specific folder containing the files you want to register.
Skipping the File Review
The scan results let you exclude files before registration. Reviewing the list is safer than removing unwanted Media Library items later.
Ignoring Duplicate Settings
Duplicate Detection and Duplicate Handling help prevent unnecessary Media Library clutter. Build the Media Hash Index when filenames or file paths are not reliable identifiers.
Using an Aggressive Batch Size
Do not use a large Batch Size on constrained hosting. If the website has limited memory or slow file operations, smaller batches can make the sync more reliable.
Best Practices
- Back up the website before a large media sync job.
- Build the Media Hash Index before using hash-based duplicate detection.
- Confirm that the Without a hash counter is 0 where possible.
- Test with a small folder before scanning a large media directory.
- Use file type filters to keep scan results focused.
- Review discovered files before clicking Start Sync.
- Use duplicate detection to avoid unnecessary Media Library clutter.
- Choose a Batch Size that matches the hosting environment.
- Use Real Media Library virtual folders when folder organization matters.
Recommended Links
FAQ
Why do FTP uploaded files not appear in the WordPress Media Library?
Files uploaded through FTP or SFTP are copied to the server, but WordPress does not automatically register them as Media Library attachments. They must be added to the WordPress database before appearing under Media -> Library.
Can WP Import Export register FTP uploaded files in the Media Library?
Yes. WP Import Export includes Media Sync, which can scan server folders and register supported files in the WordPress Media Library.
Should I build the Media Hash Index before Media Sync?
Yes. Building the Media Hash Index is recommended when the Media Library already contains files. It allows Media Sync to identify identical files even when their names, URLs, titles, or directory paths differ.
How do I build the Media Hash Index?
Go to Import Export -> Tools, find Media Hash Index, and click Start scan. Wait for the scan to finish before starting Media Sync.
Does the Media Hash Index modify existing files?
No. The scan reads each attachment file and stores its MD5 hash. It does not rename, move, replace, compress, or modify the physical file.
Where do I find Media Sync?
Open the WordPress admin area and go to Import Export -> Media Sync.
Can Media Sync scan subdirectories?
Yes. Use Include files from subdirectories when the selected folder contains nested folders that should also be scanned.
Can I choose which file types to sync?
Yes. The File Types option lets you scan all registered file types or limit the scan to supported groups such as images or videos.
Can I exclude files before syncing?
Yes. After scanning the folder, Media Sync displays the discovered files so you can select all files or exclude specific items.
Does Media Sync handle duplicate files?
Yes. Media Sync includes Duplicate Detection and Duplicate Handling options. Building the Media Hash Index improves detection of identical files whose names or locations differ.
Can Media Sync create folders in Real Media Library?
Yes. When Real Media Library is available, Media Sync can create virtual folders during synchronization.