
An affiliate store does not ship anything itself. Each product page shows the item, its price and a button that sends the visitor to the partner’s shop with your affiliate tag in the link. WooCommerce has a product type for this, External/Affiliate product, but creating hundreds of them by hand is slow, and the partner’s prices change all the time. Below: importing them from a CSV with the buy link, button text, images and categories, and updating their prices later without breaking them.
We tested it with Import Export by RockStarLab 2.1.27 and the PRO add-on 2.1.7, WooCommerce 11.2 and WordPress 7.1. Importing WooCommerce products is a PRO feature.
Short Answer
- Make a CSV with Type =
external, External URL (the partner page with your affiliate tag) and Button text, plus SKU, name, prices, categories and images. - Back up the site.
- Go to Import Export → Import → WooCommerce Products, upload the file and click Auto Map.
- Match by SKU, keep Automatically Import Media Files on and import.
- For daily price changes, import a file with only SKU, Regular price and Sale price.
The CSV
Most affiliate networks and partner programs give you a product export or a feed. Whatever its format, the file you import needs these columns:

- SKU: the partner’s product ID or any unique code. It lets you update the product later.
- Type:
external. This makes the product an External/Affiliate product with a buy button instead of an add-to-cart button. - External URL: the page the button opens, with your affiliate parameter (
?ref=examplestorein our example). - Button text: the label of the button, such as “Buy at Partner Store” or “Check price”. Leave it empty to use WooCommerce’s default “Buy product”.
- Regular price and Sale price: shown on your page; the visitor pays on the partner’s site.
- Categories:
Clothing > Hoodiescreates Hoodies under Clothing if needed. - Images: image links; the first is the product image, others go to the gallery. Check that your program allows you to show the partner’s images.
If you don’t put a Type column in the file, a row that has an External URL is still created as an external product.
Step 1: Back Up the Site
The import creates products and downloads images. Make a backup first: UpdraftPlus Backup Now, your host’s backup, or ask an AI agent to run rsl-ie/updraftplus-backup-start. See How to Create a WordPress Website Backup and Restore It.
Step 2: Upload and Map
Open Import Export → Import, choose WooCommerce Products, upload the CSV and click Auto Map. The column names of WooCommerce’s own CSV format are recognized, so all 10 columns were mapped, including External URL to product_url and Button text to button_text:

On Import Options, set Check for Existing Items by Field to SKU, keep If Match Found: Update and If No Match Found: Create, and leave Automatically Import Media Files on. Start the import:

Step 3: Check the Products
Open one of the products. Product data shows External/Affiliate product with the URL, the button text and the prices from the file:

On the product page, the visitor sees the sale price and the button, which opens the partner’s page with your tag:
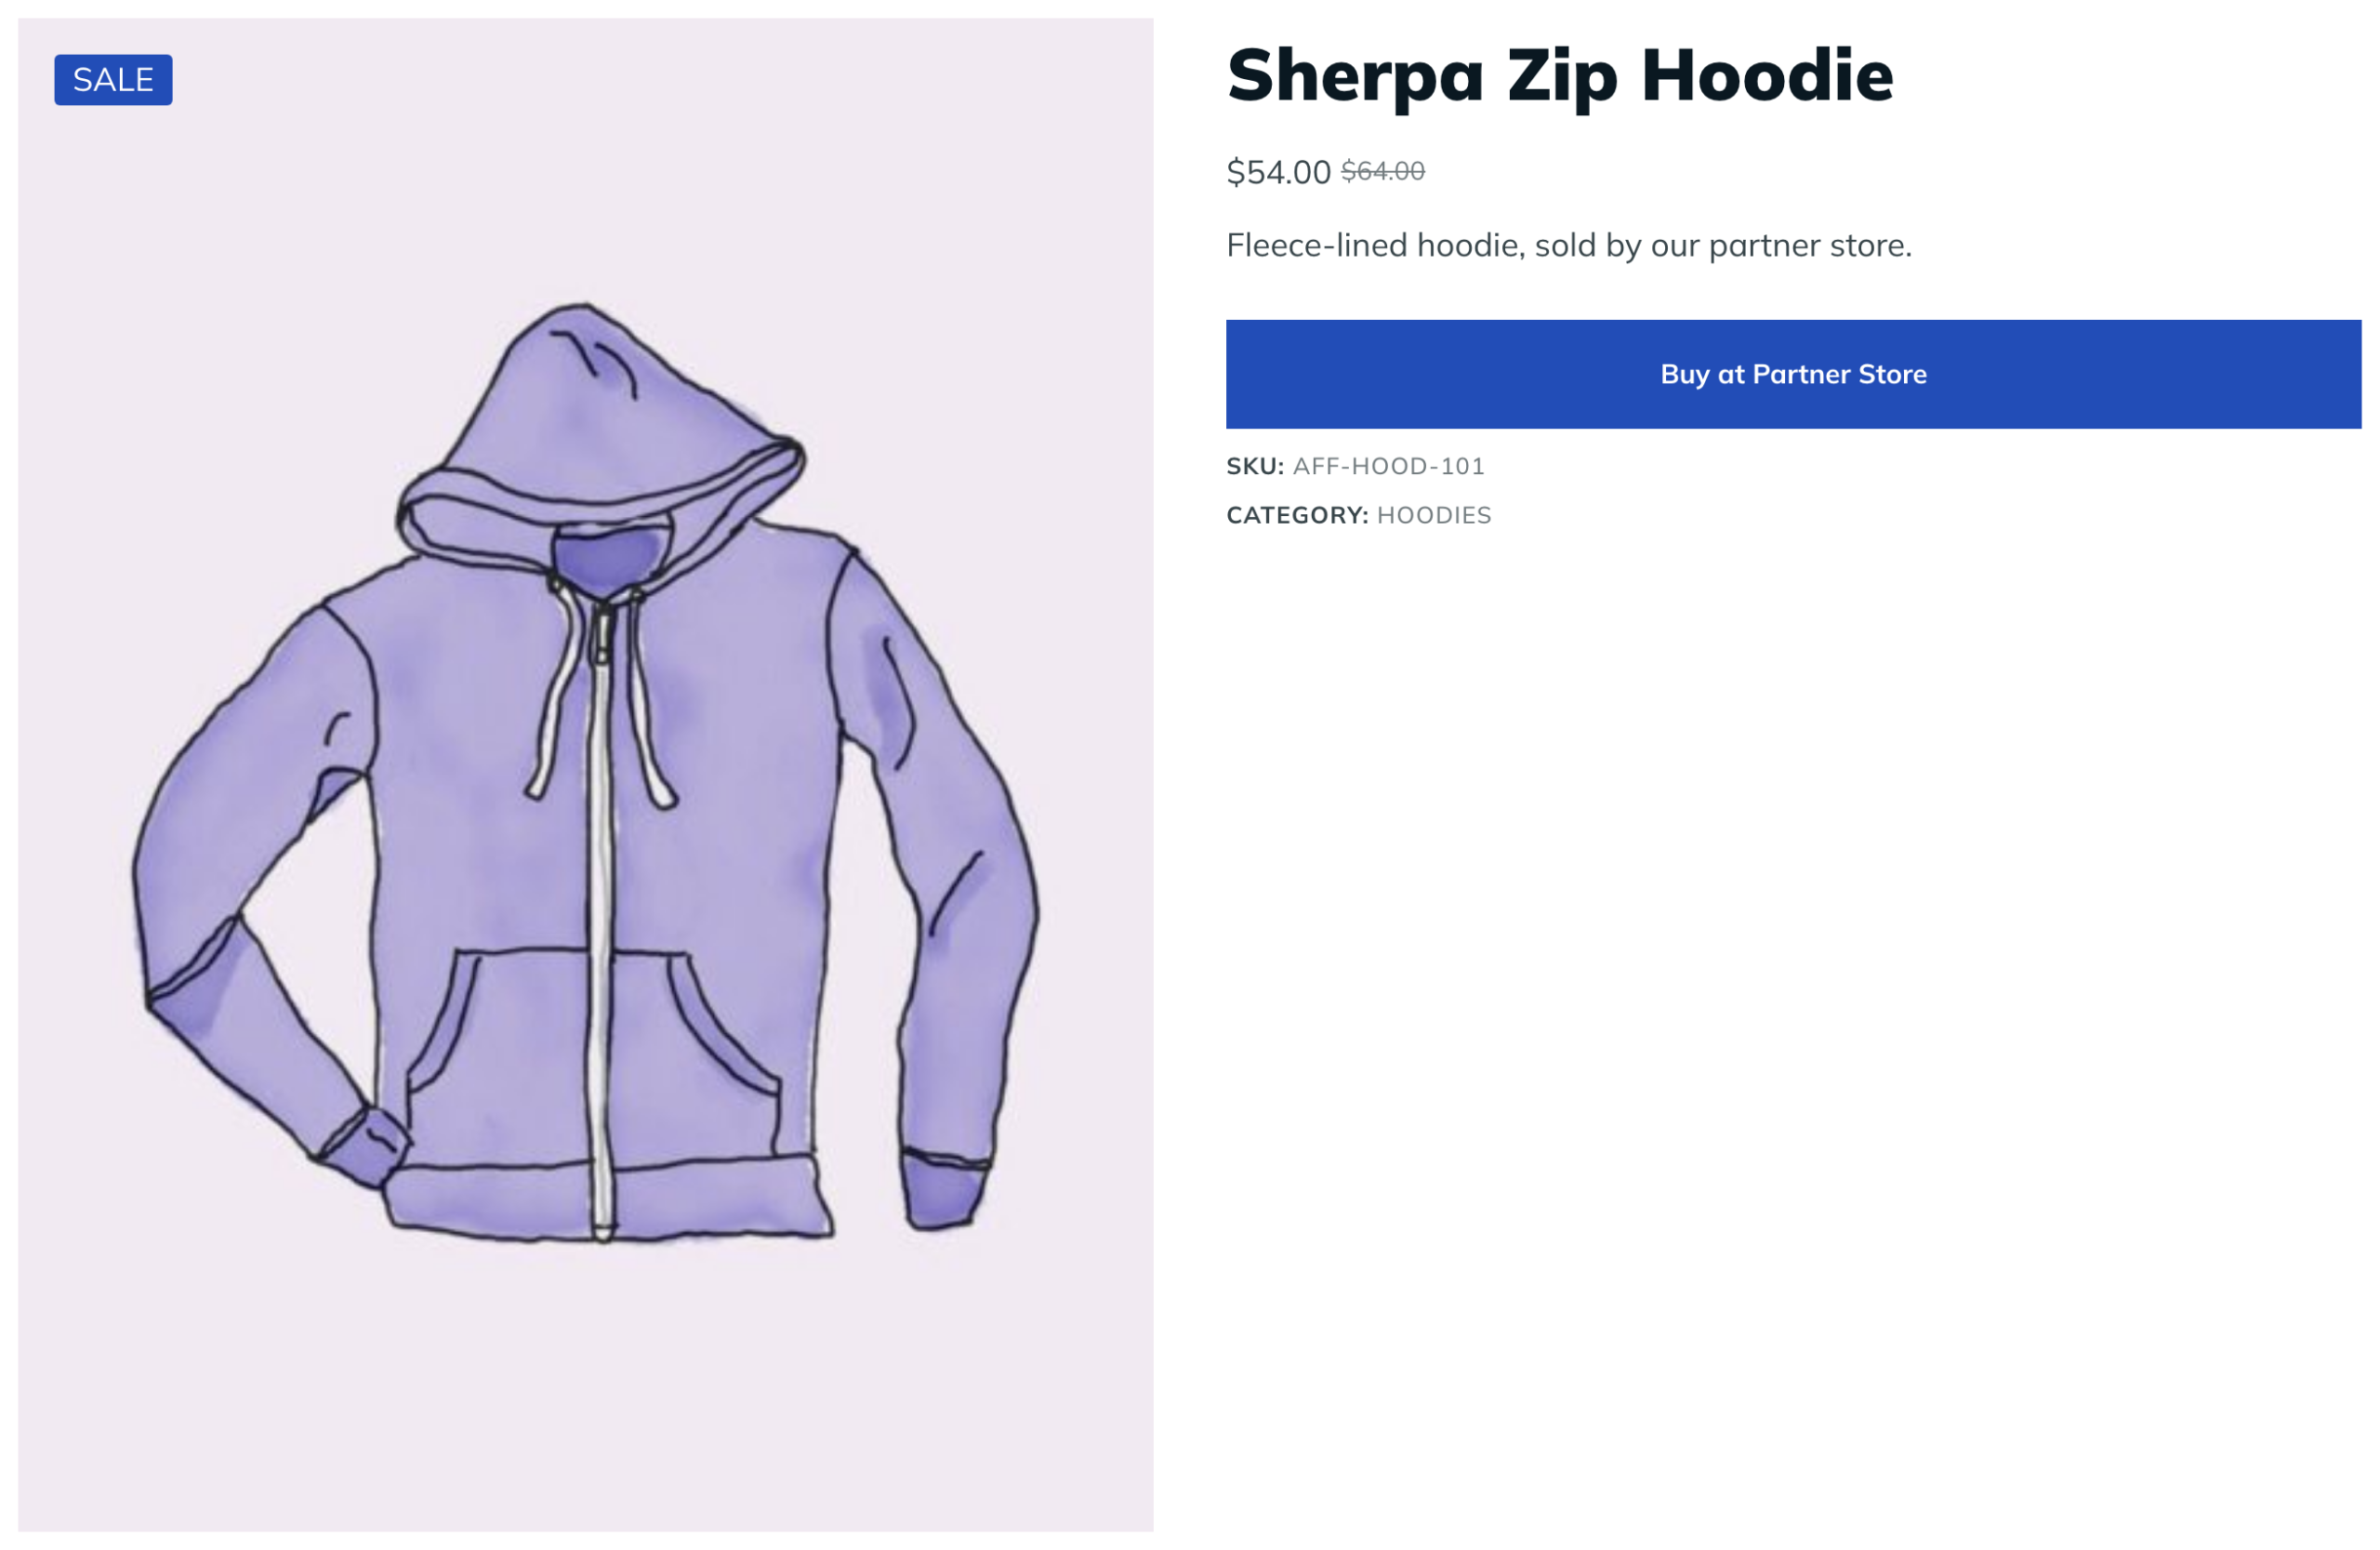
External products have no cart, stock or shipping in your store. Click the button on one product to make sure the link is right and your tag is in it.
Step 4: Update Prices Every Day
Partner prices and sales change often. You don’t need to import the whole file again; a file with the SKU and the two price columns is enough:
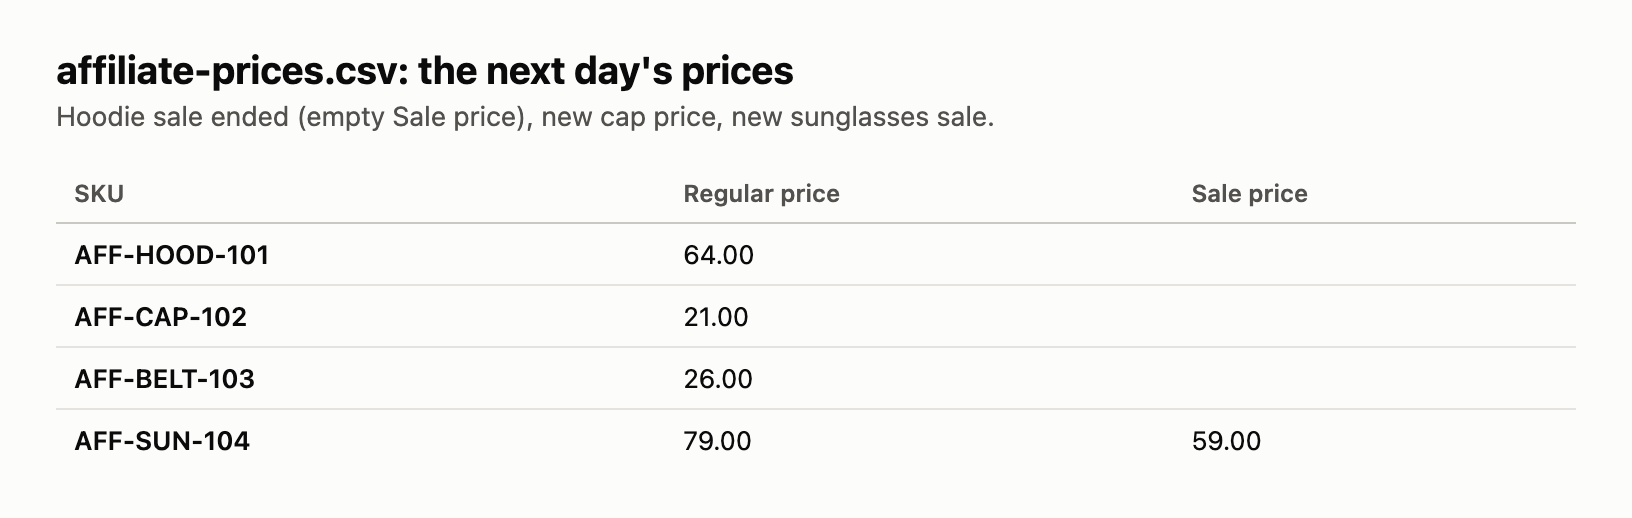
Import it as before, with If Match Found: Update and If No Match Found: Skip, so a SKU that is not in your store is ignored. In our update:
- The hoodie’s sale ended: its Sale price cell is empty, which removes the sale price.
- The cap costs $21 instead of $19.
- The sunglasses have a new sale price, $59.
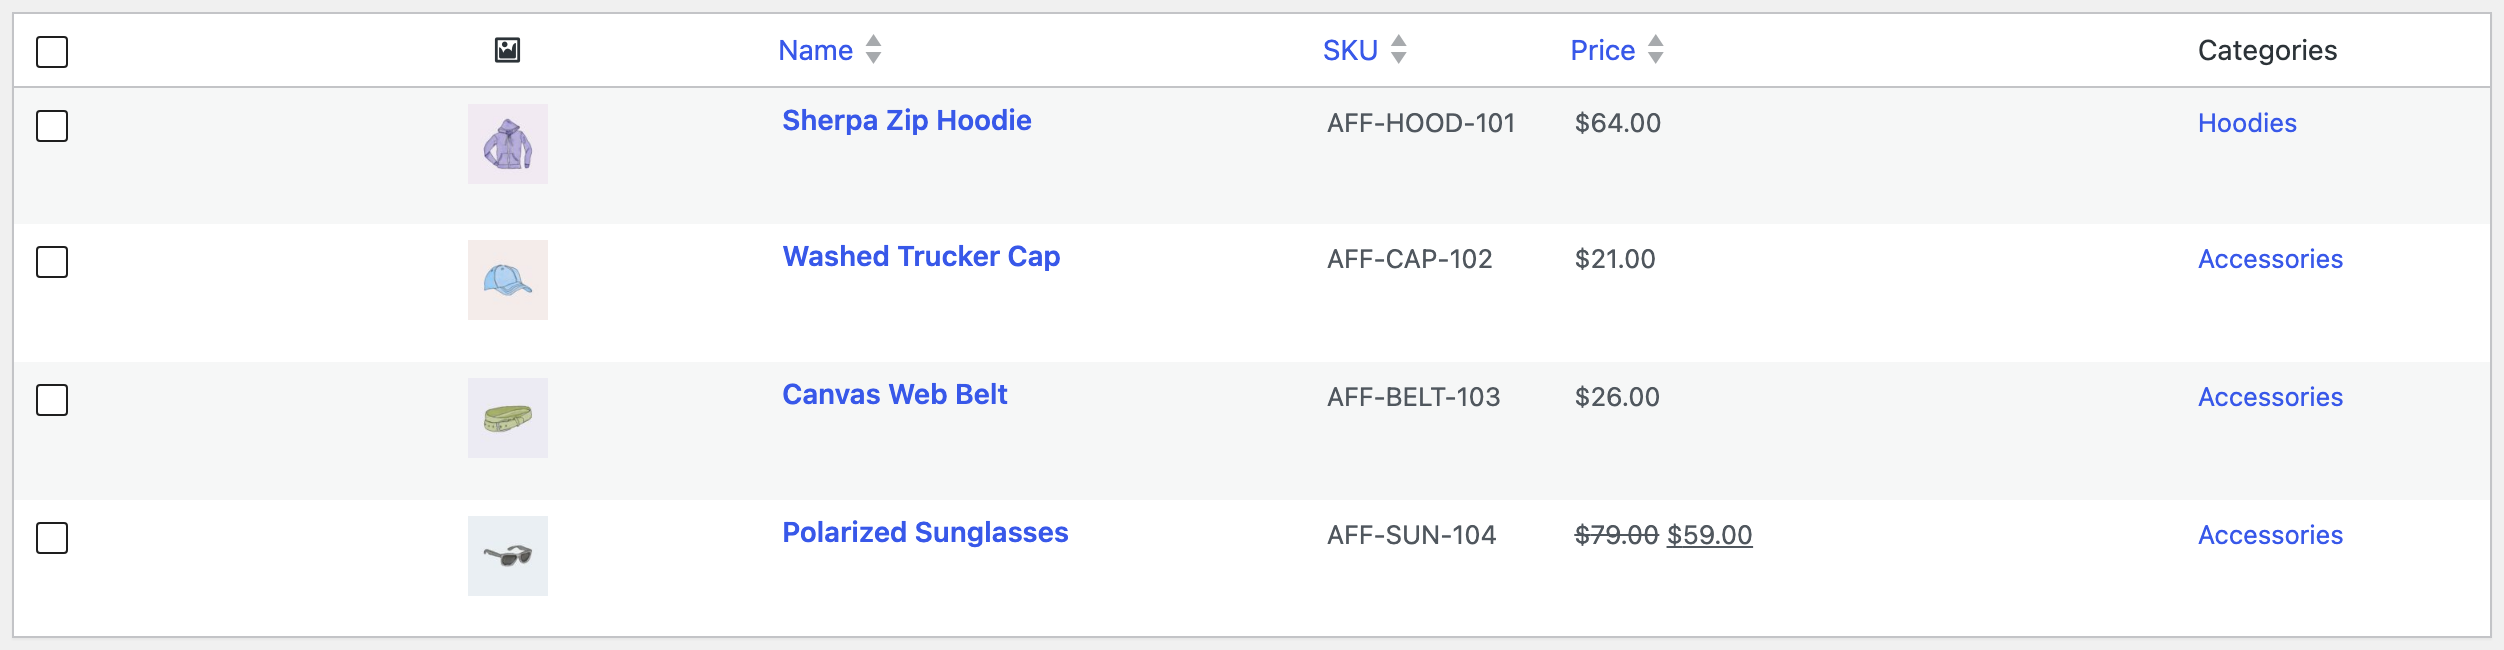
The products stay External/Affiliate products with their links, buttons, images and categories, because the file has no columns for those. Only the prices changed.
If the partner publishes this file at a fixed address, you can let the plugin download it every day and run the update on its own; see Automatic Supplier Feed Import for WooCommerce.
Common Mistakes
- The affiliate tag missing from the URL. Without it the partner cannot credit you. Check the External URL column before importing, and click a few buttons afterwards.
- Type “simple” for affiliate items. Then the product gets an add-to-cart button and visitors try to buy it from you. Use
external, or leave the Type column out and keep the External URL. - Removing a sale by leaving out the column. A file without a Sale price column keeps the current sale prices. To end a sale, include the column and leave the cell empty.
- Prices in another currency. The import saves the numbers as they are. Convert them to your store currency in the file first.
- Duplicates when the partner changes product IDs. A new SKU creates a new product. Delete or redirect the old one, or keep your own stable SKUs.
FAQ
Can I add “nofollow” or “sponsored” to the buy buttons?
The button is output by WooCommerce and your theme. Search engines expect affiliate links to be marked; use a small snippet or a plugin that adds rel="sponsored" to external product buttons.
Can I mix affiliate and normal products in one file?
Yes. The Type column decides per row: external for affiliate items, simple or variable for products you sell yourself.
Will updates overwrite descriptions I wrote myself?
Only if the update file has a description column. Leave it out and your texts stay.
Do I need PRO?
Yes, importing WooCommerce products is part of the PRO add-on.
Related Guides
- How to Import WooCommerce Products from CSV or Excel
- How to Import WooCommerce Product Images from URLs
- Automatic Supplier Feed Import for WooCommerce
- How to Update WooCommerce Prices and Stock by SKU from CSV
Get the free plugin on WordPress.org.

Comments 0
Have a question or a tip to share? Leave it below.