
A navigation menu can contain a carefully ordered collection of links, nested items, and custom fields used by your theme. Rebuilding that structure on another WordPress site means more than copying the visible labels: each category or page link needs to point to the correct destination record.
To sync a classic WordPress menu between sites, connect both sites in Import Export by RockStarLab, open Appearance → Menus on the source, click Sync, choose the destination, and push the current menu into the selected remote menu. With compatible ACF field definitions, the transfer also carries custom values attached to the menu and its individual items.
It covers the admin workflow, an ACF example and the same operation through an AI agent. Menu synchronization requires PRO on the participating sites.
Classic menus and the Navigation block are different
This workflow is for classic WordPress menus managed under Appearance → Menus. WordPress stores the menu as a nav_menu term and its entries as nav_menu_item posts. The Navigation block in the Site Editor uses a different structure, including wp_navigation content.
Do not use this tutorial as a procedure for transferring a block theme’s Navigation block. If your navigation is edited in the Site Editor rather than Appearance → Menus, first identify which navigation system your theme actually uses. A visual resemblance between two menus does not mean their stored content is interchangeable.
| Element | How to handle it |
|---|---|
| Classic menu labels, order, and nesting | Transfer the selected classic menu |
| Links to pages, posts, or taxonomy terms | Prepare the destination records and verify their references |
| ACF values on menus and menu items | Prepare matching field definitions on both sites, then sync the values |
| Header layout, typography, dropdown styling | Configure these in the destination theme |
| Theme menu locations | Review and assign the receiving menu to the intended location |
| Block Navigation | Requires a separate workflow; it is outside this classic-menu tutorial |
Prepare both sites before transferring the menu
Activate Import Export by RockStarLab and PRO on both sites. Connect the destination in Content Sync and verify the site URL. Follow the Content Sync connection guide if the connection is not already configured.
Next, prepare the content referenced by the menu. A menu item pointing to a category is a link to that category, not a request to migrate its entire archive. Create or transfer the required terms and pages first. The category and taxonomy transfer guide covers the taxonomy structure; the custom post type and ACF synchronization guide covers related content.
For an established destination menu, take a WordPress backup before replacing its structure. Choose which site owns the navigation changes. A controlled source-to-destination push is easier to manage than editing both copies independently.
The selected destination menu’s items are replaced by the incoming structure. This is not an append-only merge. An item added only on the receiving site can disappear on the next push. Menu-item IDs may change when the items are recreated, so custom integrations should not assume those IDs remain stable.
Step 1: Prepare the source menu and its ACF fields
Open Appearance → Menus on the source. Select the menu you want to transfer and click Select. Our example is Field Guide Navigation:
Explore                         Custom Link
└── Field Guides                Category
Planning resources              Custom Link
Field Guides is nested under Explore. Its destination category should already exist. The other two entries are custom links, so inspect their URLs explicitly: copying a menu should not be taken as a promise to rewrite every arbitrary URL embedded in it.
Sync ACF Fields on Menus and Menu Items
ACF distinguishes fields on the whole menu from fields on an individual menu item. In ACF → Field Groups, create these groups and deploy the same definitions to both sites:
| Group and location | Field | Type | Example |
|---|---|---|---|
| Menu details — Nav Menu is equal to All | Menu introduction: rsl_menu_intro |
Text | Find your next outdoor adventure. |
| Menu item details — Menu Item is equal to All | Menu badge: rsl_menu_badge |
Text | Start here |
| Menu item details — Menu Item is equal to All | Featured link: rsl_menu_featured |
True / False | Yes |
Keep the field keys and types compatible across sites; recreating only the visible labels is not enough. Use ACF’s field-group export/import or your normal field deployment process. This menu transfer carries values, so prepare their definitions separately.
Back in Appearance → Menus, expand Field Guides and fill in its badge and featured switch. Fill in the menu introduction below the structure, then click Save Menu. Save changes before opening Sync so the transfer uses the stored values.
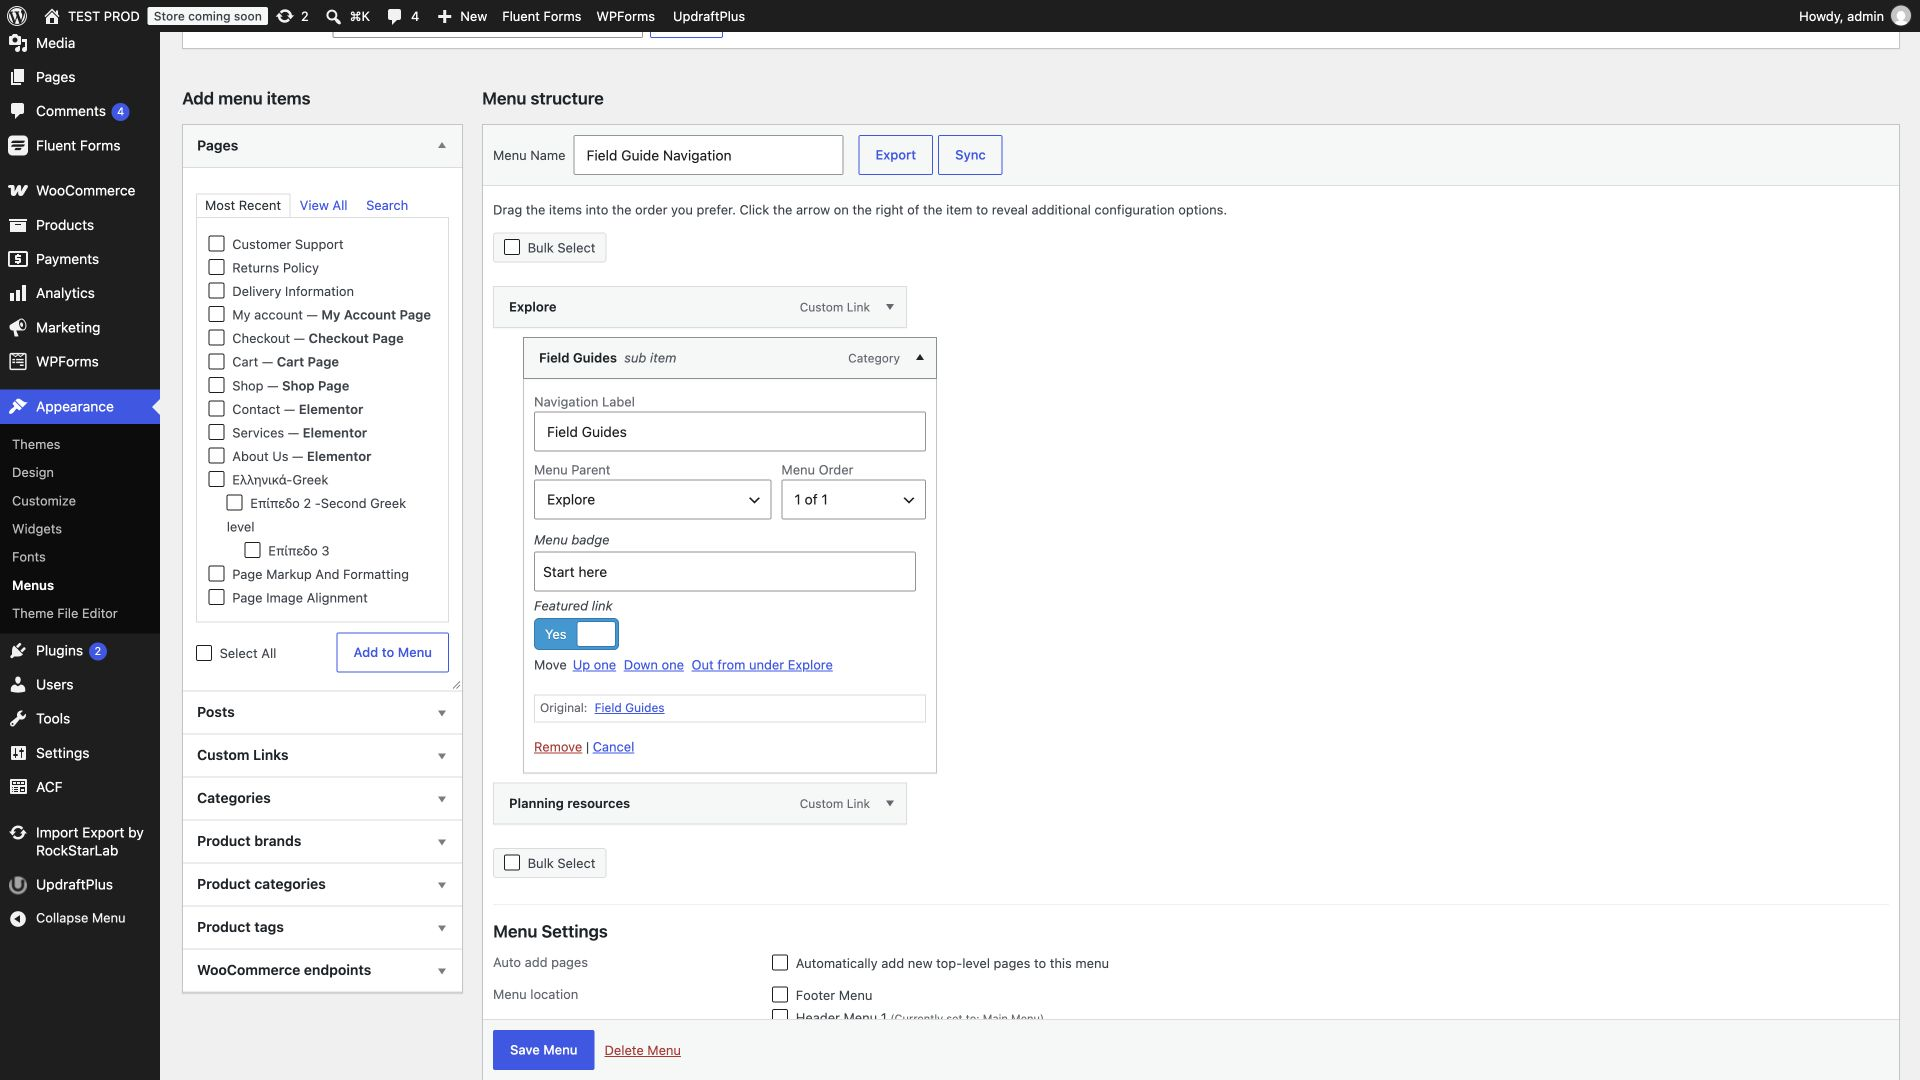
These fields can support a useful design: an introduction above a navigation panel, a Start here badge beside a link, or a highlighted item. Your theme still needs code or a supported integration that renders those ACF values. Synchronization preserves the content; it does not automatically add badge styling to the theme.
Step 2: Create a receiving menu
On the destination, open Appearance → Menus → create a new menu. Name it Field Guide Navigation and click Create Menu. Leave it empty if you are preparing a new menu rather than replacing an existing one.
You can also choose an existing receiving menu, but review its items first because the incoming structure will replace them. Do not select the site’s Main Menu merely because it is the first option. For the initial transfer, keep the new menu unassigned to a live theme location until its links are ready.
Step 3: Choose the destination and push
Return to the source menu editor and click Sync beside Menu Name. In the Sync Menus dialog, select your destination under Select Site, then click Push current menu.
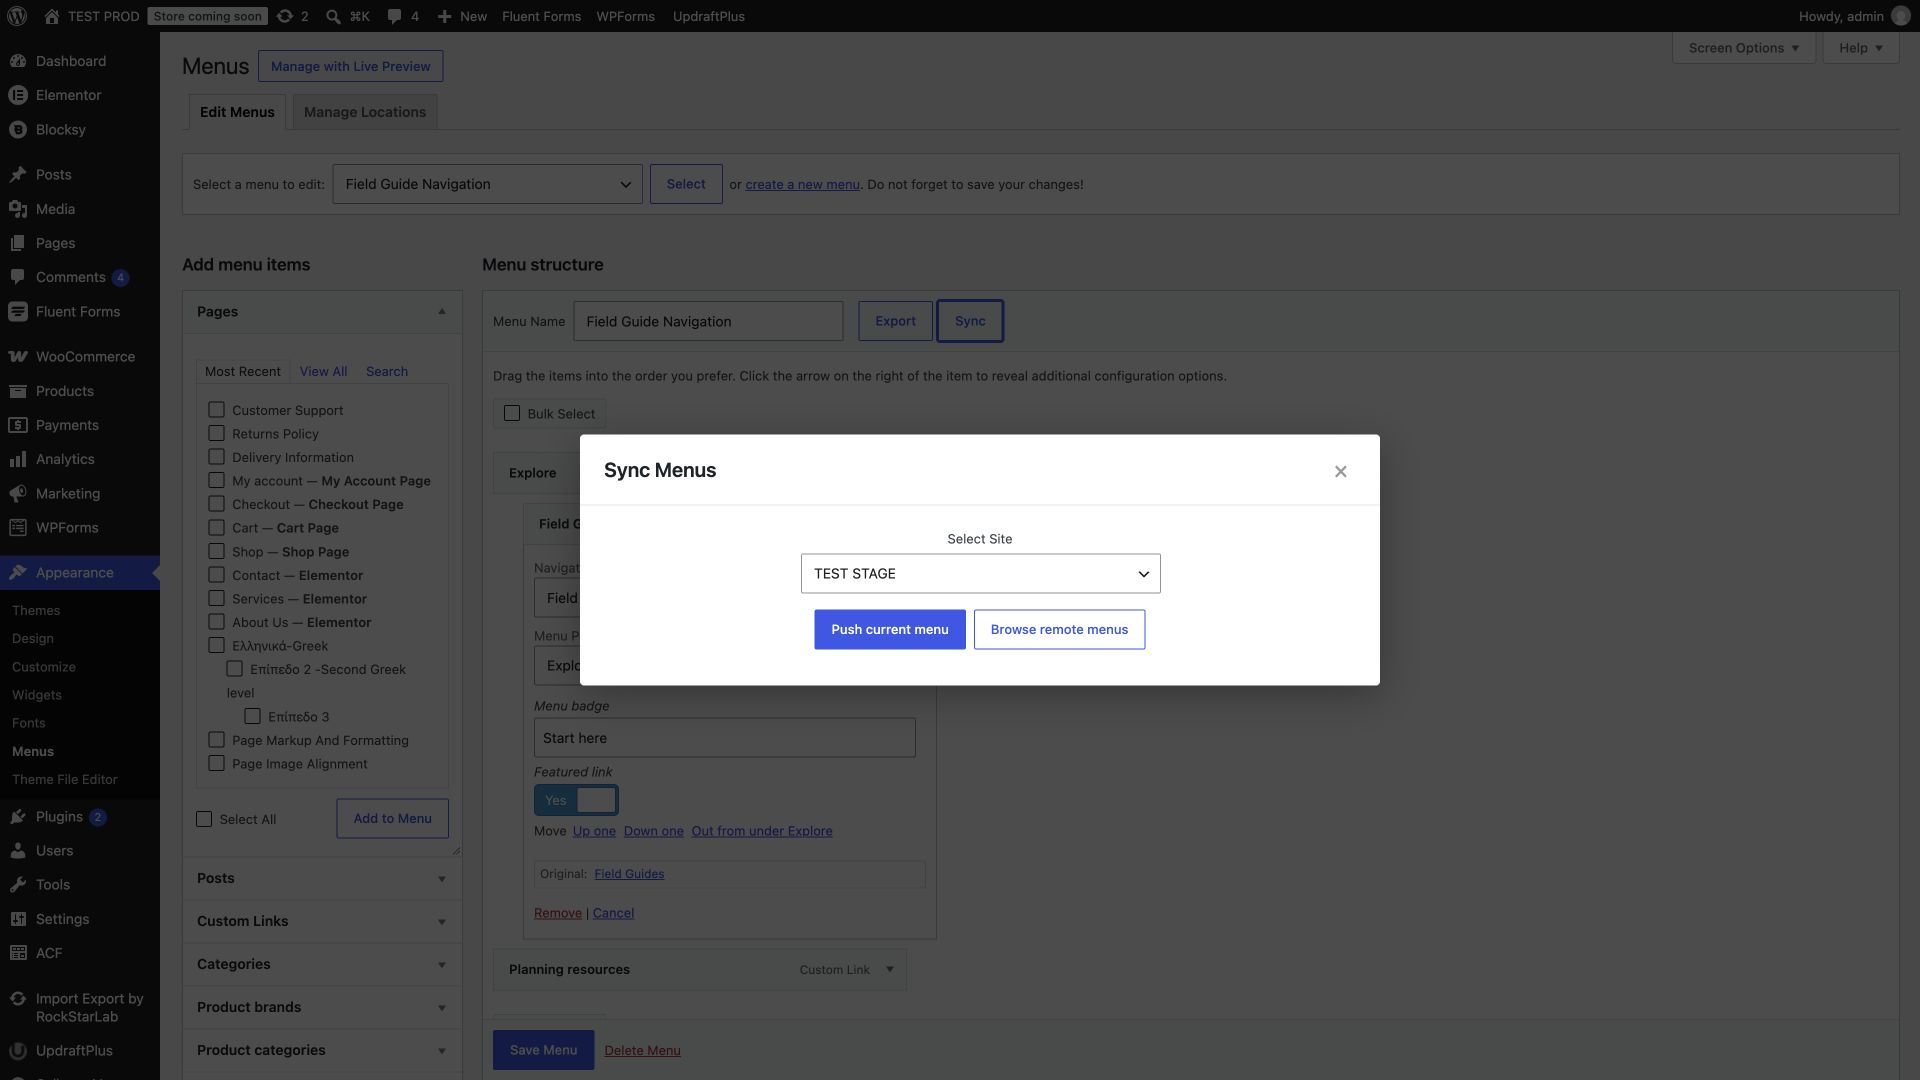
The next dialog asks for a Remote menu. Choose Field Guide Navigation, review the selected name and slug, and click Push current menu again. This identifies the exact receiving menu.

Wait for the result before closing the dialog. For an empty destination menu that already exists, the message can show Created: 0, Updated: 1, Items: 3: one menu was updated and three items were transferred. The zero created-menu count does not mean nothing happened.
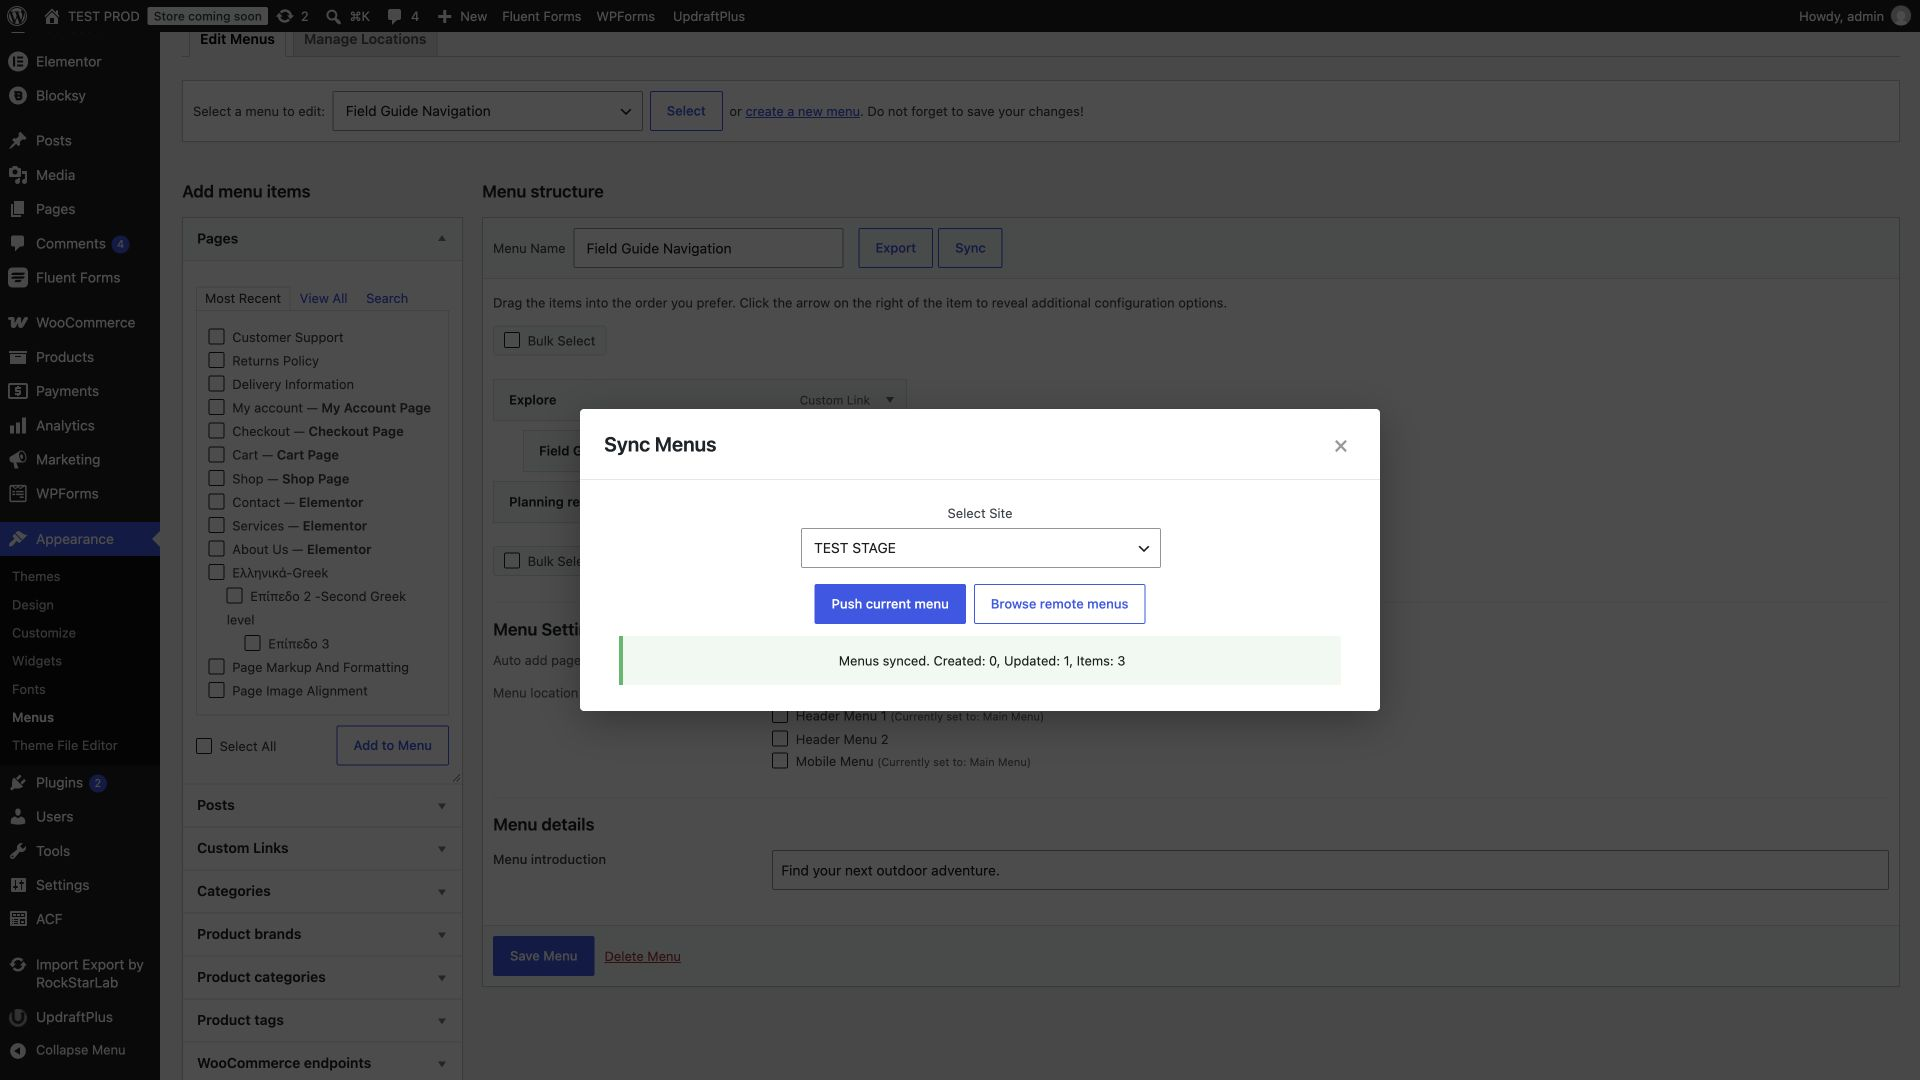
If the request times out, inspect the destination before retrying. A response can be lost after the receiving site has already made changes.
Step 4: Check hierarchy, link targets, and ACF values
Open the receiving menu in Appearance → Menus. Confirm that Explore and Planning resources are top-level items, with Field Guides beneath Explore. Expand Field Guides and check Menu Parent, the navigation label, and the Original link.
The Original link should open the destination category. A correct-looking label can still point at the wrong object, so check the link itself instead of relying on the item name. For page or post items, apply the same check to the corresponding destination page or post.
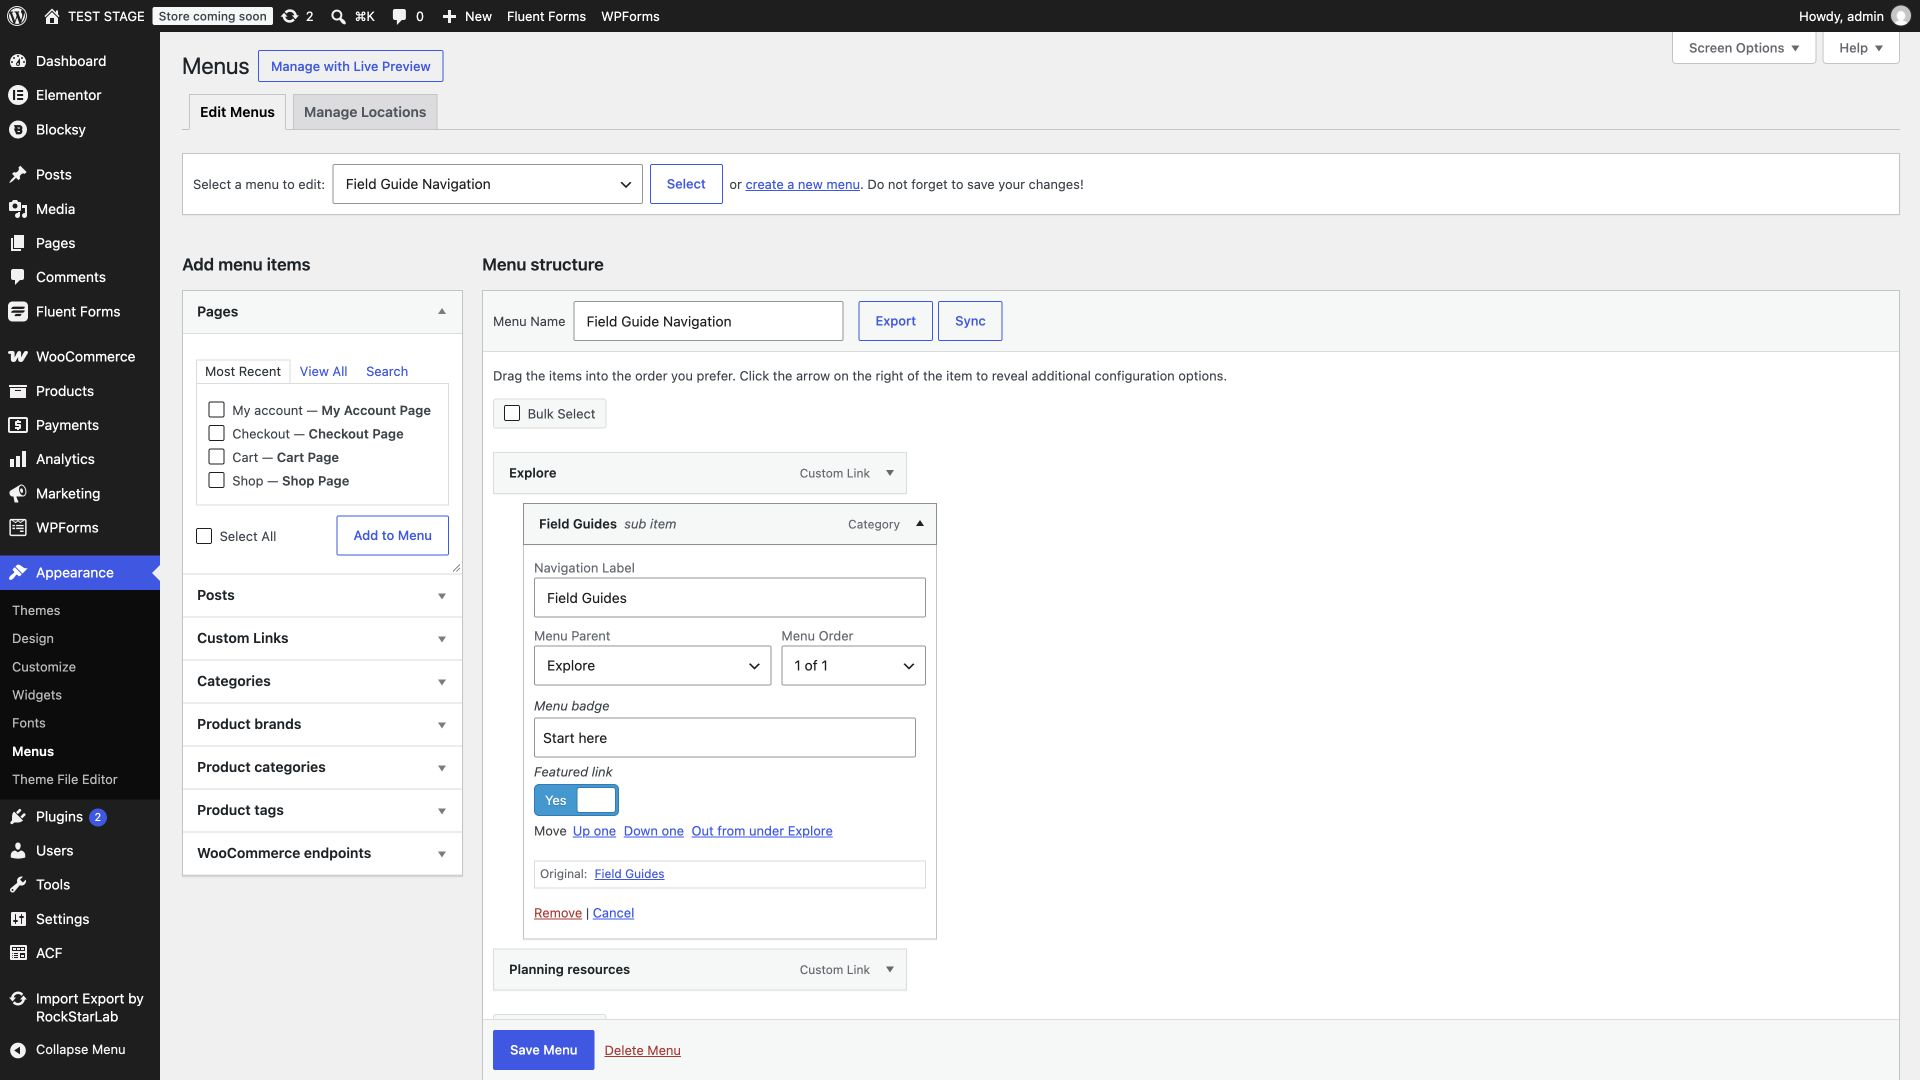
Next, compare the custom fields. The receiving menu should show the introduction, while the Field Guides item should contain Start here and an enabled Featured link switch. Check custom-link URLs as well, including external addresses and any absolute source-site links.
Once the structure is ready, select the required destination Menu location and save it. Location names come from the theme: a source header location may not exist in a different destination theme. Open the relevant page on the frontend and click through the menu. If your theme renders ACF badges, check their appearance there too.
Repeat the sync when navigation changes
Use the source menu for subsequent edits. For example, change the menu introduction to Explore routes and plan your next adventure. and the Field Guides badge to Popular guides. Save the source and push it into the same receiving menu.
The destination menu can remain the same while its items are rebuilt. Check the item hierarchy, labels, ACF values, and referenced objects after the repeat. If destination-only entries must survive, incorporate them into the source before syncing rather than expecting the operation to merge two independently edited menus.
Choose one direction for each change. Pulling an older destination menu back over the source can overwrite newer work. This process does not provide automatic conflict resolution or continuous two-way navigation synchronization.
Sync a classic menu through an AI agent
A connected agent can perform the same task through the plugin’s abilities. Start with the Abilities API and MCP setup guide. The agent should discover available abilities and inspect the current schema before running a transfer.
Prompt 1: Inspect menus and references
Inspect our source and connected destination without changing content.
Find the classic menu Field Guide Navigation on both sites.
List its items, nesting, custom URLs, and referenced pages or terms.
Check the destination records for those references.
Inspect ACF definitions and values for the menu introduction,
menu-item badge, and featured-link switch on both sites.
Show the proposed target menu and explain which items will be replaced.
Do not use a block Navigation object as the target.
The source connection’s site_id identifies a saved Content Sync connection. It is separate from both the source menu ID and the destination menu ID. Resolve all three from the actual sites.
Prompt 2: Push the approved menu with its ACF values
Push the approved classic Field Guide Navigation menu into the reviewed
destination menu using Import Export by RockStarLab.
Preserve the item order and nesting, and transfer the menu introduction,
item badge, and featured-link ACF values.
Use the confirmed destination objects for category and page links.
Replace only the reviewed target menu's items. Leave other menus alone.
Report menu and item success/failure counts. Open the destination menu
editor and check the hierarchy, links, and ACF values after the transfer.
The push ability is rsl-ie-pro/sync-menus-push. This illustrative request explicitly selects the target and maps a category reference. Replace the example IDs with discovered values:
{
  "site_id": 1,
  "menu_ids": [101],
  "remote_menu_id": 501,
  "object_mapping": {
    "taxonomy:category:201": 601
  }
}
menu_ids contains source menu IDs; remote_menu_id identifies the receiving menu. In object_mapping, the key identifies a source object and the value identifies its destination counterpart. For a page, the key format is post_type:page:SOURCE_ID; for a category, it is taxonomy:category:SOURCE_ID. Mapping references does not create the referenced content.
Without an explicit target, the ability uses menu slug matching rather than treating the source numeric menu ID as a destination identity. For an established menu, an explicitly reviewed target makes the intended replacement clear. Leave item_ids out when transferring the whole menu; do not accidentally restrict the operation to a partial selection.
Prompt 3: Apply a later ACF update
The source menu introduction and Field Guides badge have changed.
Push the same complete classic menu to the same approved destination.
Use the confirmed object mappings. Then verify the updated introduction,
Popular guides badge, enabled featured-link switch, category URL,
and Field Guides nesting under Explore in the destination editor.
Do not change theme locations or unrelated menus.

Inspect the result’s menu and item counts, including failed items. A successful request is useful feedback, but the destination editor provides the final confirmation that the intended menu and values are present.
Troubleshooting menu synchronization
| Symptom | What to check |
|---|---|
| The desired menu is absent from the editor | Confirm that it is a classic menu, not a Navigation block. |
| The receiving menu is missing from the dropdown | Create it on the connected destination, then reopen the sync dialog to refresh the selection. |
| A page or category link points to the wrong place | Check the referenced destination object and its mapping. Matching labels alone are not enough. |
| ACF fields are absent from the editor | Check ACF activation, field-group location rules, matching keys, and field types on the destination. |
| ACF values are saved but badges are not visible | Check the destination theme’s rendering code and styling. |
| The menu exists but is not in the header | Assign it to the intended theme location and save the menu. |
| Destination-only items disappear | The target items are replaced. Maintain the complete desired structure on the source. |
| The request times out | Inspect the destination state before repeating a write. |
Frequently asked questions
Can I sync a WordPress menu without an export file?
Yes. Connect the sites through Content Sync and push the classic menu from Appearance → Menus into the selected receiving menu.
Does menu synchronization require PRO?
Yes. Enable the required PRO menu-sync functionality and permissions on both participating sites.
Does this transfer block Navigation menus?
This tutorial applies to classic menus managed under Appearance → Menus. Block Navigation uses a separate WordPress content structure and is not covered by this workflow.
Can ACF fields on menus and menu items be transferred?
Yes. With compatible field definitions on both sites, menu-level and menu-item ACF values can transfer with the menu. The destination theme must separately render any visual badges or other custom output.
Will syncing the menu also migrate its pages?
Do not use menu sync as a page migration. Prepare the referenced destination pages, posts, and terms first, then verify that the menu points to them.
Does the transfer merge destination-only items?
The incoming structure replaces the selected destination menu items. Include all required entries in the source and review the target before syncing.
Why is the transferred menu missing from my header?
The destination theme controls menu locations. Assign the receiving menu to the appropriate location, save it, and check the frontend.
Can an AI agent update the menu?
Yes. A connected agent can discover the menu-sync abilities, resolve source and destination IDs and object mappings, execute the approved push, and verify the receiving editor.
For related workflows, browse the written tutorial library and the Free and PRO feature comparison.

Comments 0
Have a question or a tip to share? Leave it below.