
At the end of every month your accountant asks for the same thing: the orders of the month with totals, tax, shipping and payment method, plus the refunds. WooCommerce can show orders on screen, but a usable file for QuickBooks, Xero or a spreadsheet takes some decisions: which orders count as sales, which date decides the month, and where refunds go. The setup below exports one row per order, filtered to a month, with a separate refunds file.
We tested it on a store with sales tax for California and Texas and a month of orders: card and PayPal payments, a bank transfer, a coupon, international orders, a partial refund and a full refund. We used Import Export by RockStarLab 2.1.25 with the PRO add-on 2.1.5, WooCommerce 11.2 and WordPress 7.1. Exporting WooCommerce orders and refunds is a PRO feature.
Short Answer
- Go to Import Export → Export and choose WooCommerce Orders.
- Add three filters: Order Date greater or equal the first day of the month, Order Date less or equal the last day, and Status in
completed, processing, refunded. - Pick the columns: order number, date, status, customer, country and state, payment method, transaction ID, currency, subtotal, discount, shipping, tax and total.
- Export as CSV or XLSX.
- Export WooCommerce Refunds for the same month into a second file.
Decide What Counts as a Sale
WooCommerce orders have statuses, and not all of them are income:
- Completed and Processing: paid. Processing only means the order has not been shipped yet.
- Refunded: paid and then fully refunded. Keep it in the month it was sold, and record the refund in the month it was made.
- On hold (usually a bank transfer you have not received), Pending payment, Cancelled and Failed: no money arrived. Leave them out.
This is the usual cash view for a small shop. If your accountant works differently, for example with the date the payment arrived, use Paid Date instead of Order Date in the filters below.
Step 1: Filter the Orders of the Month
Open Import Export → Export, choose WooCommerce Orders and click Next Step. Add the filters:

- Order Date, Greater or Equal, 1 October 2026.
- Order Date, Less or Equal, 31 October 2026. Dates compare by day, so orders placed late on the 31st are included.
- Status, In,
completed, processing, refunded, separated by commas.
The counter shows 7 orders. October also had a cancelled order and an unpaid check order, and there were orders on 28 September and 2 November; the filters left all four out.
Step 2: Choose the Columns
On Select Fields, drag the columns into Export File Structure in the order your accountant wants them:
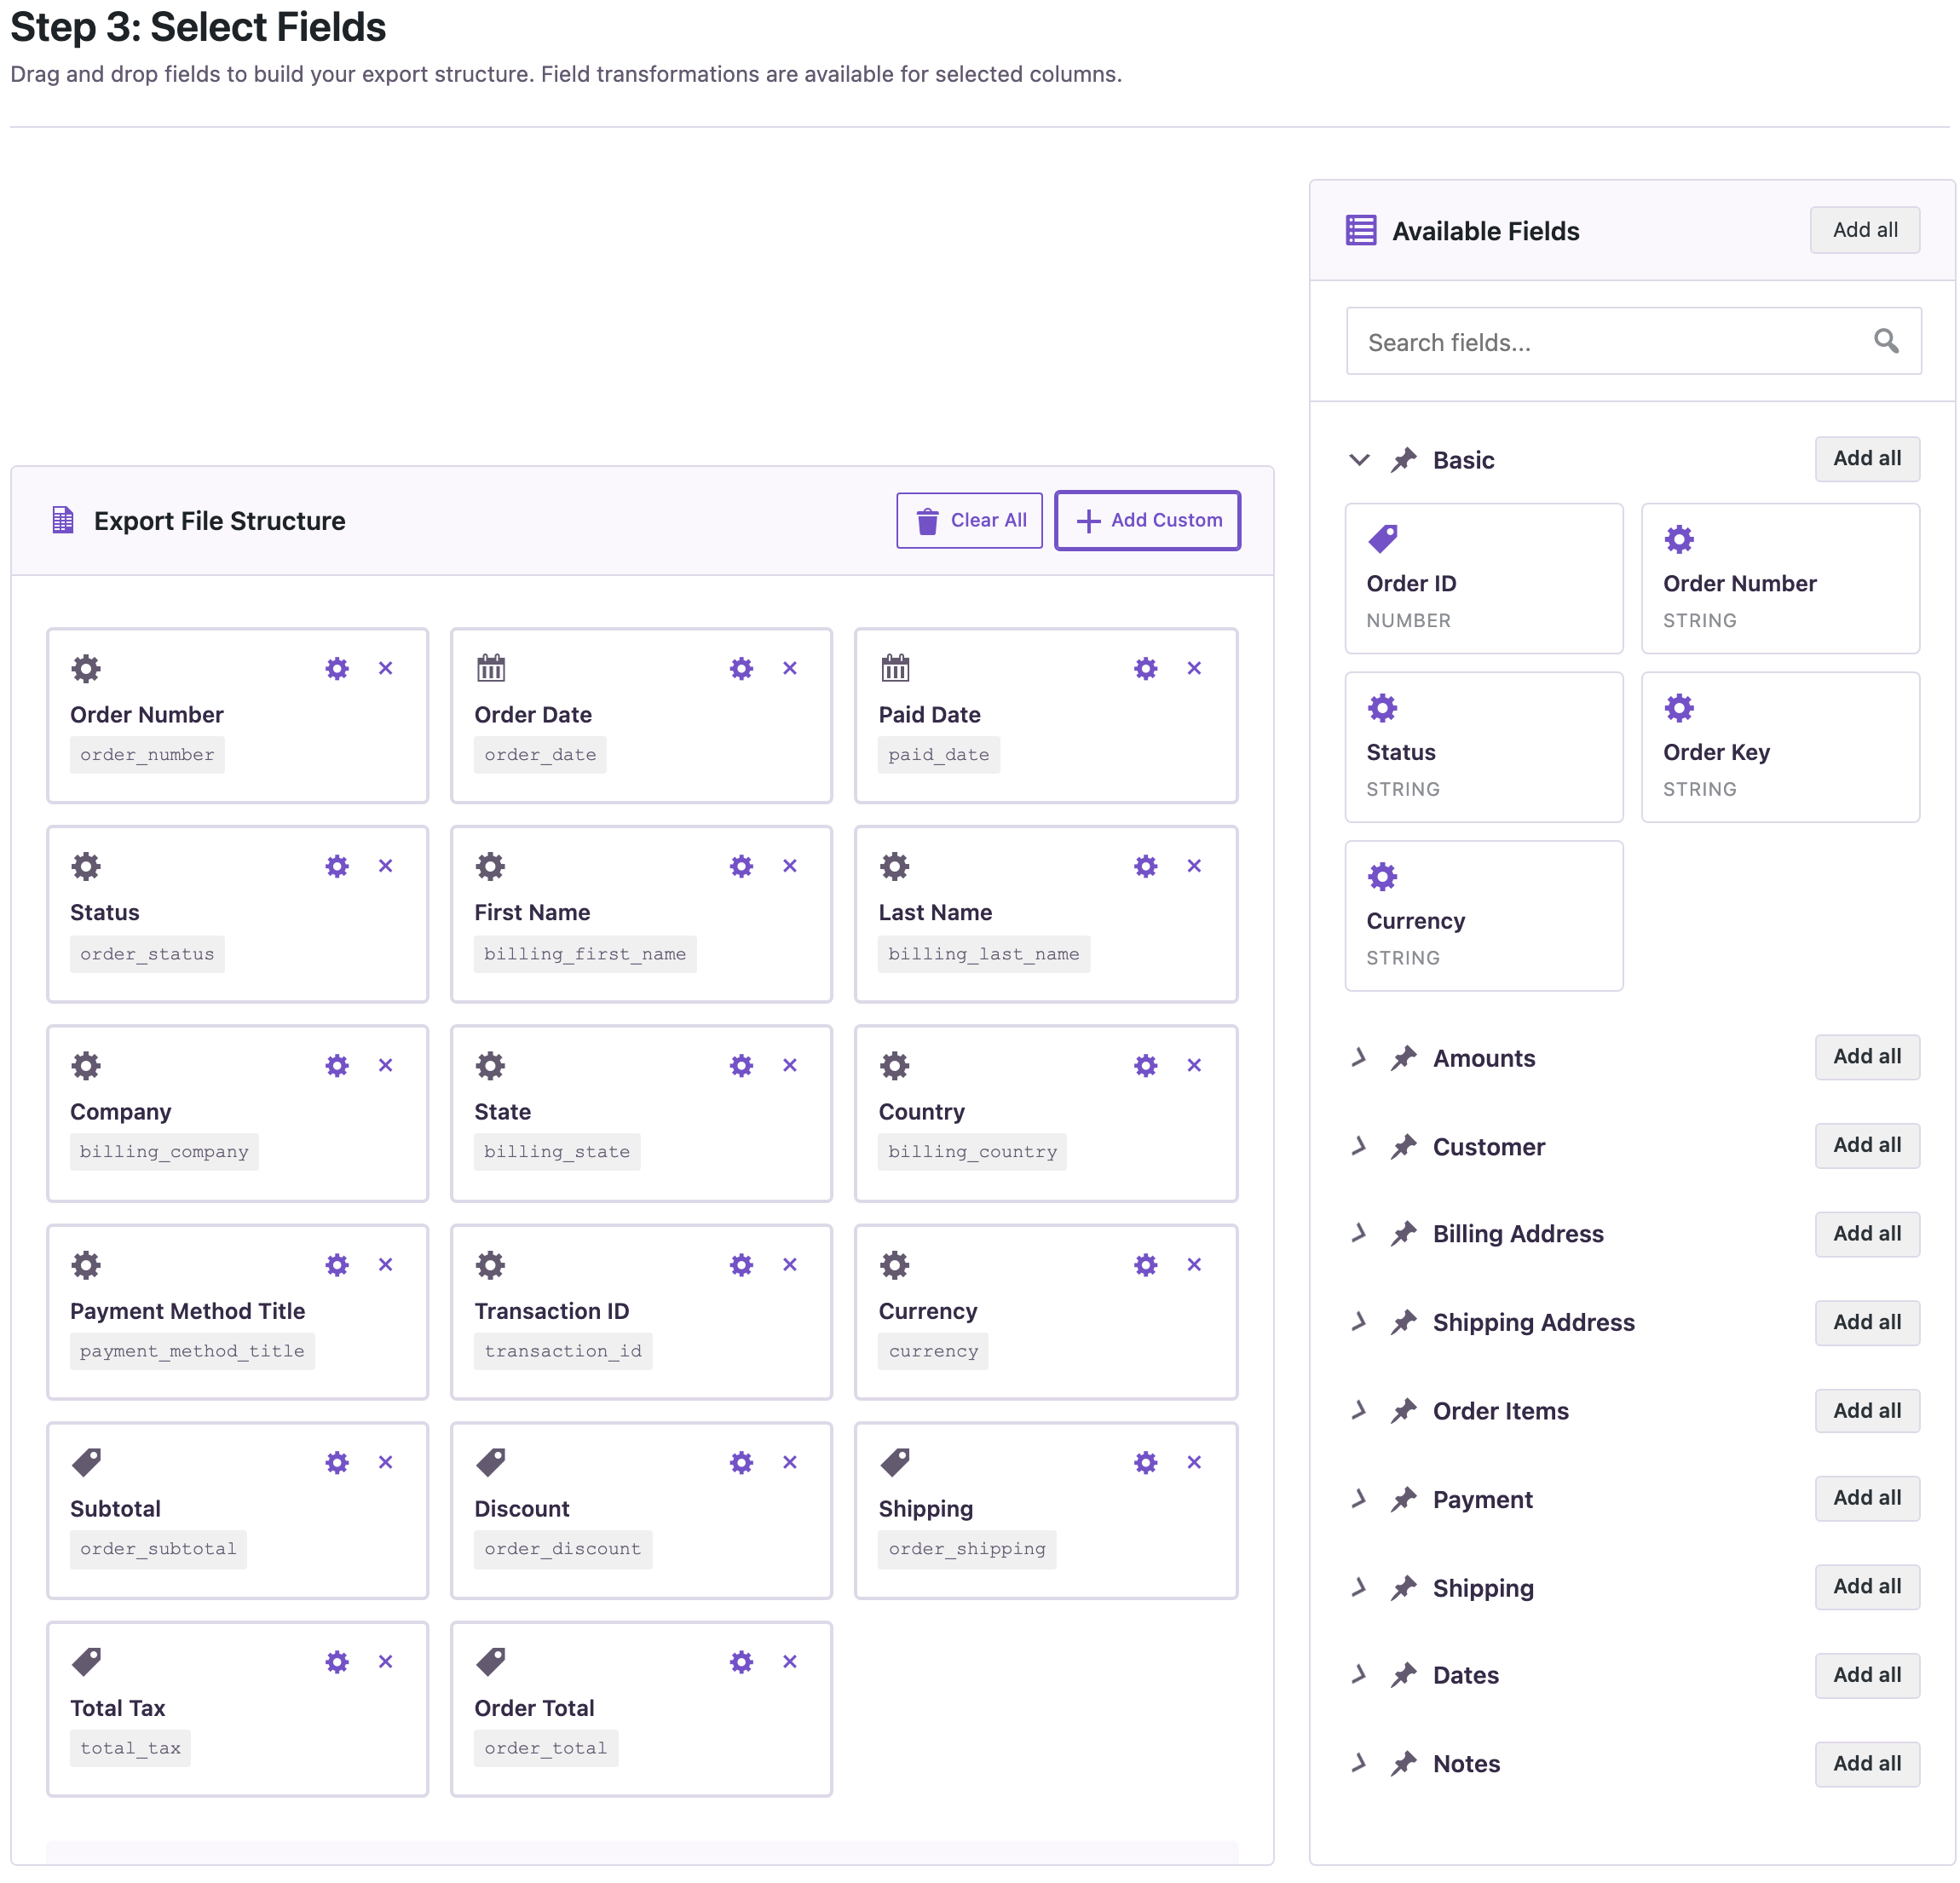
- Order Number, Order Date and Paid Date.
- Status, so refunded orders are easy to spot.
- First Name, Last Name, Company, State and Country from the billing address. State and country decide the sales tax; companies often need an invoice name.
- Payment Method Title and Transaction ID, to match each order with the Stripe or PayPal payout.
- Currency, Subtotal, Discount, Shipping, Total Tax and Order Total.
Leave out customer IP addresses, user agents and order notes; your accountant does not need them.
Step 3: Export and Check the Totals
Choose CSV (or XLSX for Excel), click Start Export and download the file. One row per order:

How the amounts fit together:
- order_subtotal is the price of the items before the coupon. order_discount is the coupon: order 2051 had 10% off 45.00.
- order_total = subtotal − discount + shipping + total_tax. For the month: 379.00 − 4.50 + 60.00 + 18.70 = 453.20.
- total_tax includes tax on shipping. The German and British orders have no US sales tax, so their tax is 0.00.
- Amounts are plain numbers with the store’s decimals (41.00, 4.50), without currency symbols, so a spreadsheet can add them up.
- transaction_id is empty for the bank transfer: there is no gateway payment to link to.
Order 2056 was refunded in full on 3 November. It stays in the October file with status refunded and its original total, and the refund goes into November.
Step 4: Export the Refunds
Refunds are separate records in WooCommerce, with their own date. Start a new export, choose WooCommerce Refunds and filter Date Created to the same month:

Choose Parent Order Number, Date Created, Amount, Reason and Currency:

In October there was one partial refund: 25.00 of order 2052, a returned shirt. Its order stays “completed” because only part of it was refunded, which is why refunds need their own file: the orders export alone would not show this money going back.
Sales Tax and VAT
- For a sales tax return, group the orders file by billing_state (or the shipping state, if your taxes are based on the shipping address) and add up total_tax.
- For VAT, add billing_country and the company name, and keep the VAT number if a plugin stores it with the order: add it with Add Custom as an order meta field.
- Tax rates and tax on shipping are set in WooCommerce → Settings → Tax. The export shows the amounts WooCommerce calculated; it does not recalculate them.
Importing into QuickBooks or Xero
Both accept CSV files of sales, but their column names and required fields change between versions and plans. The usual way is to export with the columns above, then map them on the accounting side or rename the header row once in a spreadsheet and keep that file as a template. Many shops import only the monthly totals by payment method instead of each order; a pivot table on the export gives you those numbers in a minute.
If you use a dedicated integration that syncs orders automatically, the export is still useful as a monthly cross-check.
Common Mistakes
- Exporting all statuses. Cancelled and pending orders were never paid. Filter by status.
- Taking refunded orders out of the month they were sold. Keep the sale in its month and record the refund when it happened.
- Using the orders file alone. Partial refunds do not change an order’s status. Export refunds too.
- Mixing currencies. If your shop sells in more than one currency, add Currency and total each currency separately.
- Opening the CSV with the wrong regional settings. In countries that write decimals with a comma, Excel may read 4.50 as text. Use XLSX or import the CSV with “.” as the decimal separator.
FAQ
Can I export one row per product instead of per order?
The order export has one row per order. The products of each order are in the Order Items column as a list, which is enough to check an order but not to total products. For sales by product, use WooCommerce Analytics.
Which time zone are the dates in?
The site’s time zone from Settings → General, the same times you see on the Orders screen.
Can I export only orders paid with PayPal?
Yes. Add a filter Payment Method equals the gateway ID, for example ppcp-gateway, or filter Payment Method Title contains PayPal.
Do I need PRO?
Yes, WooCommerce orders and refunds are PRO exports.
Related Guides
- How to Import WooCommerce Orders from CSV
- How to Export All WooCommerce Orders into CSV or Excel
- How to Export All WooCommerce Refunds to CSV or Excel
- How to Export WooCommerce Customers to CSV
- WordPress Export Data Filters: Examples and How to Use Them
Get the free plugin on WordPress.org.

Comments 0
Have a question or a tip to share? Leave it below.