
The Codex app, the codex CLI and the Codex extension in your editor read their MCP (Model Context Protocol) servers from the same config.toml, so a WordPress site added once is available in all three. Codex then counts and lists content, exports pages and posts, checks import jobs or syncs content between sites, talking to the site directly over HTTP. On the WordPress side, the official MCP Adapter plugin is the server.
The free Import Export by RockStarLab plugin writes the Codex settings for you and adds more than 100 actions for exports, imports and content sync. It was tested in the Codex app on macOS with WordPress 7.1, MCP Adapter 0.7.1 and version 2.1.18 of the plugin, with two real requests.
Short Answer
- Go to Import Export by RockStarLab > Plugin Options > AI Agent Connection, turn on Enable Abilities API and let the wizard activate MCP Adapter.
- Create an Application Password in Users > Profile.
- In step 4 of the wizard, choose Codex, paste the password, generate the command and run it in your terminal. It adds a
[mcp_servers.wordpress]section to~/.codex/config.toml. - Restart Codex and check the server with
codex mcp listor /mcp. - Start a new chat and send the first request, naming the
wordpressserver.
What You Need
- WordPress 6.9 or newer, where the Abilities API is part of core, and an administrator account.
- HTTPS on a live site. WordPress only offers Application Passwords over HTTPS, except on local development sites.
- Codex: the Codex app, the
codexCLI or the Codex extension in your editor, signed in. All three read the sameconfig.toml, so you set up the site once. - Python 3.11 or newer if you use the one-command setup, because it checks the TOML file before writing it. Without it, use the Custom config method below.
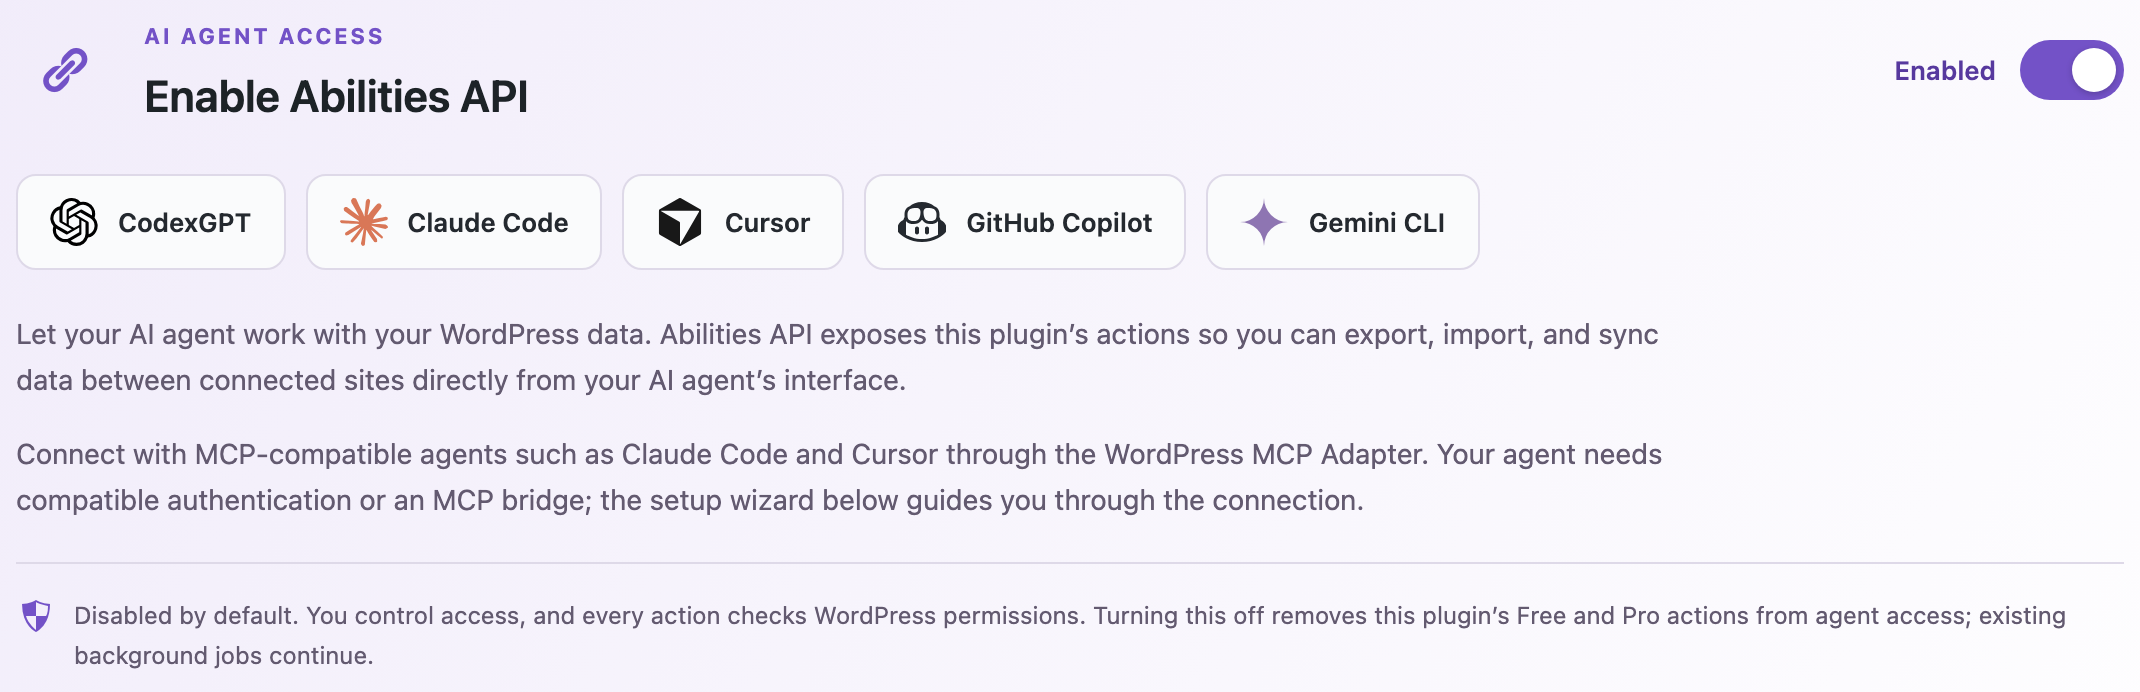
Step 1: Turn On Agent Access
Go to Import Export by RockStarLab > Plugin Options > AI Agent Connection and turn on Enable Abilities API. The setup wizard appears below the switch.
Step 2: Activate MCP Adapter and Create a Password
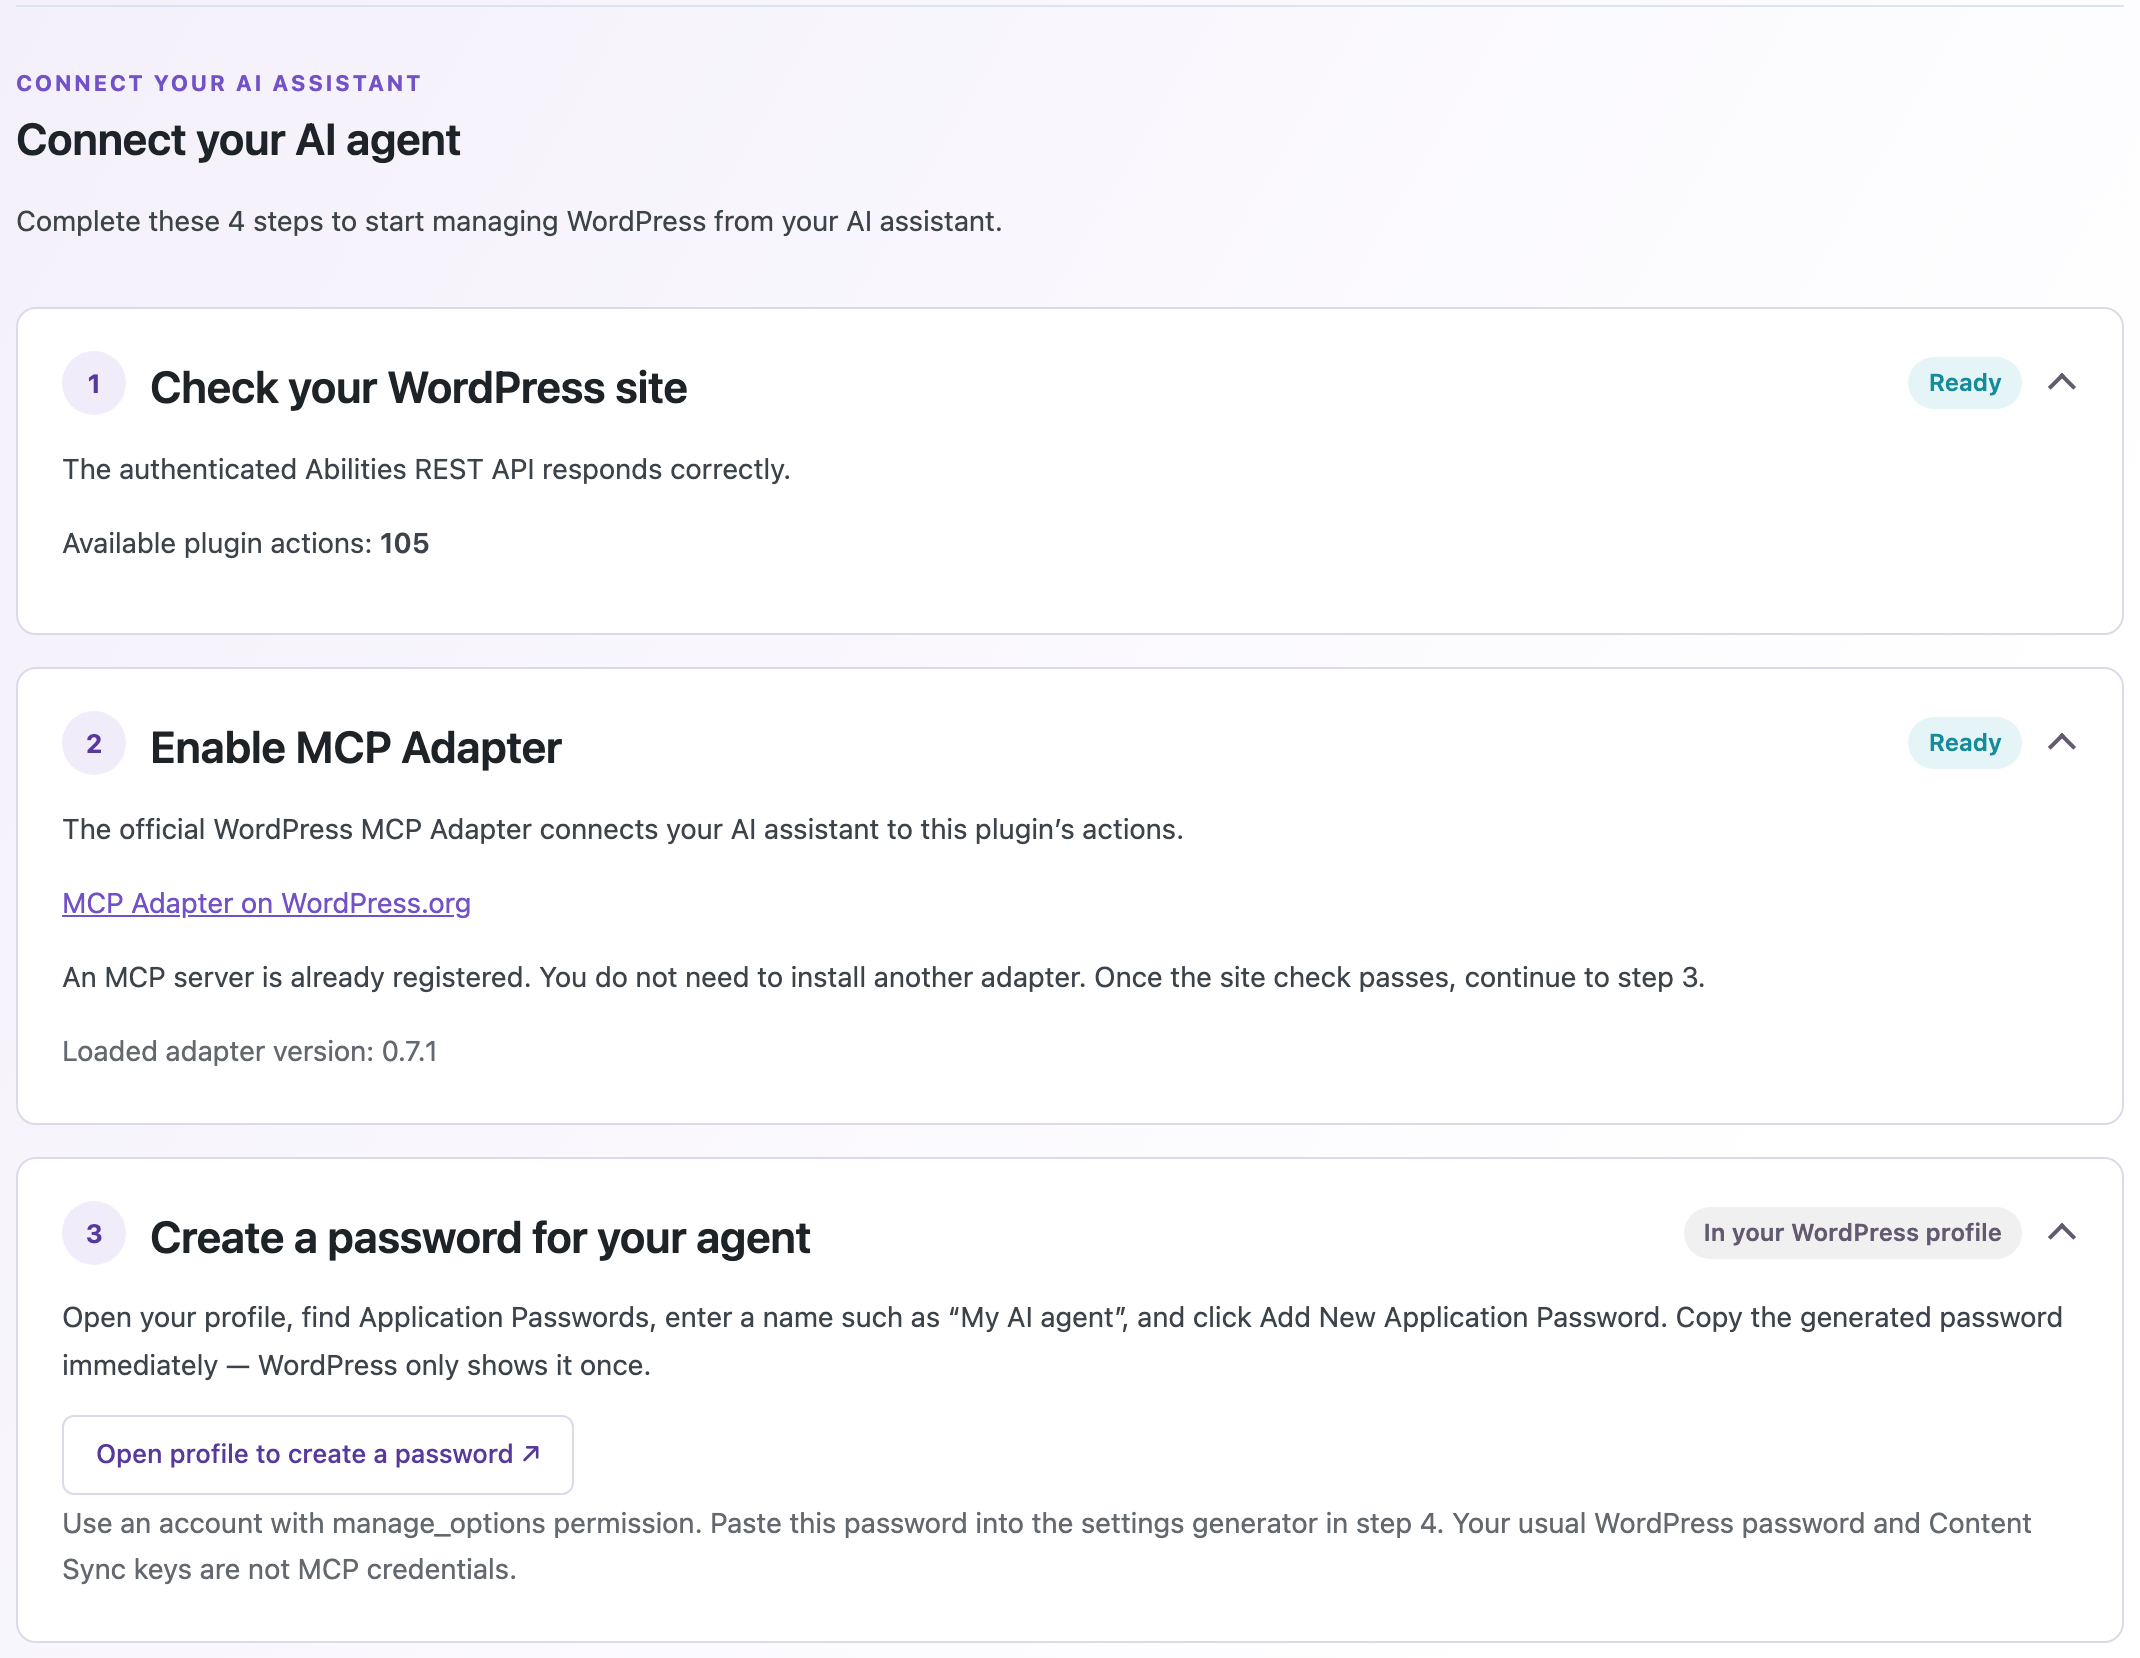
Step 2 of the wizard installs and activates MCP Adapter with one click. Step 3 links to your profile, where you create an Application Password: enter a name such as “Codex”, click Add Application Password and copy the password. WordPress shows it only once.
Step 3: Add the Site to Codex
In step 4 of the wizard, choose Codex as the AI app and One command as the method, select your terminal, and paste your username and the Application Password. Click Generate connection and Copy result. The command is built in your browser; the password is not sent anywhere.
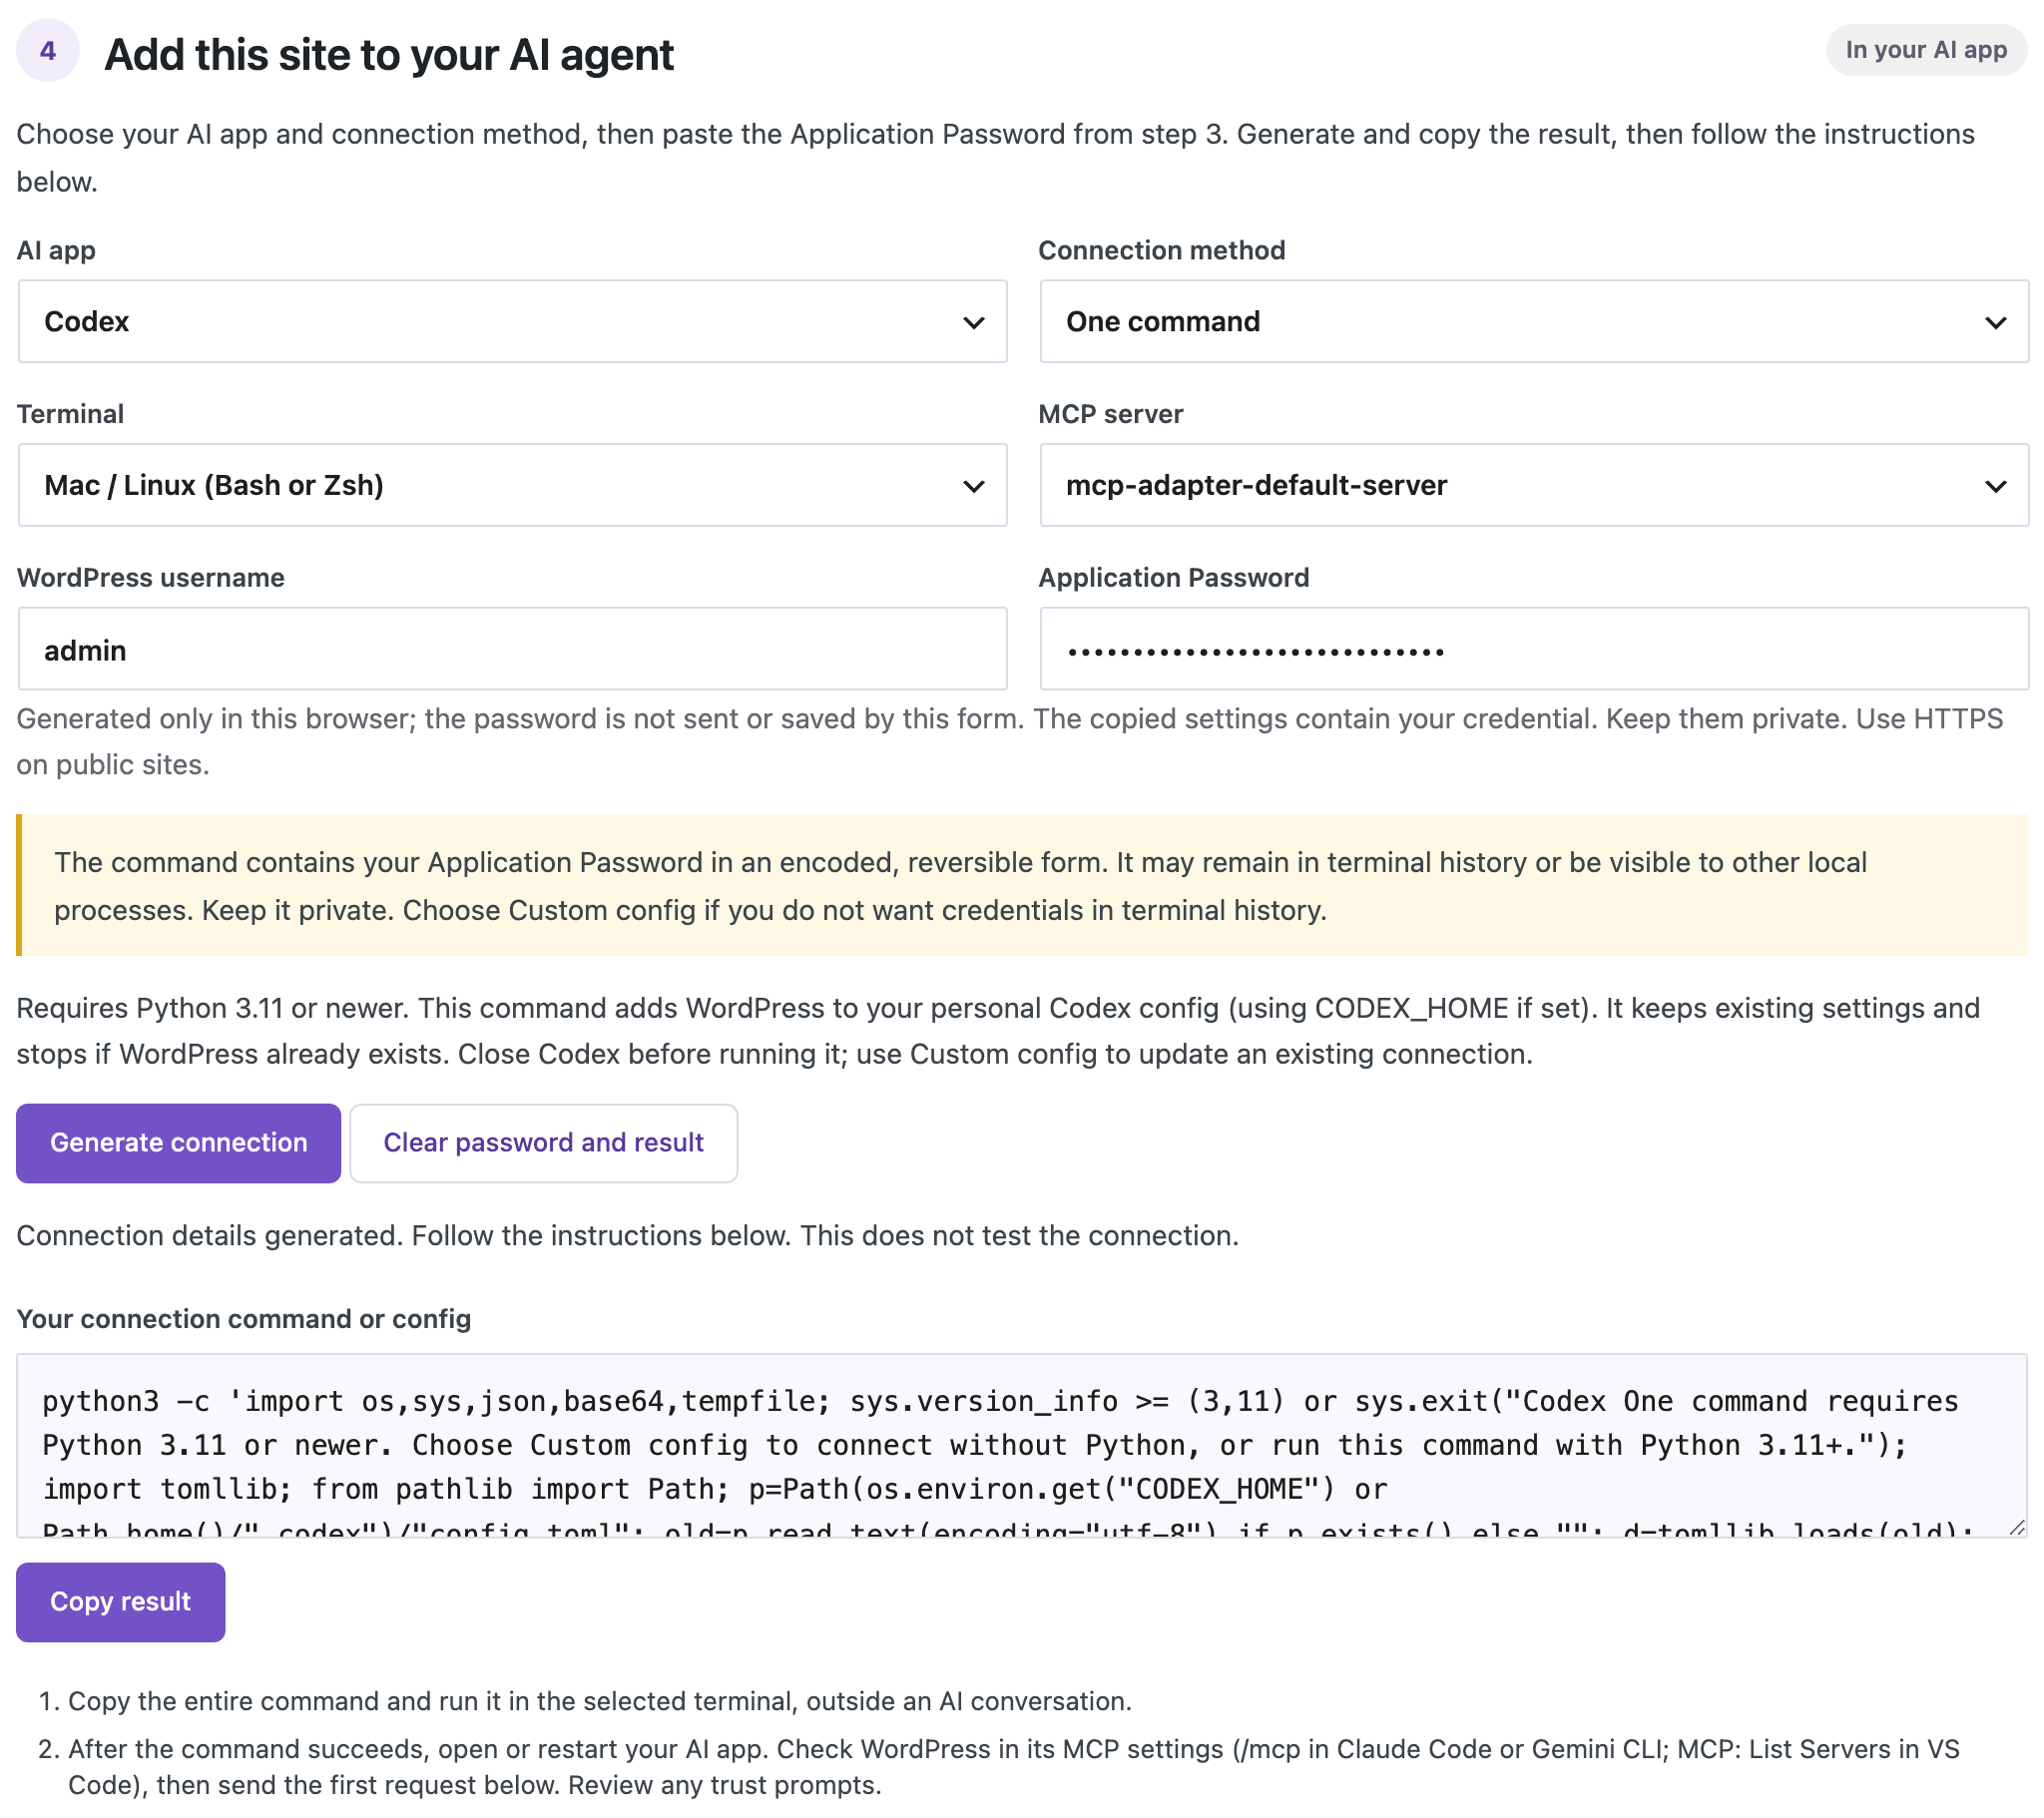
Close Codex, paste the command into a terminal and run it. It reads ~/.codex/config.toml (or the folder in CODEX_HOME, if you set one), adds a wordpress server at the end, checks that the file is still valid TOML and prints WordPress added. Restart your AI app. Your other settings and servers stay as they are. If a server named wordpress already exists, the command stops and changes nothing.
With Custom config, the wizard shows the section to add by hand at the end of config.toml:
[mcp_servers.wordpress]
url = "https://your-site.com/wp-json/mcp/mcp-adapter-default-server"
http_headers = { Authorization = "Basic ..." }
The Basic value is your username and Application Password in Base64, which is an encoding, not encryption, so keep the file private.
Step 4: Check the Connection
Restart Codex. In a terminal, codex mcp list shows the wordpress server with its address and the status enabled. The Auth column says “Bearer token” for any server with an Authorization header; the Basic header from the wizard works all the same. In the CLI or IDE extension, /mcp lists the server and its tools.
When Codex starts, it connects to every MCP server in the file and loads three tools from WordPress: Discover Abilities, Get Ability Info and Execute Ability. The actual actions (“abilities”) come from plugins: Import Export by RockStarLab adds its export, import, job, sync and migration actions, and other plugins add their own. Codex sends every header the current MCP protocol asks for, so no extra settings were needed in our test.
Step 5: Send the First Request
Start a new chat and send the first request from the wizard. We added “Use the MCP server named wordpress”, because our Codex had several WordPress sites connected; with only one site you can leave it out:
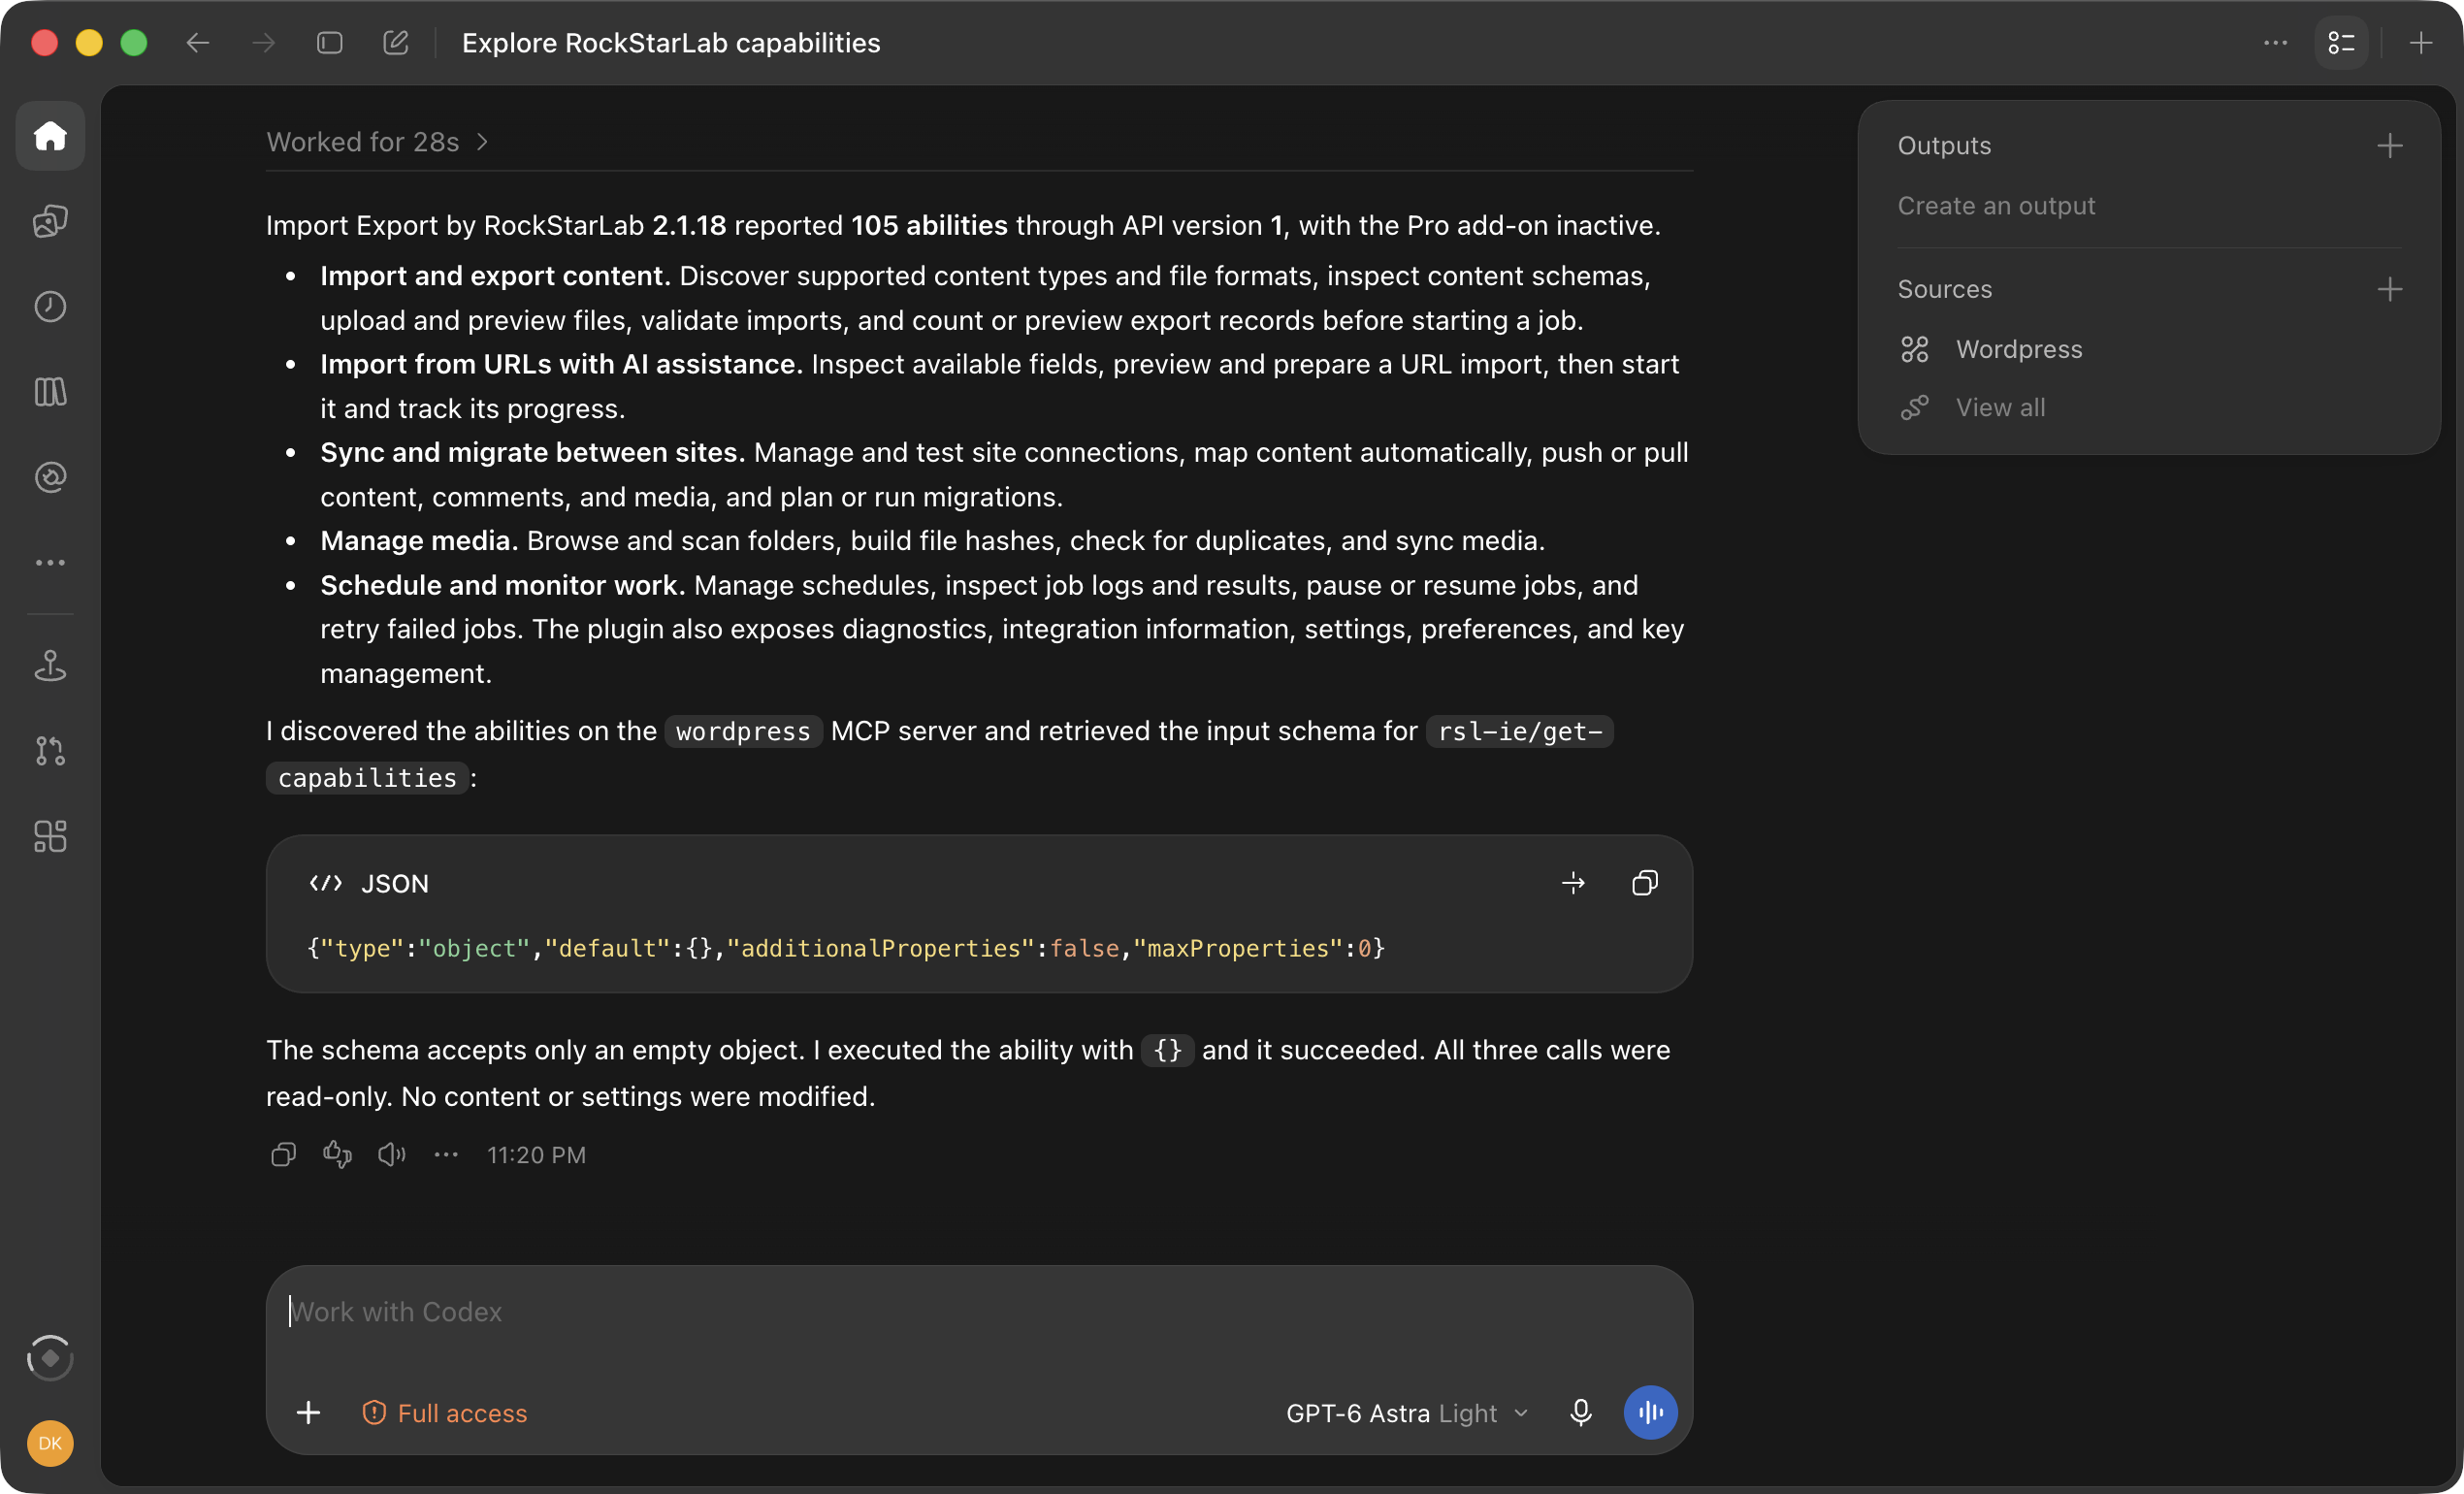
Use the MCP server named wordpress. Discover its abilities, get the input schema for rsl-ie/get-capabilities, then execute it with empty parameters {}. Summarize what Import Export by RockStarLab can do. Do not modify any content or settings.
Codex made three calls to the WordPress tools and answered in 28 seconds. It reported the plugin version, the number of abilities and that the Pro add-on is inactive, showed the input schema it had checked, and confirmed that all three calls were read-only:
A Real Task: Stale Pages and a CSV Inventory
The second request asked for published pages that nobody has edited since 2024, and for a CSV inventory of all published pages:
Use the MCP server named wordpress. Check the site for stale content: find published pages that have not been modified since January 1, 2024. For each one, show the title, address, last modified date and word count. Then export all published pages to a CSV file named content-inventory with ID, Title, Permalink, Status, Modified Date, Word Count and the Yoast meta description, and give me the browser download link. Do not change any content.
Codex worked for 1 minute and made 16 calls to the WordPress tools. It used the plugin’s own export, which processed all 9 published pages, and answered with a table of the five stale pages and a link to content-inventory.csv:
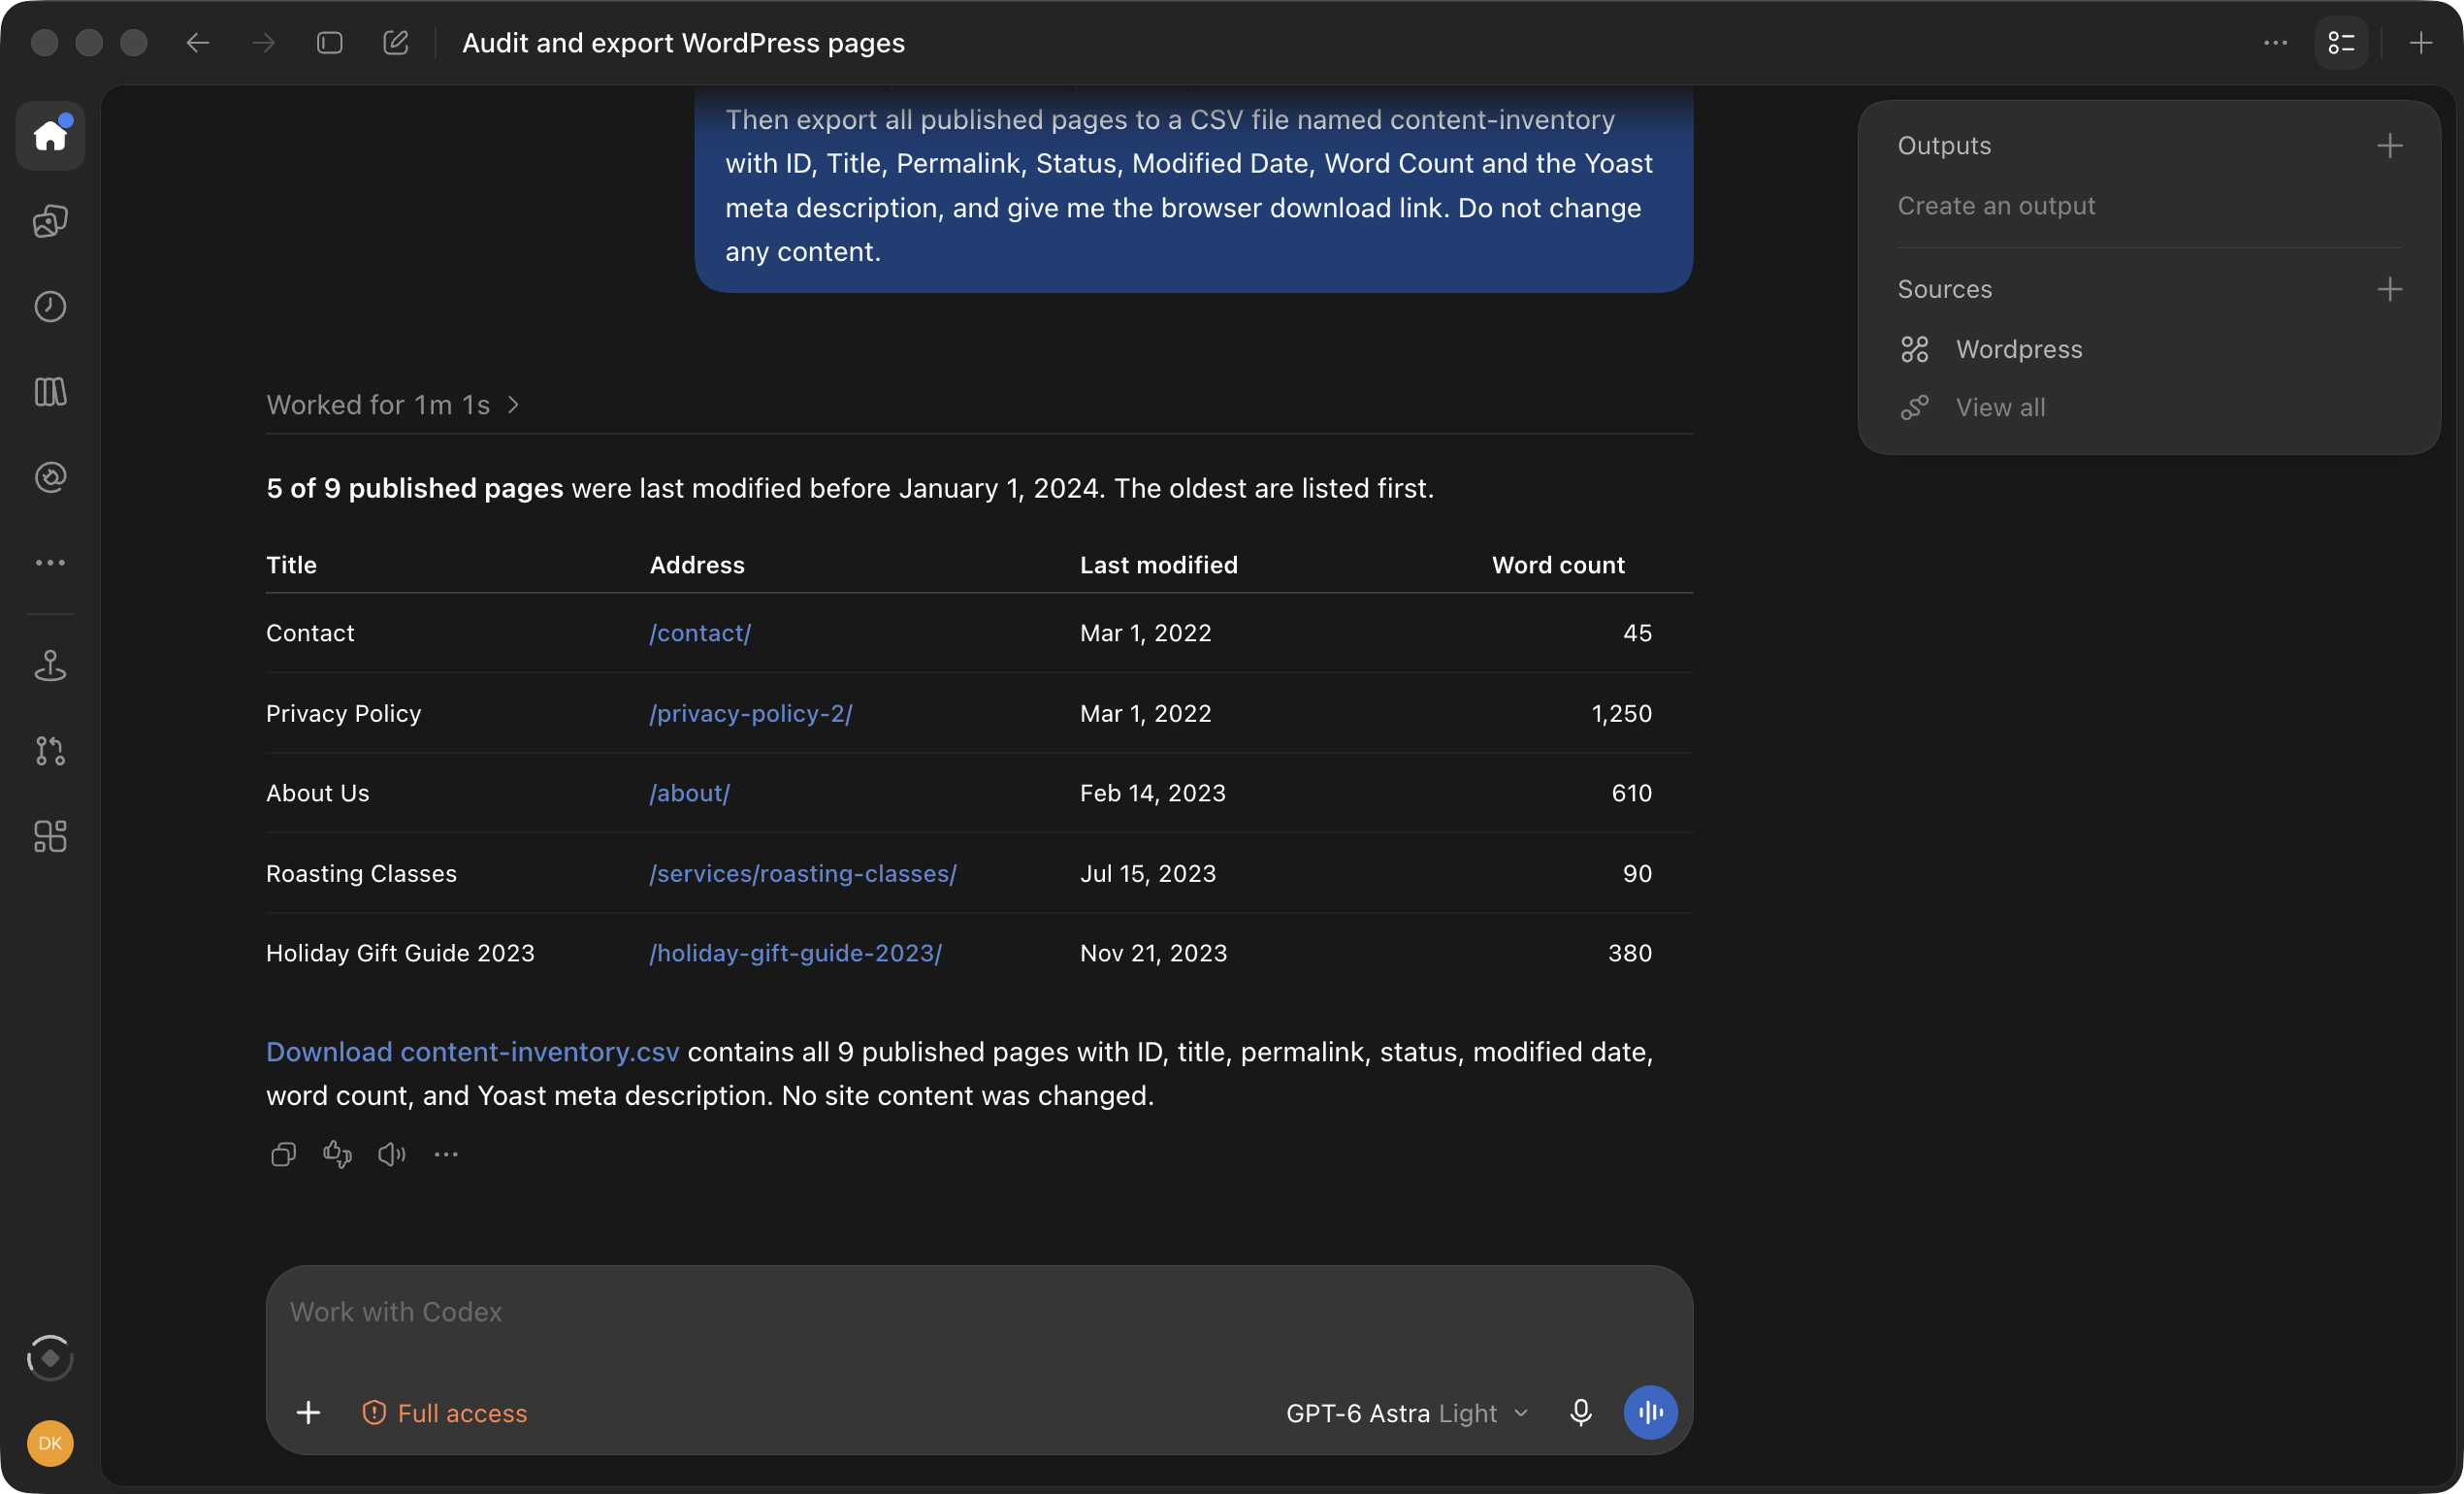
We compared the answer with the CSV file that the plugin created. The titles, addresses, dates and word counts (45, 1,250, 610, 90 and 380 words) all matched, because Codex read them from the plugin’s export instead of estimating them. The same inventory can be built by hand in the dashboard, as described in WordPress Content Inventory: Export All Pages with Dates, Authors and Status.
More Requests to Try
- “How many posts, pages, comments and media files does the site have? Do not change anything.”
- “List the last 10 import and export jobs with their status, and show the errors of any job that failed.”
- “Export all blog posts published in 2025 to an Excel file with the title, permalink, categories and featured image URL, and give me the browser download link.”
- “Find pages whose content contains old-domain.com and list their titles and addresses.”
Before You Let It Change Anything
Reading and exporting do not change the site. Imports, syncs and setting changes do. Make a backup first: with UpdraftPlus, click Backup Now, or turn on Enable Abilities API for UpdraftPlus on the same settings page and ask Codex to run rsl-ie/updraftplus-backup-start and check it with rsl-ie/updraftplus-backup-status. Both ways are described in How to Create a WordPress Website Backup and Restore It.
Check the permission mode before a task that writes. In Full access mode, the Codex app can run commands and edit files without asking for approval. With the default permissions it works inside its workspace and asks when it needs more access. Every WordPress action goes through the same Execute Ability tool, so if you connect several sites, name the one to use in every request, and try new kinds of tasks on a staging site first.
Troubleshooting
All connection errors with their exact messages and fixes are collected in WordPress MCP Adapter Errors: Fix 401, 404 and Application Password Problems.
“The model requires a newer version of Codex”
An older codex CLI cannot use the newest models and stops before it reaches WordPress. Update the CLI, or use the Codex app, which ships its own up-to-date CLI.
HTTP 401 for one of the servers
Codex starts every server in config.toml, so a 401 in the log can come from another site with an old password. Check which address it belongs to. For your WordPress site, create a new Application Password and update the Authorization value. On Apache, add SetEnvIf Authorization "(.*)" HTTP_AUTHORIZATION=$1 to .htaccess if the header does not reach WordPress.
“Codex One command requires Python 3.11 or newer”
Your python3 is older. Use Custom config and paste the section into config.toml by hand.
“WordPress already exists. Use Custom config.”
The command never overwrites an existing [mcp_servers.wordpress] section. Edit that section in config.toml, or add the site under another name such as [mcp_servers.wordpress-shop].
“Invalid config. Use Custom config.”
Your config.toml could not be read as TOML, or its mcp_servers entry has an unexpected format. Fix the file or add the section by hand.
Codex connects but finds no rsl-ie abilities
Enable Abilities API is off, or the account has no administrator rights. Turn the switch on and use an administrator’s Application Password.
FAQ
Does this work with other MCP clients?
Yes. The same wizard generates settings for Claude Code, GitHub Copilot in VS Code, Cursor and Gemini CLI. Step-by-step guides with tested requests are available for Claude Code, GitHub Copilot and Cursor.
Can I connect several sites?
Yes. Add one section per site, for example [mcp_servers.wordpress-shop] and [mcp_servers.wordpress-blog], each with its own address and Application Password, and name the server in your request.
Do I need the Pro version?
No. The connection and the free actions for posts, pages, comments, media, URL lists, jobs, content sync and migration work with the free plugin. The Pro add-on adds actions for WooCommerce, custom post types, users and menus.
Related Guides
- Letting an AI Agent Edit WordPress Content Safely: Permissions, Staging, Rollback
- WordPress MCP Adapter errors: fix 401, 404 and Application Password problems
- How to connect Claude Code to WordPress via MCP
- How to connect GitHub Copilot to WordPress via MCP
- How to connect Cursor to WordPress via MCP
- How to use the WordPress Abilities API with AI agents
Import Export by RockStarLab is free on WordPress.org.

Comments 0
Have a question or a tip to share? Leave it below.