
To import WooCommerce coupons, open Import Export by RockStarLab → Import, select WooCommerce Coupons, upload your CSV and map its columns to the coupon fields. Choose whether matching coupon codes should be updated or skipped, then start the import. The same workflow handles percentage discounts, fixed cart discounts and fixed product discounts.
Getting the code into WooCommerce is only part of the task. The amount, discount type, restrictions and expiry date must describe the offer you actually intend. A value of 10 can mean 10 percent off, 10 off a cart or 10 off each eligible item. A good import preserves that distinction.
This walkthrough uses three sample coupons imported into a separate WooCommerce installation. The first run created three coupons. Repeating the file with matching by Coupon Code updated the same three records without creating duplicates. The screenshots show the actual wizard and saved WooCommerce settings.
The interface screenshots in this guide use version 2.0 of Import Export by RockStarLab.
Before importing coupons
WooCommerce must be active on the destination, and the WooCommerce Coupons content type must be available in Import Export by RockStarLab. The test installation has the PRO add-on enabled. Make a database backup before starting, especially if existing coupons will be updated. The import wizard displays a backup reminder before you proceed.
Check that coupon use is enabled under WooCommerce → Settings → General. The WooCommerce coupon management documentation explains that setting. Importing a coupon record and enabling customers to enter coupon codes are separate parts of the setup.
If you are moving coupons between stores, prepare referenced products and categories on the destination first. A product ID from the source database may identify a completely different product on the destination. The basic example below deliberately avoids product restrictions so you can verify the main workflow first.
Begin with a small file whose expected results you can inspect individually. Record whether you expect new coupons, updates or both. Keep the input file and a note of the matching settings so a later rerun has a clear purpose.
Prepare a WooCommerce coupon CSV
Use one coupon per data row and a first row containing column names. Save the file as UTF-8 CSV. You can download the example coupon CSV or create the following file:
post_title,post_excerpt,discount_type,coupon_amount,post_status,minimum_amount,individual_use,exclude_sale_items,usage_limit,usage_limit_per_user,date_expires
article-welcome10,  Newsletter welcome offer  ,percent,10,publish,0,1,0,100,1,2027-12-31
article-save15,  Save 15 on orders of 75 or more  ,fixed_cart,15,publish,75,1,1,50,1,2027-12-31
article-item5,  Five off each eligible item  ,fixed_product,5,publish,0,1,0,25,1,2027-12-31
The spaces around the descriptions are deliberate. We will remove them using Trim Whitespace during mapping. The codes themselves have no surrounding spaces.
| Code | Discount | Selected limits |
|---|---|---|
| article-welcome10 | 10% on eligible items | 100 uses overall, one per customer |
| article-save15 | 15 in the store currency off an eligible cart with minimum spend 75 | 50 uses overall, one per customer, sale items excluded |
| article-item5 | 5 in the store currency off each eligible item | 25 uses overall, one per customer |
All three examples enable Individual Use Only. The fixed product discount describes the calculation; it does not automatically restrict the code to one specific product. Add allowed-product restrictions if that is what your campaign requires. Similarly, a description mentioning a newsletter does not itself check subscription status.
Use the exact discount type
The accepted values shown by the importer are percent, fixed_cart and fixed_product. Use those values rather than descriptive spreadsheet labels such as “ten percent welcome offer.” Keep descriptions in their own column.
Enter plain numbers for Amount. A 10 percent coupon uses 10, not 10% or 0.10. For monetary amounts, use a decimal point and omit currency symbols and thousands separators: 15.50, for example. The amount uses the destination store’s currency; the file does not perform currency conversion.
For the boolean columns in this example, consistently use 1 for enabled and 0 for disabled. This makes the file easy to inspect before importing.
Set an unambiguous expiry date
The file uses YYYY-MM-DD. The tested WooCommerce editor states that a coupon expires at 00:00:00 on the specified date. Therefore, 2027-12-31 should not be described as valid through the end of December 31. Choose and test the appropriate expiry date for the intended campaign and store time zone.
Check spreadsheet date formatting before saving. A value like 04/05/2027 can be interpreted differently across applications; 2027-05-04 is explicit. After import, inspect the actual saved date in WooCommerce.
Step 1: Select WooCommerce Coupons
- Sign in to the destination WordPress administration area.
- Open Import Export by RockStarLab → Import.
- Search for coupons and select WooCommerce Coupons.
- Click Next Step. After creating your backup, acknowledge the backup reminder and continue.
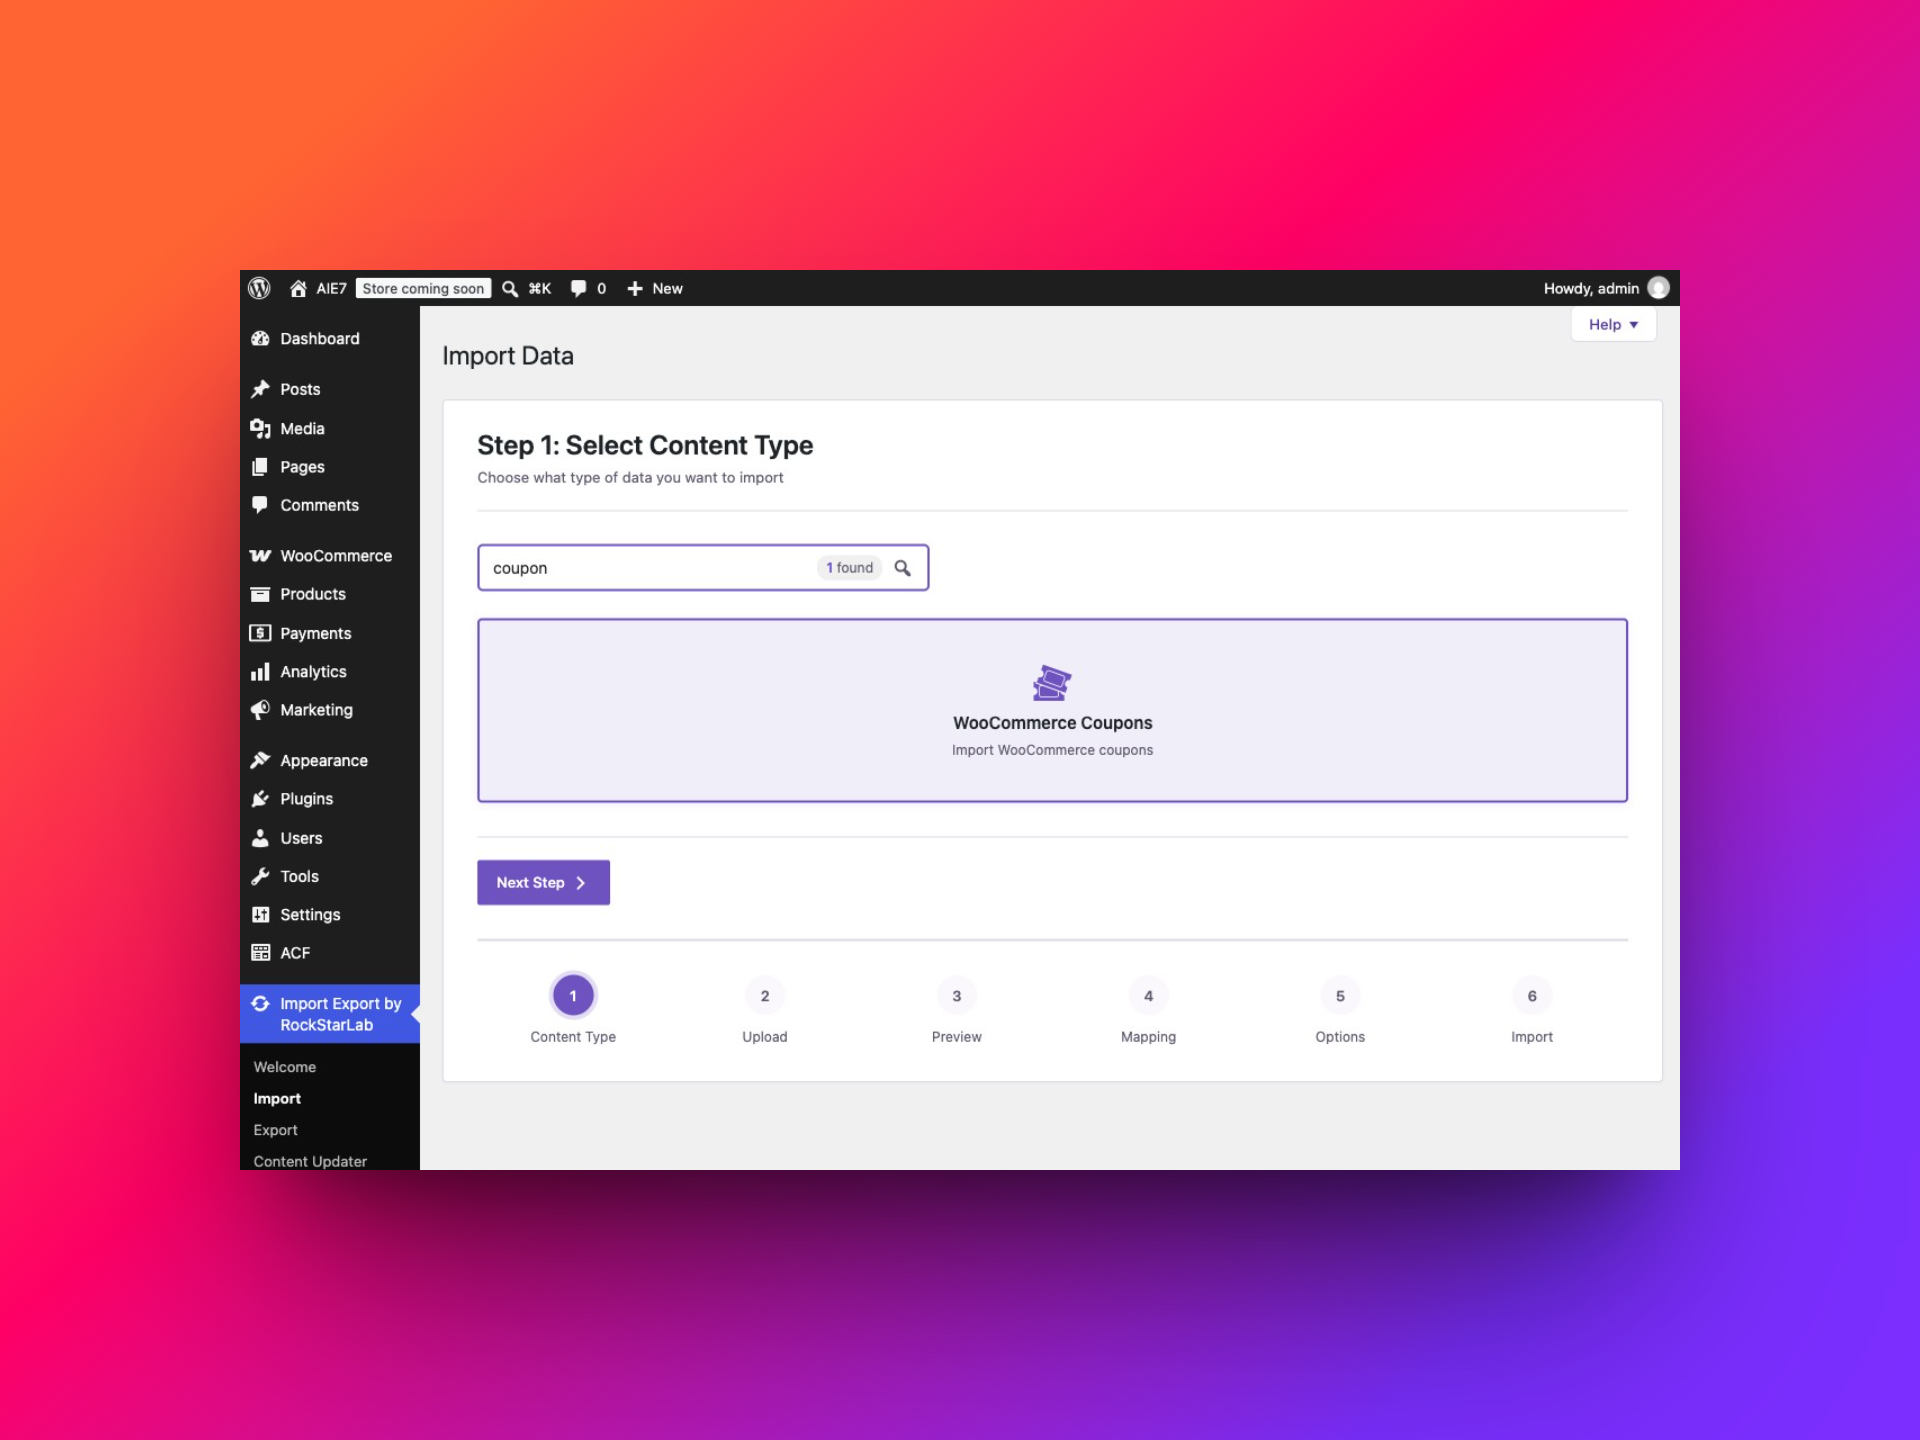
This content type exposes the coupon fields directly. You do not need to construct a generic custom-post import and guess WooCommerce metadata keys.
Step 2: Upload the file and inspect the preview
Click Select File and choose the CSV. The upload screen also supports JSON, XML, XLSX, ODS and ZIP containing a supported import file. For the sample CSV, select Comma as the delimiter and keep First row contains column names checked.
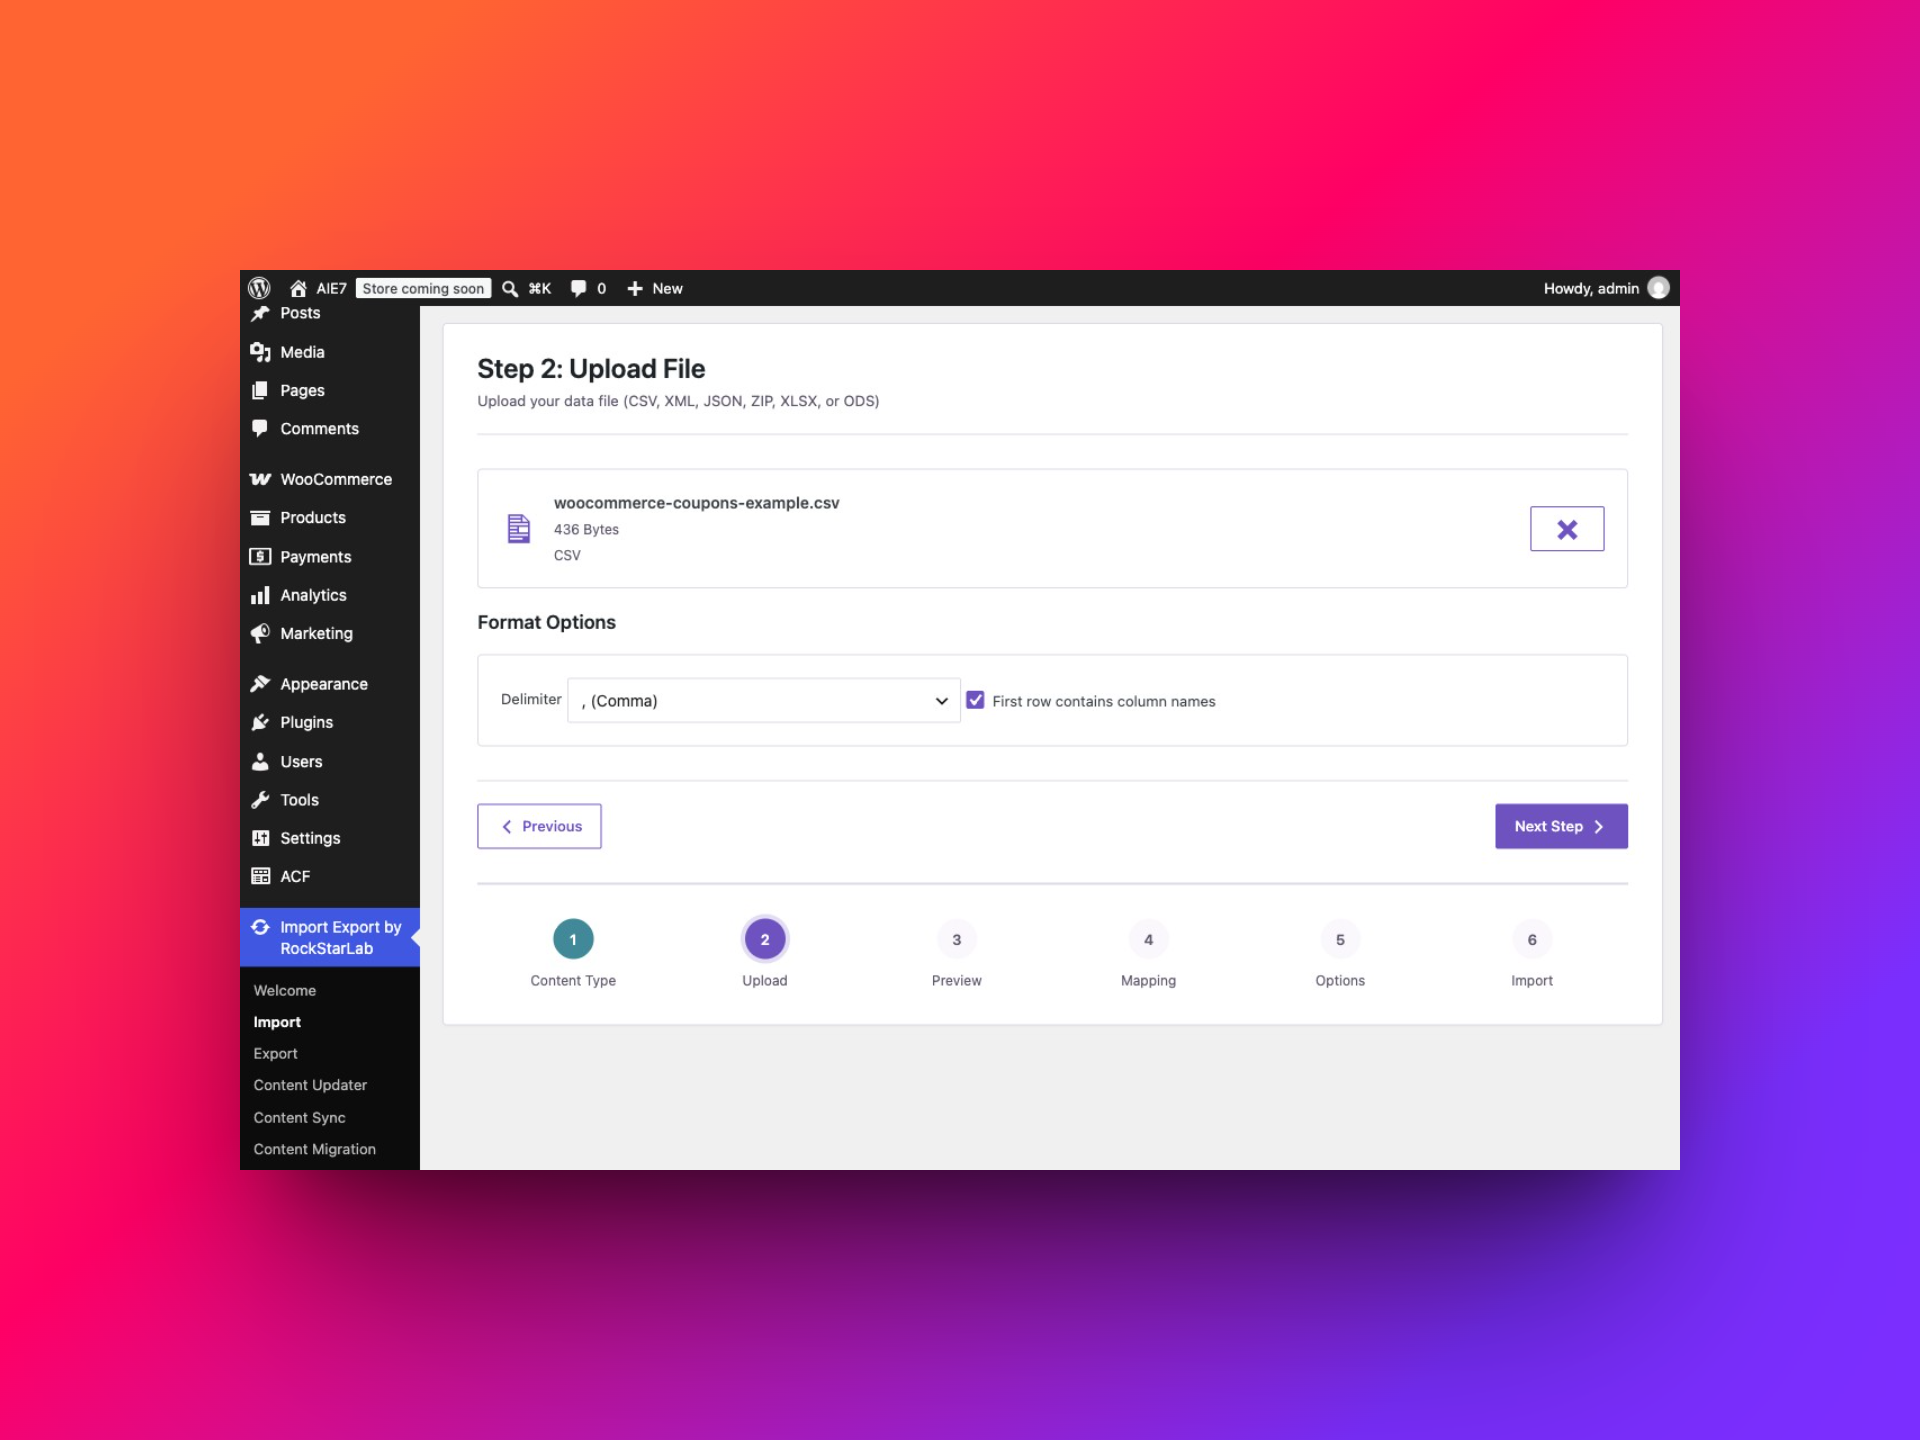
Continue to Preview Data. Check that codes appear under post_title, discount types under discount_type, and amounts under coupon_amount. Inspect the final columns too: a misplaced comma can shift limits or dates into the wrong position.
The preview shows Total Rows: 3 and Columns: 11. These are the three coupon records in the sample file; the column-name row is not an additional coupon.
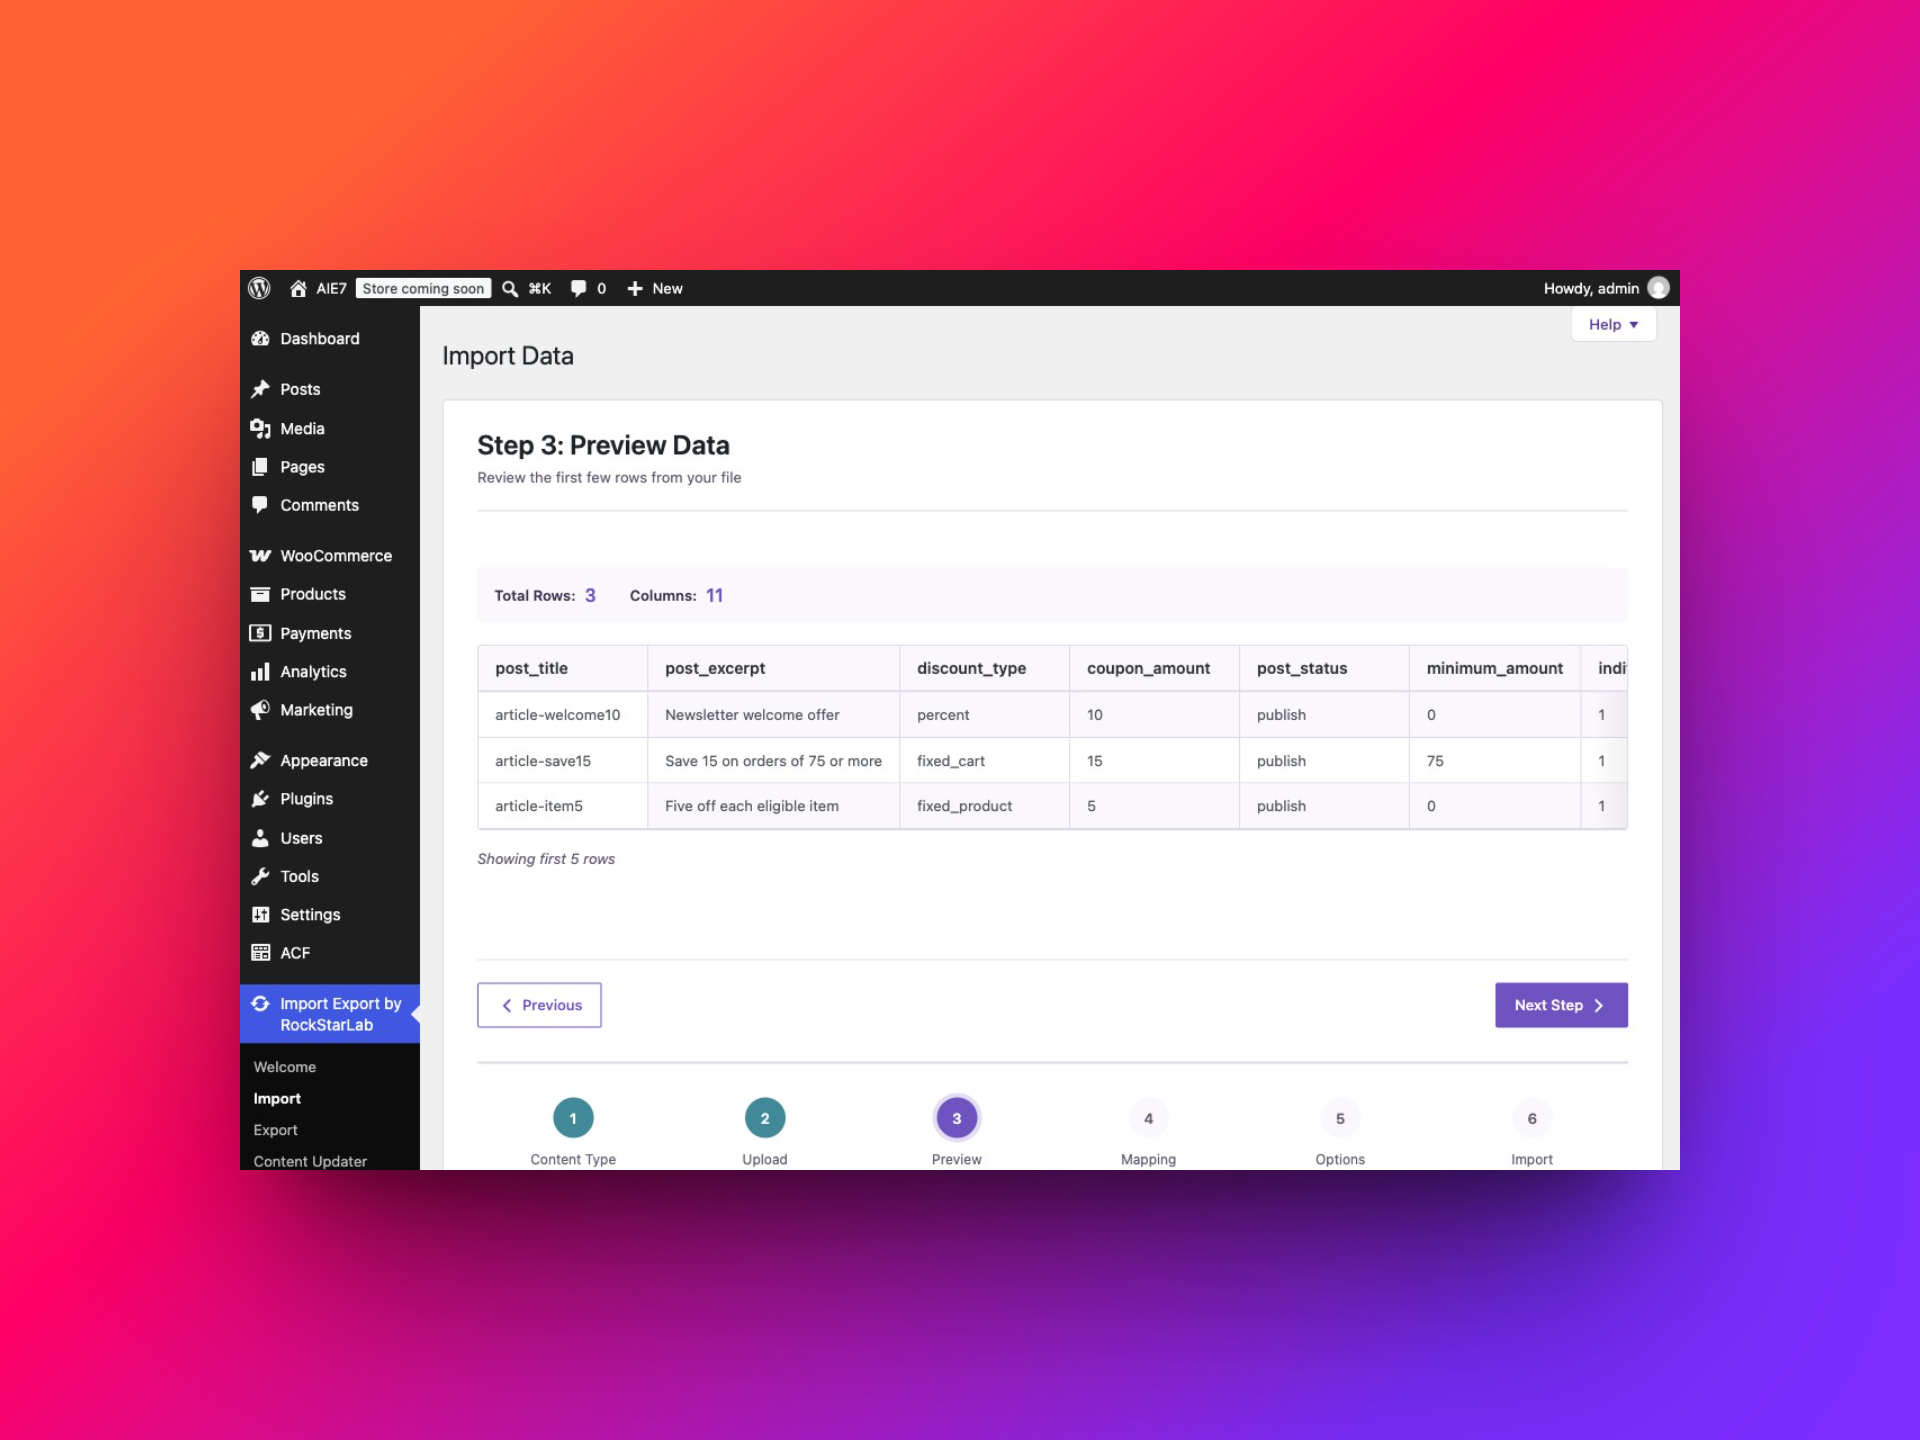
If the entire row appears in one column, correct the delimiter. If a description contains a comma, enclose that CSV cell in double quotes. For example, "Welcome offer, October campaign" is one description, not two columns. Use the preview to confirm that quoting has been preserved.
Step 3: Map CSV columns to coupon fields
The screen places Your File Columns beside WordPress Fields. Click Auto Map when the headers use recognized field names, then inspect every match. The sample file mapped all eleven columns. If a file uses a different header, such as promo_code, map it manually to Coupon Code.
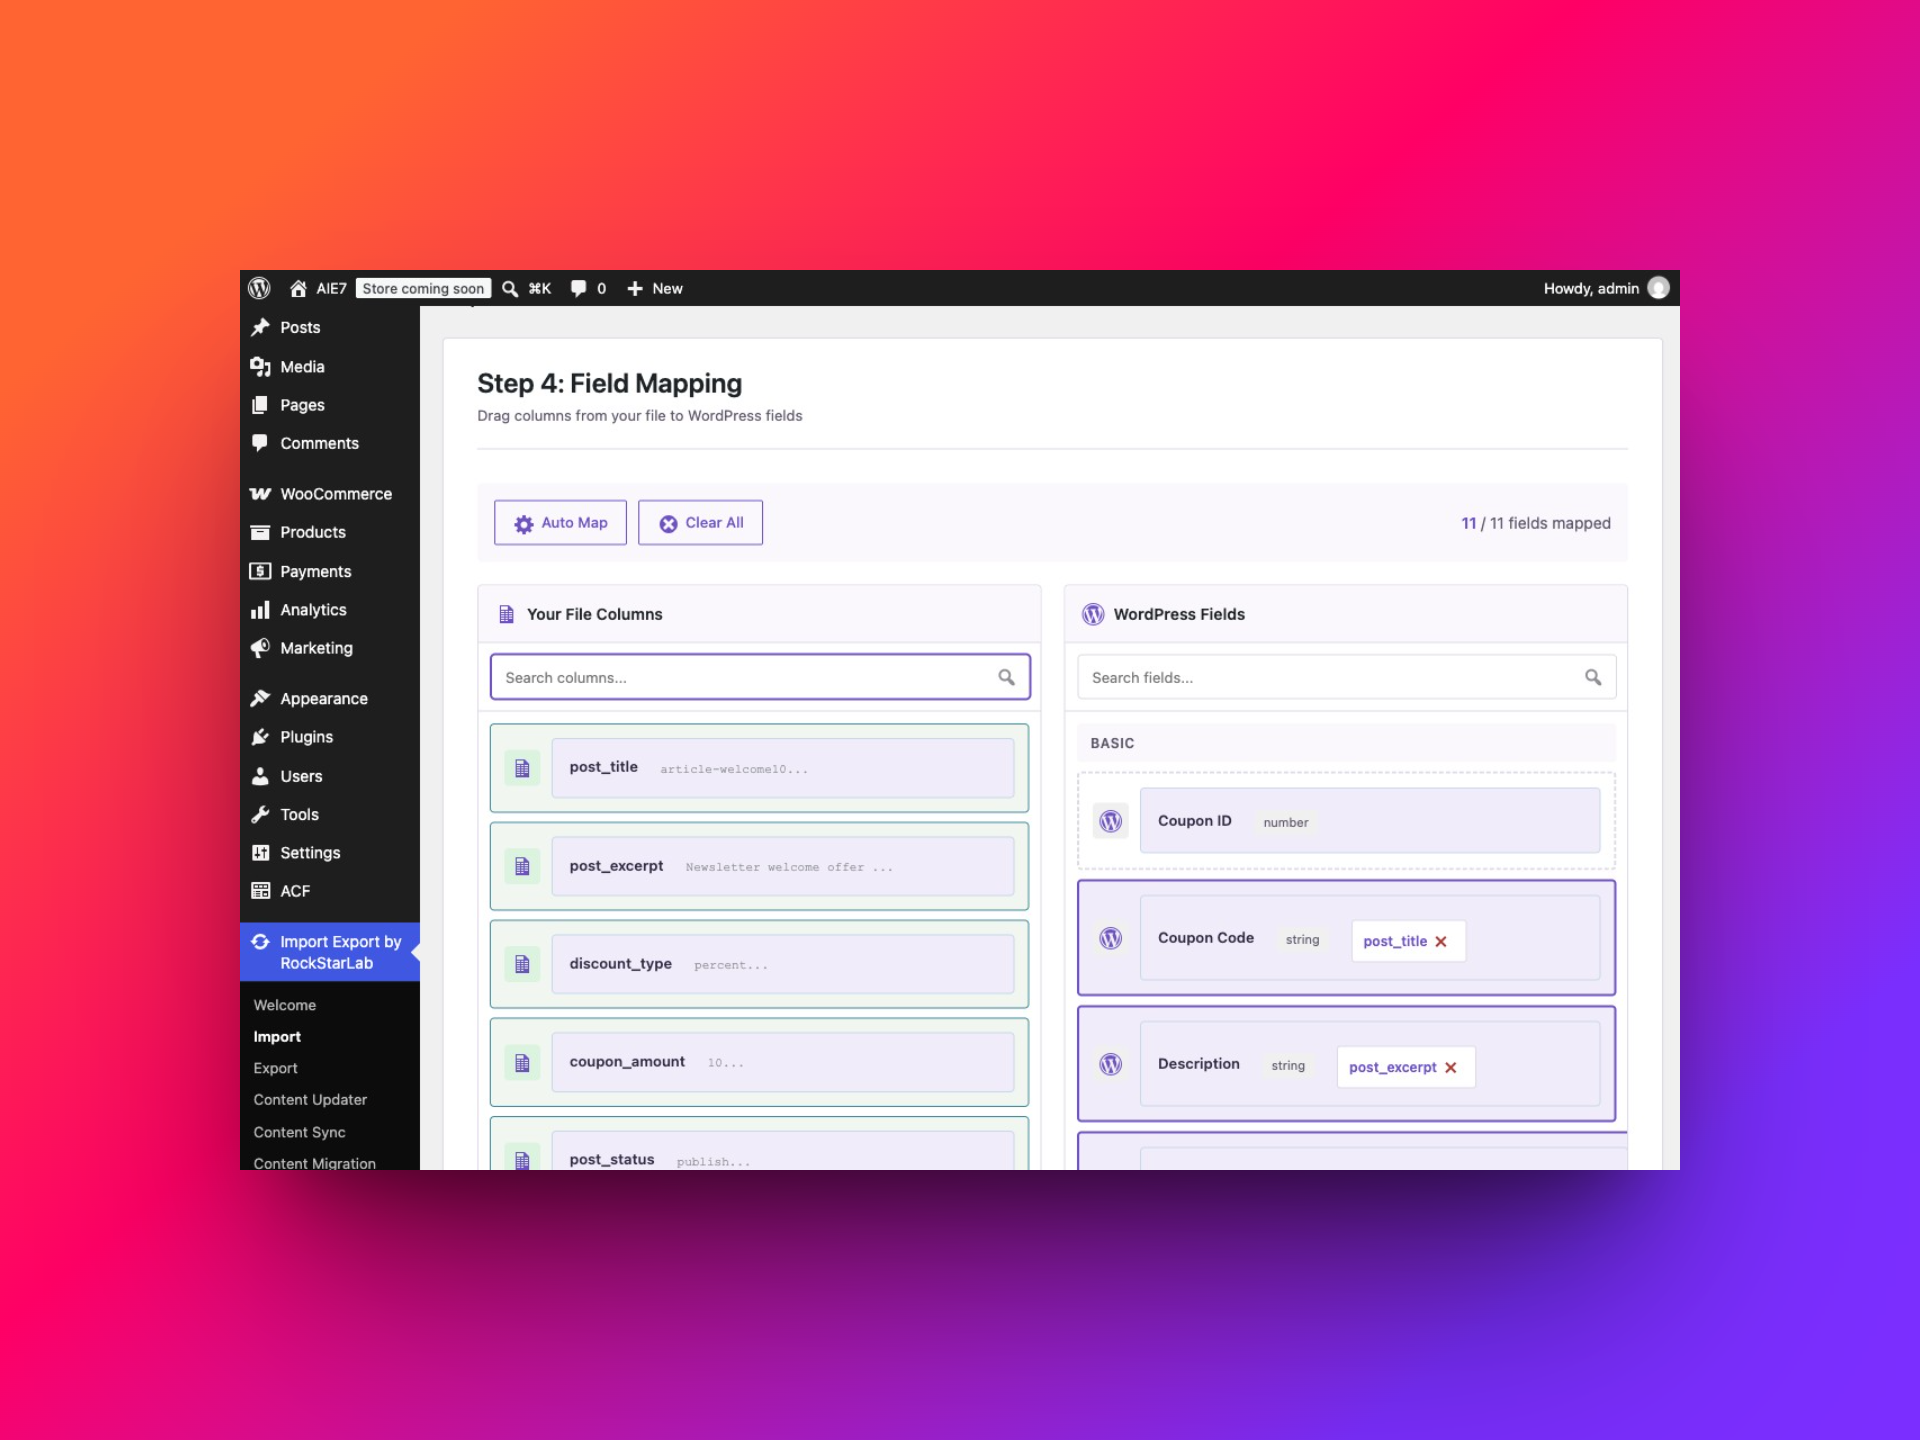
| Source column | Destination | Meaning |
|---|---|---|
| post_title | Coupon Code | Required code identifying the coupon |
| post_excerpt | Description | Internal description of the offer |
| discount_type | Discount Type | percent, fixed_cart or fixed_product |
| coupon_amount | Amount | Numeric amount interpreted according to type |
| post_status | Status | The example explicitly uses publish |
| minimum_amount | Minimum Spend | Required minimum spend |
| individual_use | Individual Use Only | Restriction on combining coupons |
| exclude_sale_items | Exclude Sale Items | Sale-item exclusion flag |
| usage_limit | Usage Limit (total) | Total redemption ceiling |
| usage_limit_per_user | Usage Limit Per User | Separate customer-level limit |
| date_expires | Expiry Date | Expiry in YYYY-MM-DD format |
Leave source Coupon IDs unmapped when creating coupons on another installation. IDs belong to their own database. Coupon Code is the matching field used in this walkthrough.
The mapping screen also exposes Maximum Spend, Free Shipping, allowed and excluded products and categories, Allowed Emails, Limit Usage to X Items, Usage Count, dates and custom metadata. Include only the columns the task requires. A file full of blank mapped settings can accidentally clear values during updates.
Optional: Transform values during import
Open the transformation control beside the Description mapping. In Field Transformations, search for Trim Whitespace and click Add. Enter Newsletter welcome offer as the Test Value and run Test Pipeline.
The expected output is Newsletter welcome offer. Click Apply Transformations after checking the result. In the tested import, the descriptions were saved without their extra leading and trailing spaces.
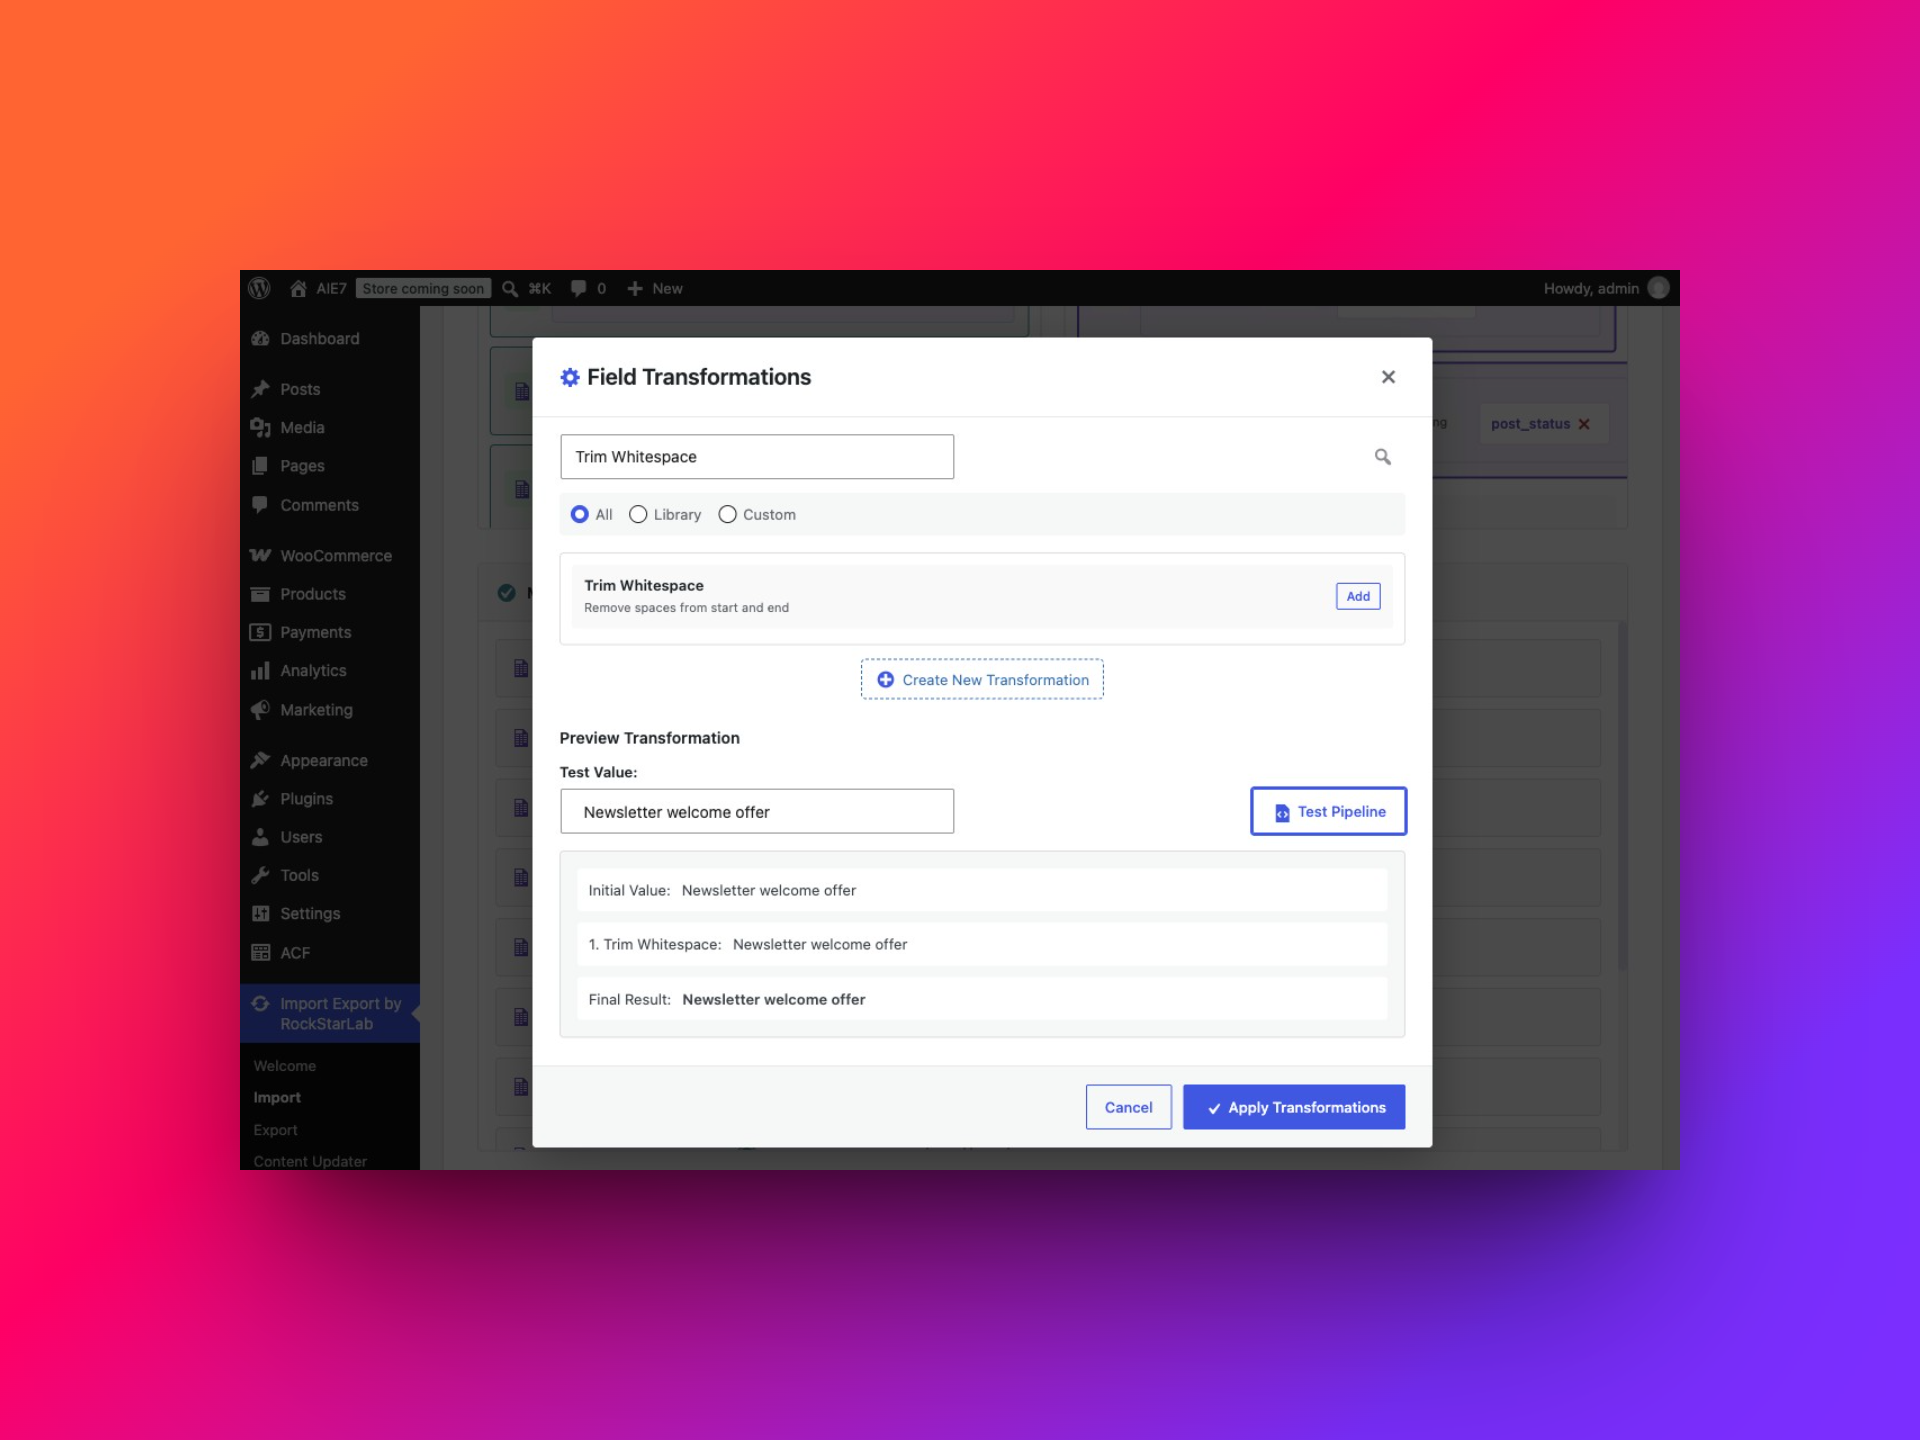
Other possible preparations include converting a known date format or cleaning a consistently formatted amount column. Check the output against the intended value. Removing every comma is not a safe substitute for understanding whether commas represent decimals or thousands.
Multiple transformations run in the order displayed. Keep the sequence understandable and avoid altering coupon codes unnecessarily, because those codes determine matching. The transformation functions guide explains the reusable Functions workflow.
Step 4: Choose how existing coupons are handled
Under Check for Existing Items by Field, choose Coupon Code. The two sets of matching rules determine whether a row creates, updates or skips a record.
| Task | If Match Found | If No Match Found |
|---|---|---|
| Add new codes while leaving existing offers alone | Skip | Create |
| Maintain a file containing new and existing offers | Update | Create |
| Change only coupons already in the store | Update | Skip |
An update-only import is useful when a mistyped code should be skipped instead of creating an unintended offer. Do not treat “always create” as a way to maintain duplicate coupon codes. Give distinct offers distinct codes.
The walkthrough uses Update for matches and Create for new codes, with a batch size of 100 for three records. Batch Size controls the number processed together, not the total number you may import. Choose a suitable value for larger files and your server’s resources.
The screen also offers Replace links, a find-and-replace option for imported text. It is not needed for these coupon values. A transformation on a specific mapped field is easier to inspect when just one description or amount column needs cleaning.
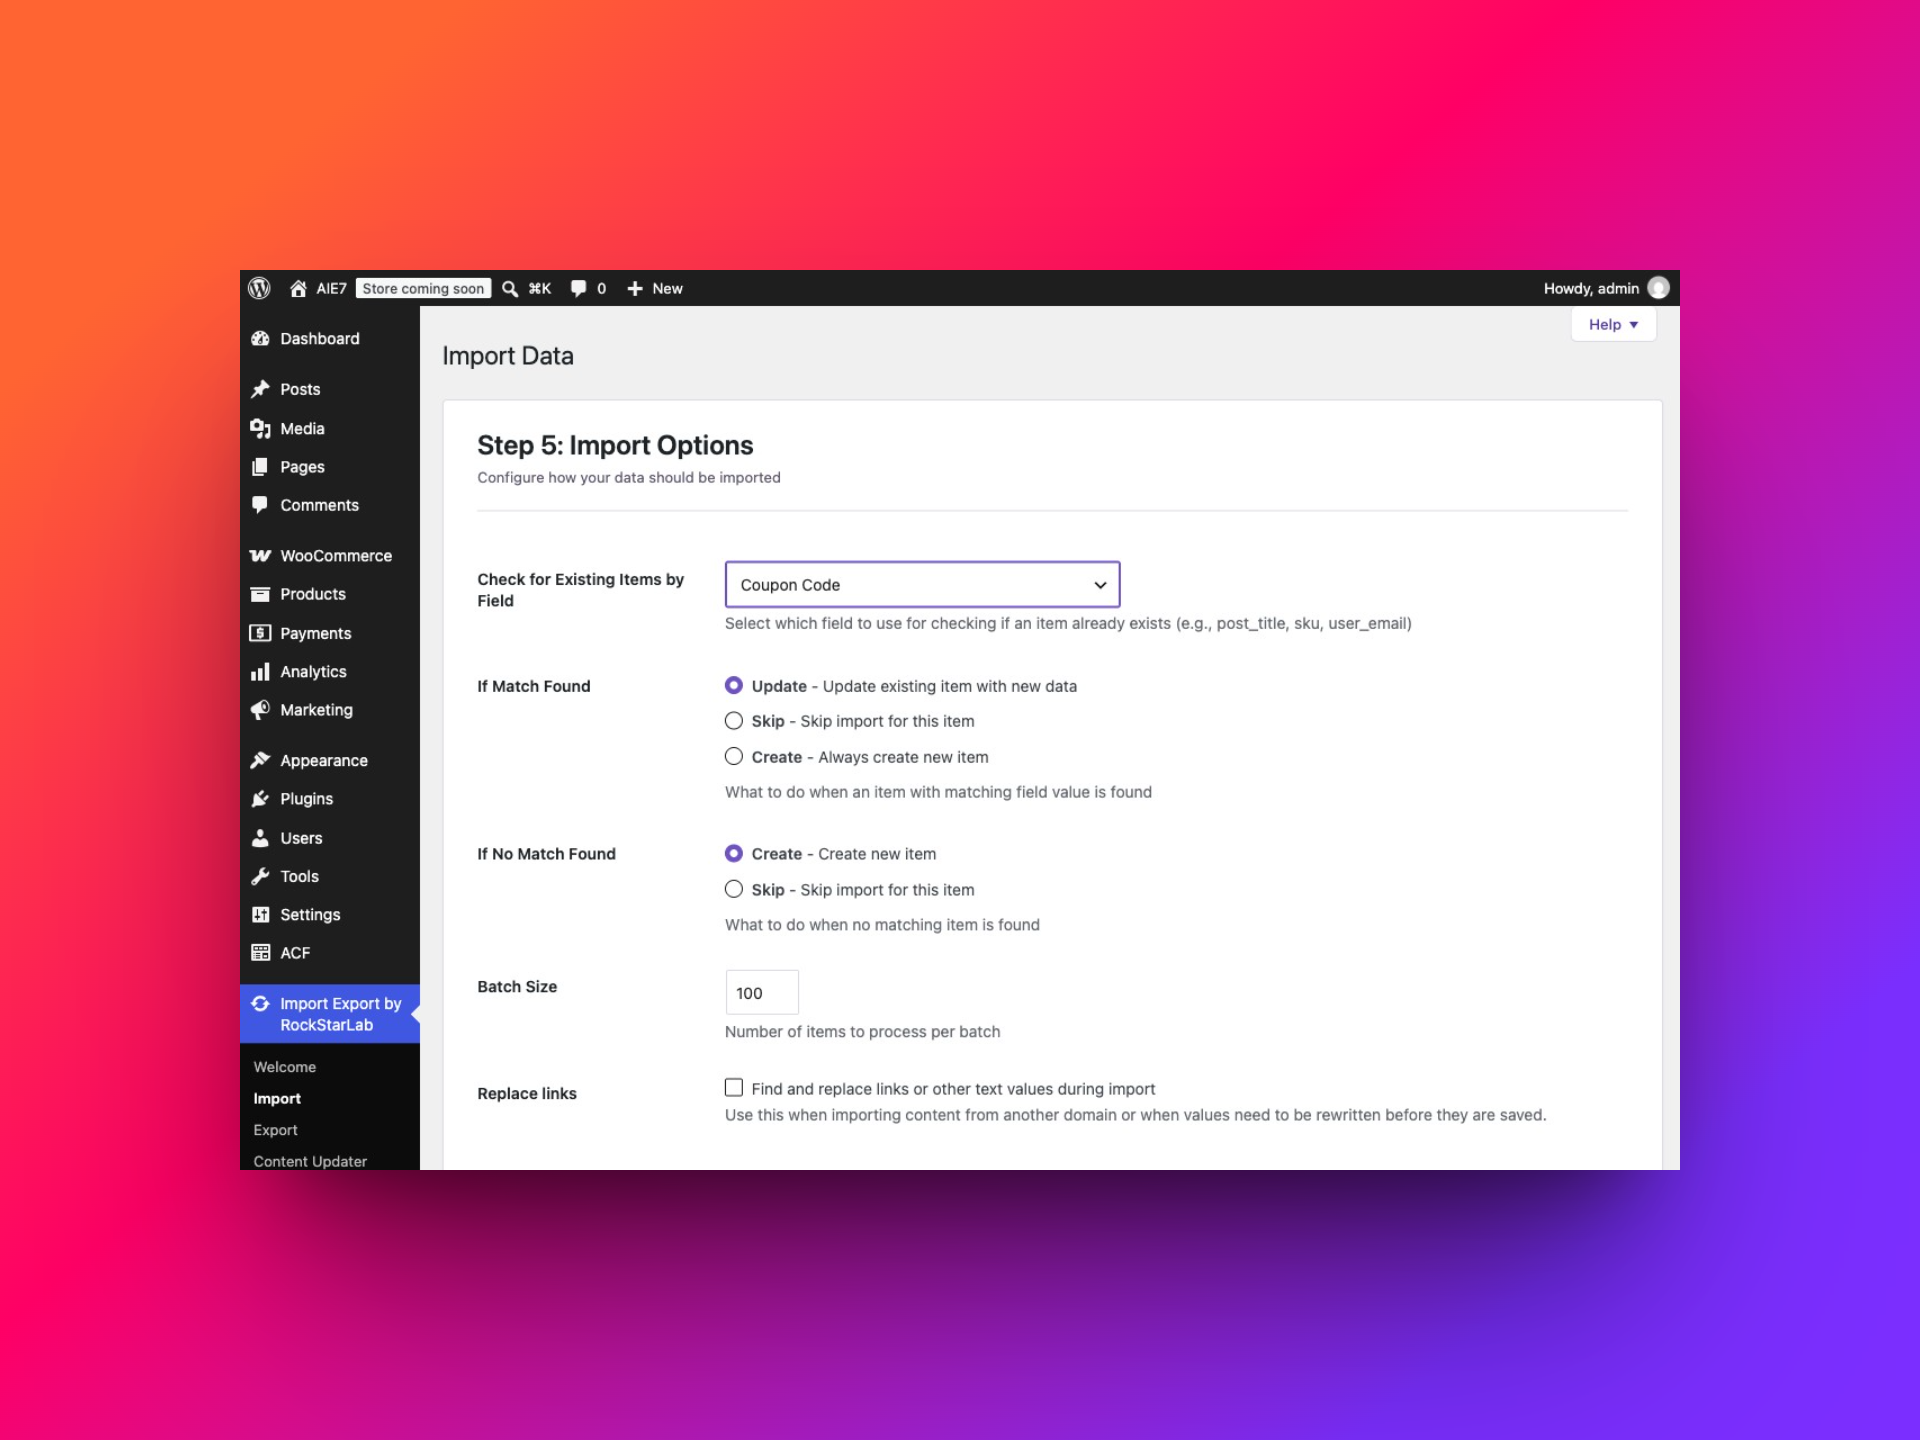
Updating discounts without resetting coupon history
For a focused amount update, include Coupon Code, the intended Discount Type, Amount and Status. Leave Usage Count out unless changing the stored redemption count is explicitly intended. Usage Limit and Usage Count mean different things: one is a ceiling, the other records uses.
Omitting a field and mapping a blank value are also different. In the tested importer, blank mapped expiry and limit fields can clear those settings. The importer has defaults for status and discount type, so do not assume every omitted field remains untouched. Include the intended status and type explicitly, test one coupon, and inspect its saved settings before importing the full update.
Step 5: Run the import and verify the coupons
Click Start Import. On completion, inspect Successful, Created, Updated, Skipped and Failed separately. A skipped row may be correct under your matching rules. An updated row should not increase the store’s coupon count.
The first test created three coupons. The repeat run shown below returned 3 updated, 0 created, 0 skipped and 0 failed. There were still three coupons in WooCommerce.
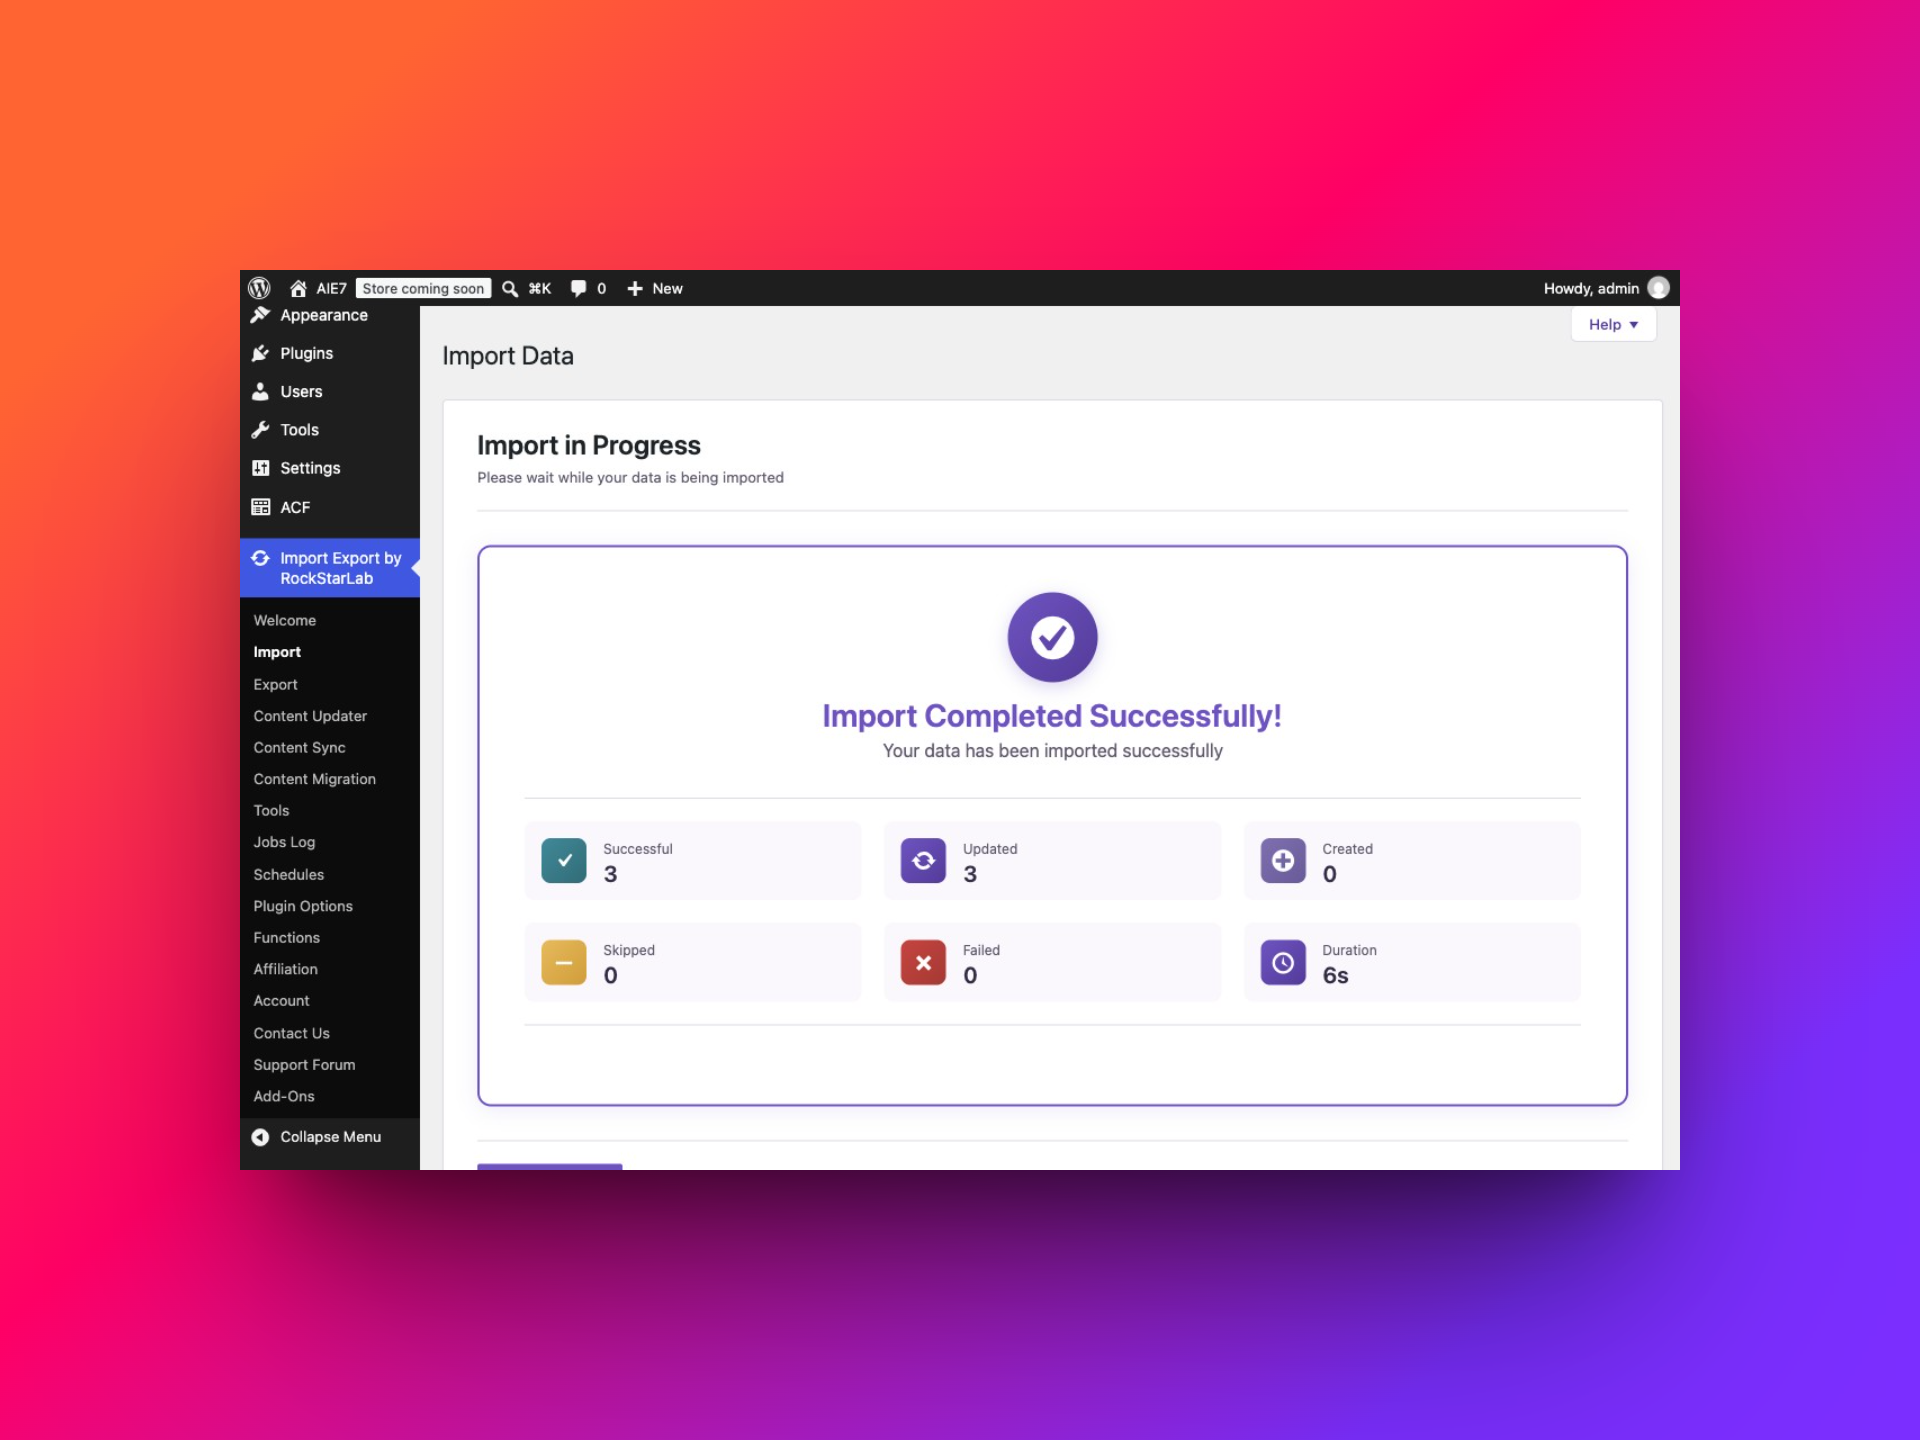
Open Marketing → Coupons. Check the code, type, amount, description, usage limit and expiry date in the list. Then open individual coupons to check settings that the list does not show.
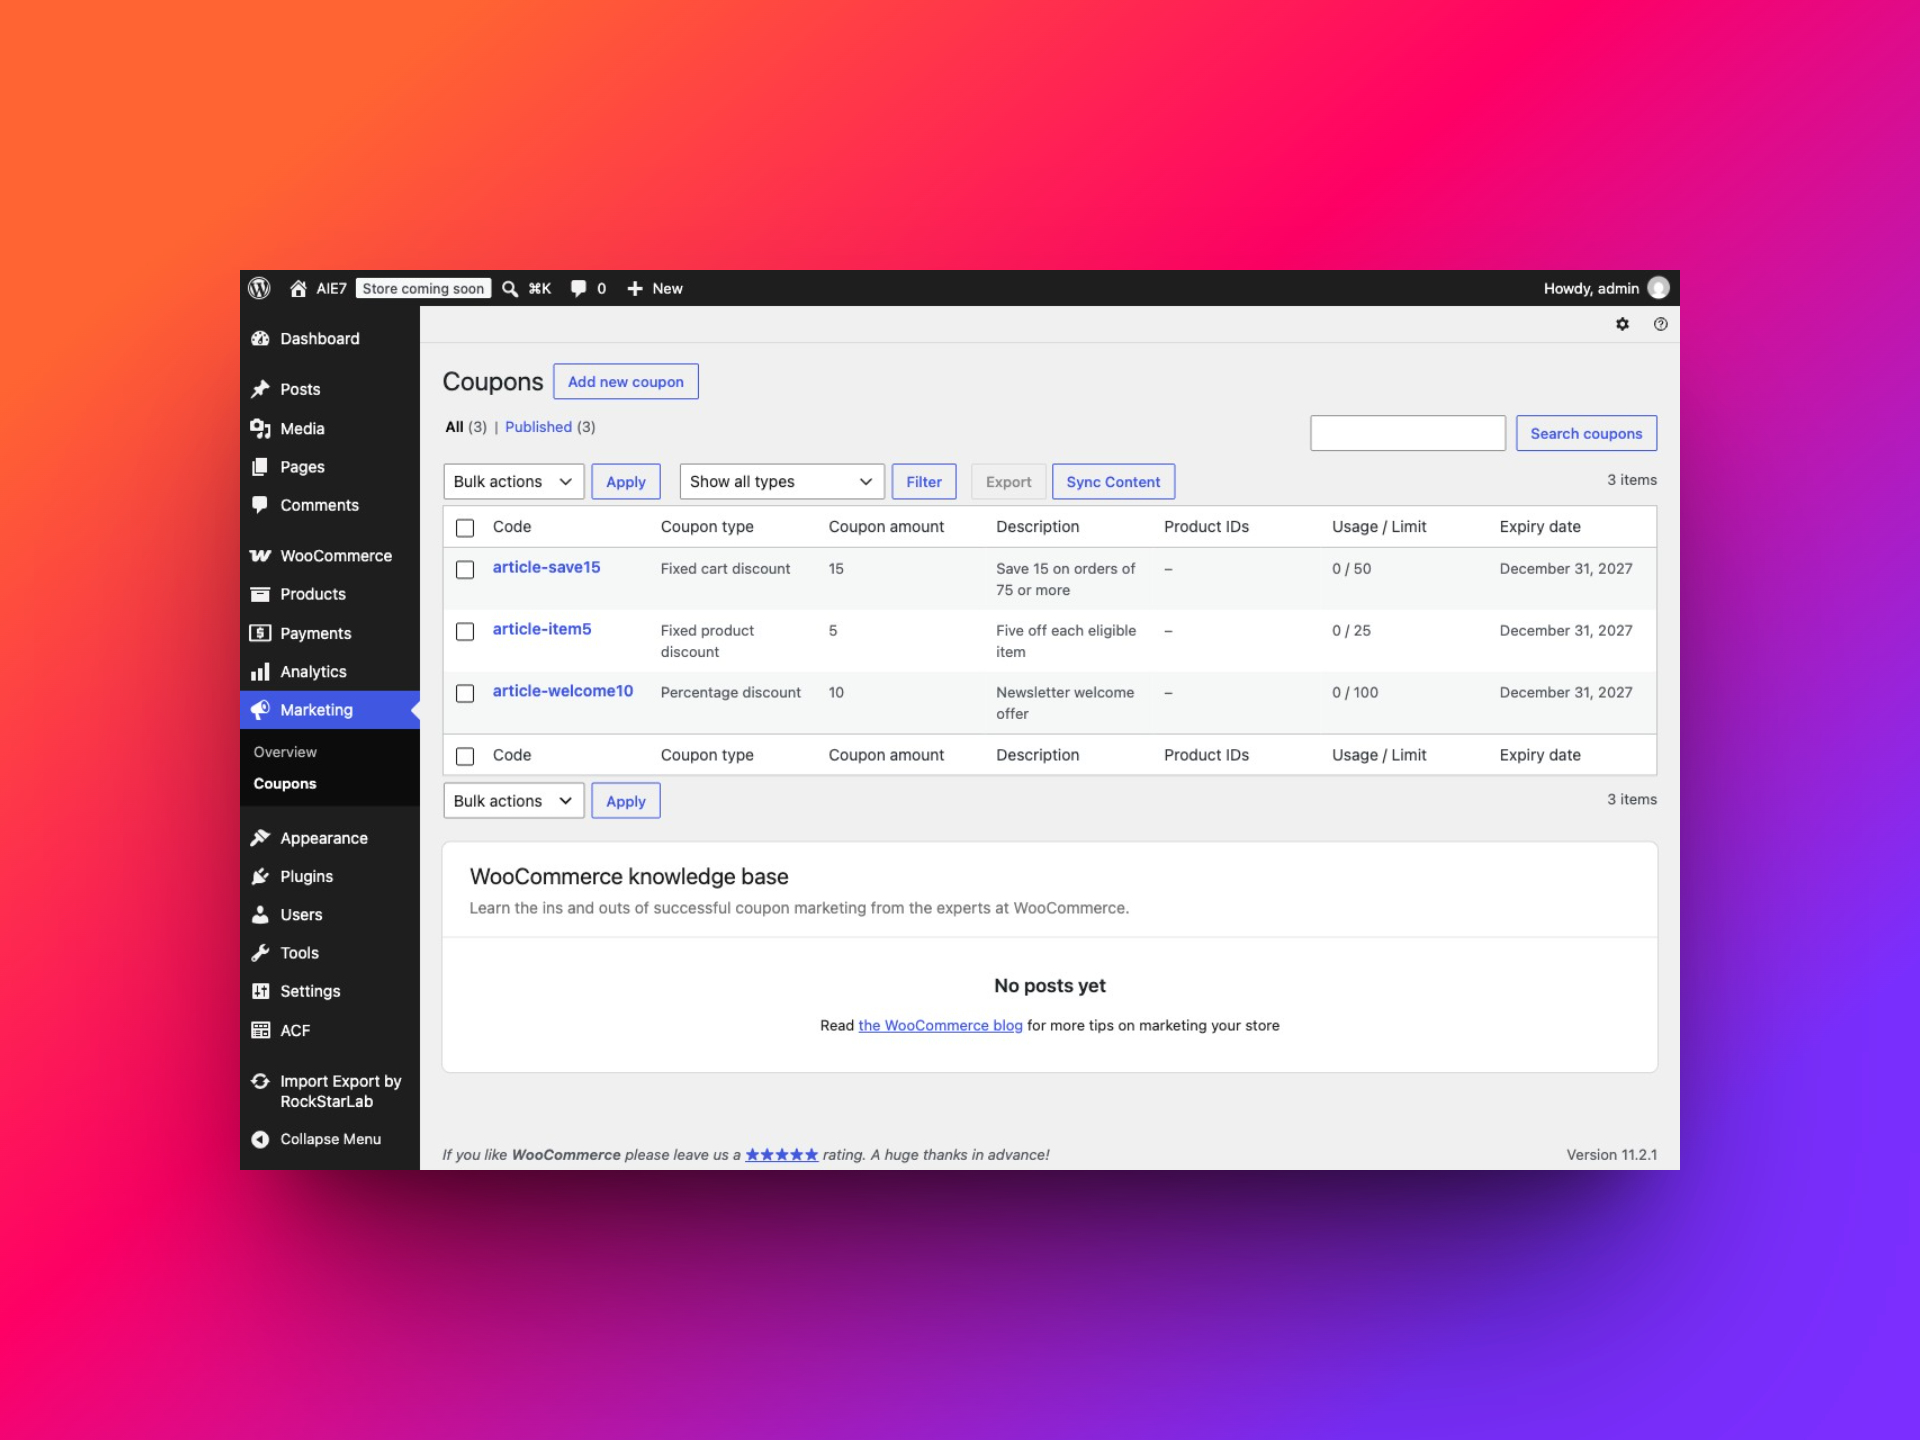
For article-save15, the saved Usage restriction tab showed Minimum spend 75, Individual use only checked and Exclude sale items checked. This verifies the stored offer beyond the importer’s success counter.
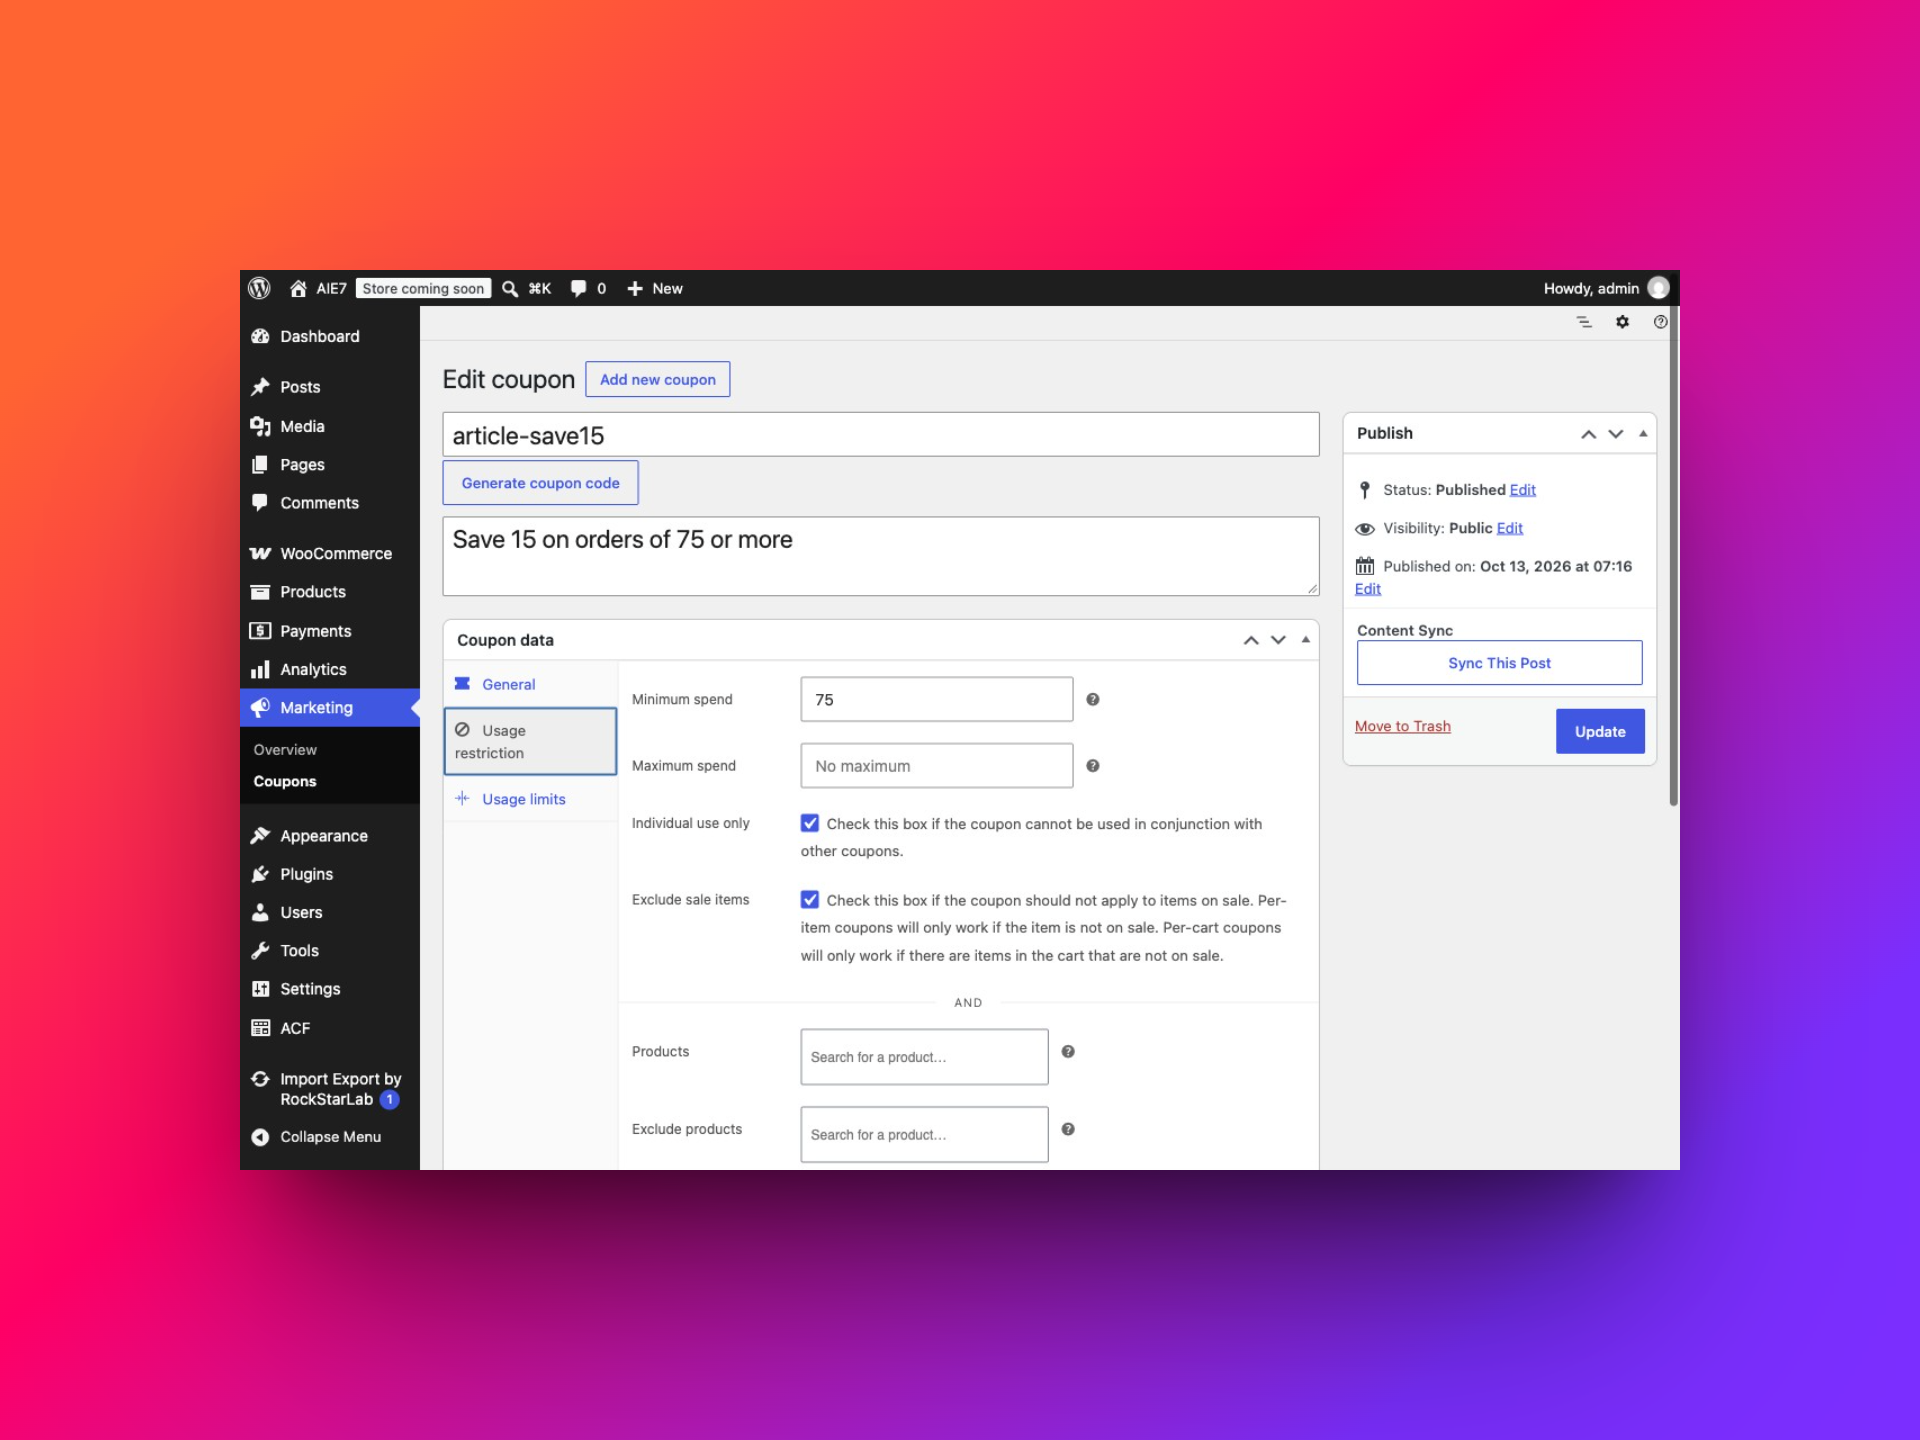
Finally, test redemption with both an eligible and an ineligible cart. For the minimum-spend example, compare carts below and above the threshold and inspect the effect of sale items and other coupons. The demonstration destination had no products, so this walkthrough verifies imported records and settings; checkout redemption still needs testing with appropriate products.
The import is recorded in Jobs Log. Filter by Import and locate the run by its creation time. Keep the input file with the job information when investigating an unexpected update.
More coupon import examples
Restrict an offer to selected products
Add a product_ids column and map it to Allowed Products. The interface accepts JSON or comma-separated identifiers. For illustrative destination IDs 120 and 125, the CSV would contain:
post_title,discount_type,coupon_amount,post_status,product_ids
selected-items5,fixed_product,5,publish,"120,125"
Replace these numbers with actual destination product IDs. Inspect the saved Products selection after import. A successful row does not prove every product reference resolved. If the selection is empty, your intended restriction may be missing. The three-coupon demonstration did not test product matching.
Limit a code to selected customers
Map allowed_emails to Allowed Emails. A cell can contain a quoted comma-separated list such as "alex@example.com,sam@example.com". Replace these example addresses with the intended recipients, verify the saved restriction and test with the relevant billing email.
A description saying “existing customers” does not establish an email restriction or purchase-history rule. Put the actual eligibility values in the corresponding fields.
Distinguish uses from discounted items
Use usage_limit for the total redemption ceiling and usage_limit_per_user for the customer-level ceiling. Combining 100 total uses with one per customer does not generate 100 individual codes: customers use the same code.
The separate Limit Usage to X Items field controls how many items receive an applicable per-item discount. Do not map a customer count or total redemption count to that field. Check the interaction between the discount type and item limit using a cart with several eligible items.
Import a free-shipping flag
Map free_shipping to Free Shipping and use 1 when appropriate. The relevant shipping zone also needs a free-shipping method configured to accept a qualifying coupon. The flag does not configure shipping zones by itself. See the WooCommerce free-shipping documentation for the shipping setup.
Questions and troubleshooting
Can I import coupons from Excel?
The upload screen supports XLSX as well as CSV. Keep one header row and one coupon per data row. Inspect the preview before mapping. CSV is convenient for checking exact field values; XLSX avoids selecting a CSV delimiter.
Why did an import fail?
Check that Coupon Code is mapped and nonempty, Discount Type uses an accepted value, and amounts and dates have the expected formats. Review the job result and matching settings. Test a single failing row to separate a data problem from a larger processing issue.
Why were existing coupons skipped?
Check If Match Found. Skip deliberately leaves existing records alone. Choose Update only when the mapped values are intended to replace the corresponding saved settings.
Why is a coupon present but unusable?
Read the checkout message and inspect the coupon’s status, expiry, restrictions and limits. Confirm coupon use is enabled. A correctly imported restriction can legitimately make a code unavailable to the cart you are testing.
Can I move coupons from another store?
A compatible coupon export can serve as the input file. Review its columns, reconcile destination product and category references, and match existing coupons by code. Do not assume source database IDs have the same meaning on the destination.
Does importing email the coupon codes?
This workflow creates or updates coupon records. It does not send a campaign email. Verify and test the offers before sharing codes through your chosen marketing channel.
Where can I find more import instructions?
Visit the Import Export video tutorials for the broader wizard and transformation workflows. Retain the tested file and matching rules so future updates begin with a known configuration.