
A portfolio entry is rarely just a title and a block of text. It may also have its own categories and tags, plus a dozen Advanced Custom Fields for images, galleries, dates, links, or flexible content. Moving only the post itself can leave a perfectly good case study looking half-finished on the new site.
Here’s a practical way to move a complete WordPress custom post type (CPT) with its taxonomy terms and ACF values using Import Export by RockStarLab. We’ll use the Portfolio post type on one WordPress site and import it to another. The same approach works for many other custom post types.
Why export a custom post type with its taxonomies and ACF fields?
Custom post types keep different kinds of content organized. A Portfolio CPT, for example, can hold case studies without mixing them into regular blog posts. Custom taxonomies then group those entries by discipline, industry, or service, while ACF fields store the details that make each entry useful.
That combination is handy when you’re moving a site from development to staging, launching a redesigned site, handing content to a new team, or creating a second site with the same portfolio structure. Exporting the post, taxonomy assignments, and custom field values together saves you from rebuilding every entry by hand.
What you need on the destination site
Before importing, make sure the destination site is ready to receive the content:
- The destination has the custom post type you want to import into, registered and available in WordPress. Its post type key does not have to match the source key: choose the destination post type in the import wizard.
- The destination has the taxonomies you want to assign, registered and available for that post type. Their taxonomy keys do not have to match the source keys; map each exported taxonomy column to the intended destination taxonomy.
- Advanced Custom Fields (ACF) and the destination field definitions are in place. Matching field names helps Auto Map, but you can map a source column to a differently named destination field. The destination field type and expected data structure still need to be compatible; importing values does not recreate the ACF field-group configuration.
- You have administrator access and a current database backup of the destination site.
Think of the export as the content and field values, not a package of your theme, CPT registration code, taxonomy setup, or ACF field-group definitions. Set up the destination structure first, then map the incoming data to it. The source and destination can use different post type, taxonomy, and ACF field names; only the destination structures must exist and the mappings must point to the right targets.
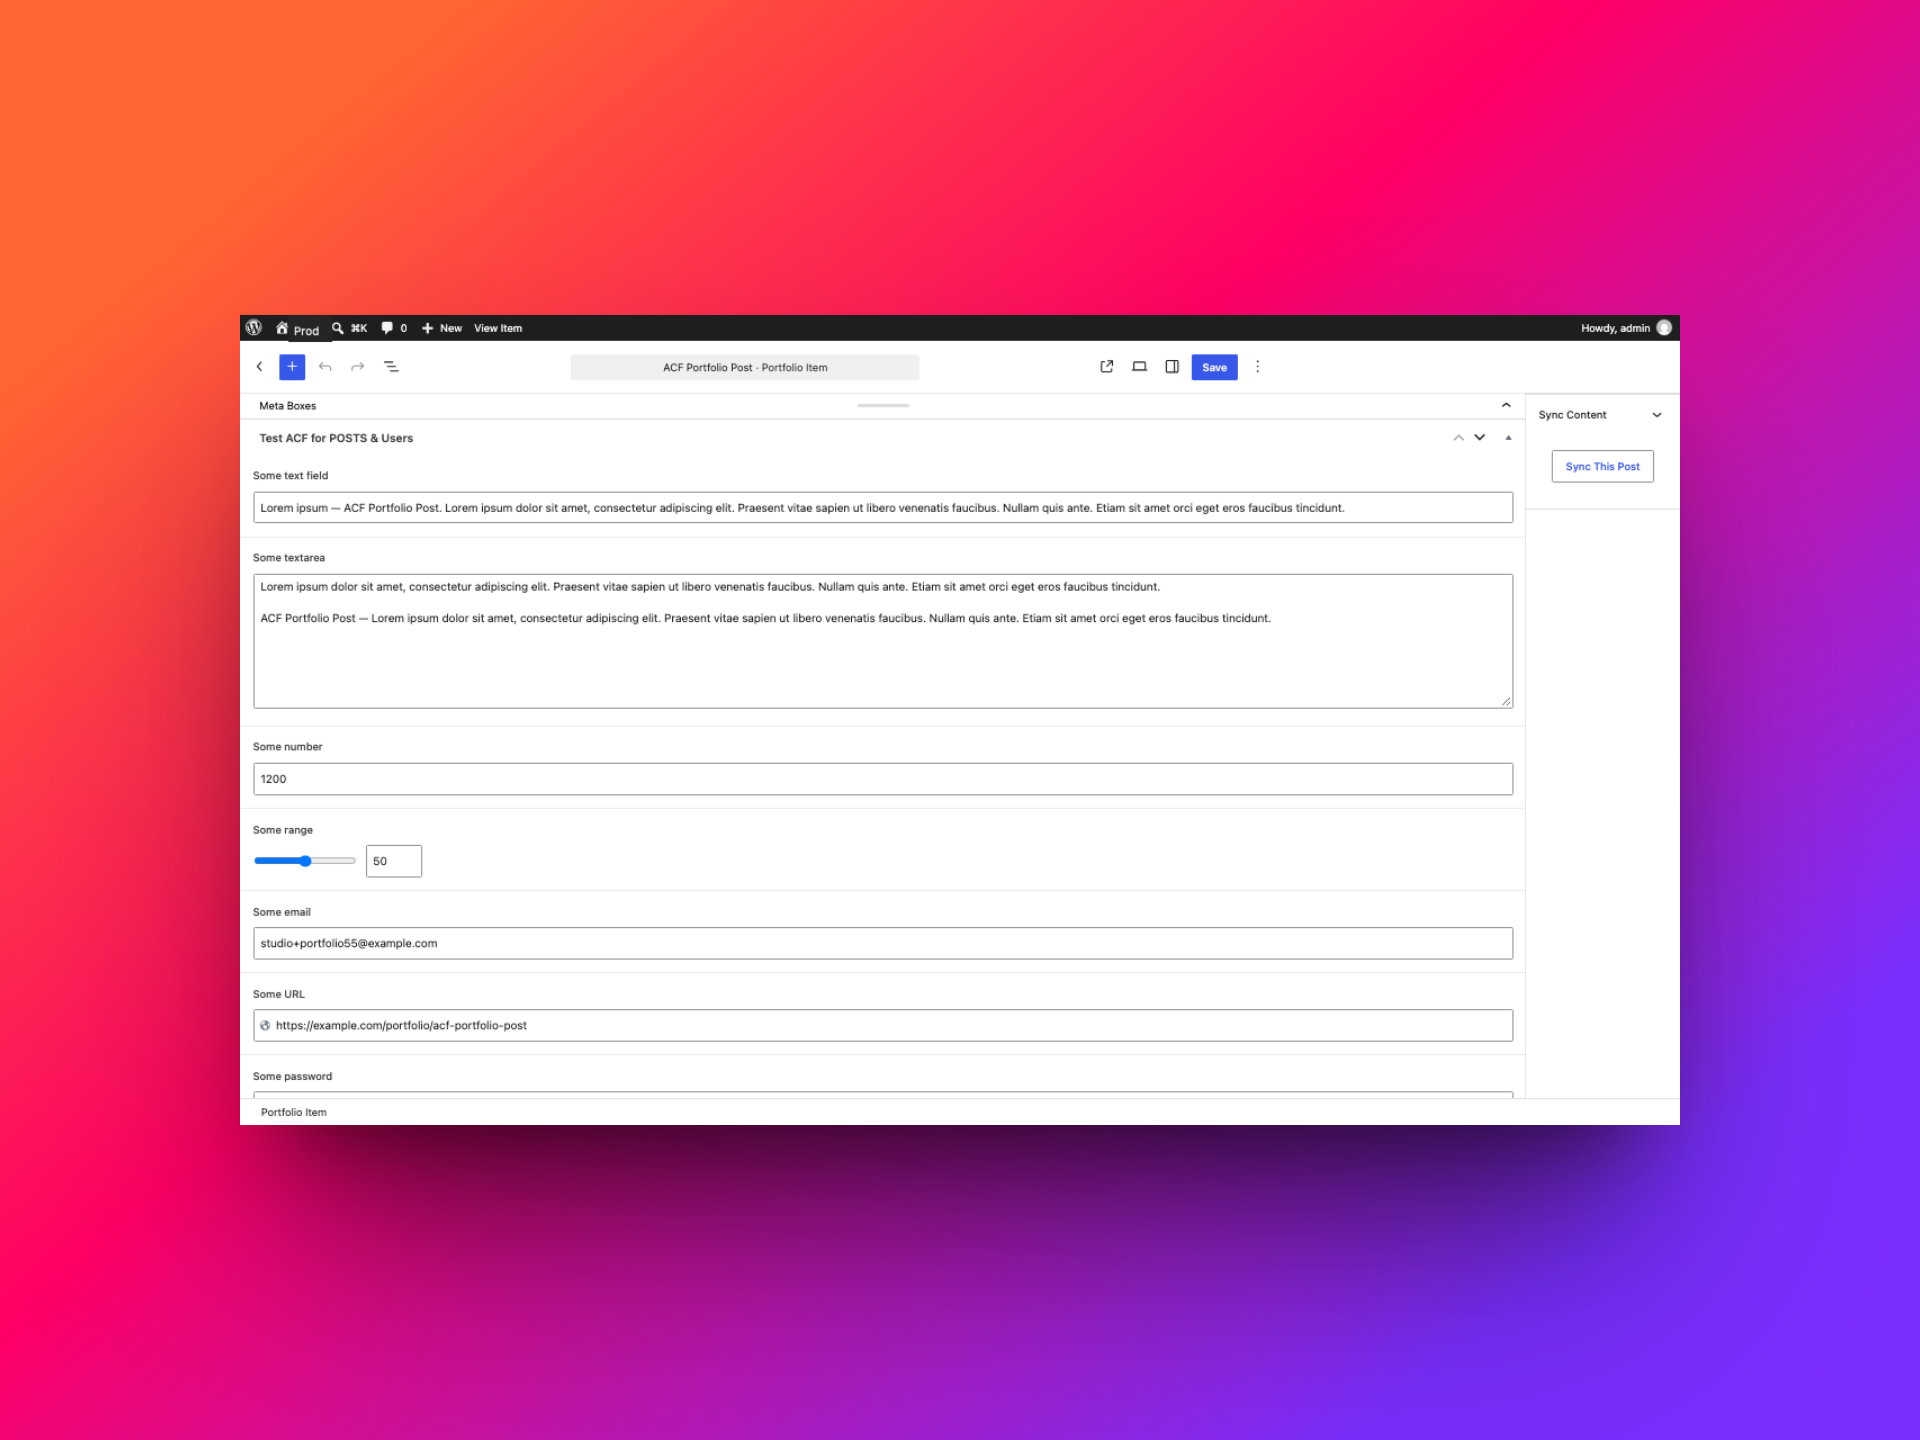
How to export Portfolio posts with ACF fields
In this walkthrough, content moves from Production to Stage. The example export contains 24 Portfolio records and 32 columns, including standard post fields, Portfolio Categories, Portfolio Tags, and the selected ACF fields.
1. Choose Custom Post Types
In the WordPress dashboard on the source site, open Import Export by RockStarLab → Export. Choose Custom Post Types, then continue. This tells the export wizard to work with registered post types such as Portfolio rather than regular blog posts.
2. Filter the export to the records you need
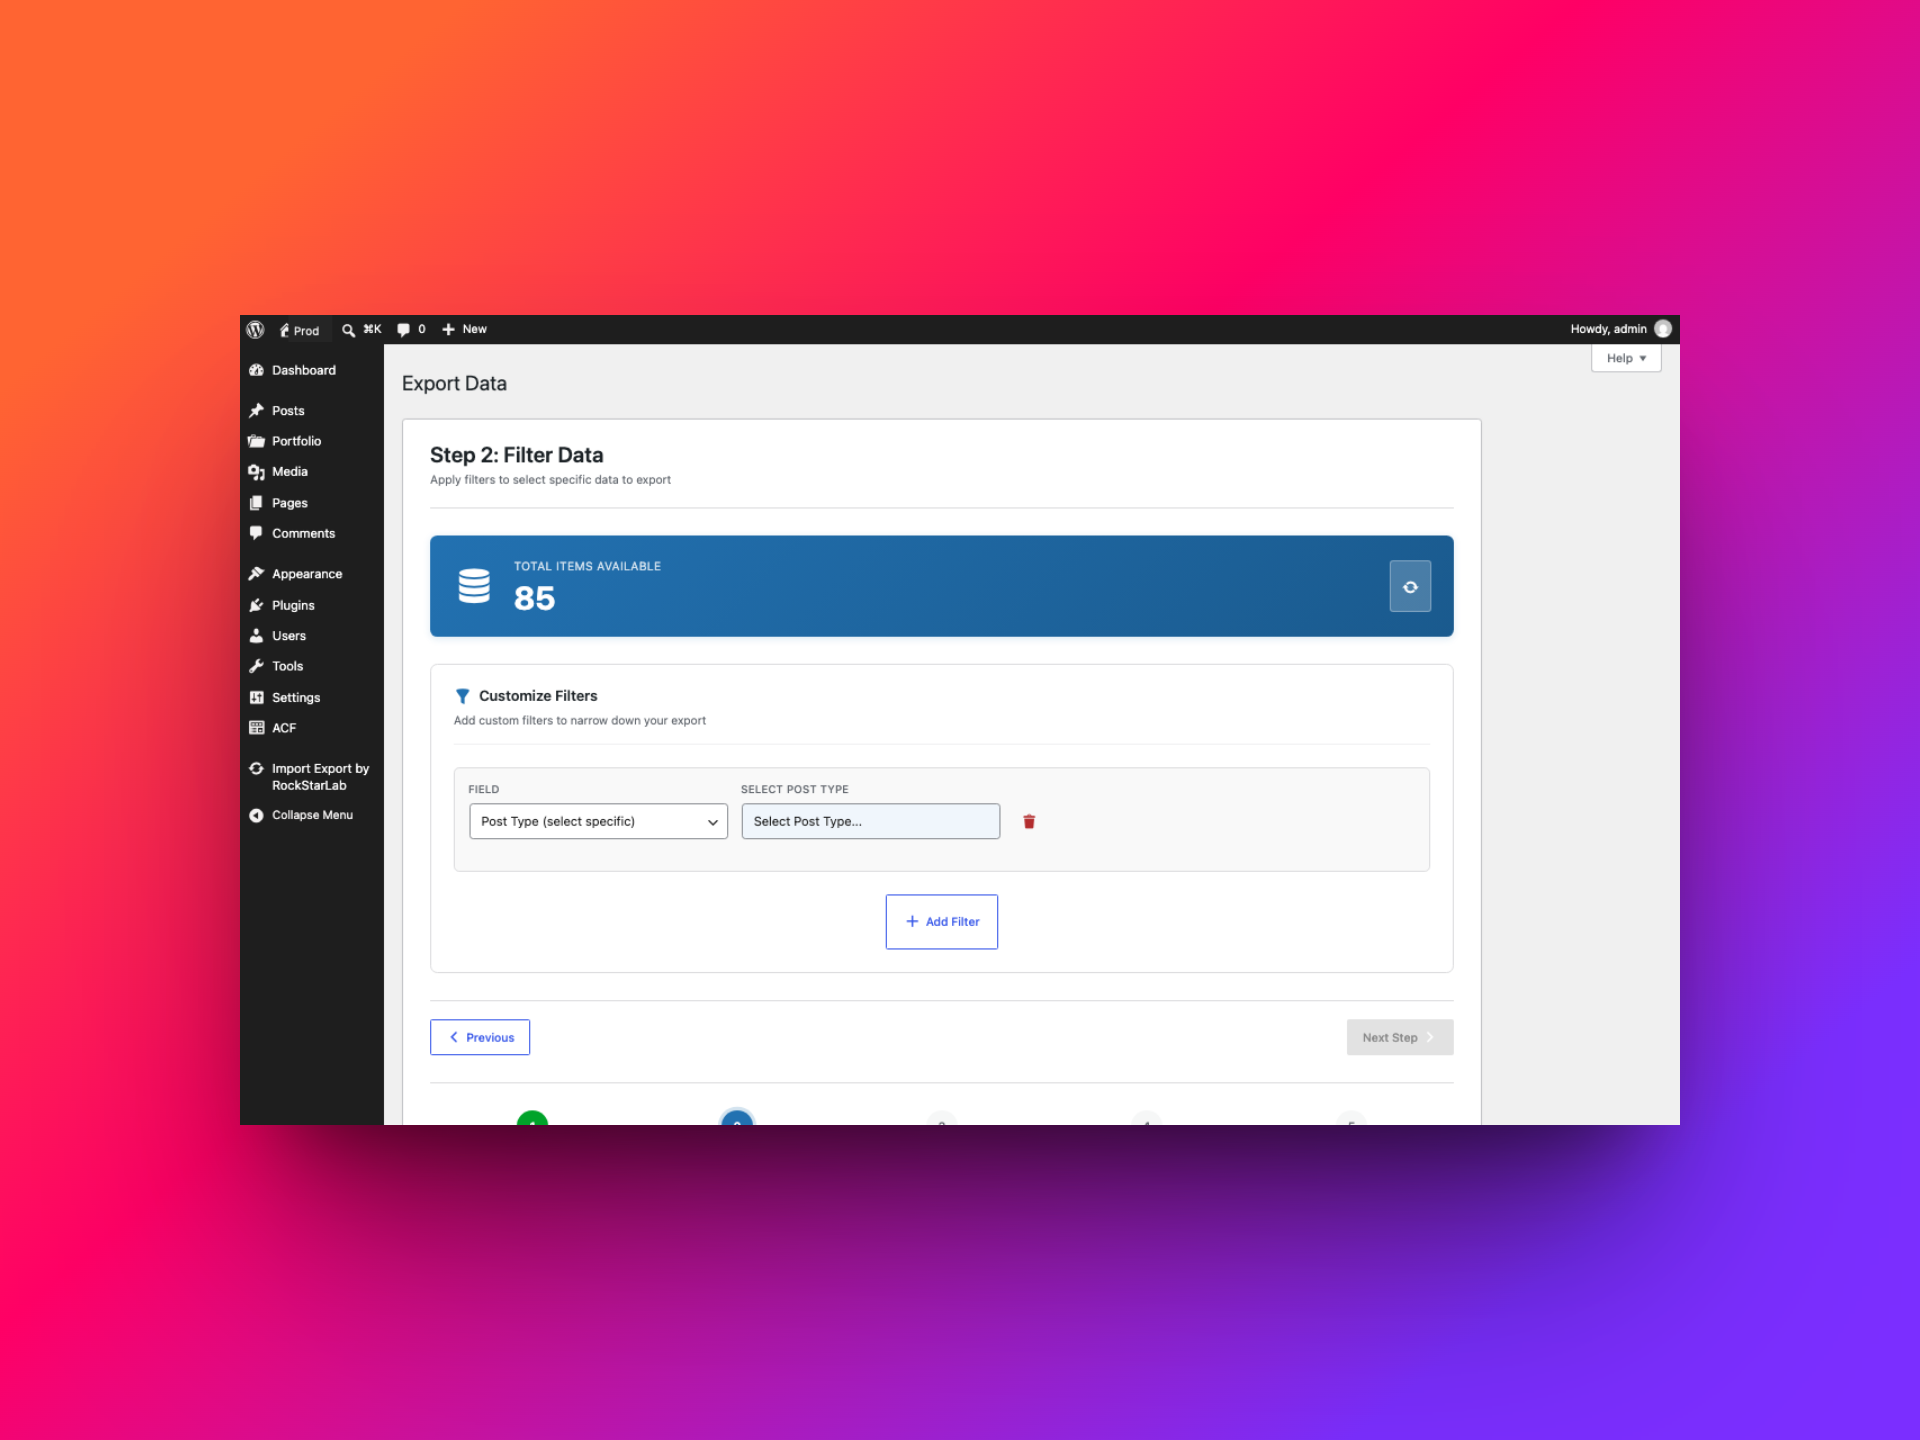
The filter step shows how many records match your criteria. Start with Post Type (select specific) = Portfolio so the export is limited to this CPT; the example dataset has 24 Portfolio entries. Then add one or more filters for the content you actually want. Each additional condition narrows the result, so check the total before continuing.
| Example filter | Result in this walkthrough | Useful when |
|---|---|---|
| Post Type = Portfolio | 24 entries | Keep the export focused on the intended custom post type. |
| Post Type = Portfolio; Status = publish | 21 entries | Move published work without drafts, pending posts, or private entries. |
| Post Type = Portfolio; Title contains “Optimizer” | 1 entry | Find a specific title or make a small test export. |
Taxonomy Filter: portfolio_category has term ai-strategy |
Choose the taxonomy and term slug, then refresh the count | Move items from one custom taxonomy category or tag. |
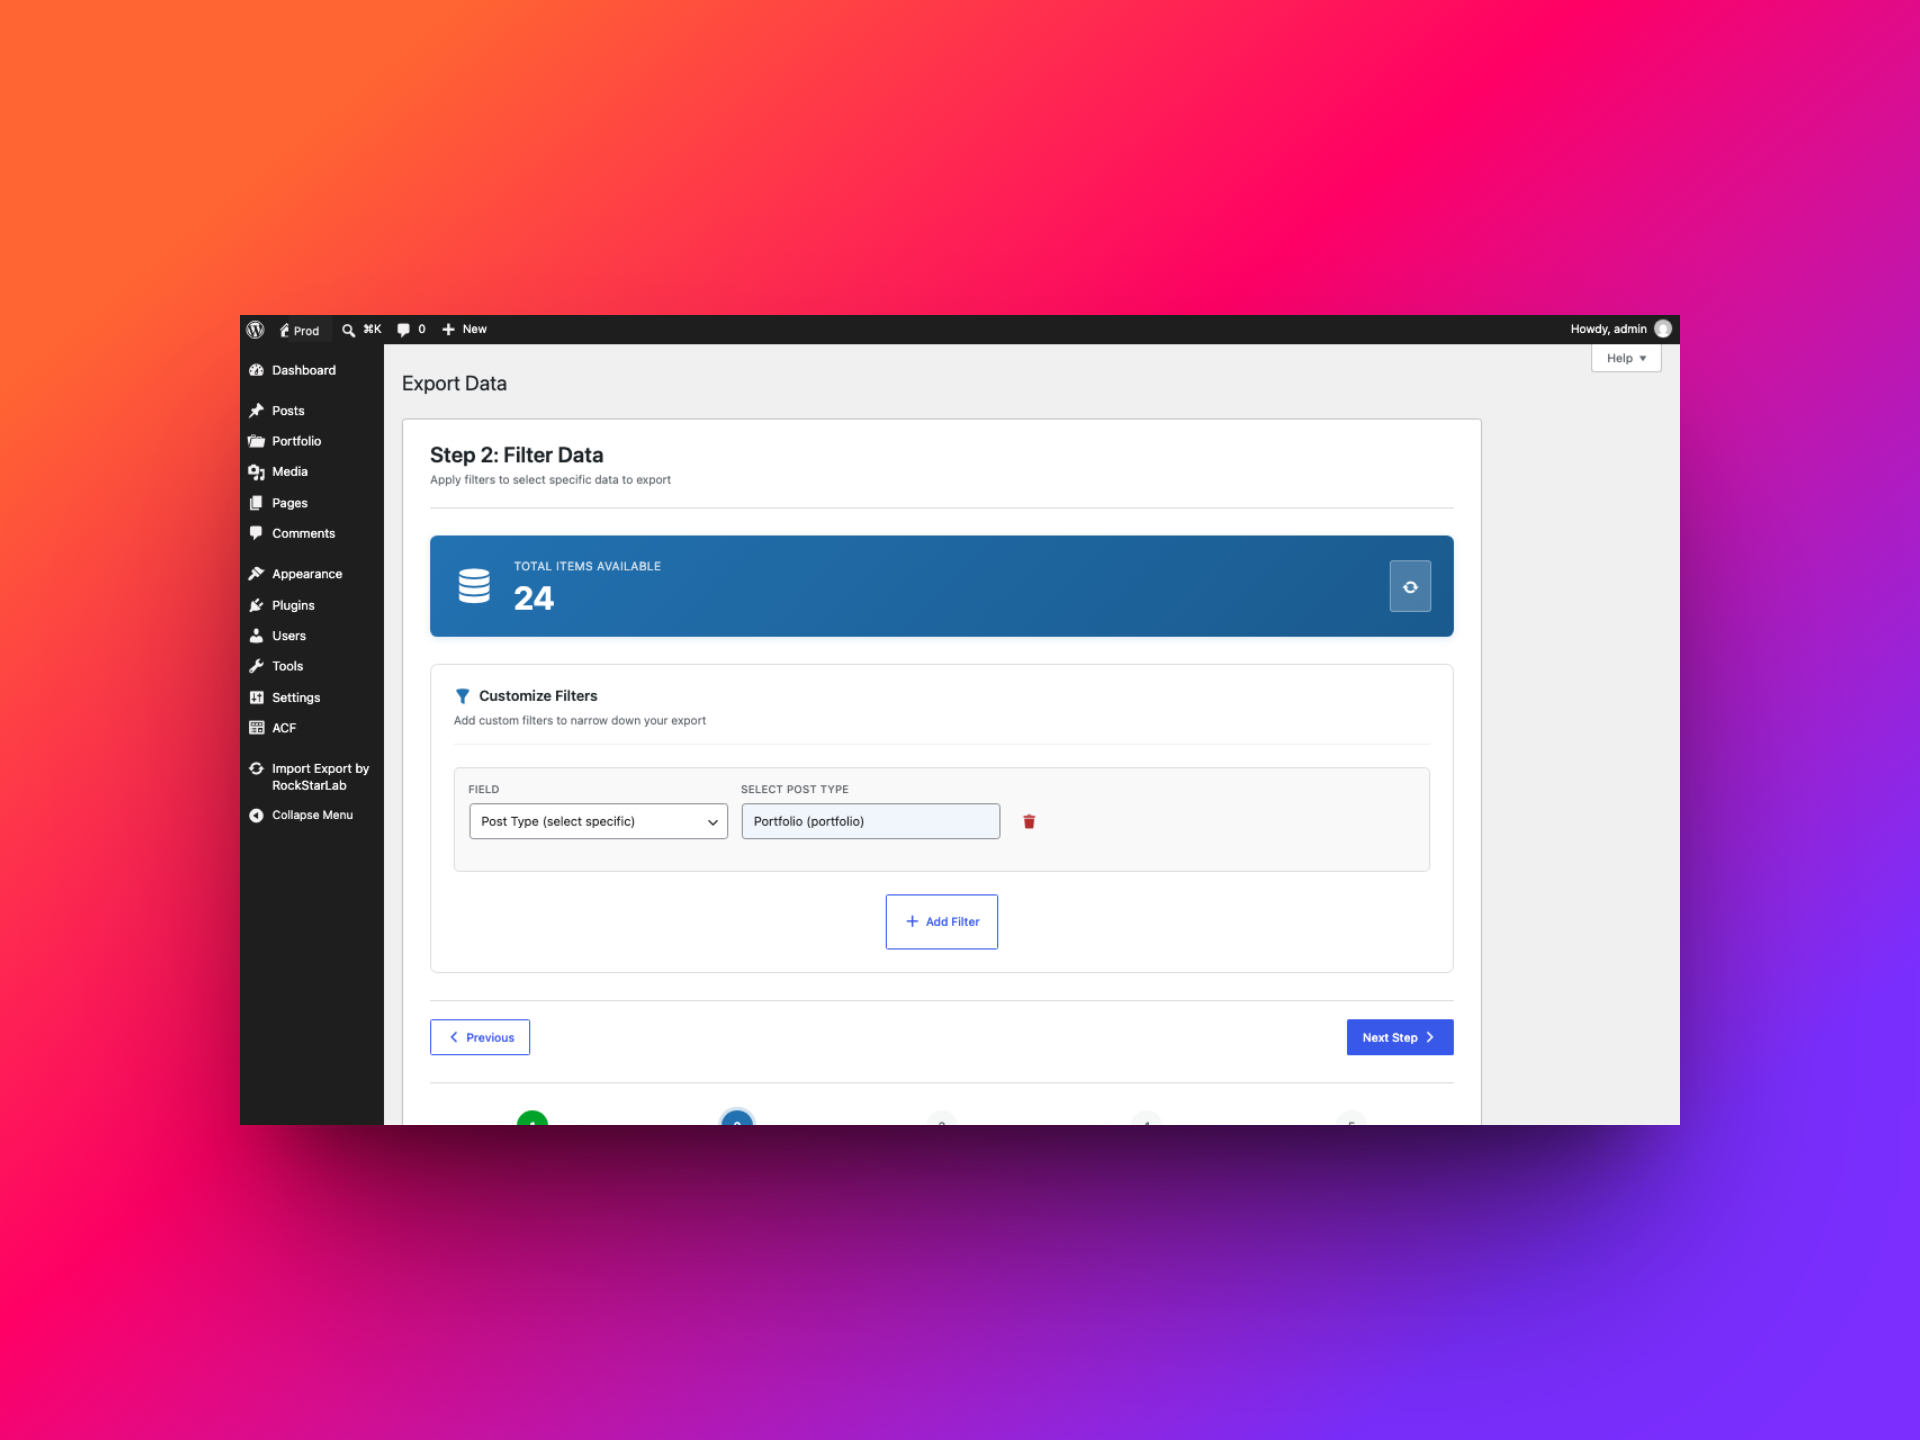
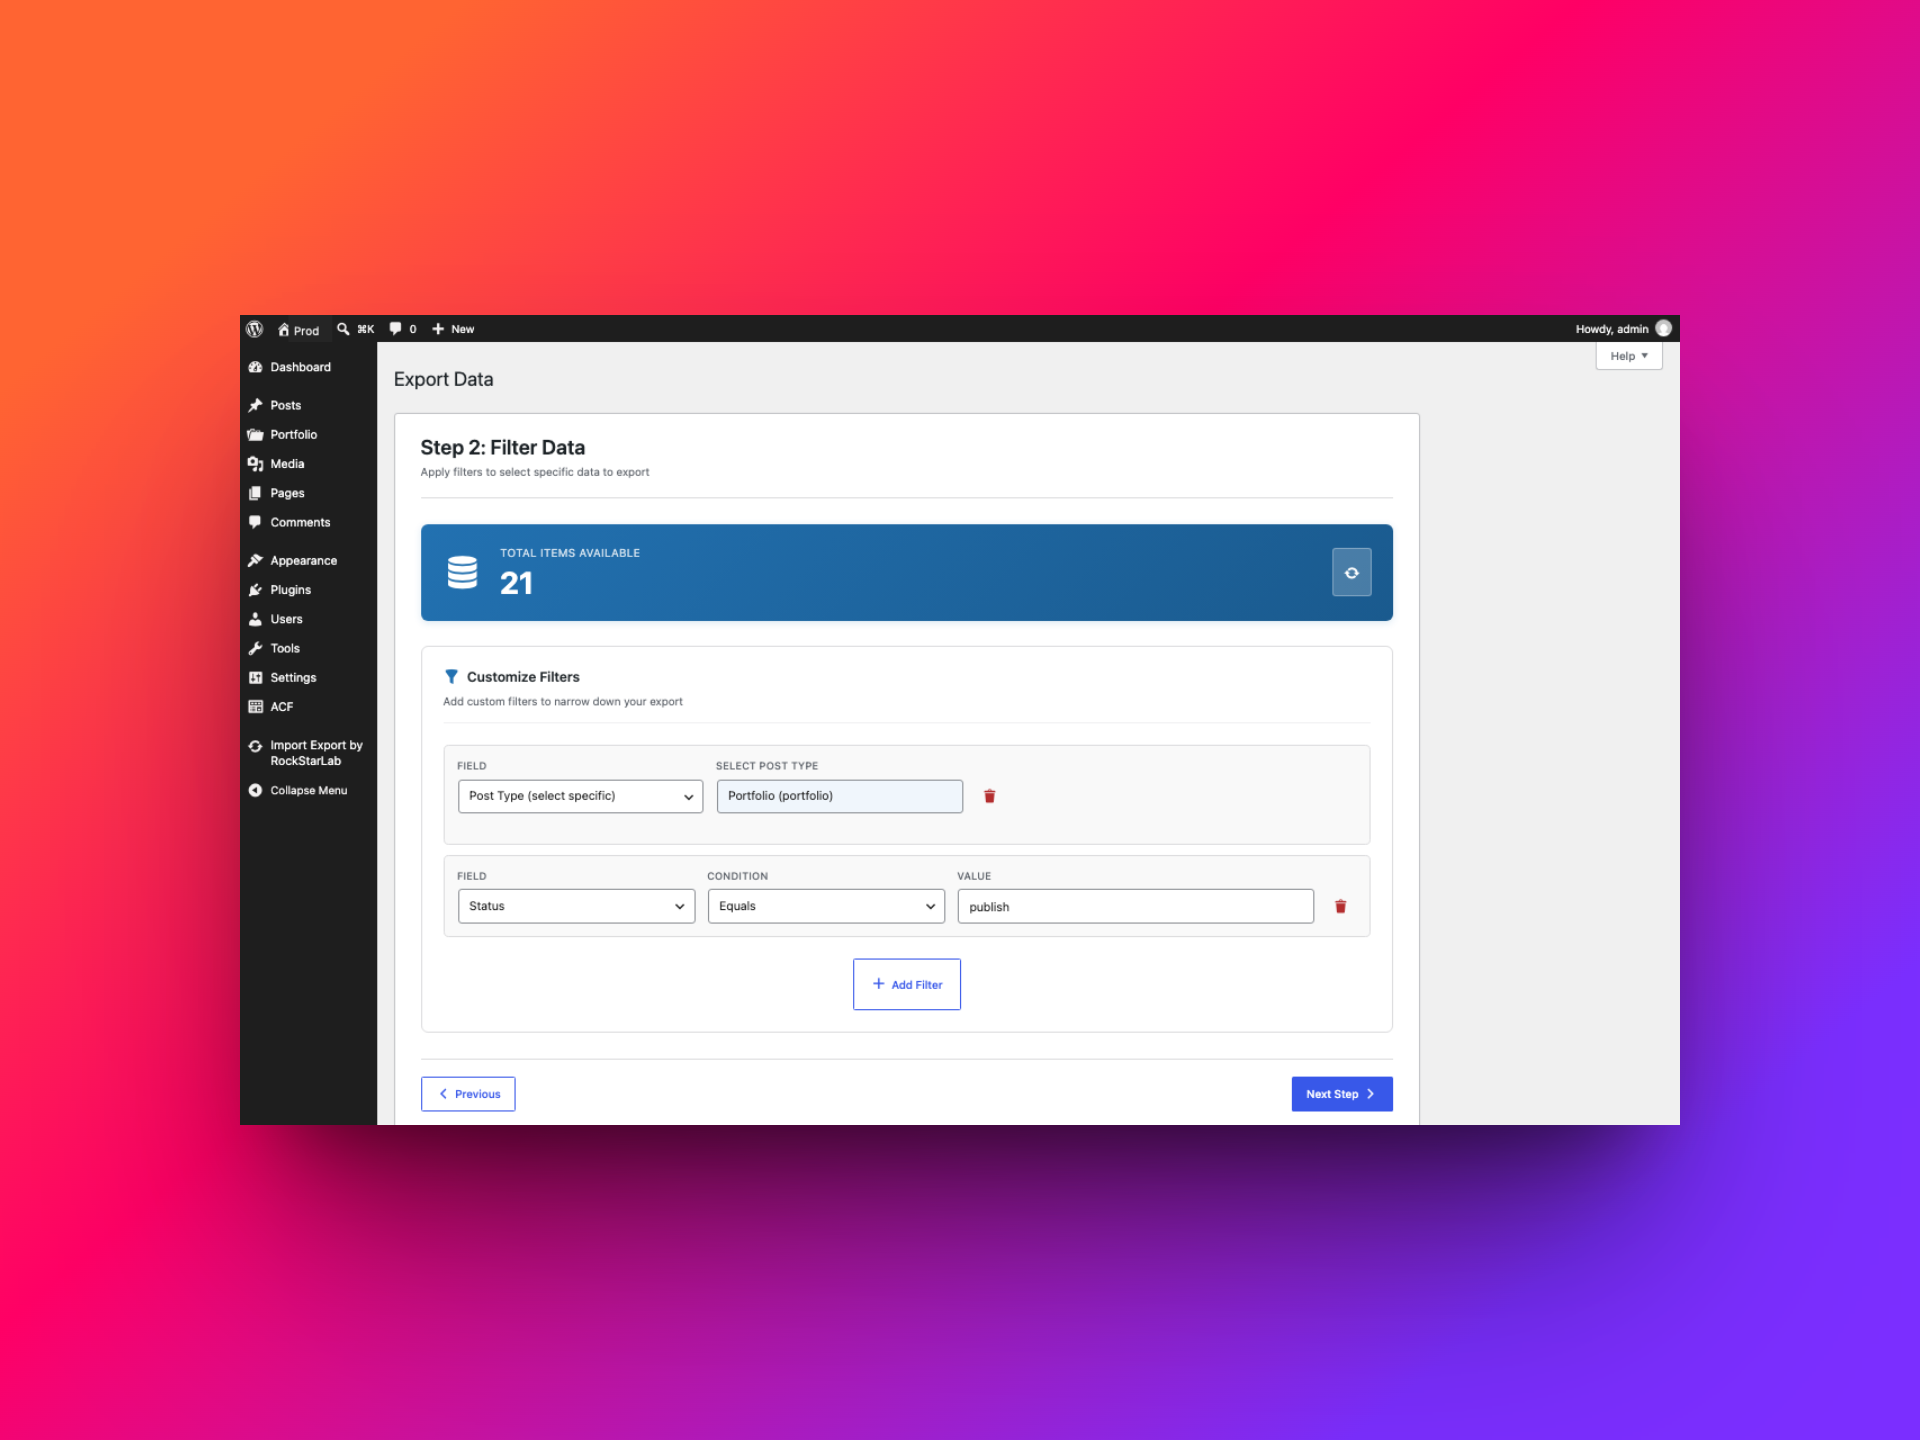
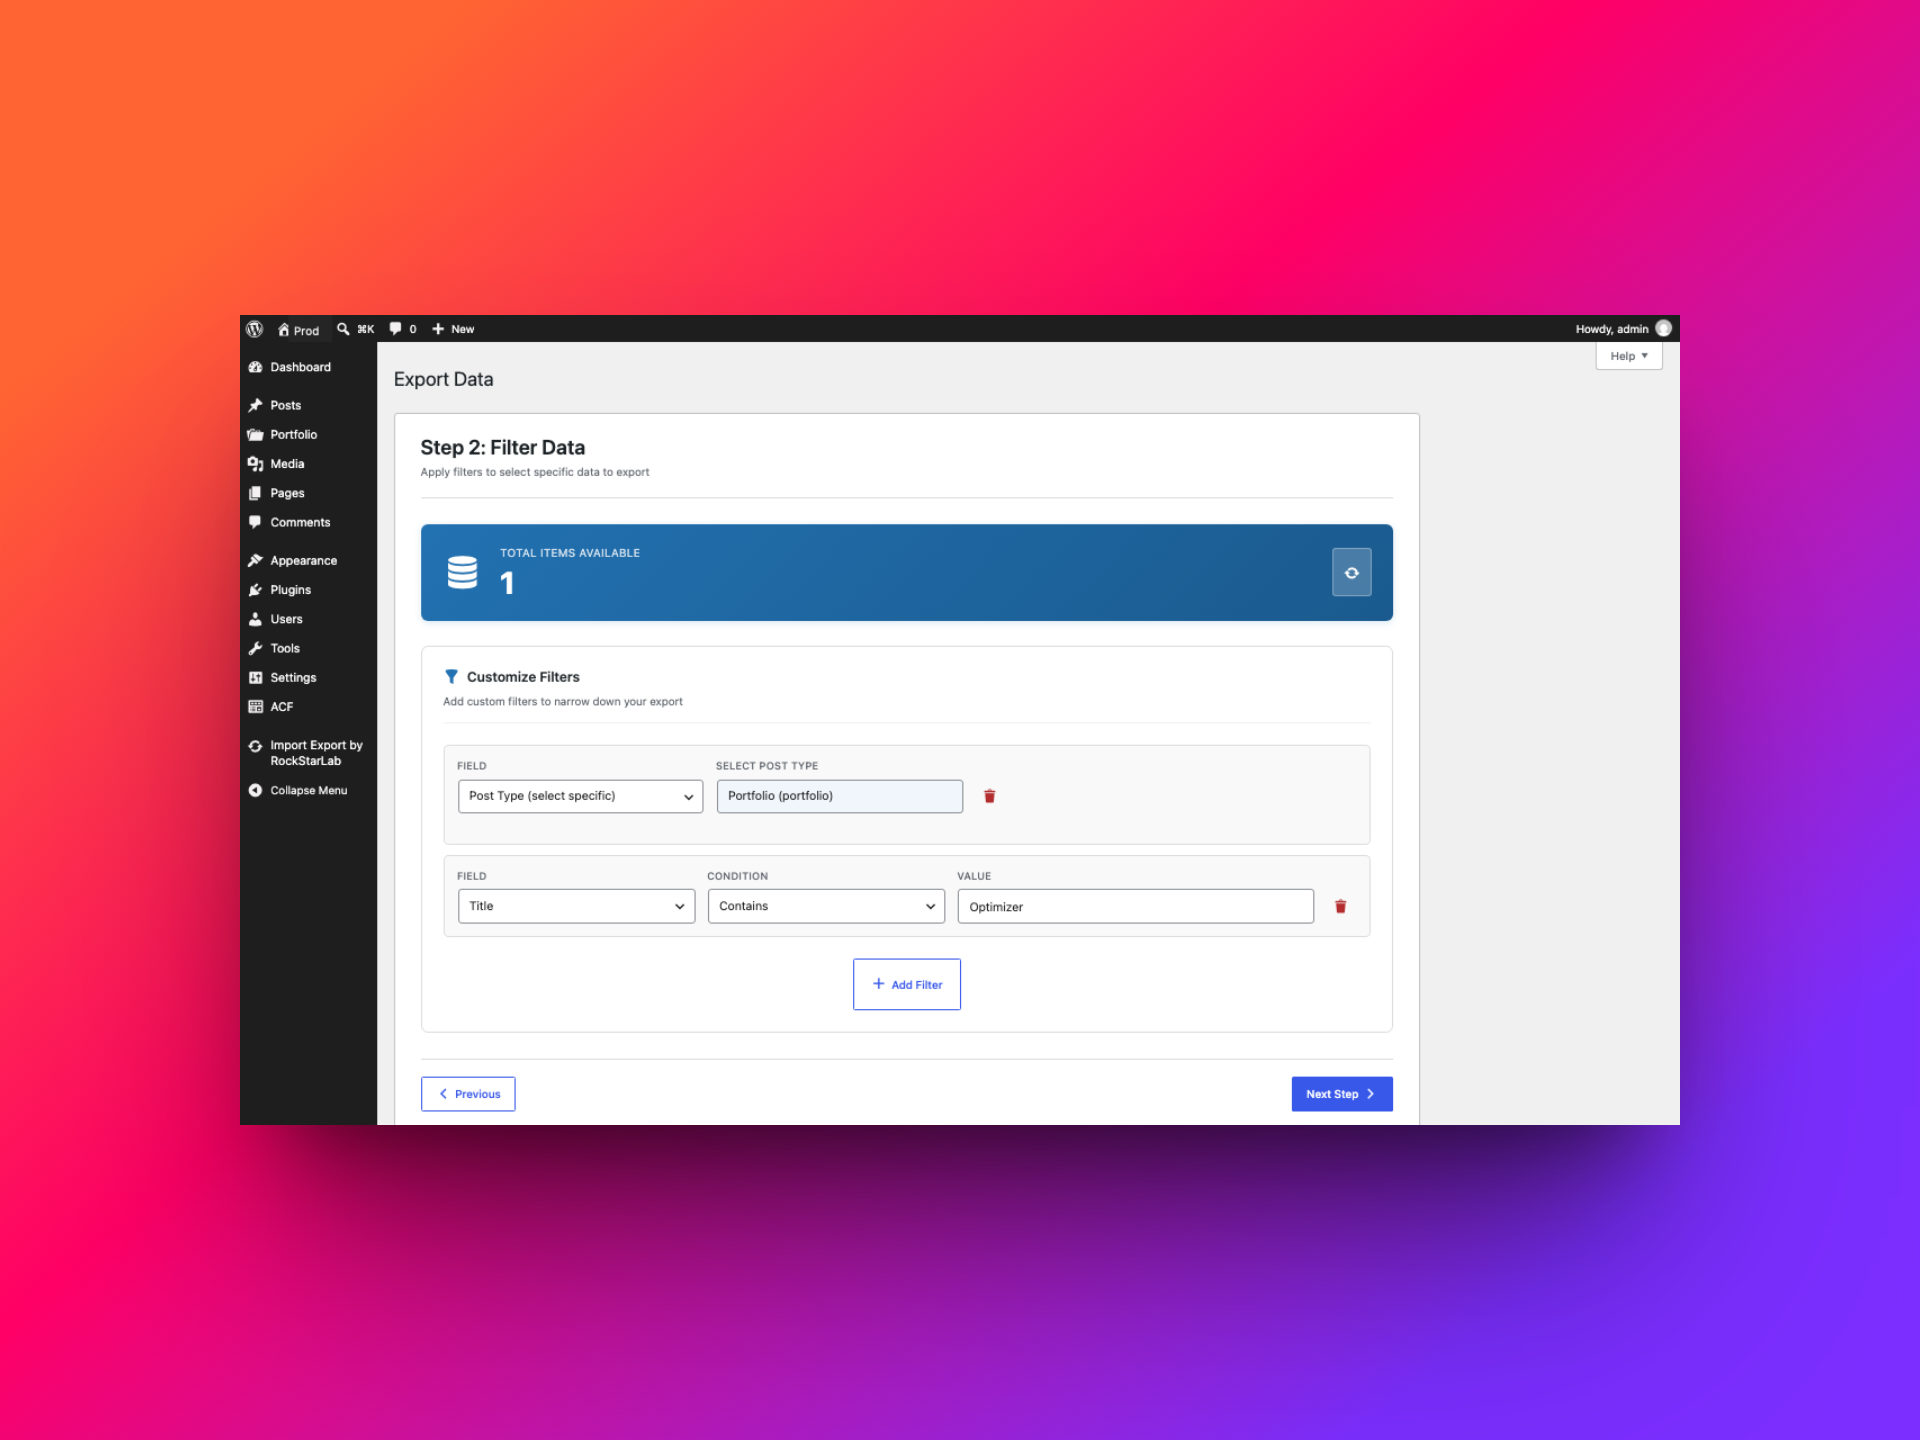
For a taxonomy filter, select Taxonomy Filter, enter the source site’s taxonomy key (for example, portfolio_category), choose the term condition, and enter the term slug rather than its display label. This key is used to filter the source export; it does not require the destination taxonomy to have the same key. After setting or changing a condition, use the refresh control and confirm the resulting count before moving on. You can remove a condition with its trash icon or add another filter when the export needs to be narrower.
3. Select the post, taxonomy, and ACF fields
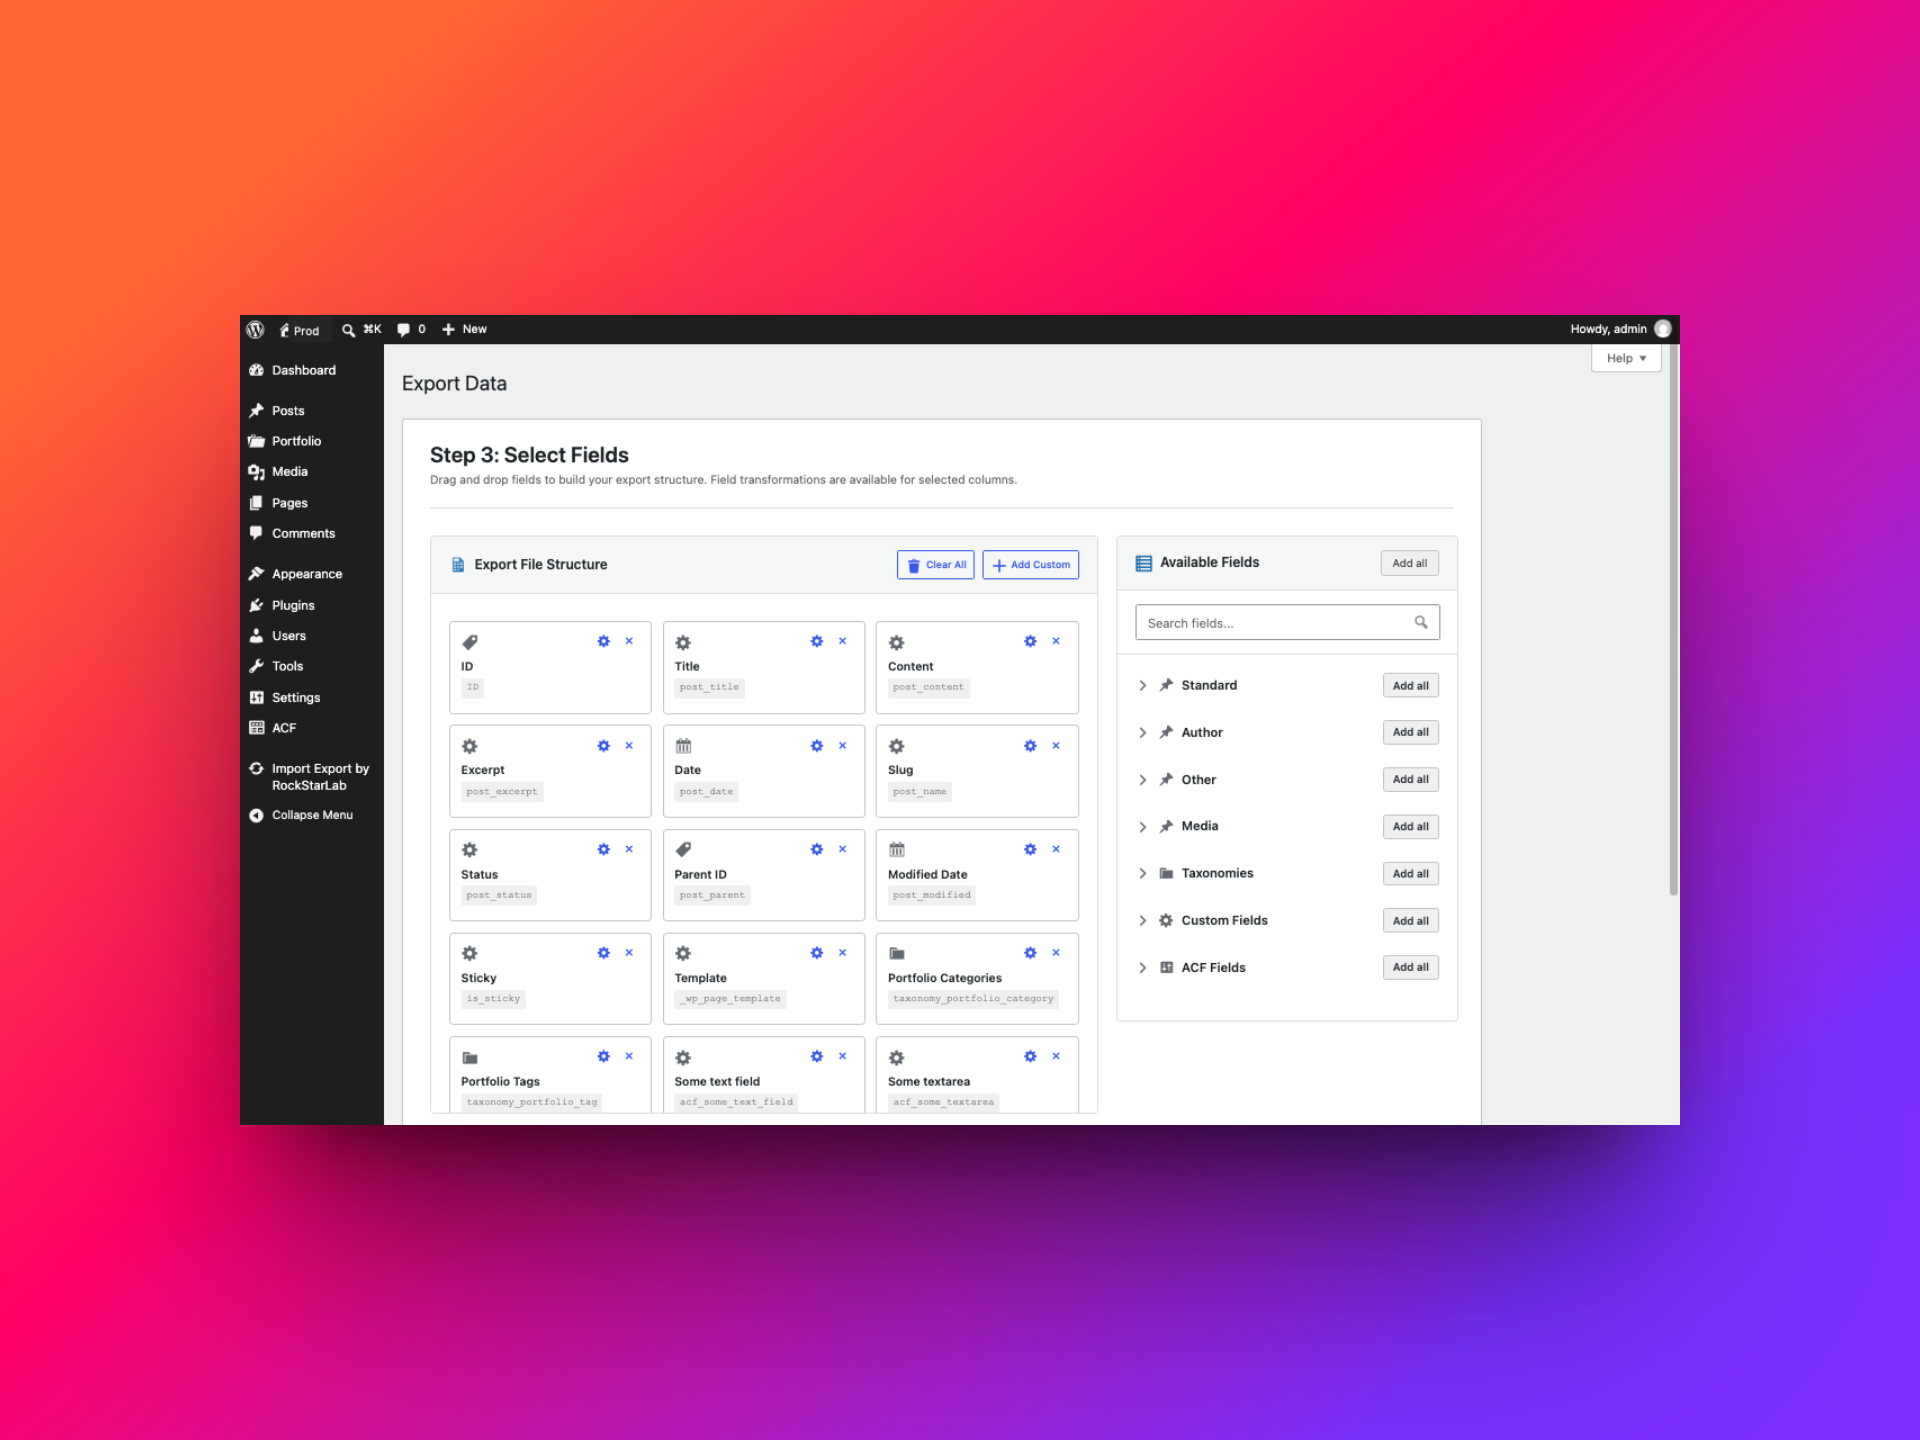
On the field-selection step, build the columns you want in the export. You can add every available field group for a broad migration, or pick only the columns needed for a focused task. The wizard groups standard post data, author details, media, taxonomies, custom fields, and ACF fields separately. For a complete Portfolio move, include the title, content, excerpt, slug, date, status, source Portfolio taxonomy fields, and the ACF fields used by your entries.
In this example, adding the Standard, Other, Taxonomies, and ACF Fields groups produced 32 columns. The taxonomy columns carried the Portfolio Categories and Portfolio Tags assigned to each post. The ACF group included text, number, group, image, gallery, file, map, date, and flexible-content fields. You can add individual fields instead of the whole group when you want a smaller, more deliberate file.
This flexibility is useful for an SEO audit too. Rather than exporting every field, create a compact sheet with the post title, SEO title, meta description, and canonical URL fields you want to review. When Yoast SEO or Rank Math is active, the plugin can expose its SEO metadata fields, including SEO Title, Meta Description, and Canonical URL. For a sitewide list of public page URLs, choose All Site URLs as the export content type; that is a separate URL inventory from a Portfolio post export. If you need URLs and SEO metadata together, include an available permalink/URL field for the selected content type or match the separate exports by a stable value such as slug. Check which SEO plugin fields are available on your site before building the file.
Review the selected structure before continuing. Including an ID column in the export can be useful for reference, but post IDs are local to each WordPress database. When importing to another site, don’t map source IDs unless you have a specific ID-matching plan.
4. Choose a file format and export
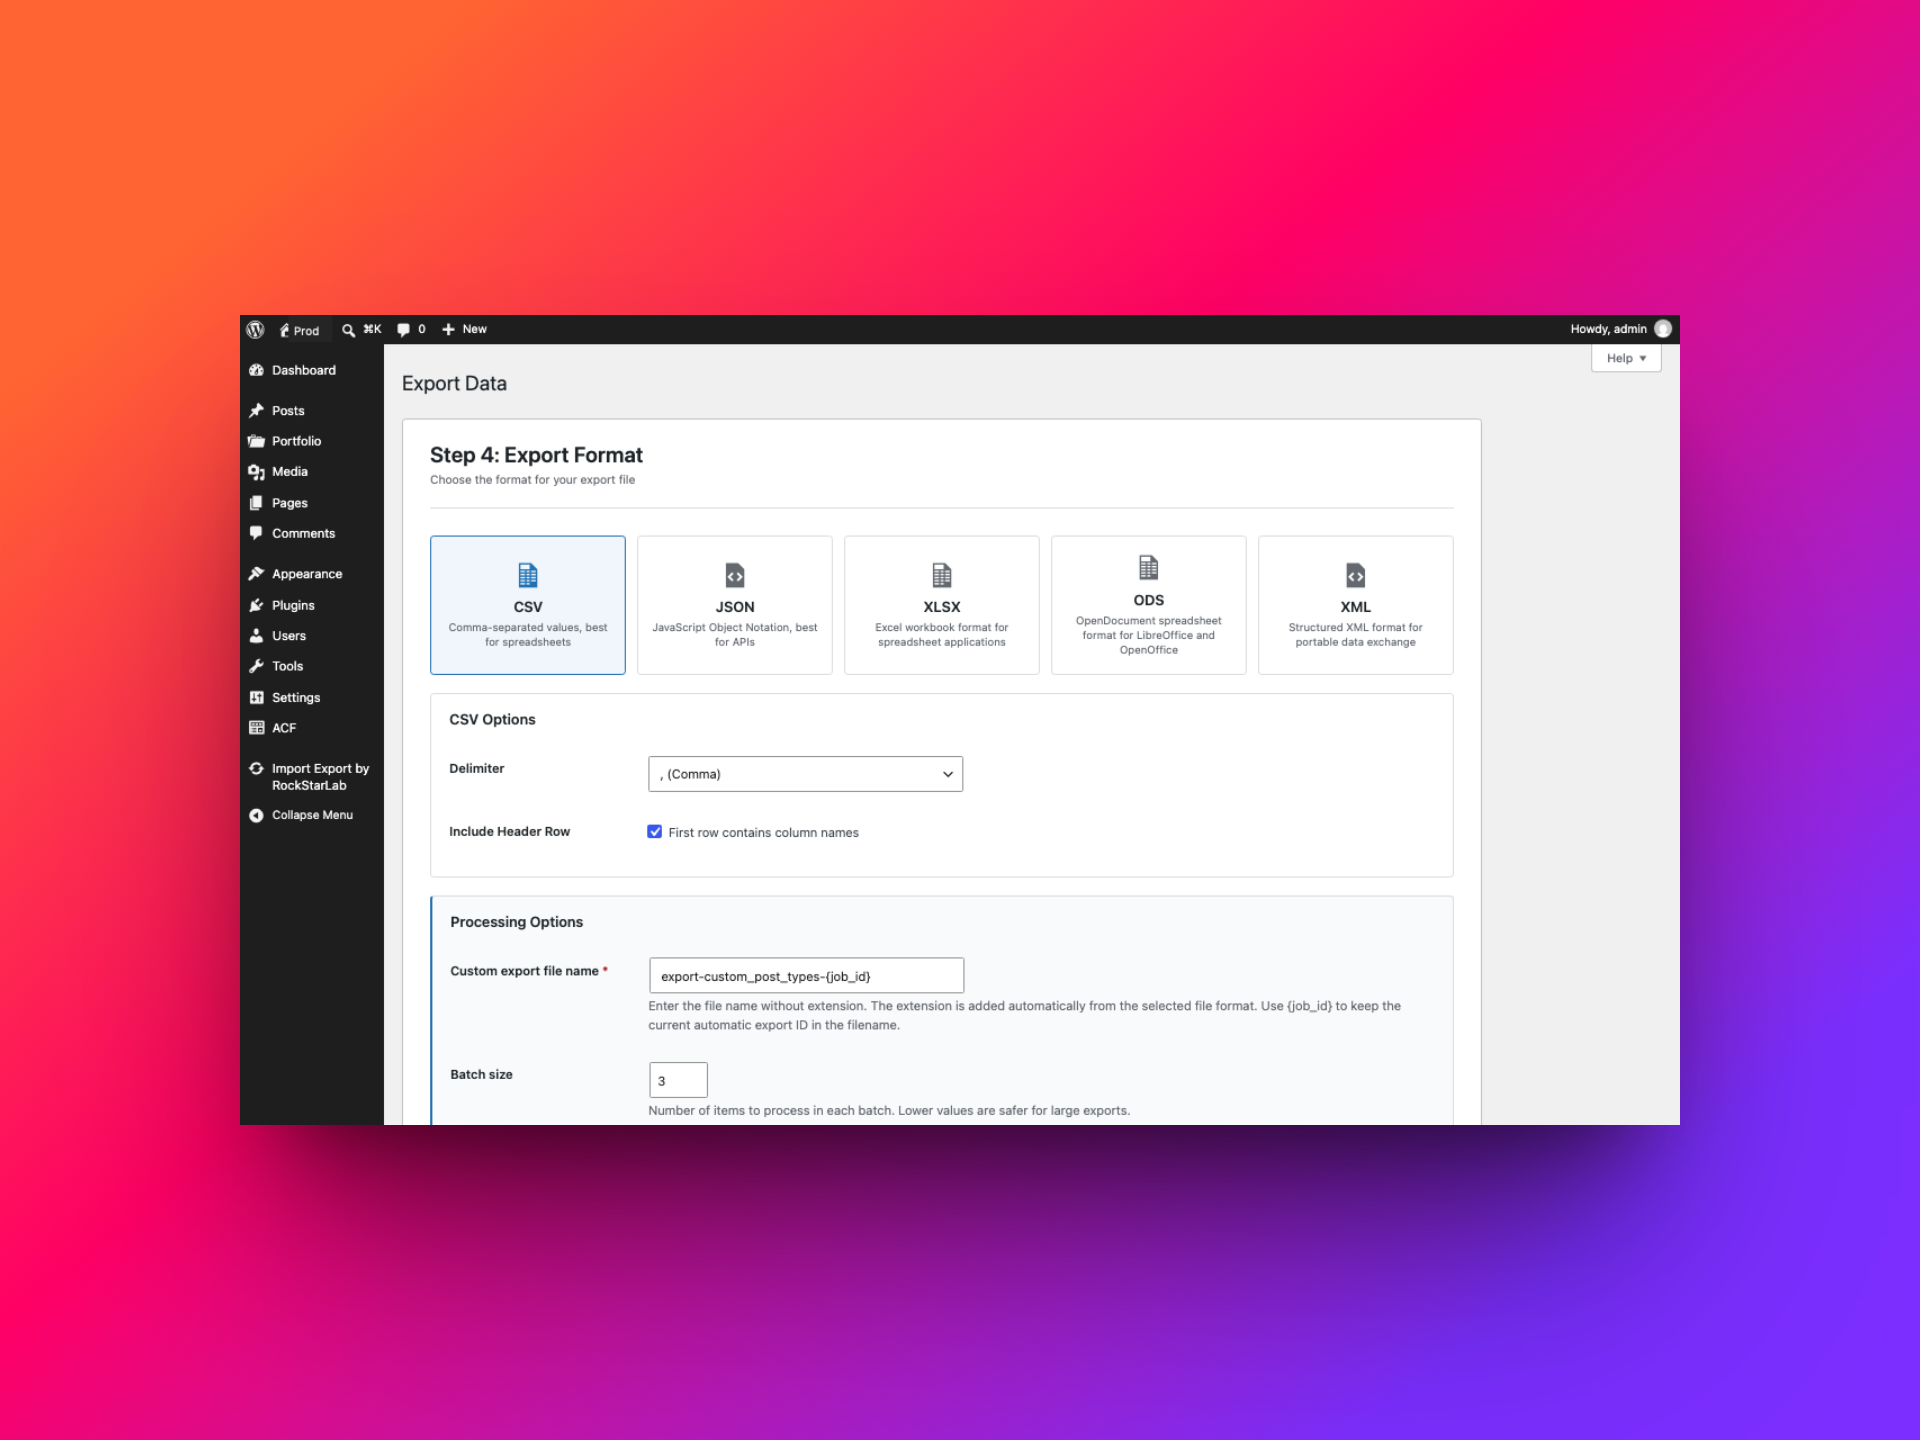
Choose a format based on who will use the file and what happens next. All five formats below can be imported by the plugin; the best choice depends on whether you want a simple table, a spreadsheet for people, or structured data for another system.
| Format | Good fit | Why you might choose it |
|---|---|---|
| CSV | Routine imports, spreadsheets, SEO audits, and reporting tools | Plain tabular data is easy to inspect and widely supported. Keep the header row enabled; choose comma, semicolon, tab, pipe, or a custom delimiter to suit the receiving tool and avoid conflicts with your field values. |
| XLSX | Teams who work in Microsoft Excel | A workbook opens directly in Excel and is convenient for sorting, filtering, reviewing, and sharing records without first importing a delimited text file. |
| ODS | LibreOffice, OpenOffice, or an open spreadsheet workflow | Use the OpenDocument spreadsheet format when collaborators prefer those applications or an open spreadsheet file. |
| JSON | Developers, APIs, and scripts that consume structured data | JSON is a common exchange format for web applications. Pretty Print adds indentation to make the file easier to read while debugging or reviewing it. |
| XML | Integrations or data pipelines that specifically expect XML | Choose XML when the receiving system requires a structured XML document; Pretty Print can make that document easier to inspect. |
For the Production-to-Stage import in this walkthrough, CSV is a straightforward choice: its column headers are easy to verify in the preview and map in the importer. If a downstream tool expects JSON or XML, choose that format instead and confirm that the receiving workflow supports the same structure.
The wizard also lets you name the export file and set a batch size. Smaller batches can be helpful for large exports; the right value depends on the server and the size of the records. Start the export, wait for it to complete, then download the file.
How to import the CPT, taxonomies, and ACF values
Now switch to the Stage WordPress site. The importer has a few important checks before it writes anything, so take a moment to review the backup, file preview, and field mapping rather than clicking through on autopilot.
5. Select Custom Post Types and confirm your backup
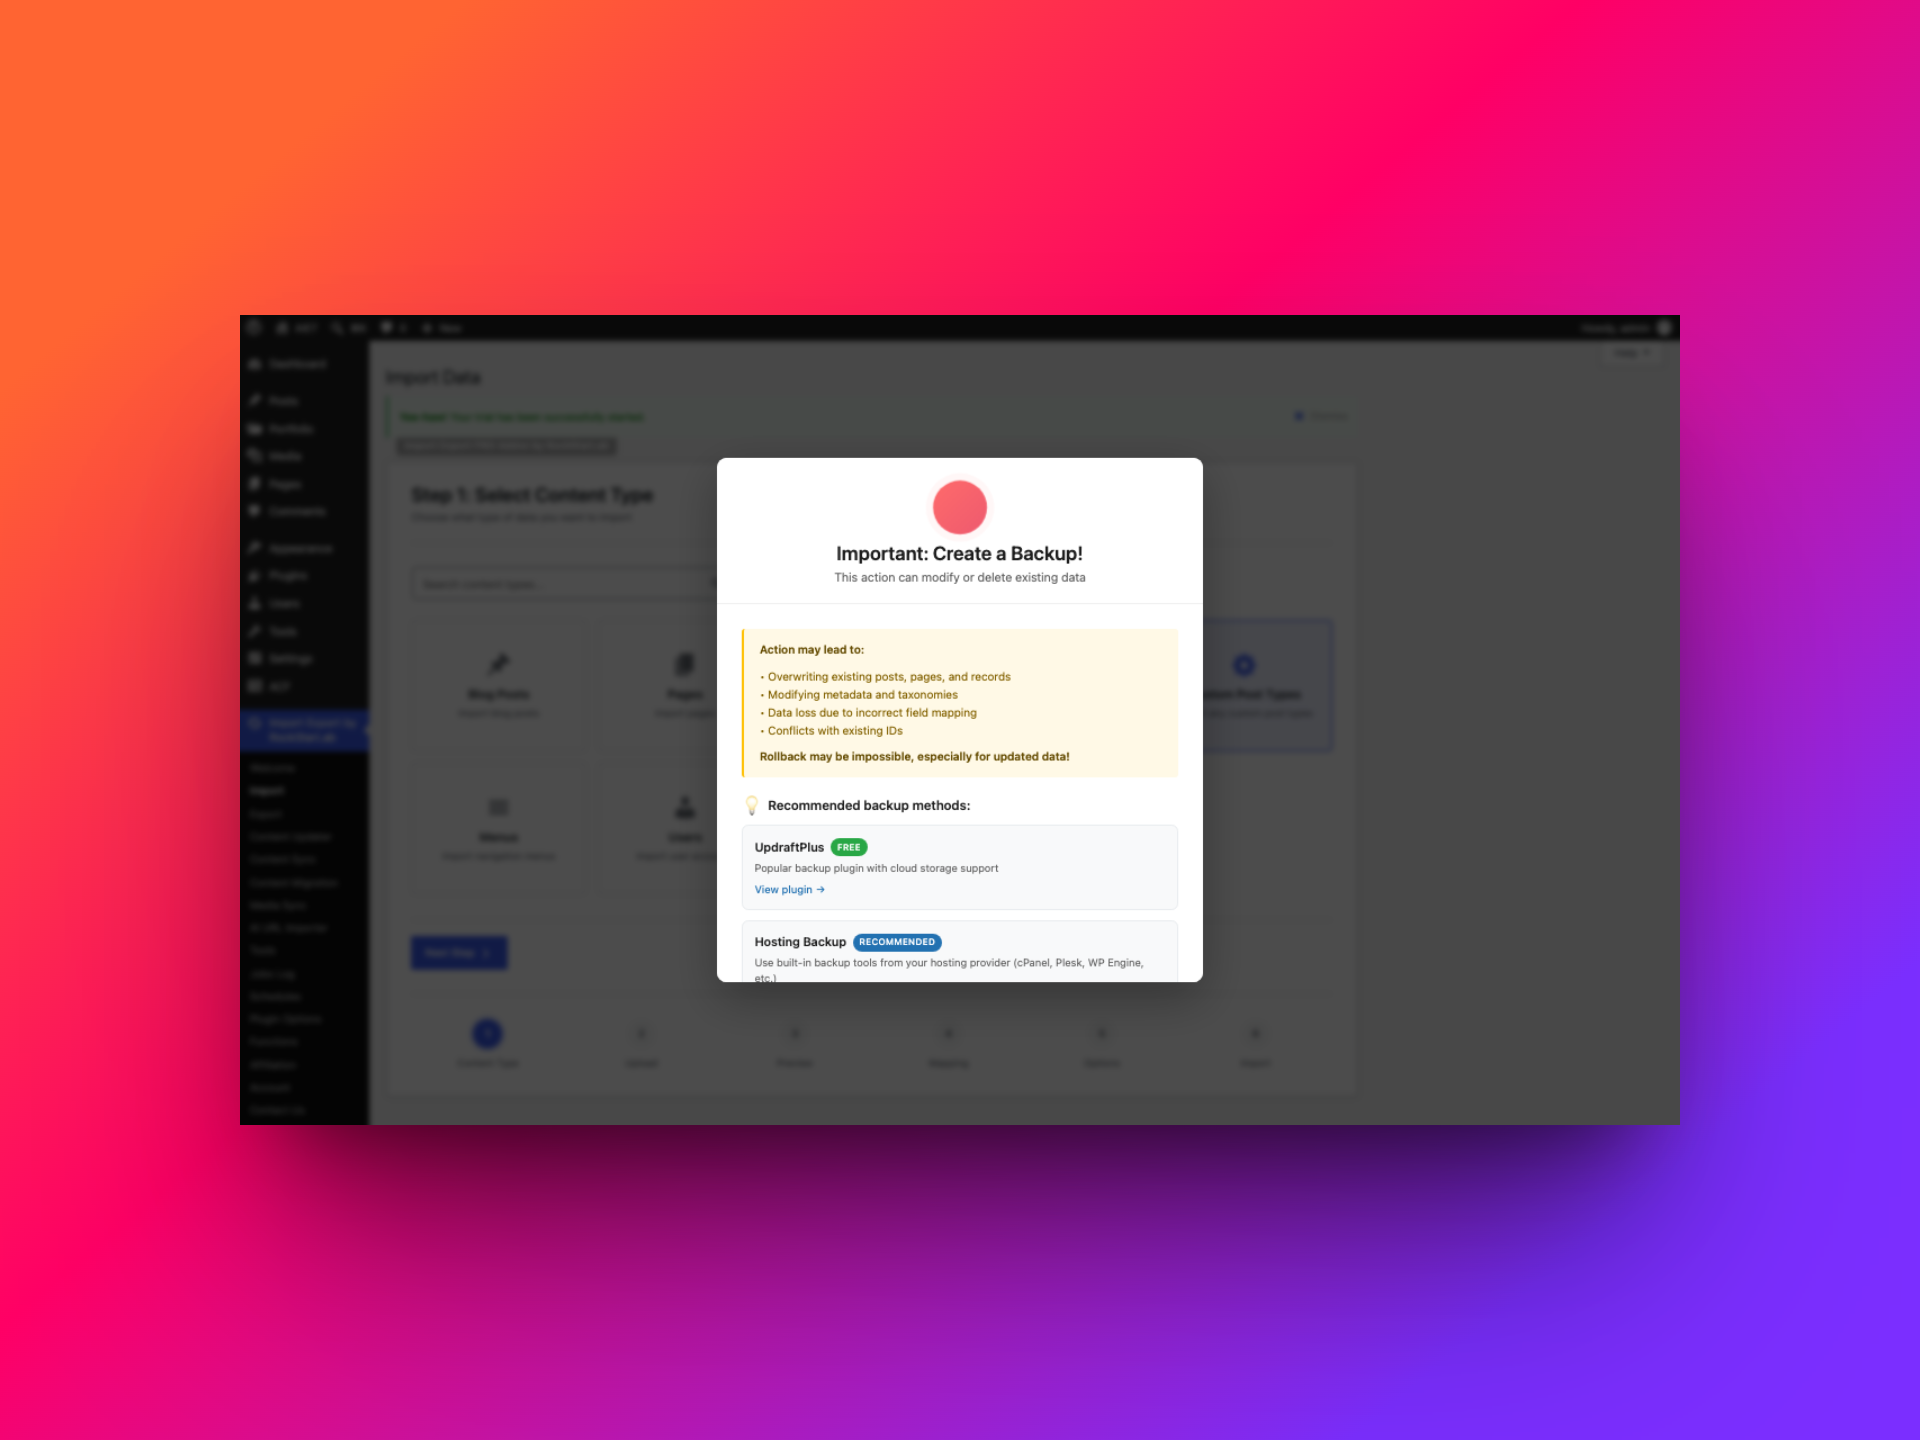
Open Import Export by RockStarLab → Import and choose Custom Post Types. The importer displays a warning because an import can create or update posts, metadata, and taxonomy assignments, and there is no simple undo button for those changes. A current backup gives you a recovery point if the wrong file, mapping, or update rule is used. We recommend UpdraftPlus for managing WordPress backups. Create and verify the backup before continuing, then acknowledge the import warning.
Choose a backup scope that matches your recovery needs. The database contains posts, terms, and metadata; uploaded media lives in files, so a database-only backup will not restore changed or newly downloaded attachments. If the import includes media, include the uploads/files in your backup plan as well.
6. Upload the export and inspect the preview
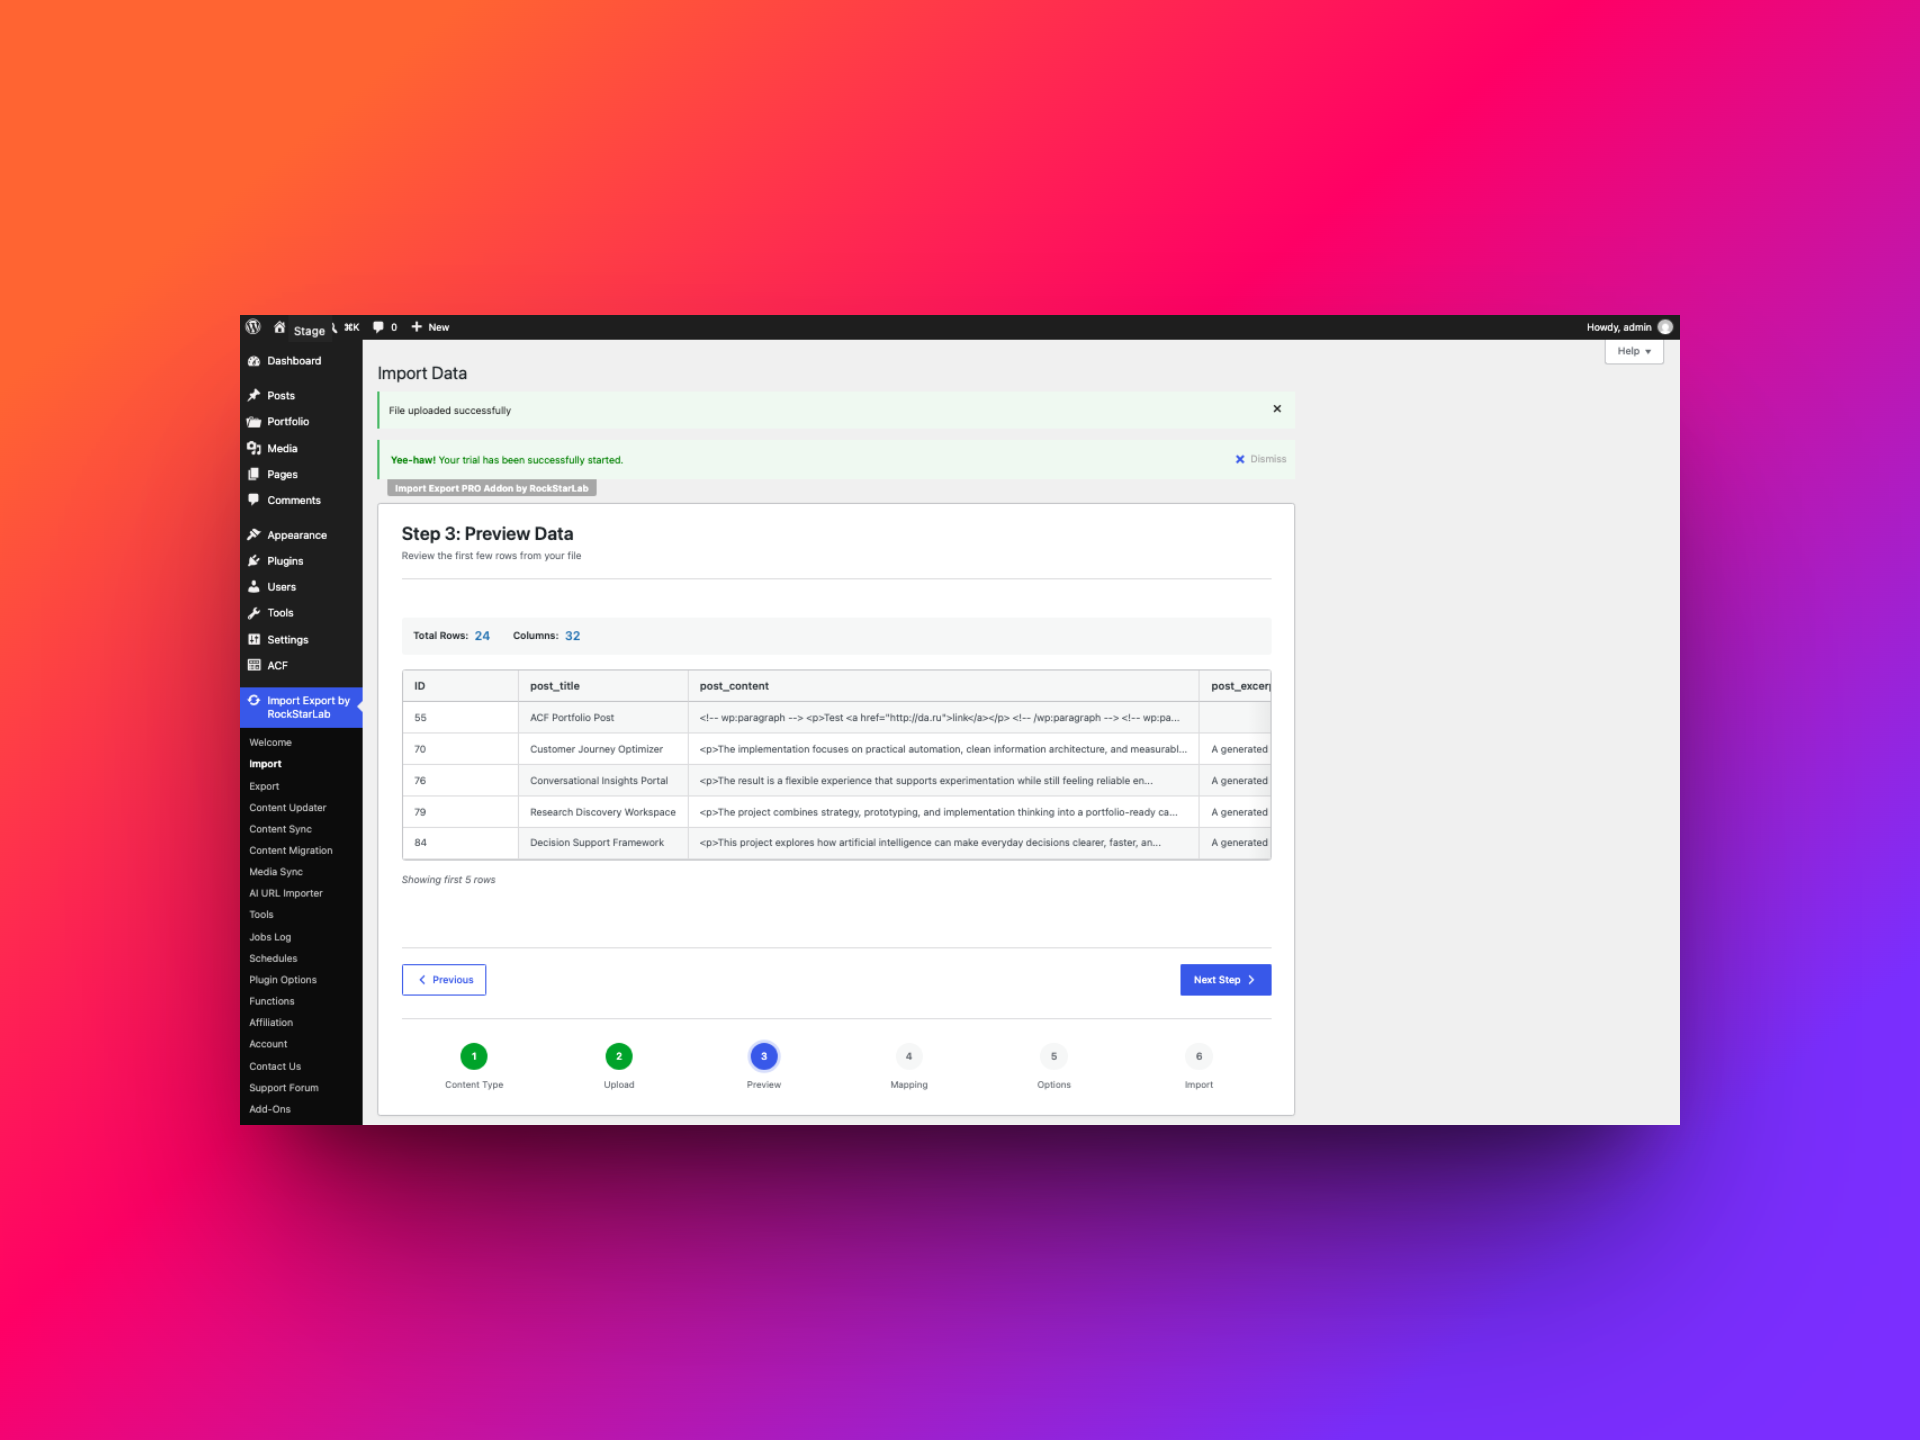
Upload the CSV, confirm the delimiter and that the first row contains column names, then continue to the preview. Check the row and column totals, and make sure the values appear under the expected headers. A preview is a quick way to catch a wrong delimiter or a mismatched file before mapping begins.
For this Portfolio export, the preview showed 24 rows and 32 columns. The taxonomy and ACF values can be long—especially galleries, groups, and flexible content—so the preview may truncate them on screen. The important thing is that they remain in their own columns and the row count looks right.
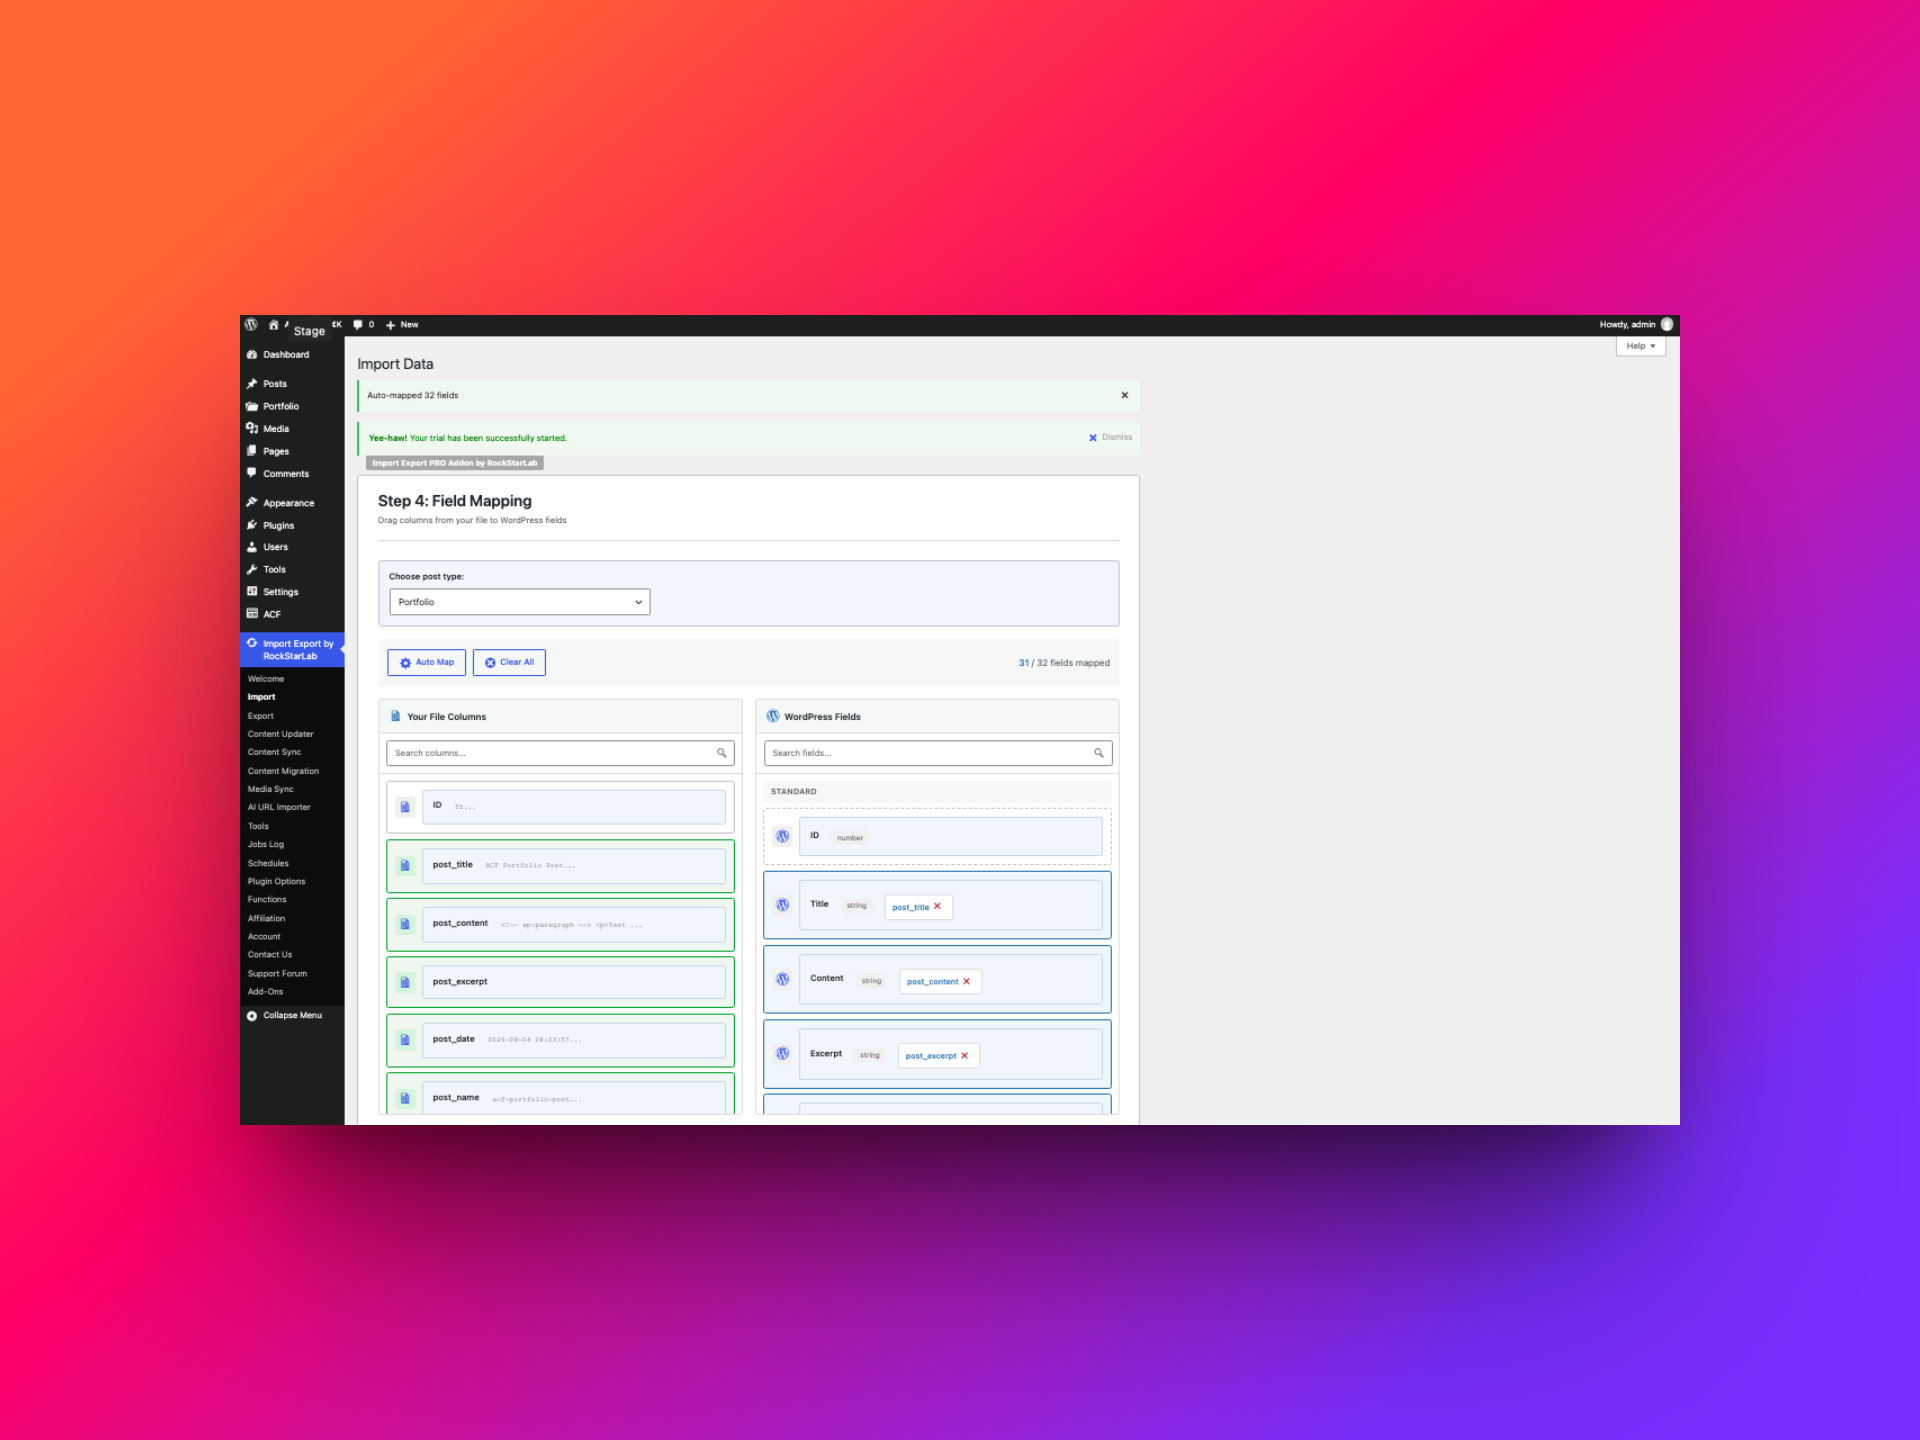
7. Auto-map, then verify every important field
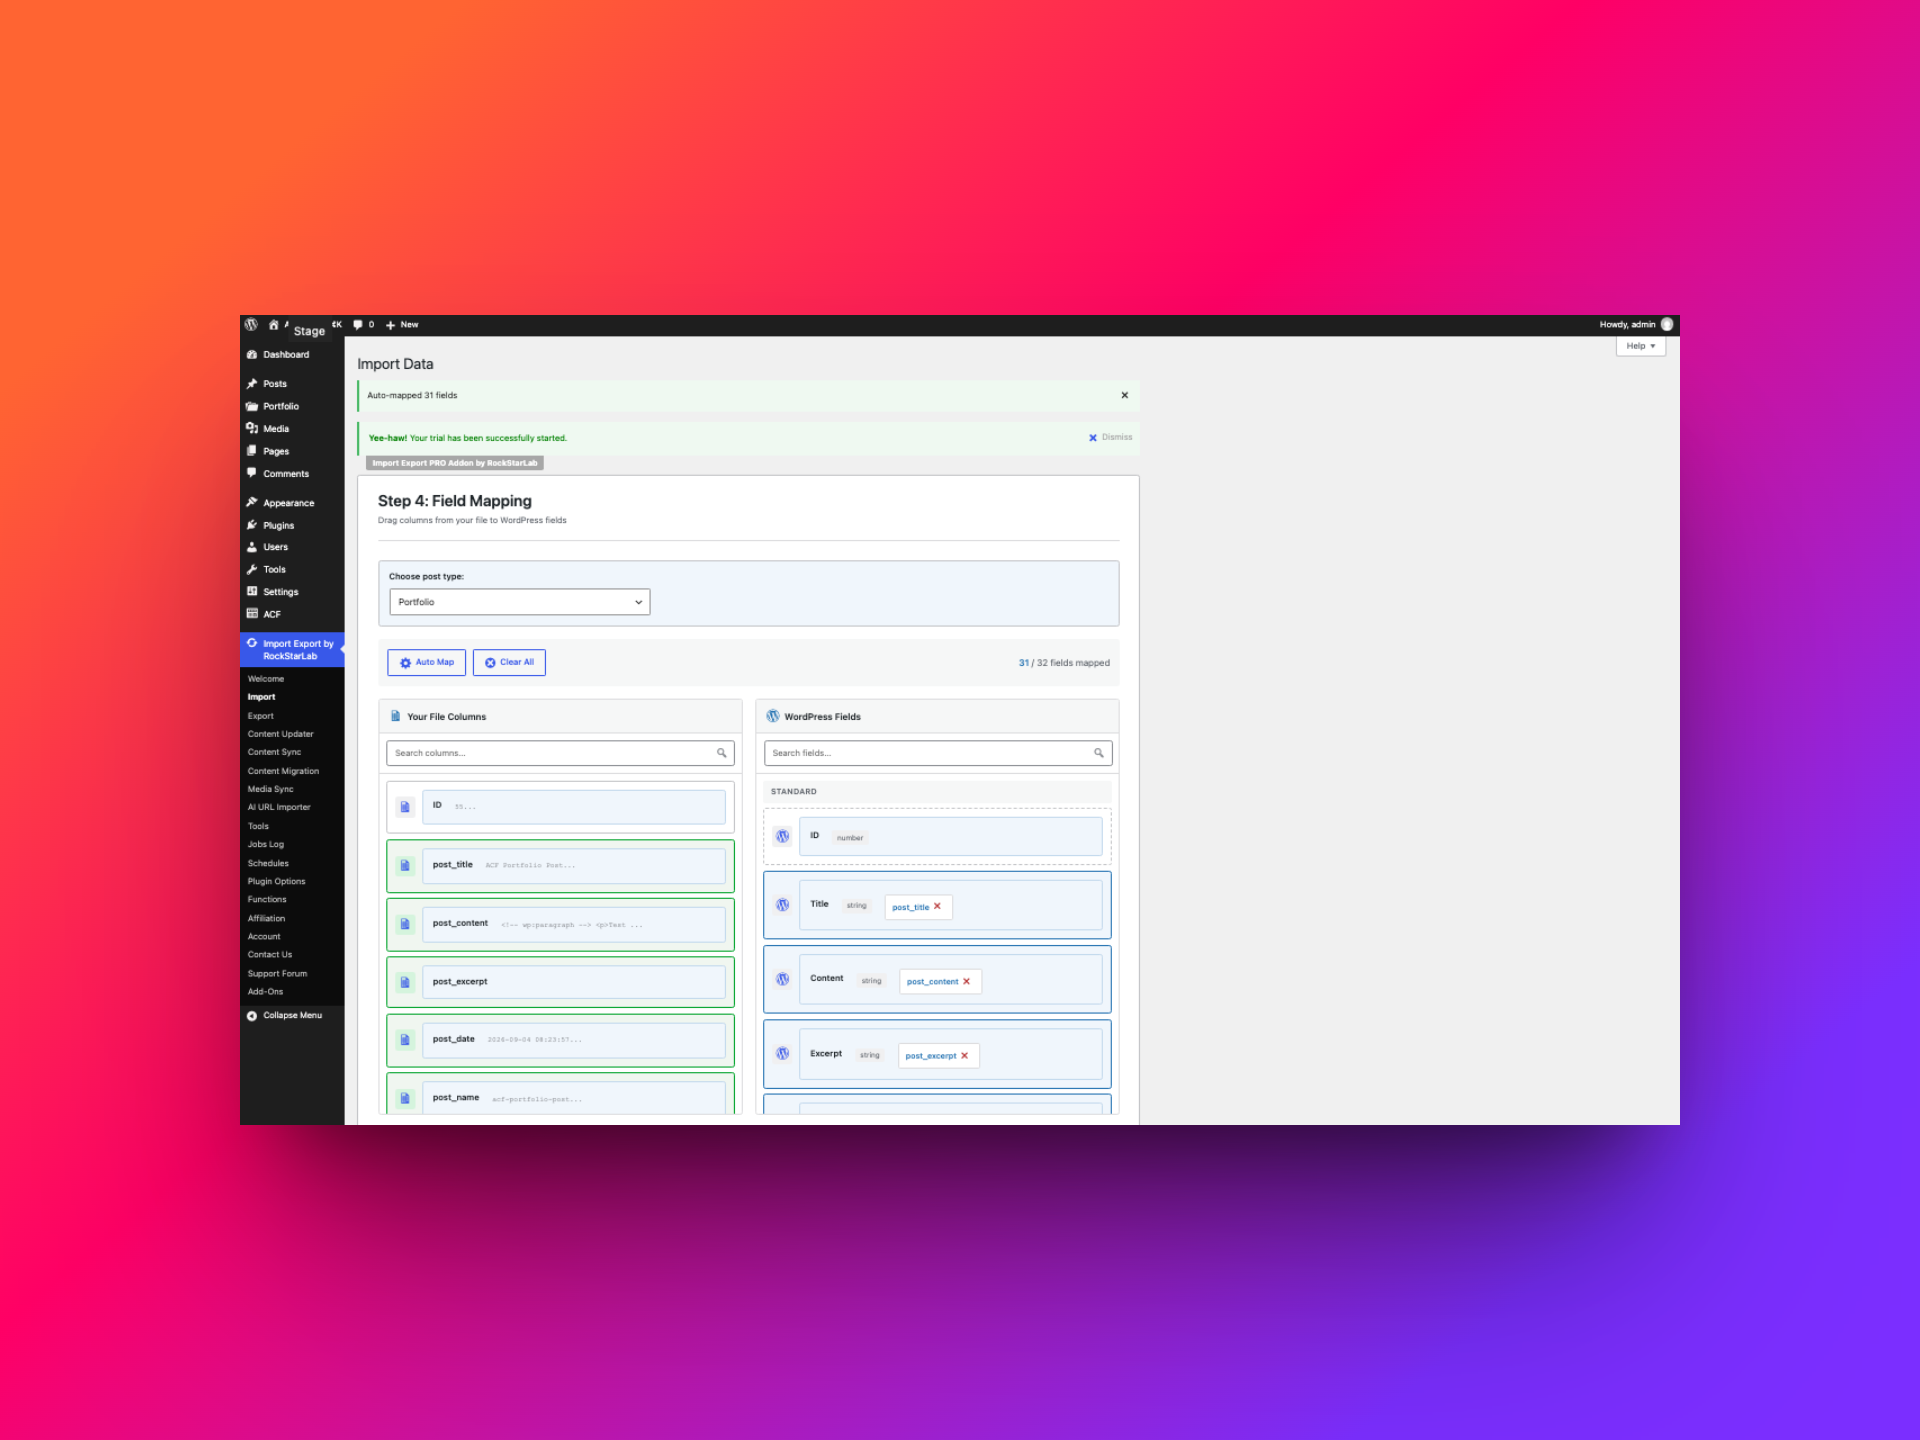
Choose the destination post type you want to receive the records. It can have a different key from the source CPT: the selected destination type controls where imported posts are created. Use Auto Map to match familiar column names, then review the mapping list. Confirm that the title, content, slug, status, taxonomy columns, and each required ACF field point to the intended destination fields.
When source and destination taxonomy keys differ, do not leave an unmapped taxonomy column or assume Auto Map chose the right one. Map the source column to the destination taxonomy target; if needed, add a taxonomy target using its destination key. For a custom taxonomy mapping, the importer lets you specify whether incoming values are term names, slugs, or IDs. Name/slug values can resolve to existing destination terms or be used to create terms; term IDs are database-specific, so do not assume a source term ID identifies the same term on the destination.
ACF fields work similarly: Auto Map is convenient when names line up, while manual mapping lets you connect a source column to a differently named destination ACF field. Make sure the destination ACF field exists and accepts the incoming value’s format. Mapping a field does not translate incompatible structures or create the destination field group.
In the cross-site example, the source post ID column was deliberately left unmapped. The importer has a separate option for choosing a field to check for existing posts. This example uses Slug; choose it only if the incoming slugs identify the intended destination records. The post type key is a separate setting, and source post IDs should not be copied into destination IDs.
8. Set matching, media, and URL options
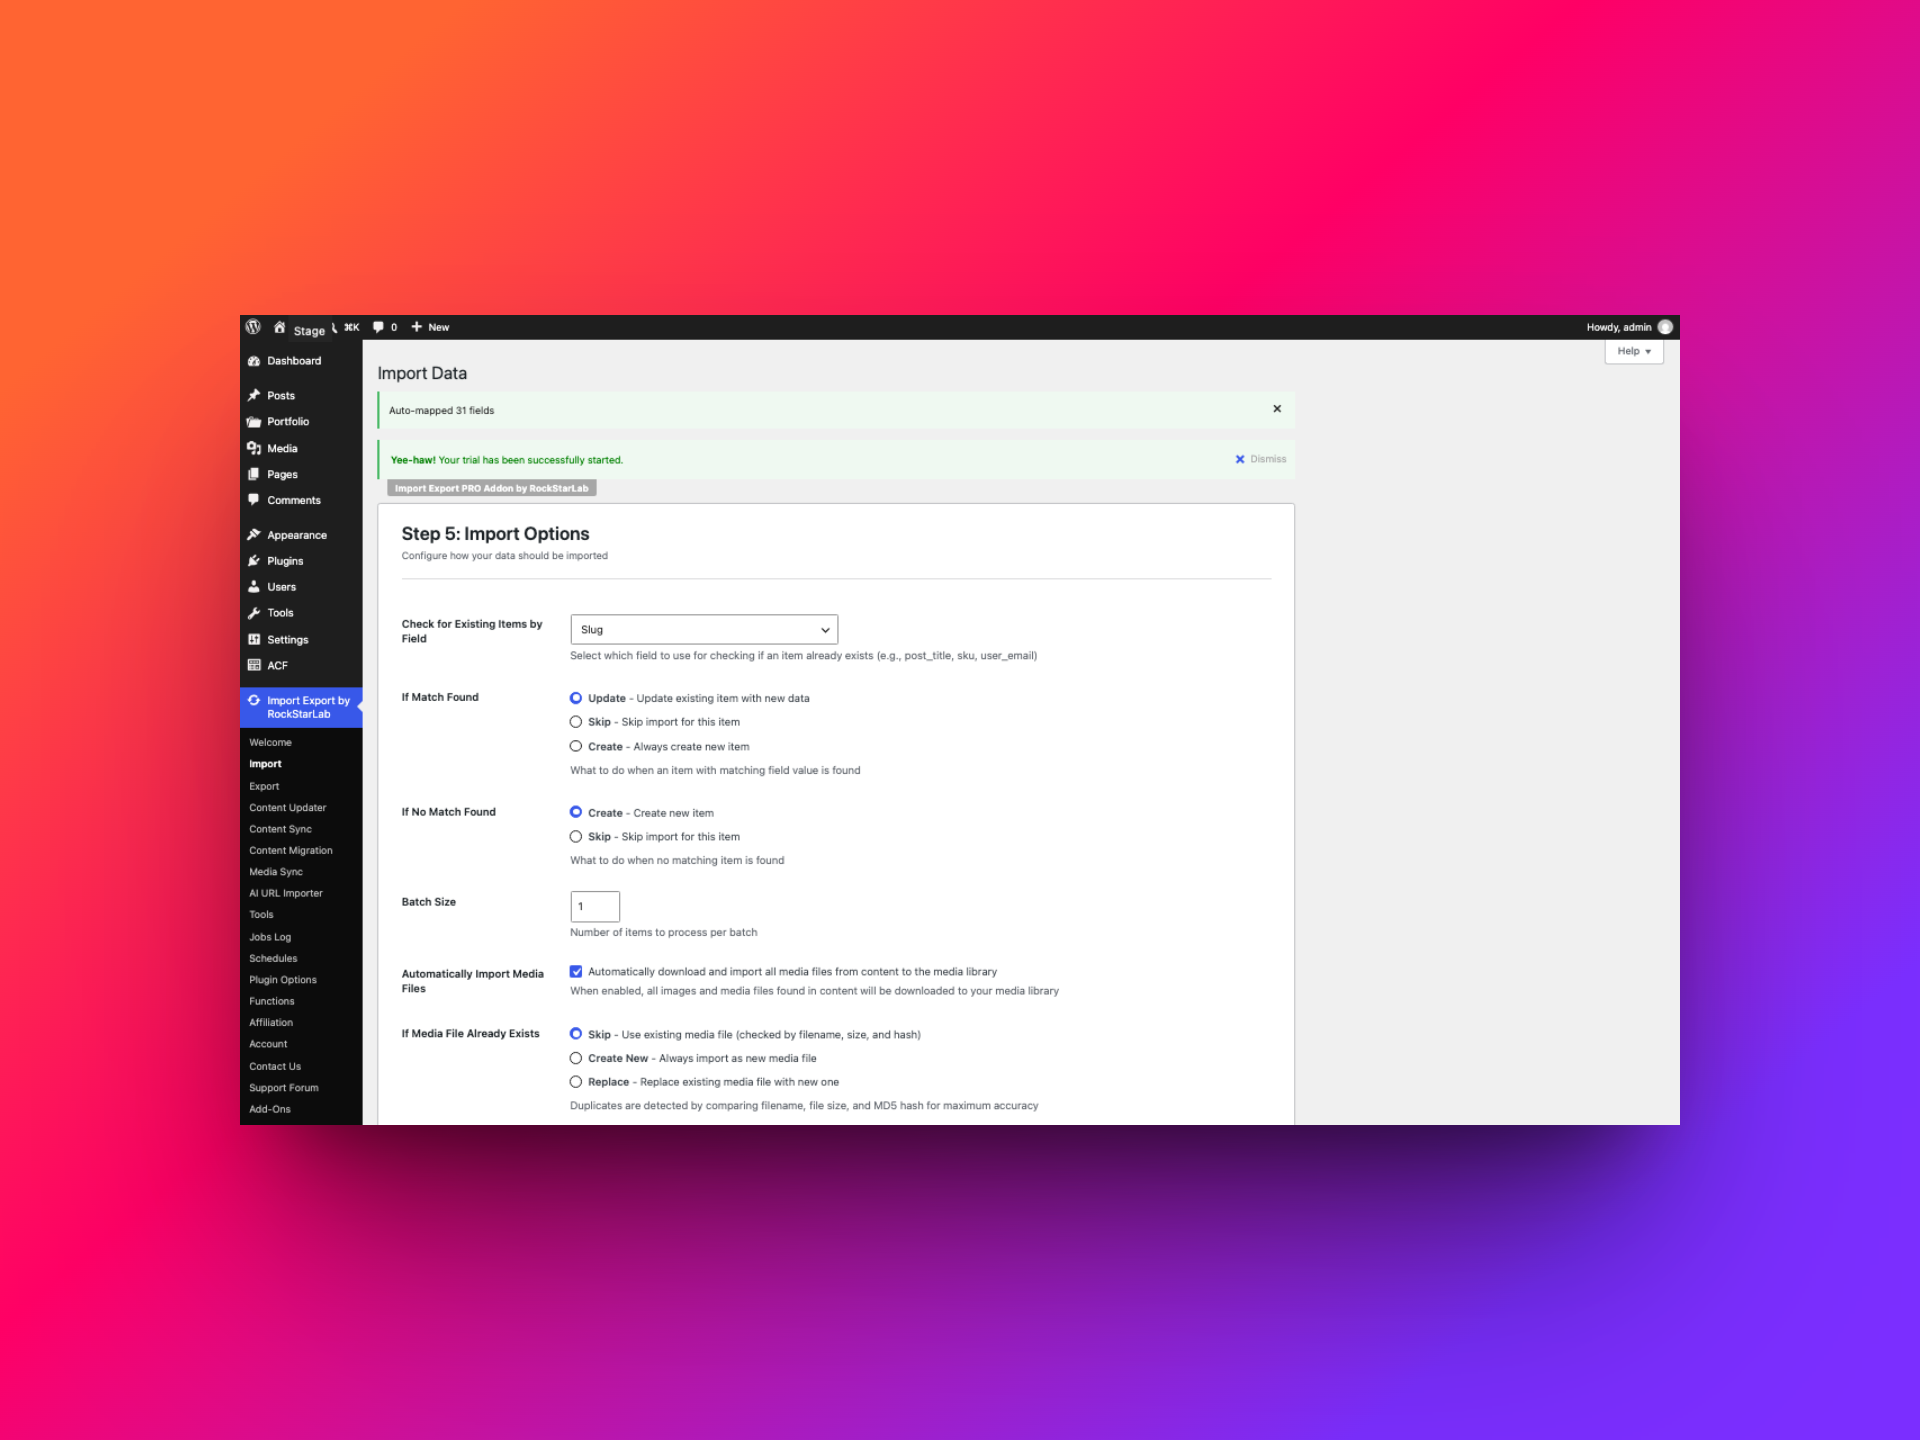
Choose the field used to detect an existing item. For this migration, the import matched records by Slug. This matches posts by their incoming slug within the selected destination post type; it is not a requirement that the source and destination CPT keys match. Use Slug when the relevant records share stable, unique slugs, or choose another suitable unique field if they do not. Set the action for a match—Update, Skip, or Create—and decide what to do when there is no match. Update existing records and create new ones is a practical choice for a refresh, but it can overwrite content on the destination, so confirm the target site is the one you intend to change.
If the exported content or ACF values refer to images and files, enable Automatically Import Media Files when those attachments should be brought over too. The duplicate-media options let you skip, create, or replace a file; skipping duplicates is a sensible default when you don’t want to create unnecessary copies. If media is not part of the move, turn this option off and remember that imported image fields may still point to files that only exist on the source.
When Production and Stage use different domains, use Replace links to update links in imported content—for example, replace https://prod.example.com with https://stage.example.com. Enter the exact source and destination URLs you intend to replace. Batch size is adjustable too; smaller batches can reduce pressure on a server during a large import.
| Import option | Example choice | What to check |
|---|---|---|
| Match field | Slug | Use a stable value that is unique for the records you are moving. |
| If a match is found | Update | Existing destination content may be overwritten. |
| If no match is found | Create | New Portfolio entries are added to the destination. |
| Automatically import media | On when images/files are part of the move | Check media URLs and duplicate handling. |
| Replace links | Source site URL → destination site URL | Use the exact old and new domains you intend to replace. |
9. Run the import and check the result
Start the import only after the mapping and options look right. Watch the progress screen, then check the completion summary for successful, created, updated, or failed records. The Jobs Log keeps a record of imports and their status, so it is a good place to look if the result is not what you expected.
Finally, open a few Portfolio entries on the destination site. Check that the title, content, category/tag assignments, and ACF values appear correctly. For image, gallery, and file fields, confirm the attachment is present and the URL resolves on the destination. A successful row count is encouraging, but a quick spot check catches field or media issues that a count cannot.
Important: verify ACF fields that reference media or other records
ACF fields do not all store values in the same way. Text and number values are straightforward to verify, while image, file, gallery, relationship, and other fields may store attachment or post IDs that belong to the source database. Importing the media files does not necessarily remap every ID stored inside an ACF value.
In the example import, simple ACF values such as text and number fields arrived correctly. Although media import was enabled, the image and file fields were 0 on the destination and the gallery was empty; some nested references also did not resolve to the corresponding destination records. Treat that as a reason to test your own field setup on staging—not as a guarantee that every ACF field type will transfer intact. Check representative posts and, if references are missing, plan a separate ID-remapping or field-specific migration.
| ACF value type | What to verify after import |
|---|---|
| Text, number, and other scalar values | Confirm the value is present and formatted as expected. |
| Image, file, or gallery | Confirm the attachment exists on the destination and each field resolves to it; do not assume copied files automatically update stored IDs. |
| Relationship or post/user references | Confirm each referenced record exists and that the destination field points to the correct local record. |
| Group or flexible content containing references | Inspect nested values as well as the top-level field; references may need their own mapping. |
Review, restart, or retry a job in Jobs Log
After an export or import starts, use Import Export by RockStarLab → Jobs Log to check its type, status, progress, item count, and elapsed time. Filter by job type or status to find an earlier run. View Details is read-only and shows the result counts and job configuration, which helps distinguish a completed run from one that needs attention.
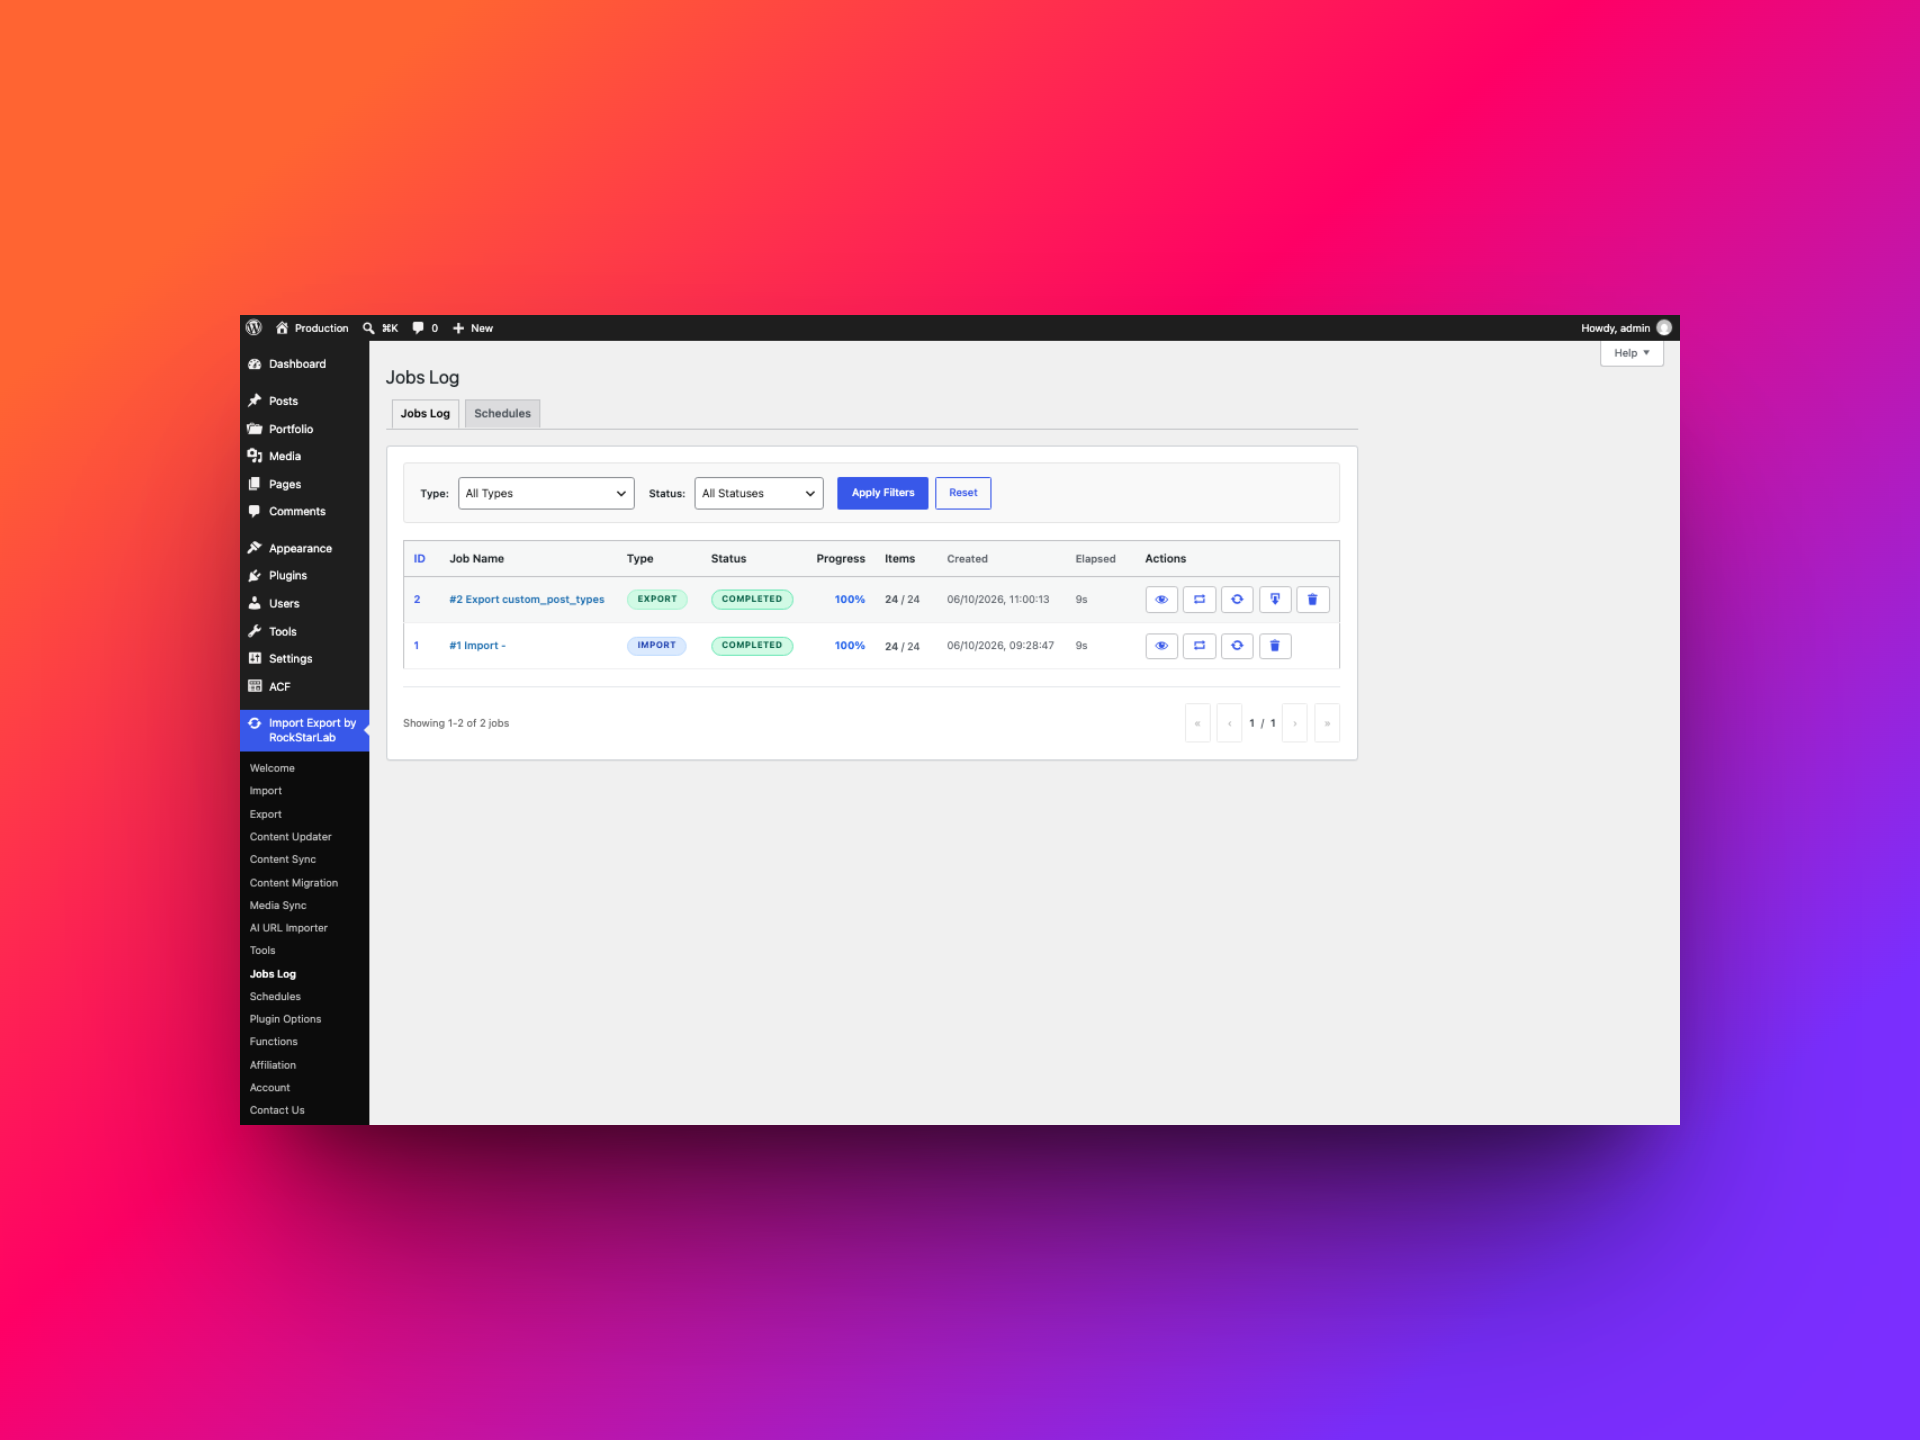
If an export stopped partway through, inspect its details first. Restart creates a new job with the same configuration; Retry creates a new job and opens its progress screen immediately. For example, after a temporary server interruption, you could restart a failed export using the same filters, or retry an import after resolving a temporary connection issue. A paused job may also offer Resume to continue its existing progress.
These actions rerun the saved job configuration; they do not let you fix a wrong field mapping or change the filters. If the file or mapping itself needs changes, create a new export or import instead. Rerunning an import can update existing posts or create more records depending on the saved matching rules, so check the target site, source file, and update/create/skip settings before confirming. Back up first if a rerun could change content.
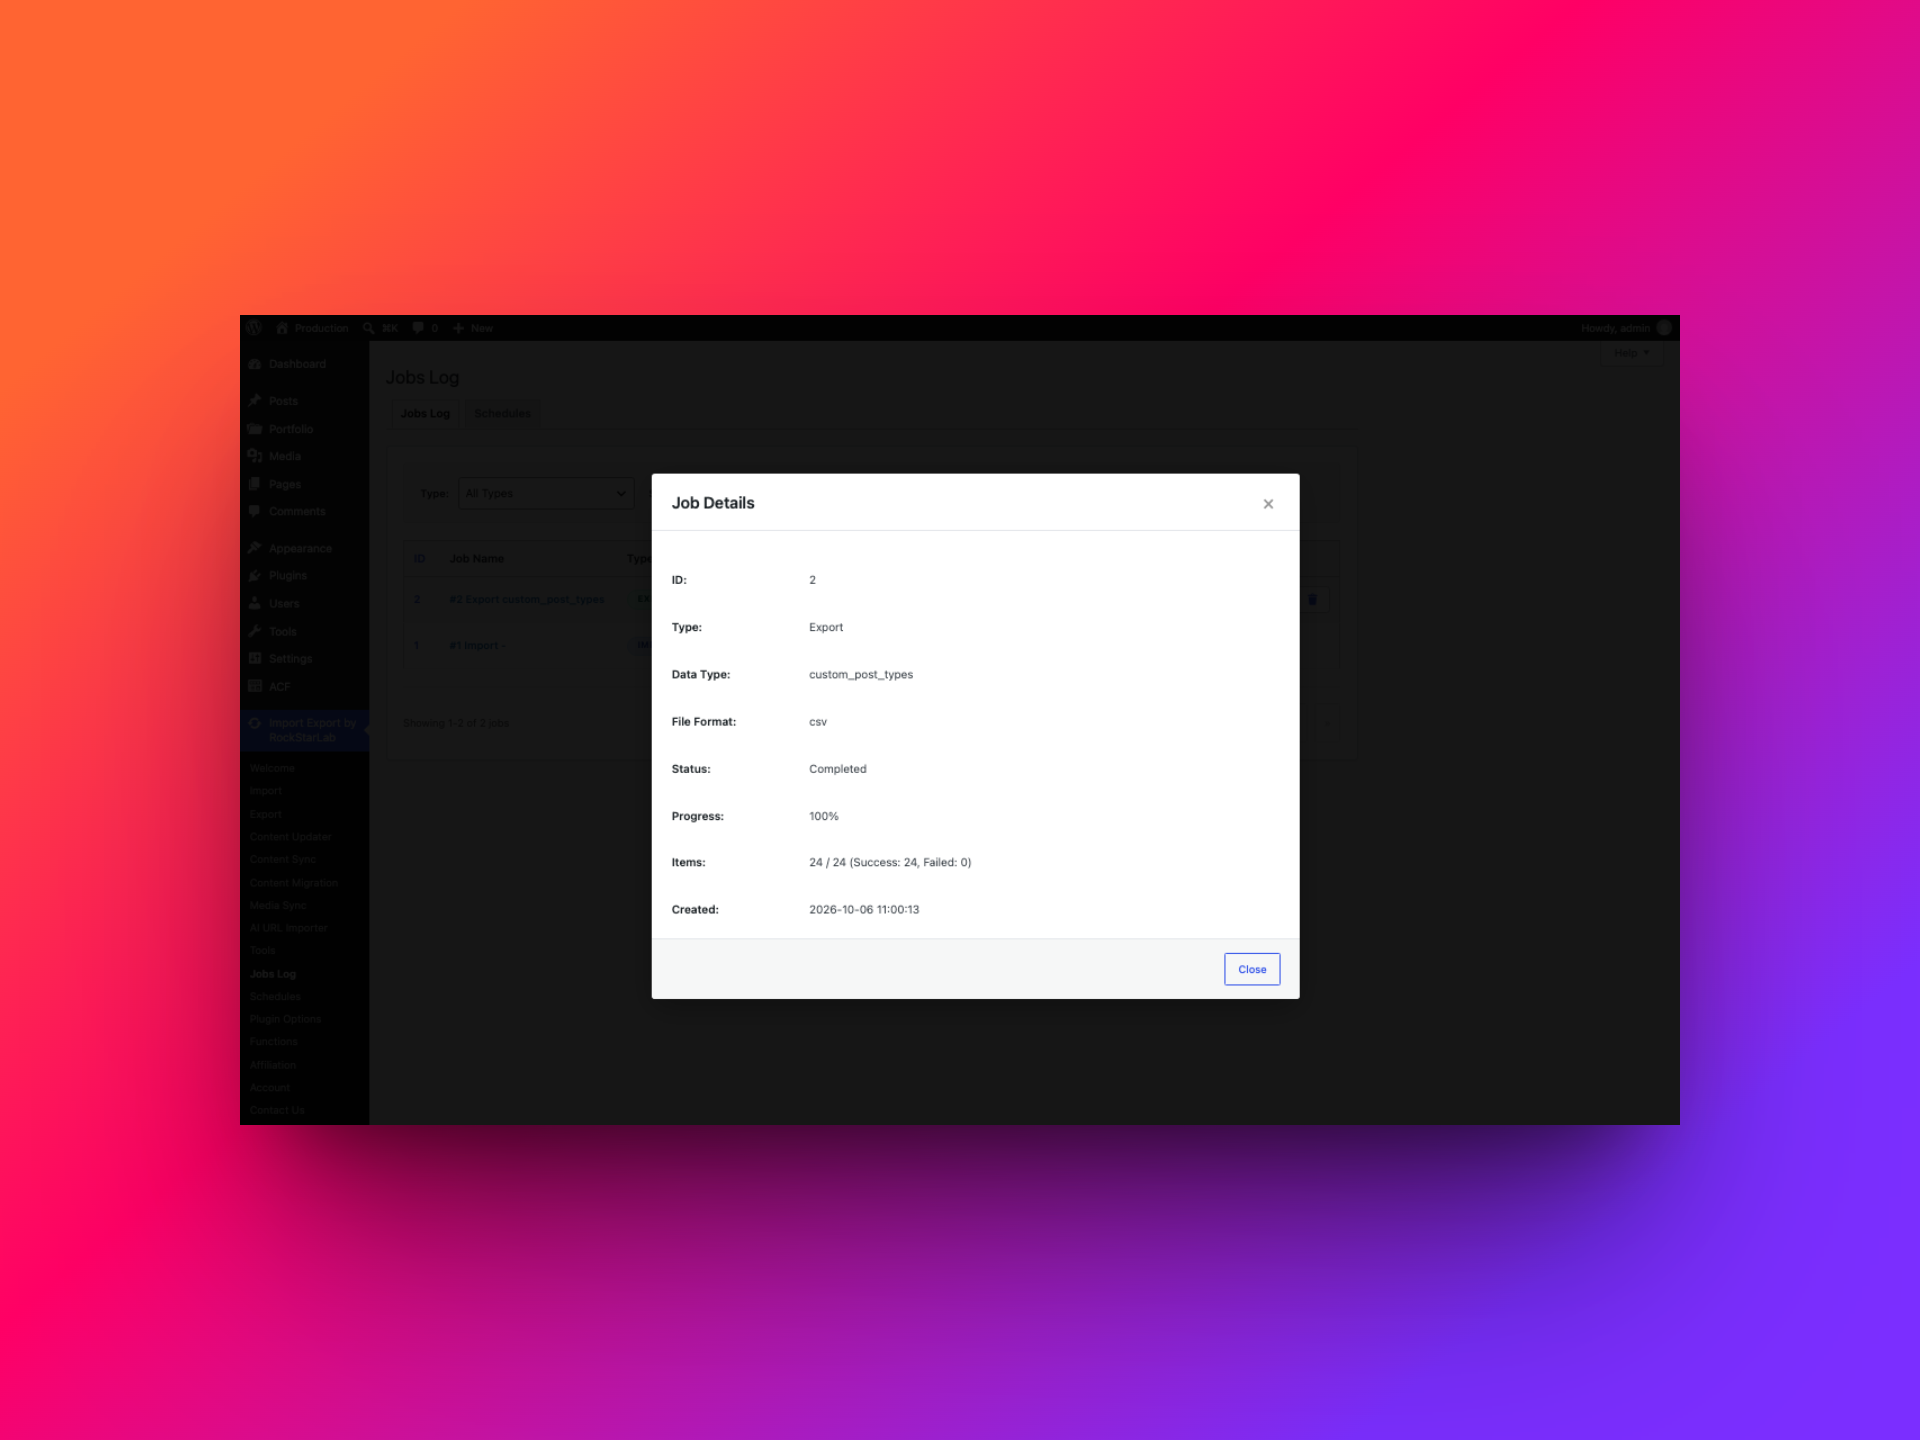
For this example, the export and import each processed 24 items. A green completed status confirms the job finished, not that every taxonomy, ACF reference, or media URL is correct; verify representative posts on Stage after import.
Schedule a recurring export or a one-time job
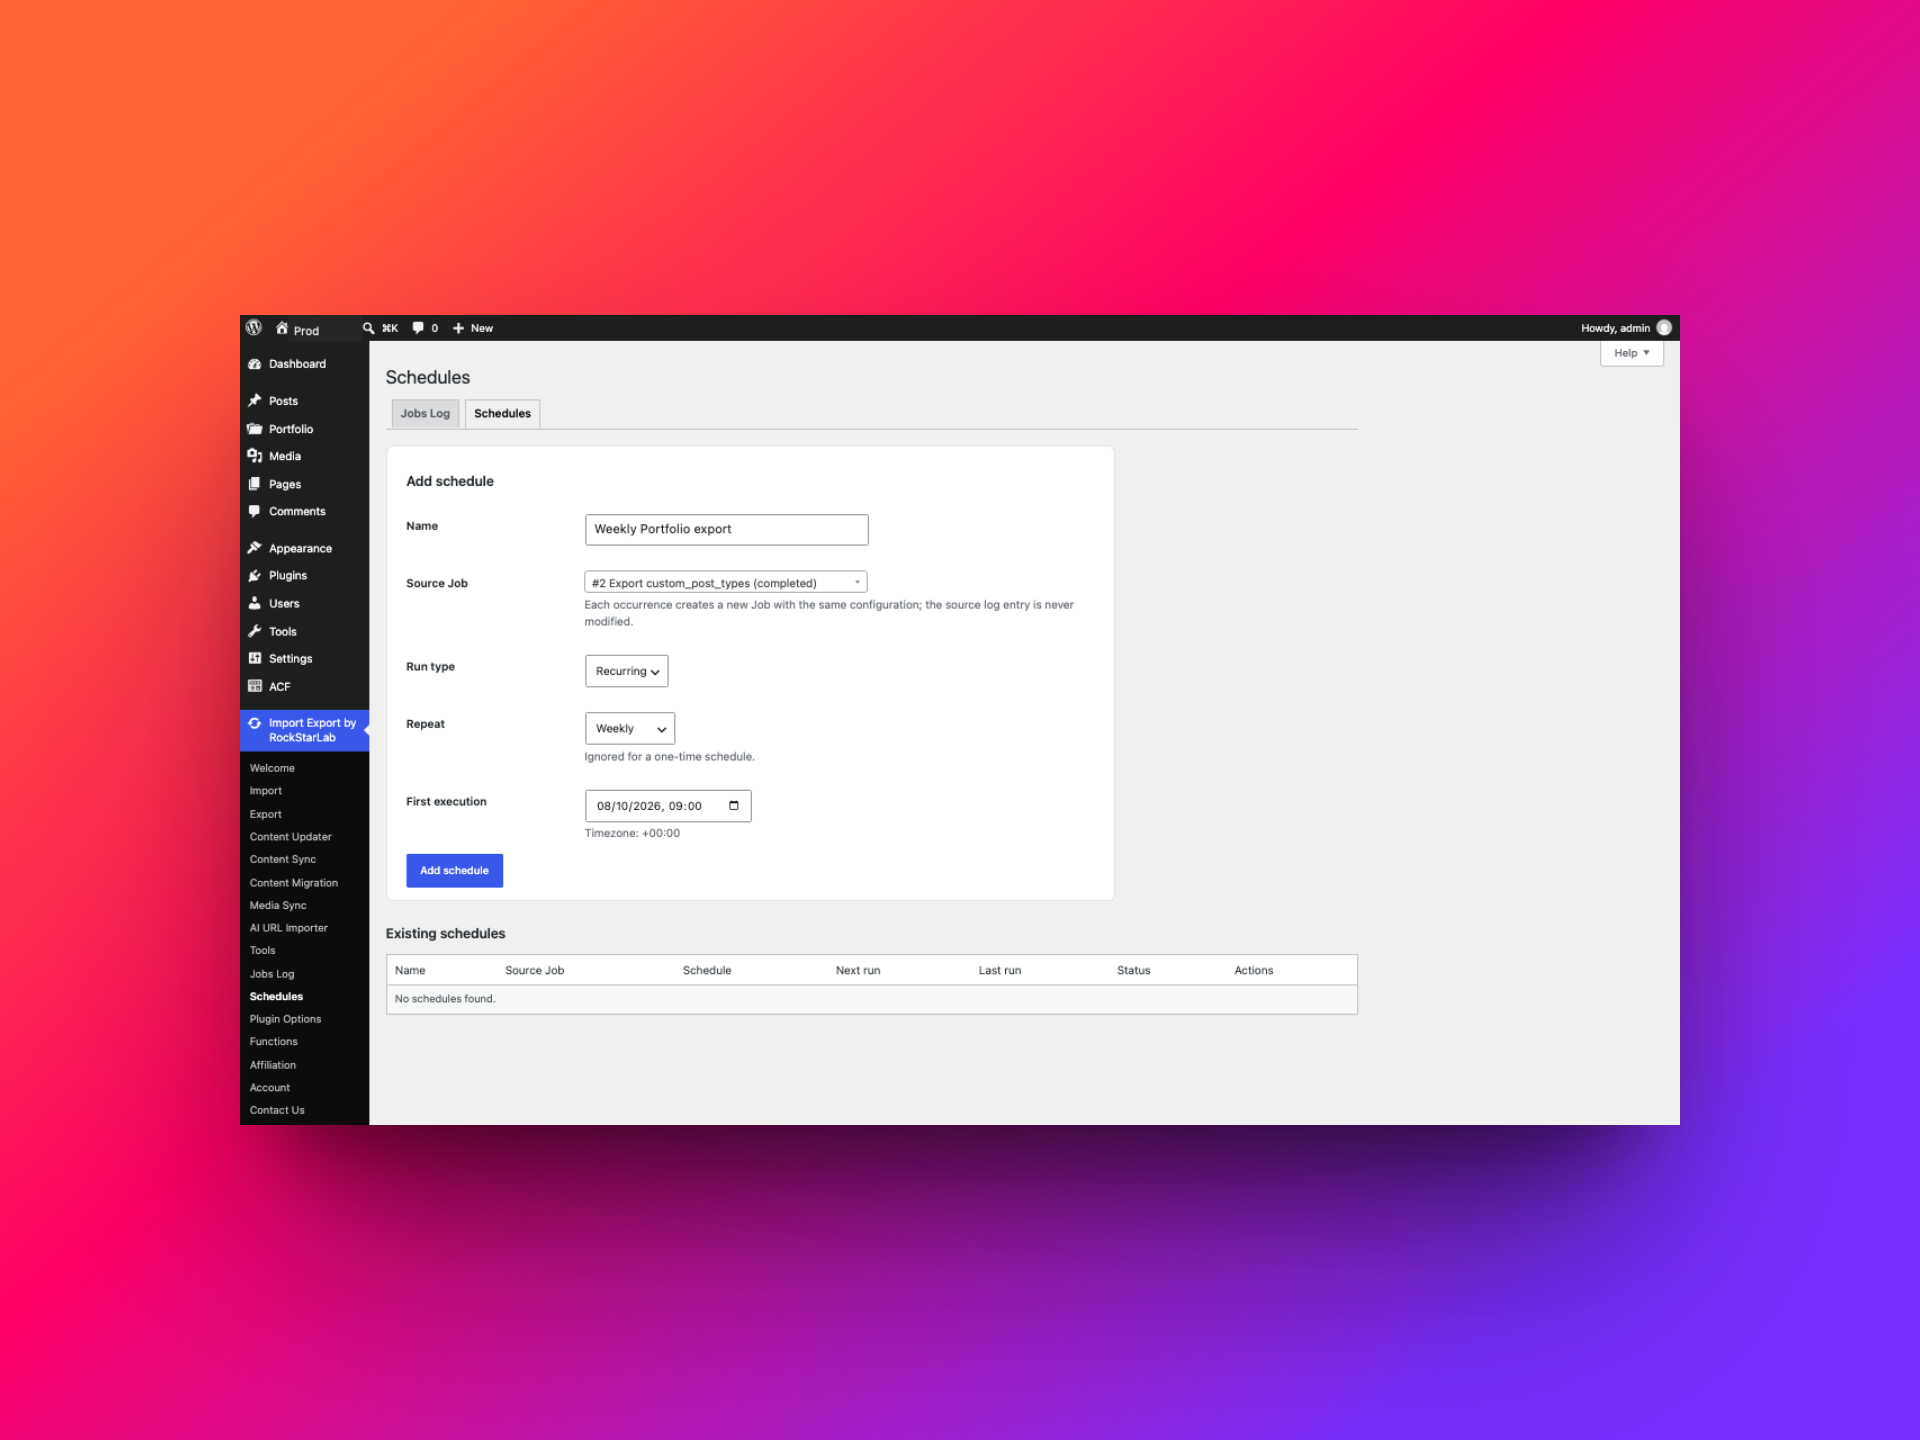
The Schedules screen lets you select a completed source job, choose a one-time or recurring run, and set its first execution time. Recurring intervals include hourly, twice daily, daily, and weekly. Each occurrence creates a separate new job with the source job’s saved configuration; the original Jobs Log entry is left unchanged.
For example, if a team reviews Portfolio content every week, you could schedule a weekly export from a completed Portfolio export job and give the schedule a clear name such as “Weekly Portfolio export.” Each run repeats that job’s filters and field selection; it is not an automatic “only changed posts” export. To change the scope, first create a new export job with the desired filters and then use that job as the schedule source. A one-time schedule can be useful for preparing a known import or export to run outside working hours.
Before scheduling an import or Content Sync push/pull, check the same target, matching rules, and overwrite implications you would review for a manual run. Repeating a data-changing job can update the same records each time. Confirm the source job and timezone, then monitor each scheduled occurrence in Jobs Log. The example below is filled in for illustration only and has not been saved.
How to transform field values during export or import
With the Import Export PRO add-on, you can assign transformations to individual fields in either wizard. The free version does not include the transformation library or per-field assignment controls. A transformation changes the value being written to the export file or destination field; it does not change the ACF field definition.
Transform selected fields in the export
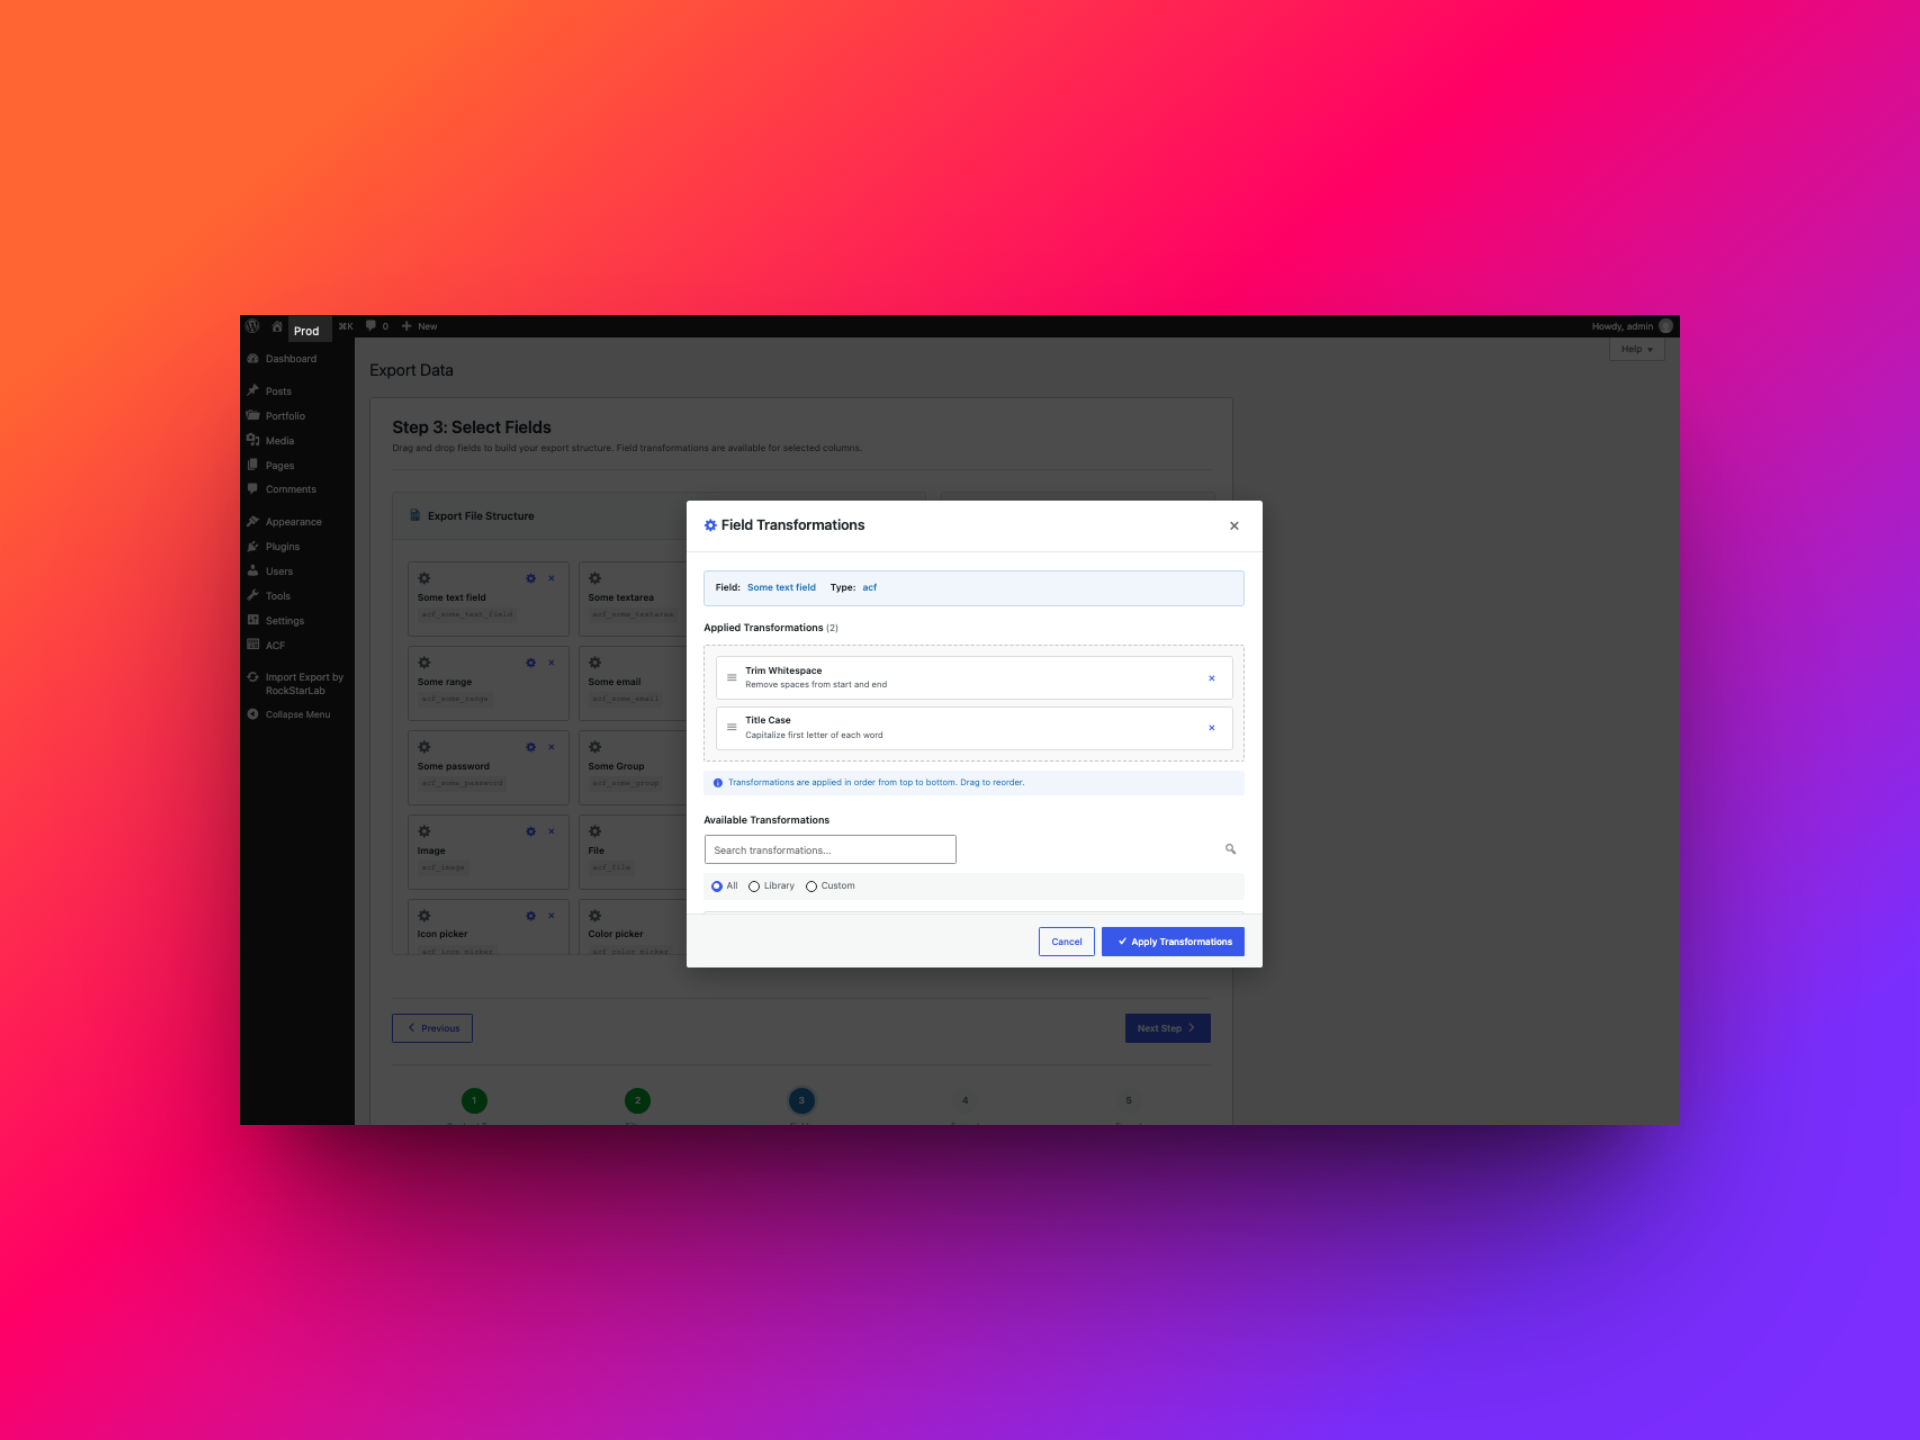
On the export field-selection step, add the field you want to clean up, then open its transformation control. For the Portfolio ACF field Some text field, this example applies Trim Whitespace followed by Title Case. The order matters: first remove extra spaces at the beginning and end, then capitalize the words. Use the test/preview value to check the result before exporting.
Transform mapped fields on import
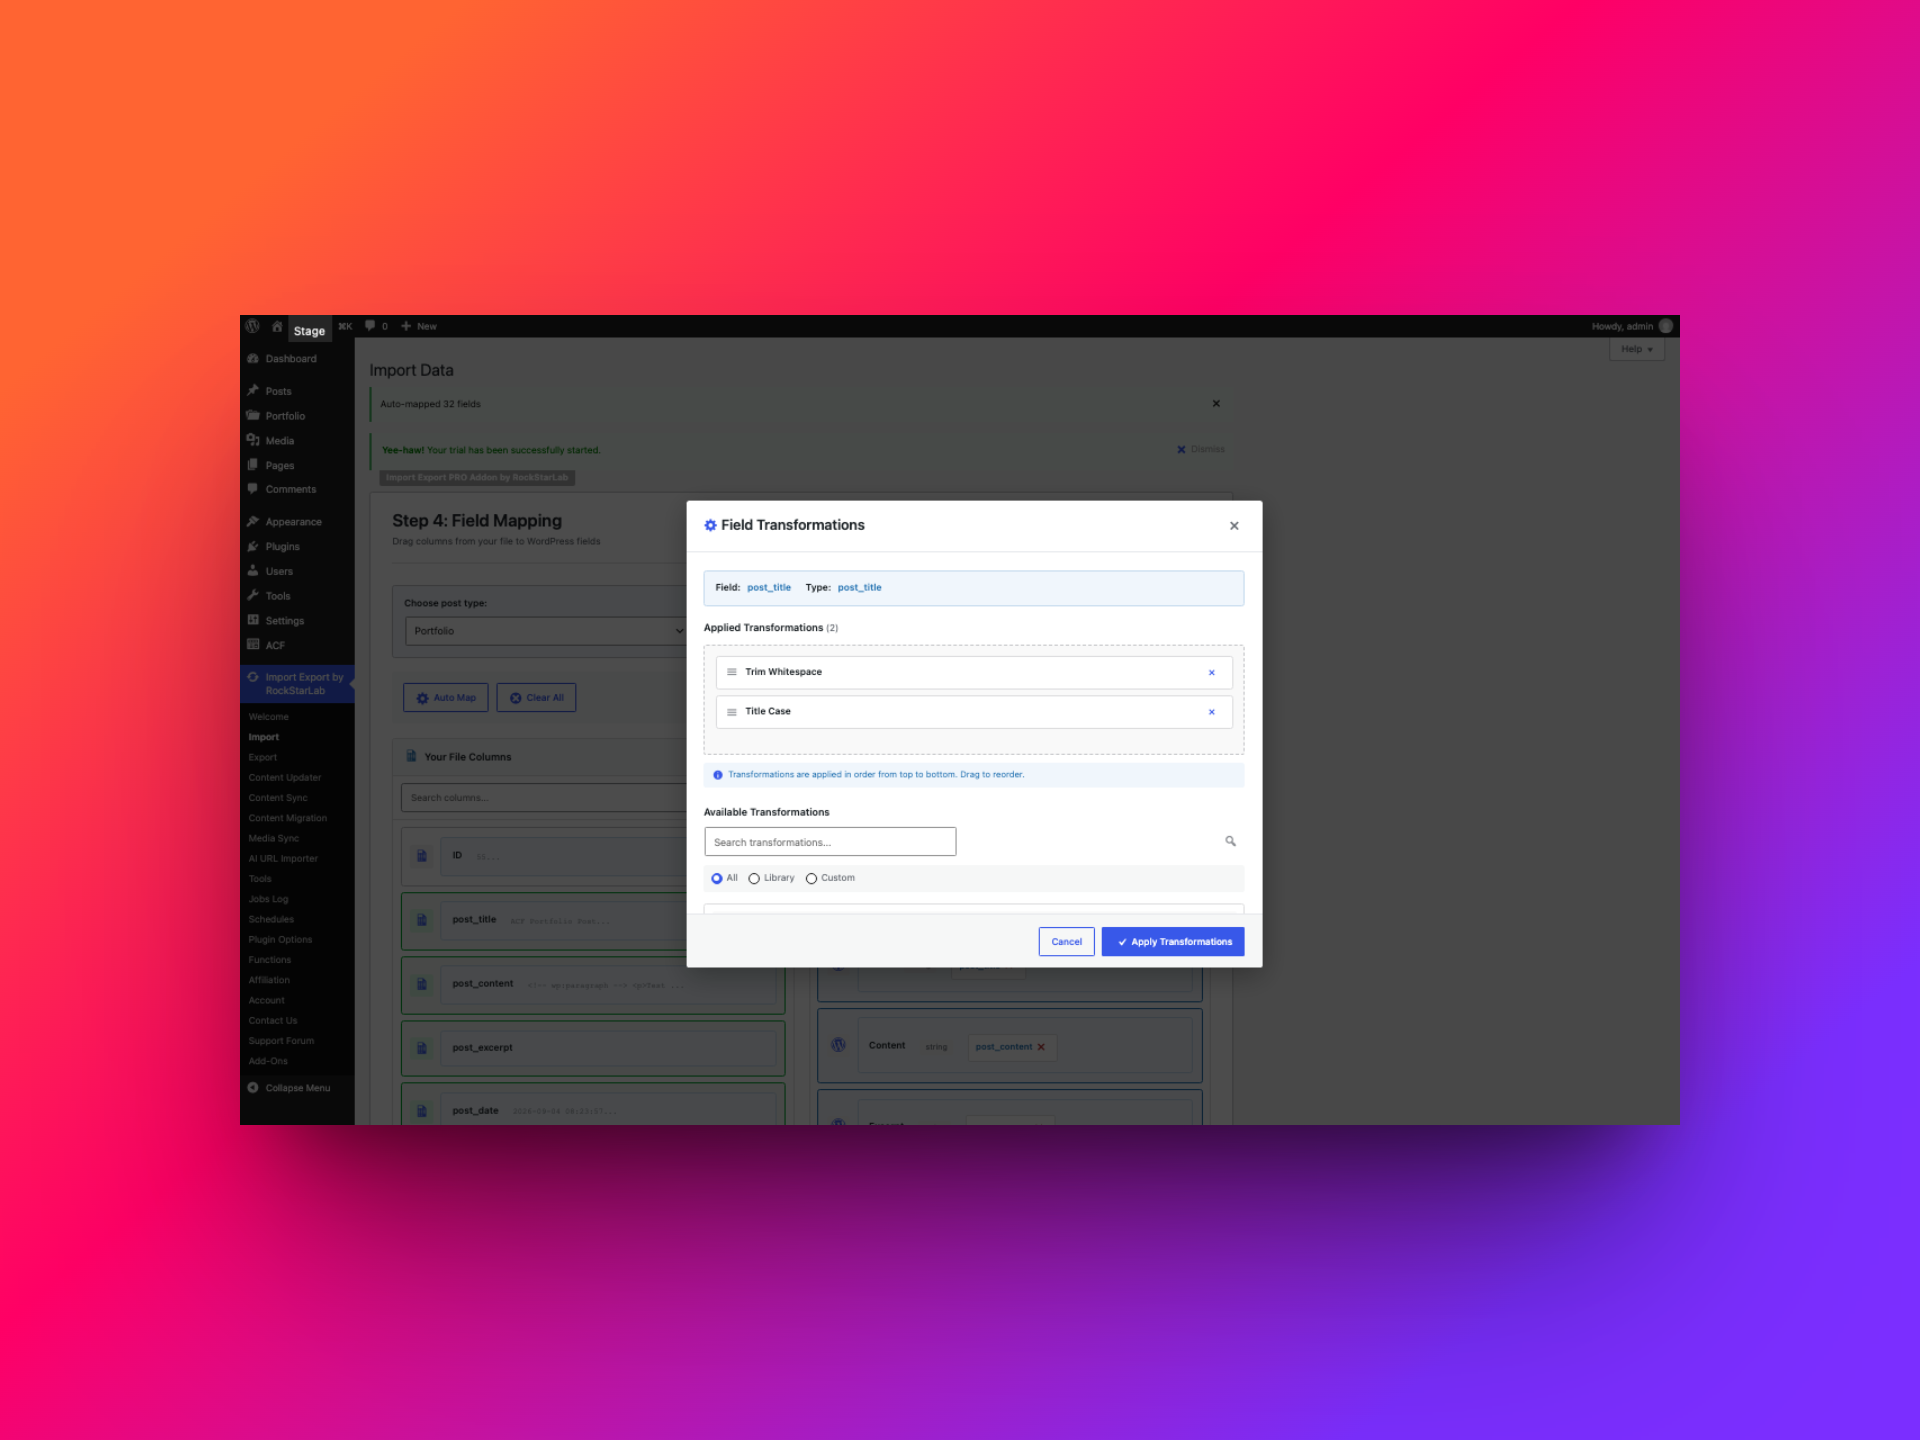
After mapping the CSV columns to WordPress fields, open the transformation control beside the mapped destination. In this example, post_title uses the same two-step pipeline: sample imported title becomes Sample Imported Title. Apply transformations from top to bottom, test a representative value, and only then apply the mapping. You can use other library functions for jobs such as converting a date from DD/MM/YYYY to YYYY-MM-DD, adding a prefix, or looking up a term ID from its slug.
Keep transformations targeted to fields that need them. Test dates, numeric values, and reference fields with realistic samples; a transformation that is right for a title may be wrong for an ACF value. If a value needs custom logic, PRO also lets you create and test custom functions. These tools are optional—the ordinary import and export flow works without them.
How to export only selected Portfolio posts
You do not have to build a filter for every small one-off export. On the Portfolio list screen, select the checkboxes beside the entries you want and click the contextual Export (n) button. The number in the button reflects your selection. In this example, two entries—ACF Portfolio Post and Customer Journey Optimizer—are selected.
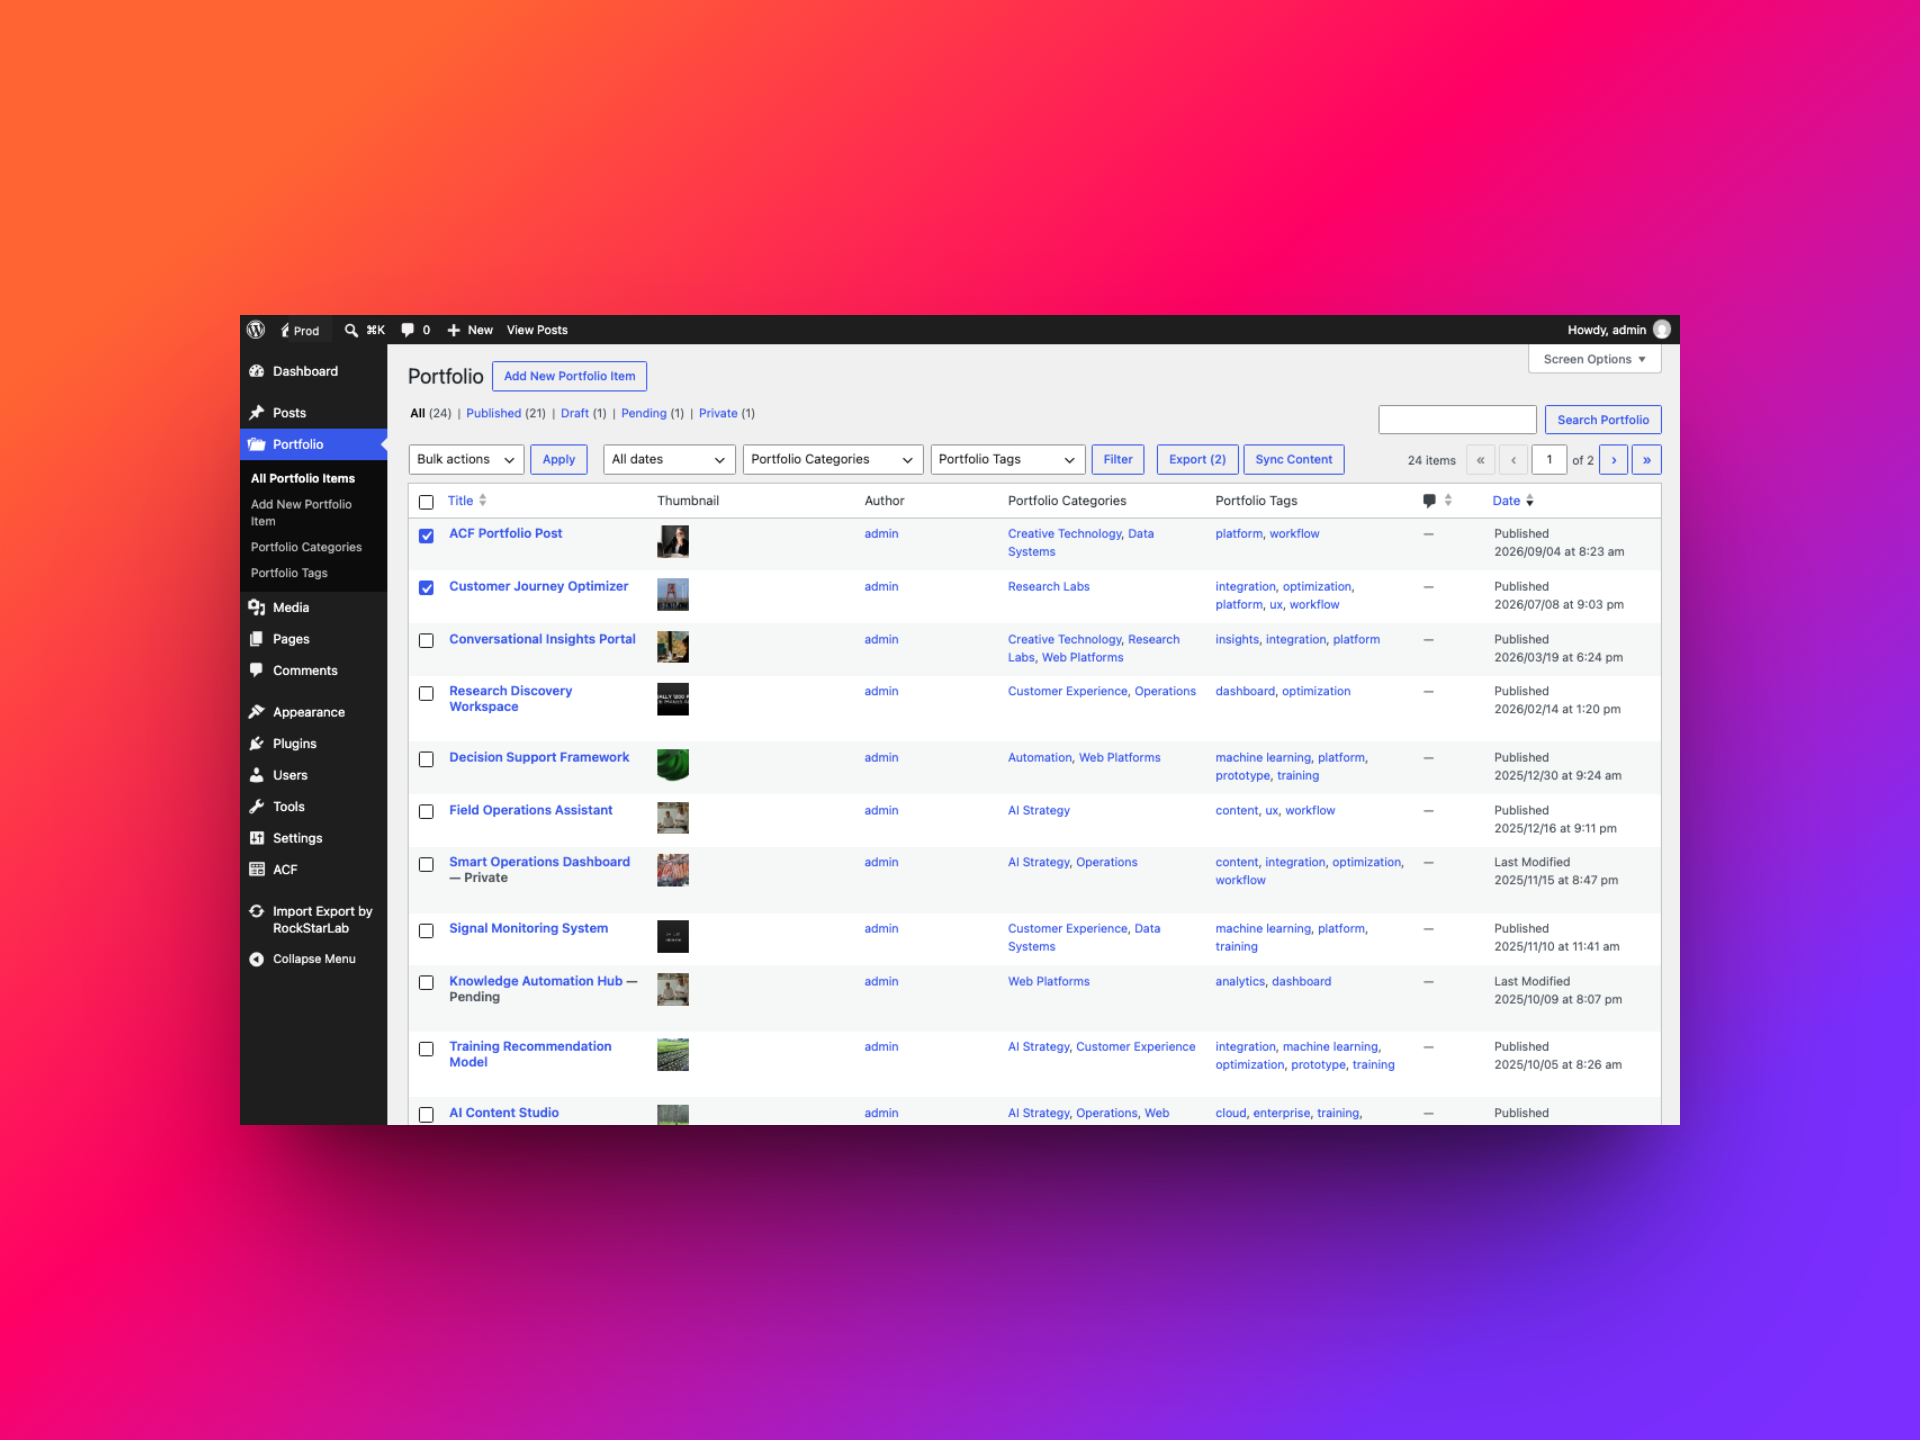
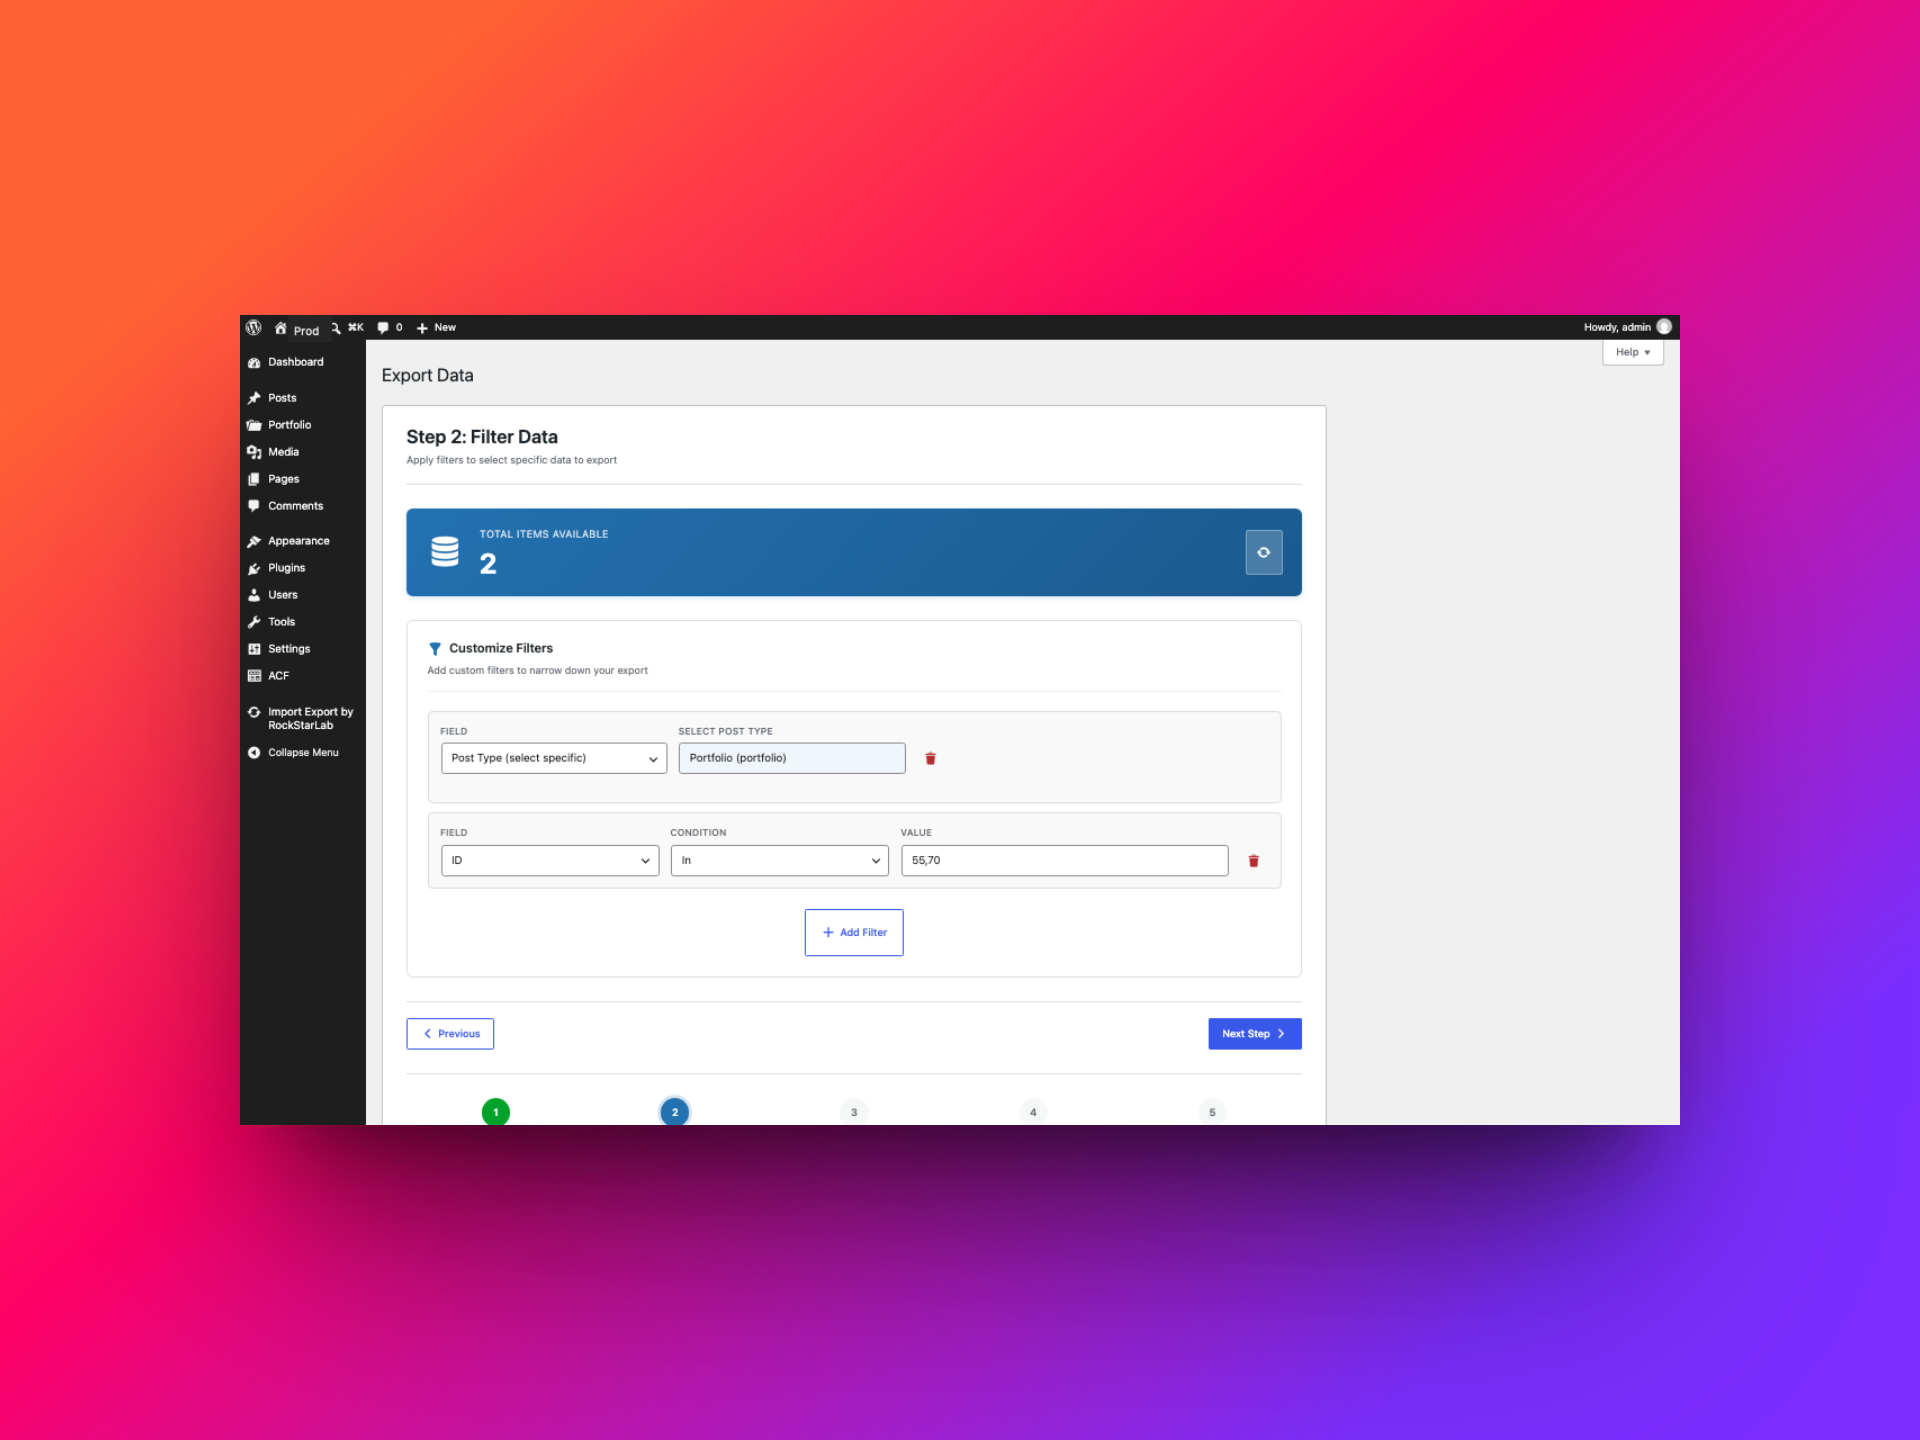
The button opens the Export wizard with the Portfolio post type and an ID filter already filled in for the selected entries. Confirm that the count matches your selection, then continue to choose fields, format, and export options as usual. The selected IDs are a filter for this source site; do not map those source IDs into destination post IDs during a cross-site import.
What if you only need to sync a few posts?
A file-based export and import is a good fit for a batch move or a repeatable migration. If both sites are connected in Content Sync and you only need to send one entry or a selected group, the Portfolio list screen also offers a Sync Content action; the editor has Sync This Post. Those workflows let you choose a connected site and a Push or Pull direction, then review the field mapping before confirming the sync.
Content Sync is a different workflow from the Export and Import wizards. Check the mapping and target site there too, especially when the post type, taxonomy, or ACF fields differ between environments.
Why use Import Export by RockStarLab?
Moving a CPT often means juggling several tools or writing a one-off script. Import Export by RockStarLab keeps the main steps in one WordPress workflow: filter the records, select fields, choose a file format, preview imported data, map columns, set conflict rules, and review the job afterward.
| What you need to move | What the plugin provides |
|---|---|
| Only a subset of a CPT | Filters for post fields, custom fields, and taxonomies. |
| A handful of specific posts | Bulk-select rows from a content list and open a prefilled Export wizard. |
| Taxonomy assignments | Taxonomy fields can be included with the selected post data and mapped to destination taxonomies, even when their keys differ. |
| ACF values | Detected ACF fields can be selected for export and mapped to destination ACF fields; compatible field definitions must already exist. |
| Consistent values across environments | PRO transformations can be assigned to individual fields during export or import. |
| A file suited to your workflow | CSV, JSON, XLSX, ODS, and XML export formats. |
| A safer import review | File preview, Auto Map, explicit match/no-match behavior, batch settings, and a backup warning. |
| Repeatable operations | Jobs Log for reviewing import/export status; Content Sync for connected-site push/pull workflows. |
Need to clean or reshape values as they move? The PRO add-on provides field transformations for import and export, such as formatting dates, trimming text, mapping values, or applying a custom pipeline. Those transformations are PRO features; they are not available in the free version.
The key advantage is control: you choose which records and fields travel, how existing content is matched, and what happens when a record is new. That makes the plugin useful for a one-time migration as well as for ongoing content operations—provided you prepare the destination structure and review the import settings first.
Quick checklist for importing Portfolio content
- Register the destination post type and the taxonomies you plan to use; their keys do not have to match the source.
- Install ACF and create compatible destination fields; map incoming columns to them, even if their names differ.
- Back up the destination database before importing.
- Export the intended CPT and include its taxonomy and ACF fields.
- Use filters or bulk selection to include only the records you intend to move.
- Preview the file and verify the row and column counts.
- Auto-map, review each taxonomy/ACF target, and avoid blindly mapping source IDs.
- If using PRO transformations, test each pipeline with a representative value.
- Choose a stable matching field and deliberate update/create behavior.
- Decide whether media should be imported and whether source URLs need replacing.
- Review the job result and spot-check posts, taxonomy terms, ACF values, and media.
In short: exporting a custom post type is straightforward; preserving the relationships around it takes a little care. Include the taxonomy and ACF fields, prepare the destination to understand them, and review matching and media settings before importing. That way your Portfolio arrives as working content—not just a list of titles.