
Need a spreadsheet of your WooCommerce catalogue, a clean file for a supplier, or product data ready for another system? You can export exactly the product records and fields you need instead of copying them one by one. This walkthrough shows how to export WooCommerce products to CSV, an Excel workbook, or XML with Import Export by RockStarLab.
We’ll go through the full export wizard, look at useful product filters, and cover a few ways to tidy values before they leave your store. You’ll also see how to reuse a completed product export as a recurring schedule.
Why use this exporter instead of WooCommerce’s built-in tool?
WooCommerce already includes product import and export tools, and they’re a good choice for straightforward CSV work. The built-in product exporter can select columns, product types, and categories, while the importer helps map CSV columns to product fields. If that covers your task, you may not need another plugin.
Import Export by RockStarLab is useful when you need more control over the file or want to reuse the same export workflow. In this walkthrough, that means choosing from CSV, Excel-compatible XLSX, or XML; filtering products by specific field values; and selecting and ordering the output fields. You can also export other WordPress data types from the same plugin.
- More output formats: create CSV, XLSX, or XML files instead of limiting this workflow to the built-in product CSV exporter.
- Targeted product lists: combine filters such as product name, price, sale price, SKU, or stock status before creating the file.
- More control over columns: choose and arrange the product fields you need, including supported custom fields and ACF fields.
- Optional value transformations: with the PRO add-on, normalize or reformat selected values in the exported file without changing the products stored in WooCommerce.
- Repeatable exports: save a completed export as a recurring schedule and review individual runs in Jobs Log.
These extra options are most helpful for supplier feeds, recurring reports, and handoffs to systems with specific file requirements. The plugin doesn’t make every export better by default: for a one-off CSV using WooCommerce’s standard columns, the built-in exporter may be the simpler choice. The steps below focus on the additional filtering and format options available in Import Export by RockStarLab.
Choose the right format for your product data
Before starting, think about what will open or process the file. The export wizard offers several formats:
- CSV is a simple table of values. It is a good choice for Excel, Google Sheets, inventory reviews, and many supplier tools. CSV does not preserve workbook styling, formulas, or multiple sheets.
- XLSX is an Excel workbook. Choose it when the people receiving the file work in Excel and want a spreadsheet file rather than plain text. XLSX is the format here; it is not the older
.xlsformat. - XML represents data with named tags and a hierarchy. It can be useful for software integrations that specifically accept XML. Check the receiving system’s expected structure before sending it a file.
CSV is often the easiest starting point when you simply need to review or sort product data. Pick XLSX for an Excel-first workflow, and use XML when the system on the other end asks for it. The plugin also offers JSON and ODS if those suit your workflow better.
Step 1: Select WooCommerce Products
- In the WordPress dashboard, open Import Export by RockStarLab → Export.
- On Step 1: Select Content Type, choose WooCommerce Products. This is the product catalogue exporter, not the separate options for orders, coupons, customers, or reviews.
- Continue to the next step to set up filters.
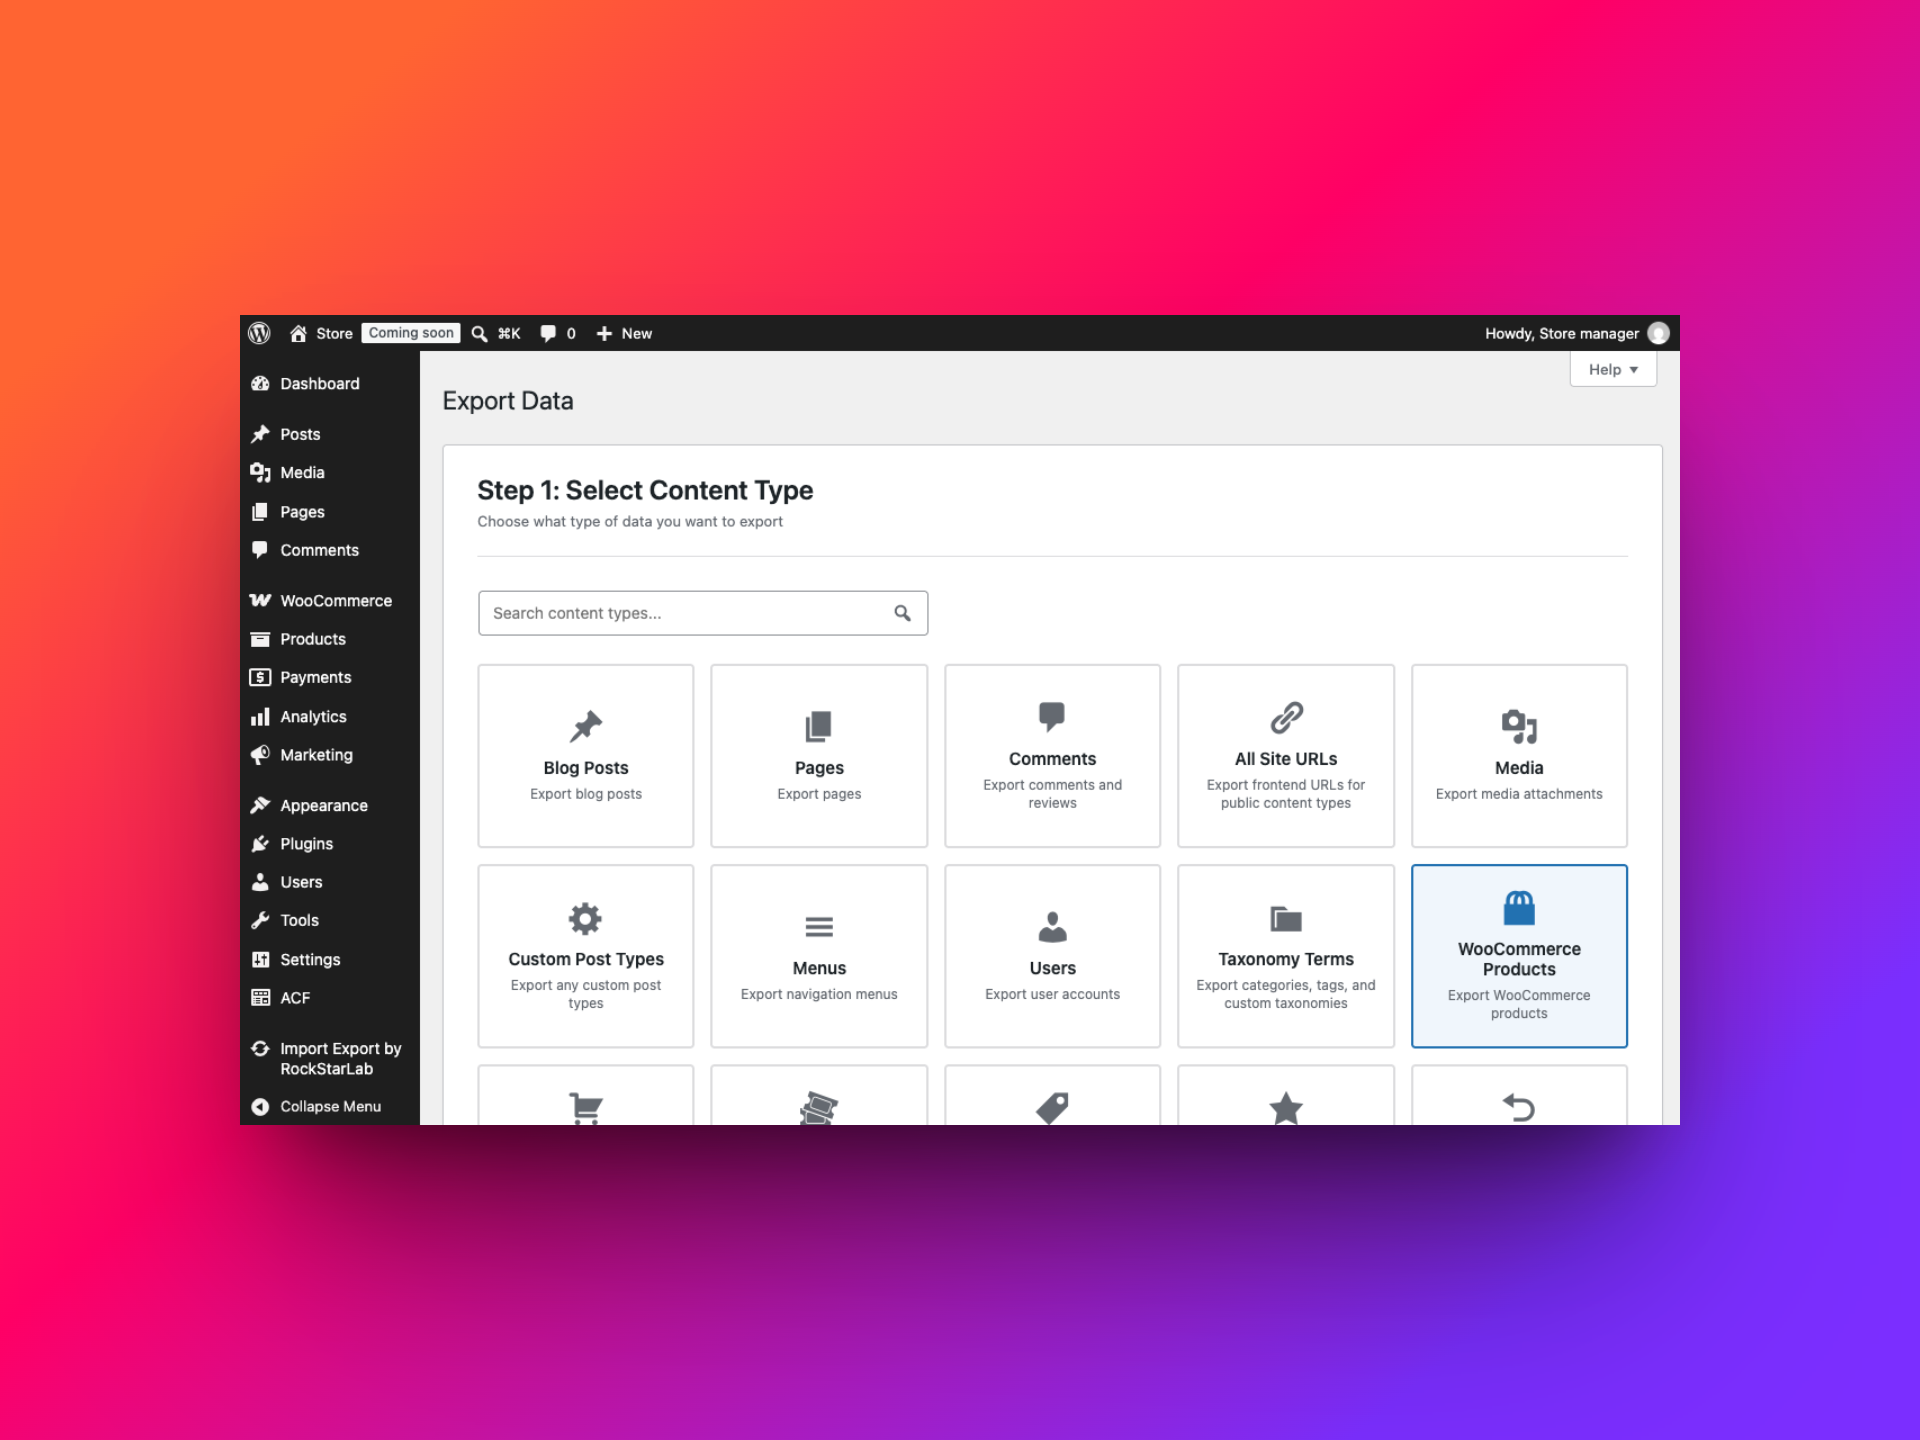
You can export products with different WooCommerce product types, including simple, variable, grouped, and external products. Which information appears in each row depends on the fields you choose. For example, the field list includes product type, external product details, variations, attributes, and grouped-product references.
Step 2: Filter products before exporting
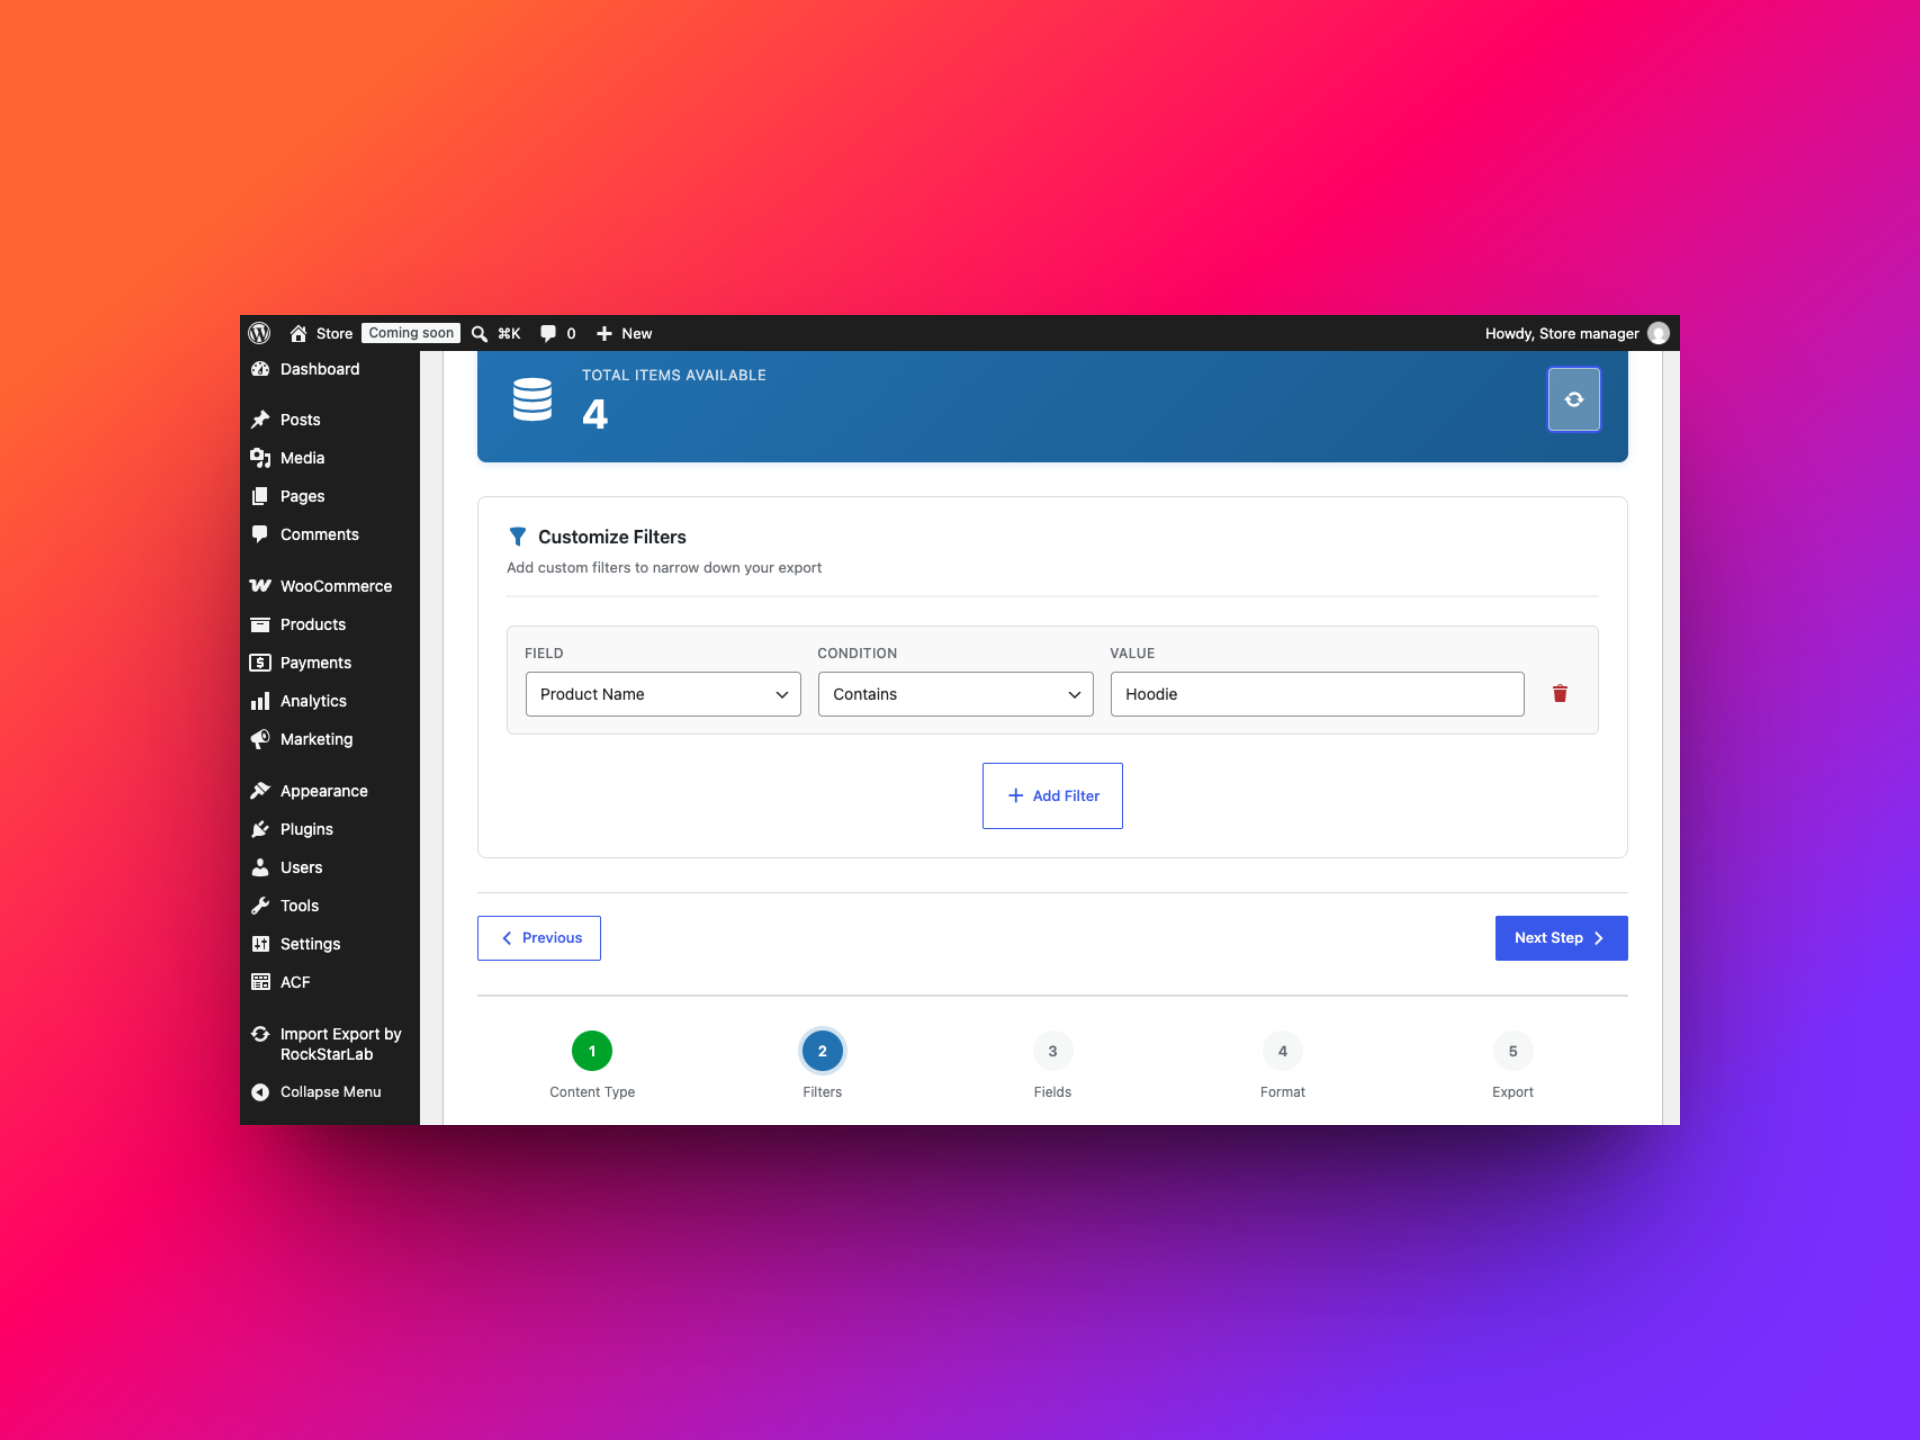
Filters decide which products go into the file. Add a filter row, select a product field, choose a condition, and enter a value when the condition needs one. The total count at the top refreshes when you update the filters; it reflects the products on your store and will naturally differ from the examples below.
Use more than one row when the export should satisfy several criteria. For example, filtering by a product name and a maximum regular price creates a narrower list than either condition by itself. A good rule of thumb is to start with the question you want the file to answer, then add only the filters needed for that report.
Example 1: Export products with a word in the name
To create a report of hoodie products, set Product Name to Contains and enter Hoodie. This can include products whose titles contain that word, such as a hoodie with a logo or a particular color. Use the word or phrase that actually appears in your product names.
Example 2: Find products below a price
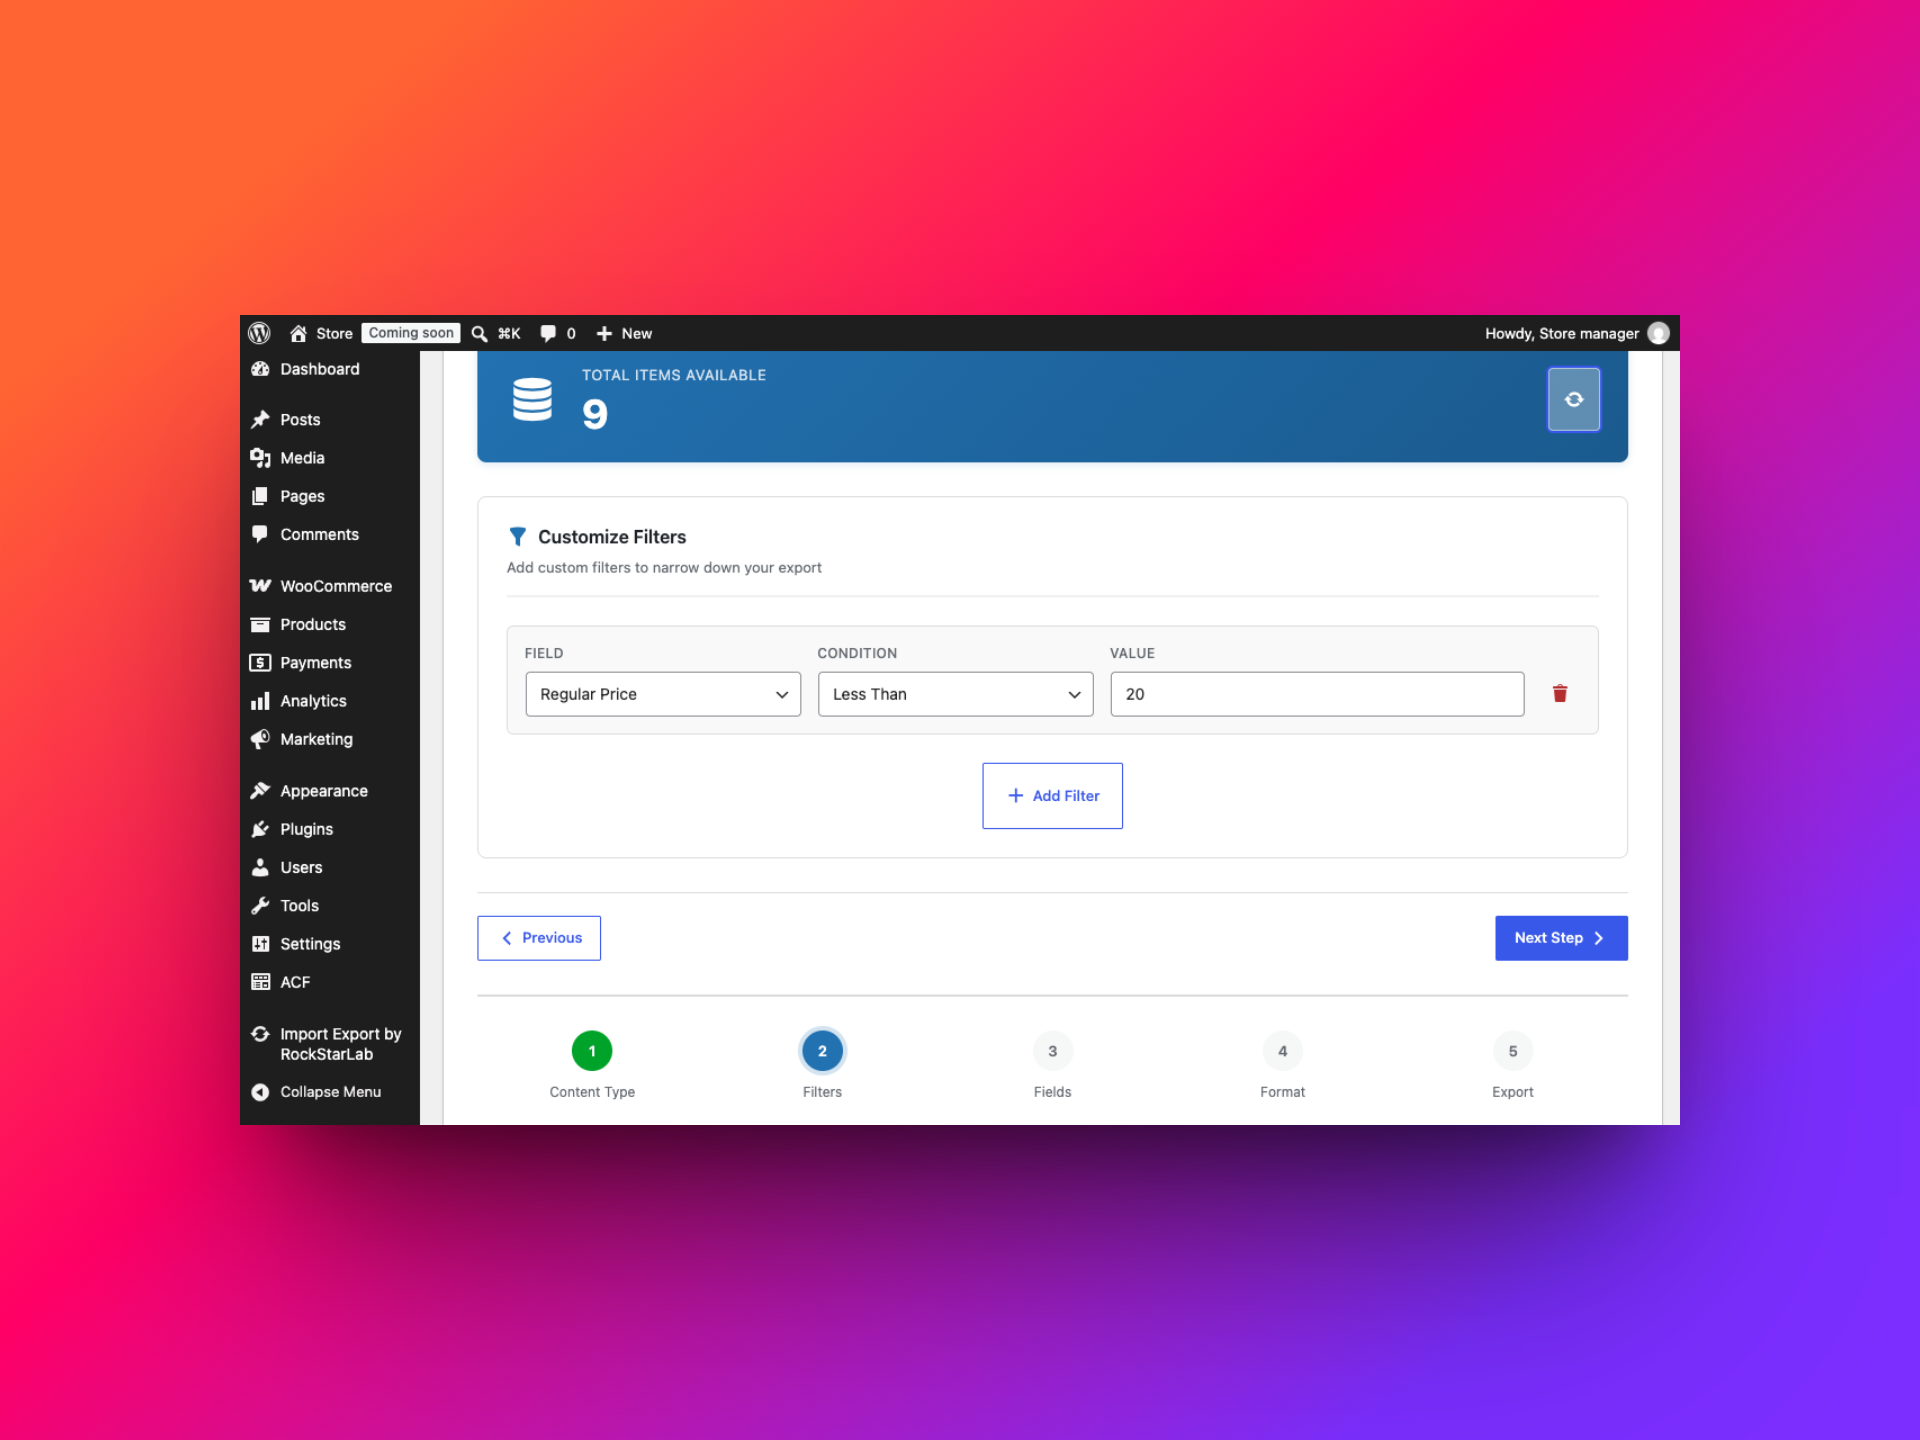
To make a lower-priced product list, choose Regular Price, select Less Than, and enter a number such as 20. Choose Greater Than instead when you want products above a threshold. Remember that this example checks the regular price, not the sale price.
Example 3: Export products that have a sale price
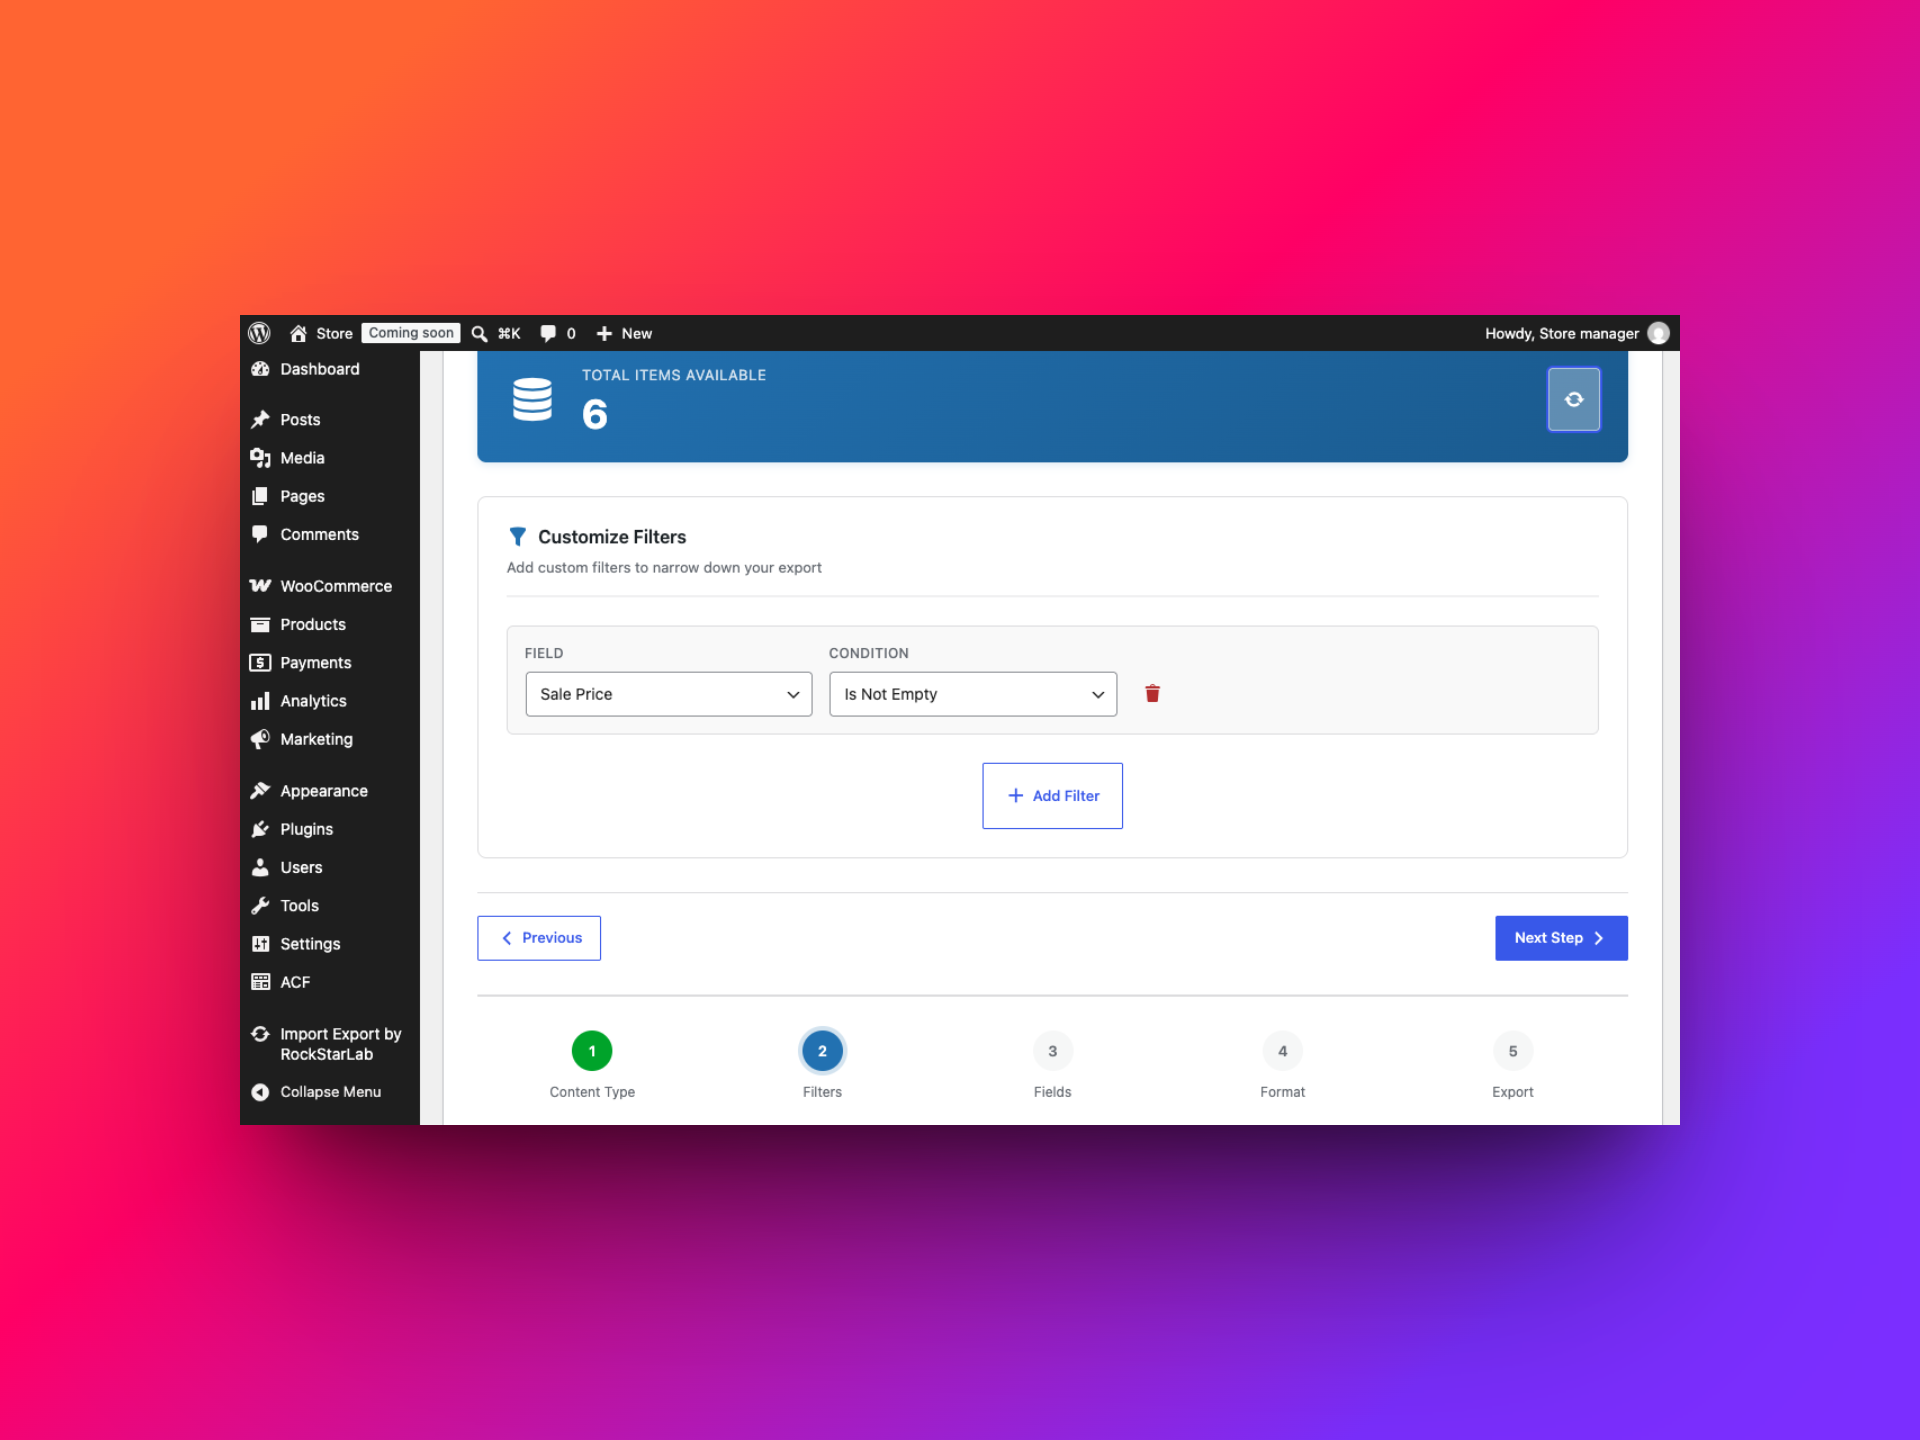
Choose Sale Price and set the condition to Is Not Empty. This is a quick way to prepare a list for checking sale items. If you want to test a particular sale-price range instead, use a numeric comparison condition and enter the value that fits your report.
More useful filter ideas
- Products in a category: choose Categories, then use a text condition such as Contains with the category name, for example
Tshirts. Use the category label as it appears in WooCommerce. - Products available to sell: choose Stock Status, set Equals, and enter
instock. Check the refreshed total; products with stock management disabled may still be considered in stock depending on your WooCommerce settings. - Products with a particular SKU: use the SKU field with Equals for one exact identifier, or Contains when your SKUs share a prefix.
- Featured products: use the Featured field and select the value used by your filter interface for featured items; on WooCommerce this is commonly represented as
yes. - Combine conditions: for example, use Product Name contains
Hoodieand Regular Price less than50to export only hoodies under your chosen regular-price threshold.
Before moving on, read the filter rows once more and make sure you used the intended price field. Regular Price and Sale Price are separate product values. If the total count is not what you expected, check spelling, selected conditions, and whether the product data is stored in the field you filtered.
Step 3: Choose the product fields for your file
On the Fields step, build the export structure by adding the columns you need and arranging them in a useful order. You can expand a field group, search the available fields, and drag a field into the export structure. Leaving out unused columns makes a file easier to review and can make it easier for another system to import.
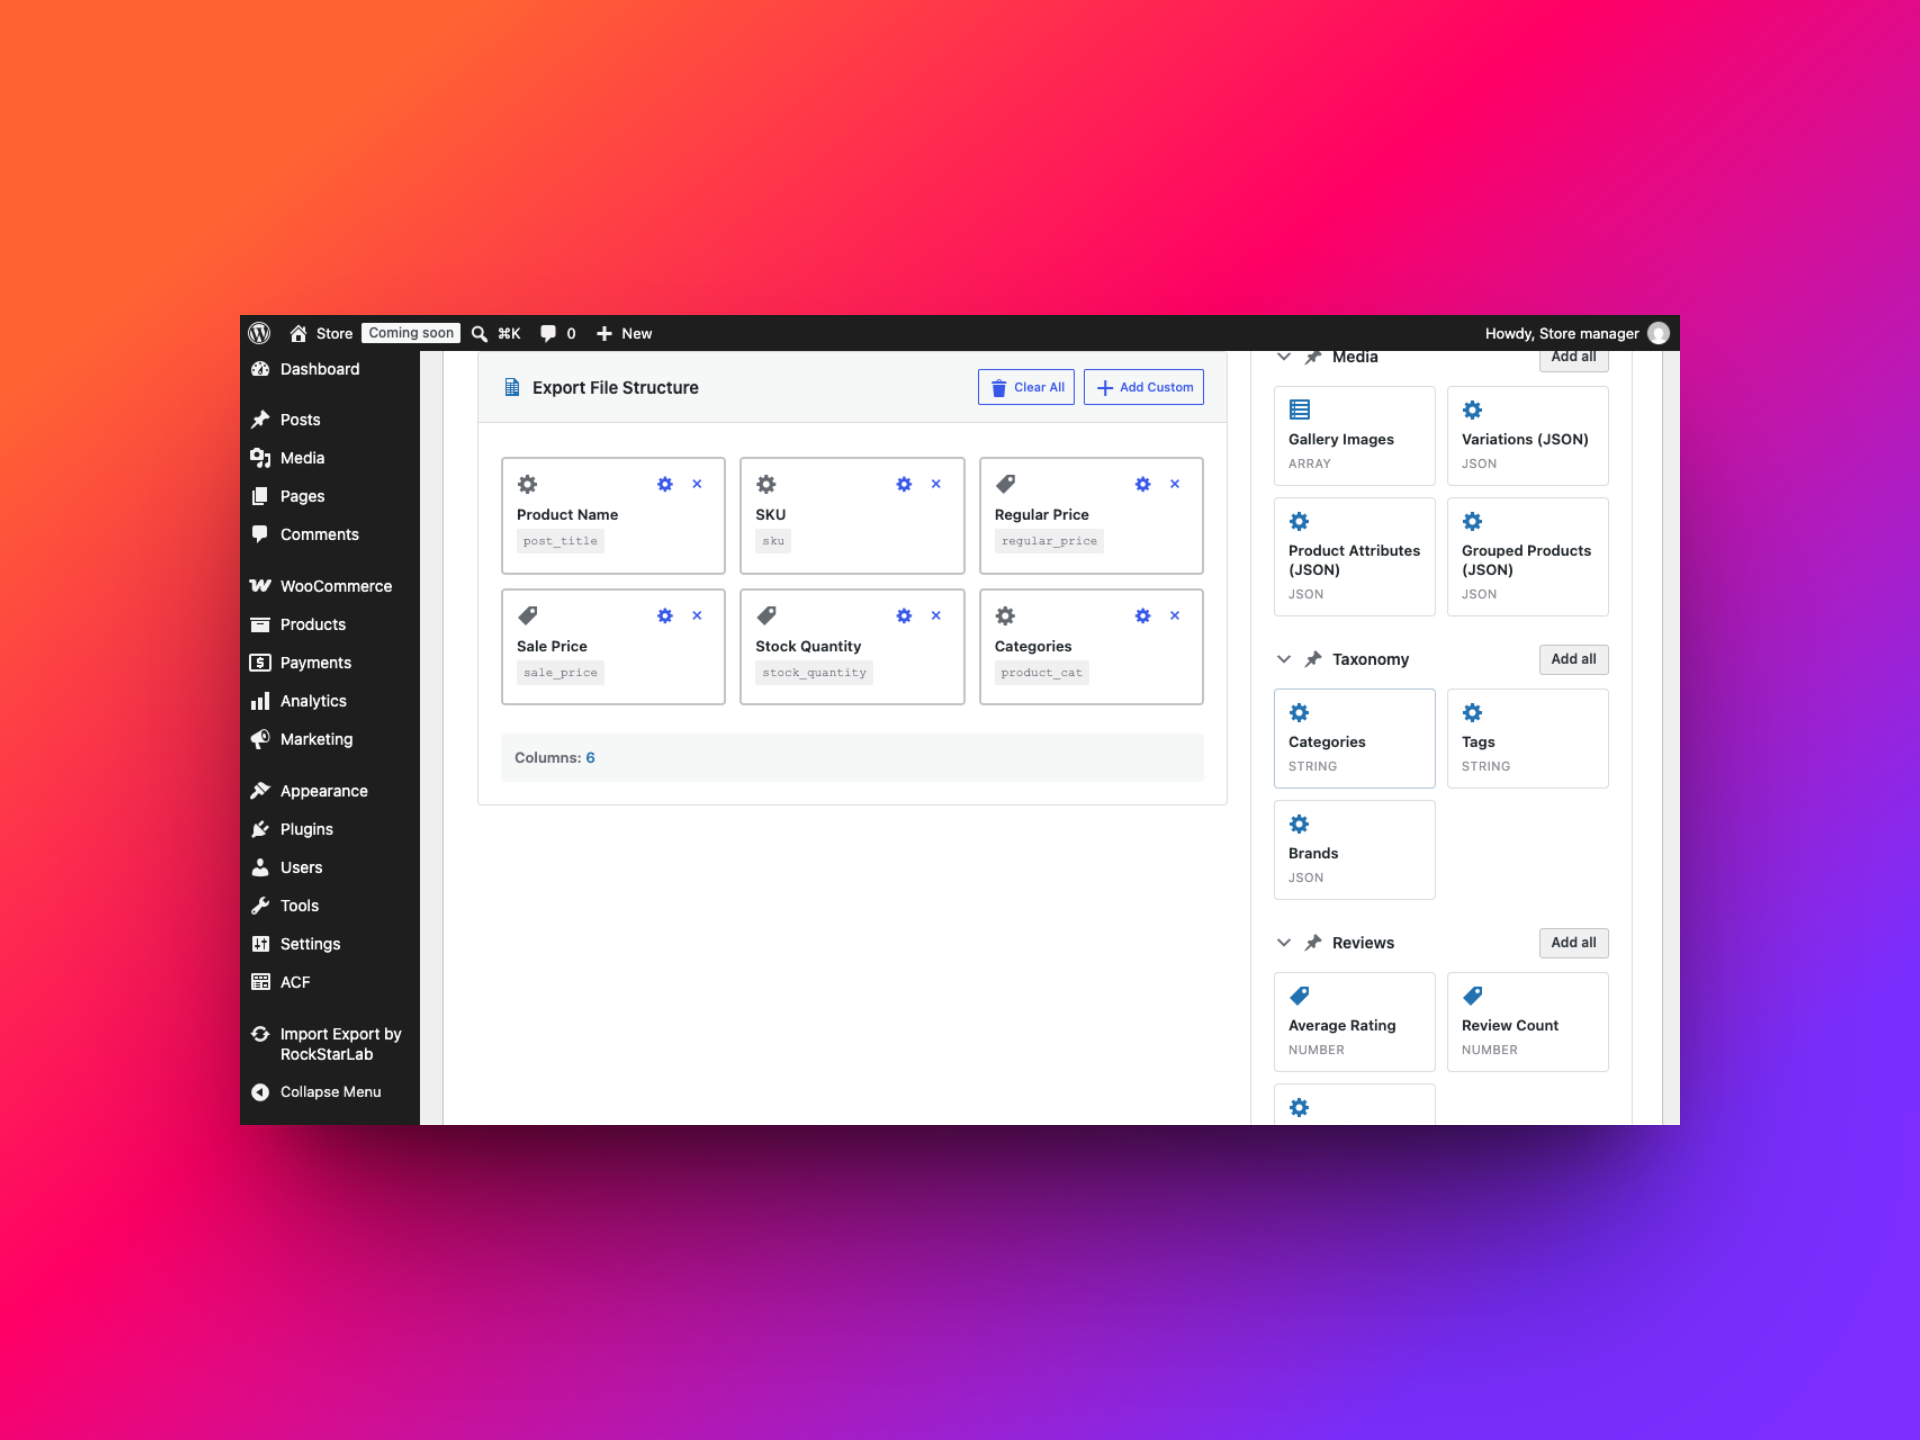
The WooCommerce product fields are grouped to help you find what you need. Common choices include:
- Identification: Product ID, Product Name, Slug, Status, and SKU.
- Pricing and stock: Regular Price, Sale Price, Tax Status, Stock Quantity, Stock Status, Manage Stock, and Backorders.
- Product details: Description, Short Description, Product Type, Virtual, Downloadable, and external product URL/button text.
- Shipping and media: Weight, dimensions, Shipping Class, Featured Image, and Gallery Images.
- Store organization: Categories, Tags, Brands, Featured, Catalog Visibility, Average Rating, Review Count, and Total Sales.
- Variable or grouped product data: Variations (JSON), Product Attributes (JSON), and Grouped Products (JSON).
Here are a few practical column sets:
- Quick inventory check: Product Name, SKU, Stock Quantity, Stock Status, and Manage Stock.
- Price review: Product Name, SKU, Regular Price, Sale Price, Tax Status, and Categories.
- Catalogue content review: Product Name, Slug, Description, Short Description, Product Type, Featured Image, Gallery Images, Categories, and Tags.
- Variable product handoff: Product Name, SKU, Product Type, Variations (JSON), Product Attributes (JSON), and Categories. Check that the destination system can interpret the structured variation data before relying on it.
Choose fields for the task, not just because they are available. For a simple spreadsheet, a handful of familiar columns is often more useful than every product property. If you need custom product metadata, check the Custom Fields or ACF field groups for fields registered on your site.
Step 4: Transform values before they go into the export
If you have the PRO add-on, you can assign transformations to selected export fields. A transformation changes the value written to that column; it does not change the saved WooCommerce product. You can apply more than one transformation to a field, and the order matters. Use the pipeline preview with representative sample values before exporting a live catalogue.
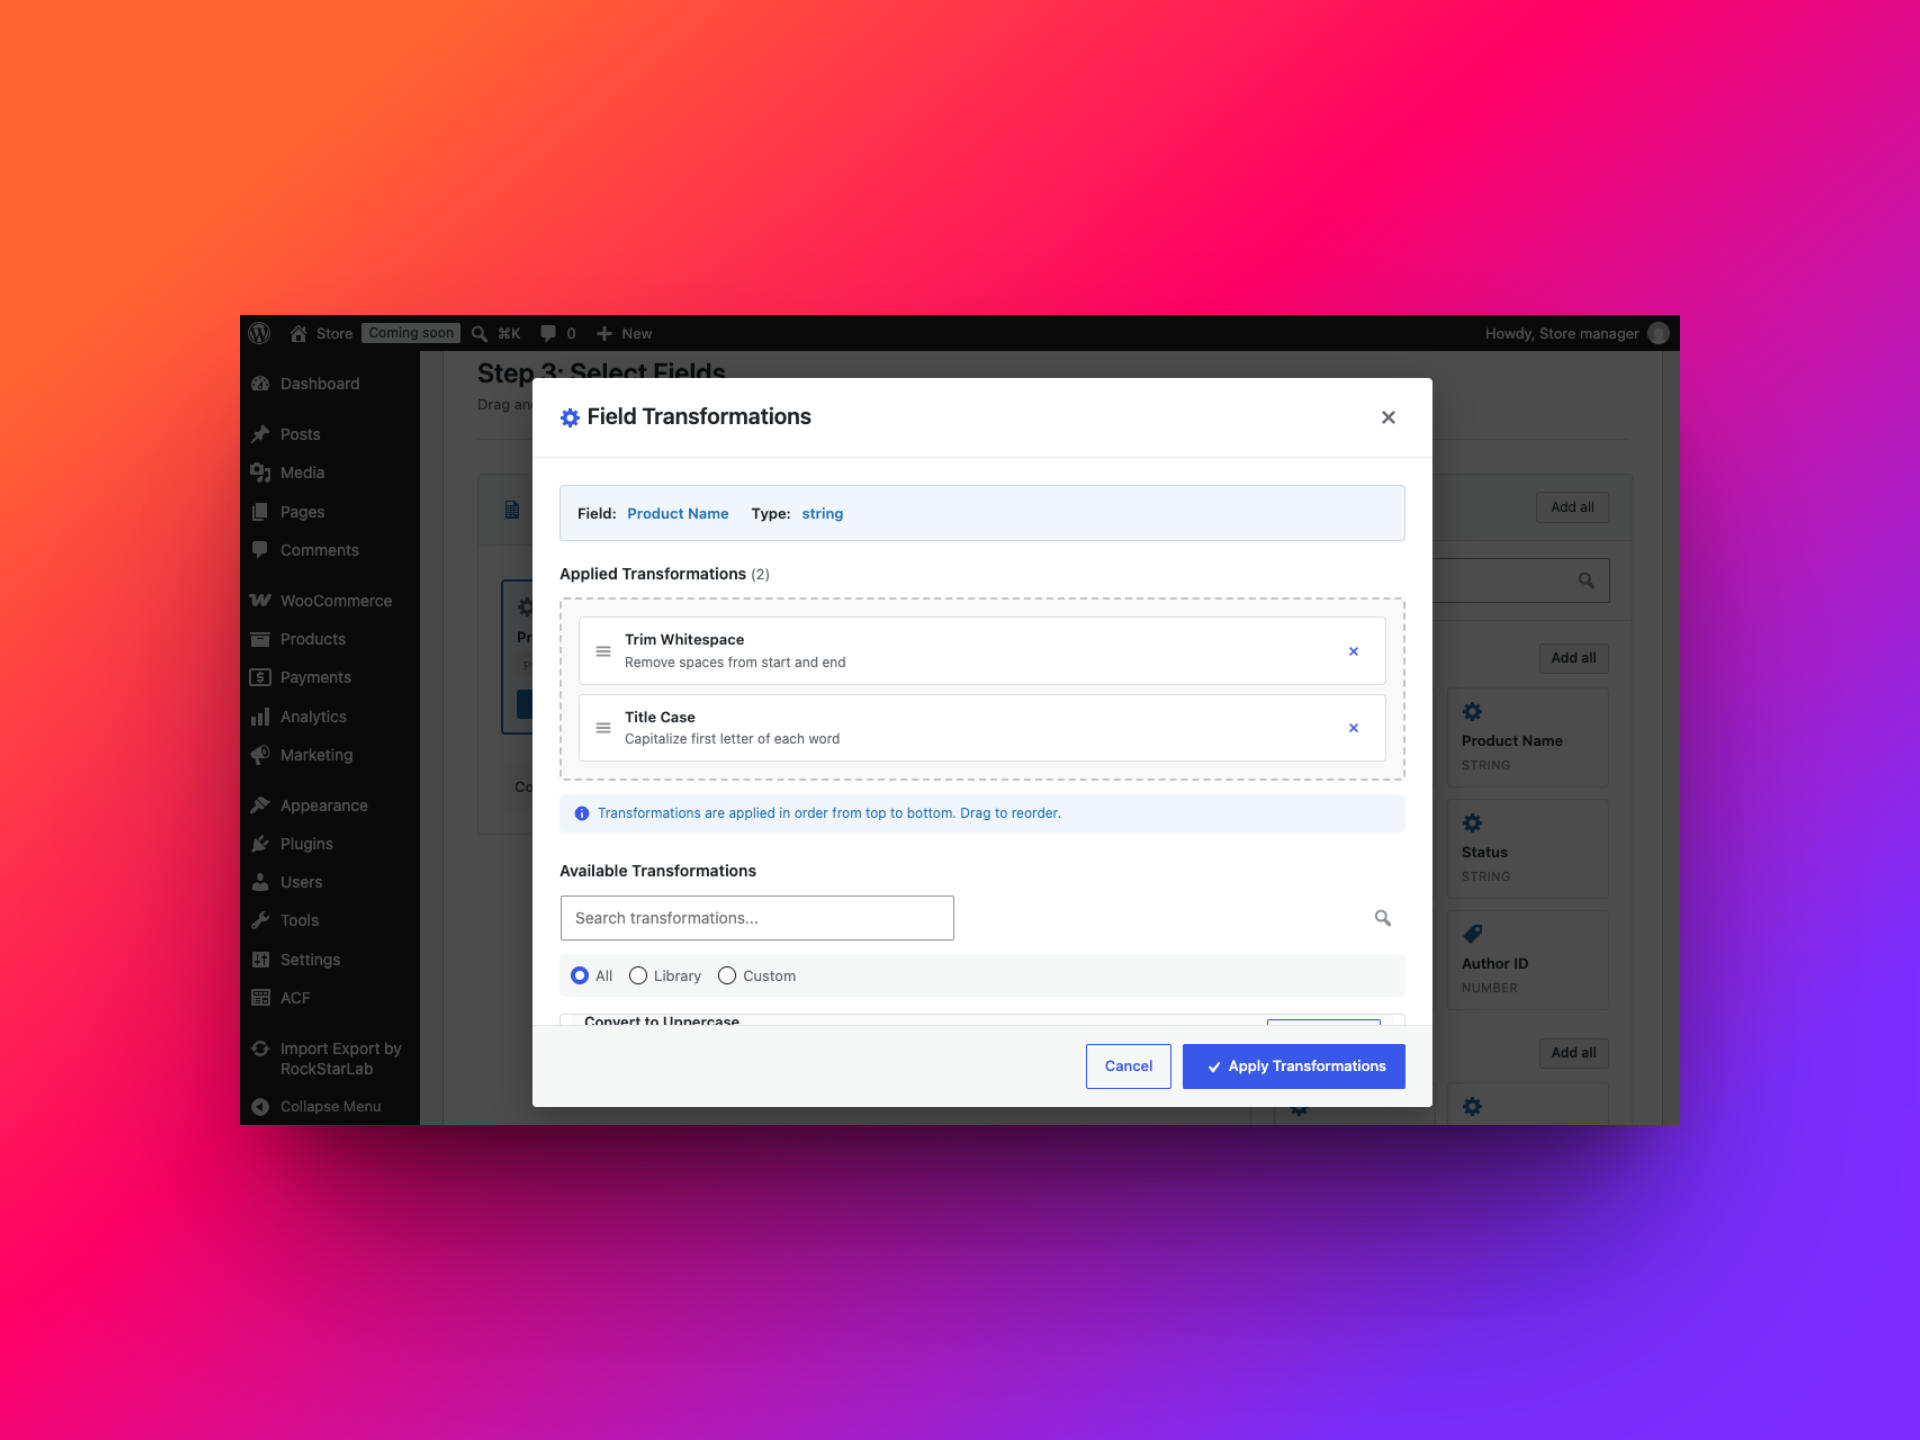
Some useful product-export examples:
- Clean up product names: apply Trim Whitespace, then Title Case. For example, a test value like
classic summer hoodiebecomesClassic Summer Hoodie. Preview carefully: title casing may not suit brand names or intentionally stylized capitalization. - Standardize a price column: apply Clean Price if the source value might include formatting, then Format Price or Round to 2 Decimals if the recipient expects two decimal places. Test values with and without decimals before using the result in a financial workflow.
- Create a URL-friendly product label: select Slug or Product Name and use Generate Slug to produce a normalized, URL-friendly value in the exported column.
- Mark a file for a downstream system: use Add Prefix or Add Suffix on a suitable text field when an integration expects a consistent label. Avoid changing SKUs or identifiers unless the receiving system explicitly requires it.
- Normalize inconsistent labels: use Map Values to convert known source labels to the values expected by a partner, or Default if Empty to fill a blank output value with a chosen fallback.
Transformations are a PRO feature. If you are using the free version, you can still choose fields and filter products, but these per-field transformation controls are not available. When transformations are available, test them with empty values, symbols, product names with punctuation, and representative prices—not just one ideal example.
Step 5: Set CSV, Excel, or XML options
On the Format step, choose CSV, XLSX, or XML. The available settings depend on the format you select.
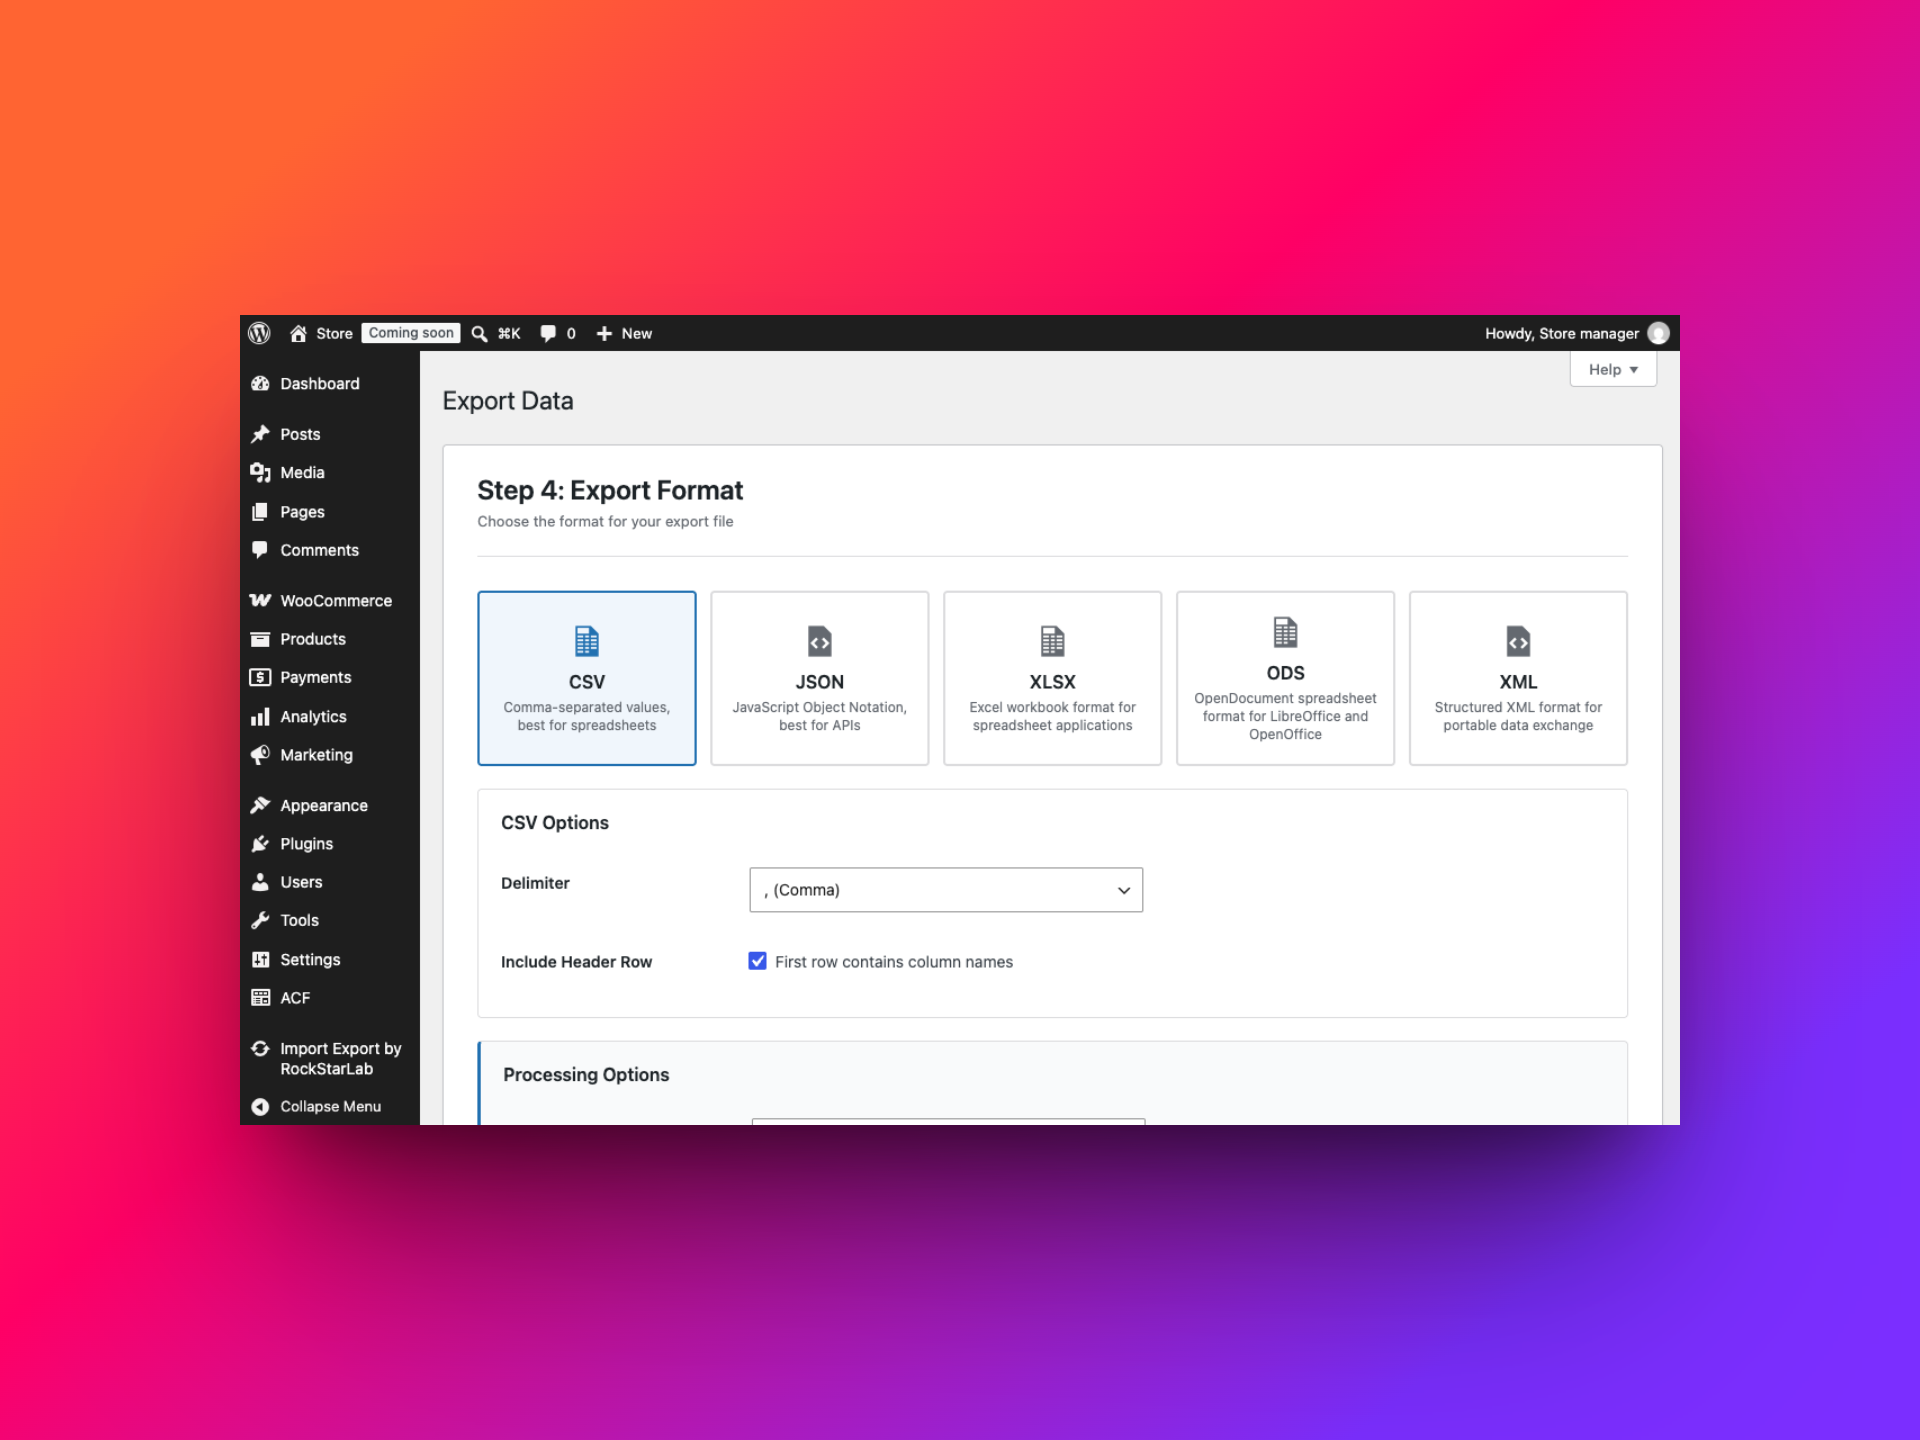
CSV settings
CSV exports can use a comma, semicolon, tab, pipe, or custom delimiter. Comma is a common default, but some spreadsheet locales expect semicolons. If columns appear in one cell when you open the file, try importing it through the spreadsheet program’s text/CSV import option and select the delimiter explicitly. Keep Include Header Row enabled when the first row should contain the column names.
XLSX settings
Select XLSX when you need a workbook for Excel or compatible spreadsheet software. Check the header option and selected columns before you start. If the file is intended for a system that requires plain text or a particular XML schema, an Excel workbook is not a substitute for that format.
XML settings
Select XML when the receiving software asks for structured XML. The export wizard provides a pretty-print option. XML can represent nested product data, but different systems often expect different tag names and structures. Confirm those requirements with the recipient and test a small export before sending a large catalogue.
Filename and batch size
Set a recognizable filename without typing the extension; the selected format adds it automatically. The default filename includes {job_id}, which keeps an export job identifier in the name. You can use a label such as weekly-product-stock-{job_id} to make downloaded runs easier to identify.
The batch size controls how many products the exporter processes at a time. Smaller batches can be safer on limited hosting, particularly for a large catalogue, though they may take longer. If an export stops or times out, try a smaller batch and check the available server resources before raising it.
Step 6: Run, download, and verify the file
- Review the content type, filters, selected columns, format, filename, and batch size.
- Select Start Export and let the job finish. Avoid closing the page while the interface is actively processing unless the plugin indicates that the job can continue in the background.
- When it completes, use the provided download control or open Import Export by RockStarLab → Jobs Log to find the completed export and its file.
- Open the downloaded file and spot-check several products. Confirm that the rows, headings, prices, stock values, images, and special characters look as expected.
A quick check catches common issues early: a blank export caused by an overly restrictive filter, a missing column, an unexpected CSV delimiter, or a downstream system that cannot read the chosen format. For a critical integration, validate the file with the receiving system before using it for a full catalogue update.
Schedule a recurring WooCommerce product export
If you need the same report regularly, first complete a product export with the right filters, fields, and format. Then open Import Export by RockStarLab → Jobs Log → Schedules, add a schedule, give it a clear name, and select the completed export as the source job.
- Choose Recurring and select an interval such as Daily or Weekly.
- Set the first execution date and time, taking the site’s WordPress timezone into account.
- Save the schedule, then check its next run and status in the Schedules table.
- After it runs, review the new job in Jobs Log and download that run’s export file.
For example, a store could create a completed CSV export filtered to in-stock products with Product Name, SKU, and Stock Quantity, then schedule it to run every Monday morning. Each run creates a new job using the source job’s saved configuration. If you later need different fields or filters, create and complete a new export first, then use that job as the schedule source.
WordPress’s built-in WP-Cron is triggered by site requests, not by a continuously running system timer. On a site with no visitors around the scheduled time, a due task may run late. For more reliable timing, ask your host to configure a server cron. If your host cannot do that, an external service can request the public site’s wp-cron.php endpoint at regular intervals. See our guide to scheduling repeated WordPress exports for the full setup, including cron-job.org.
Troubleshooting and good habits
- The product count is zero: remove or loosen filters one at a time and refresh the count. Check exact field values and category names.
- There are too many or too few rows: confirm that multiple filter rows reflect the intended logic, and verify each field/operator pair before starting the export.
- A price is missing: regular price and sale price are different fields. Add both if your report needs to compare them.
- Variable products look incomplete: include the variation and attribute fields if the receiving workflow needs that information. Check how the target system expects variant records to be represented.
- Spreadsheet columns do not split correctly: use the import-data option in your spreadsheet application and choose the CSV delimiter instead of relying on automatic detection.
- A large job is interrupted: lower the batch size and try again. For very large catalogues, ask your host about PHP execution time, memory, and background request limits.
- A scheduled export did not run on time: check the schedule status, WordPress timezone, Jobs Log, and whether WP-Cron is being triggered reliably.
A useful export is not necessarily the biggest one. Start with the smallest set of fields that answers the question, test the output, and expand it only when the recipient needs more data. That keeps routine product reports easier to understand and maintain.
Export only the WooCommerce data you need
To export WooCommerce products to CSV, Excel, or XML, select the product content type, narrow the catalogue with filters, choose the fields, and match the format to the next step in your workflow. If you have PRO, field transformations can also help normalize selected output values. Once a job is complete, you can reuse it for a recurring export and review each run in Jobs Log.